一 控件
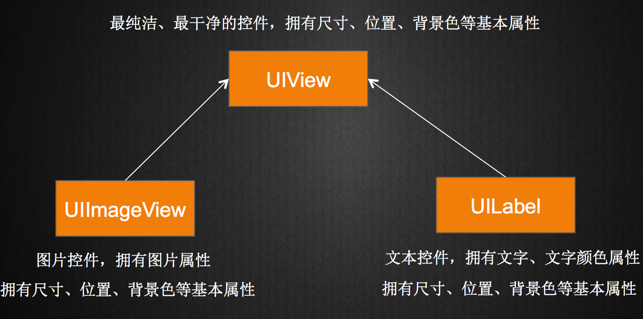
1.屏幕上的所有UI元素都叫做控件(也有叫做视图、组件)比如按钮(UIButton)、文本(UILabel)都是控件.
2.控件的共同属性有哪些?
尺寸,位置,背景色
3. 苹果将控件的共同属性都抽取到父类UIView中
所有的控件最终都继承自UIView
UIButton、UILabel都继承自UIView(可以查看头文件验证)
二 UIView
1. UIView是所有控件的父控件。
2. 父控件和子控件
1)每个控件都是个容器,能容纳其他控件
2)内部小控件是大控件的子控件
3)大控件是内部小控件的父控件
3)每一个控制器(UIViewController)内部都有个默认的UIView属性
@property(nonatomic,retain) UIView *view;
控制器中管理的其他所有控件都是这个view的子控件(直接或者间接)
ViewDidLoad 方法
3.UIView的常用属性
@property(nonatomic,readonly) UIView *superview;
 获得自己的父控件对象

@property(nonatomic,readonly,copy) NSArray *subviews;
 获得自己的所有子控件对象

@property(nonatomic) NSInteger tag;
 控件的ID(标识),父控件可以通过tag来找到对应的子控件

@property(nonatomic) CGAffineTransform transform;
 控件的形变属性(可以设置旋转角度、比例缩放、平移等属性)
@property(nonatomic) CGRect frame;
控件矩形框在父控件中的位置和尺寸(以父控件的左上角为坐标原点)
@property(nonatomic) CGRect bounds;
控件矩形框的位置和尺寸(以自己左上角为坐标原点,所以bounds的x、y一般为0)
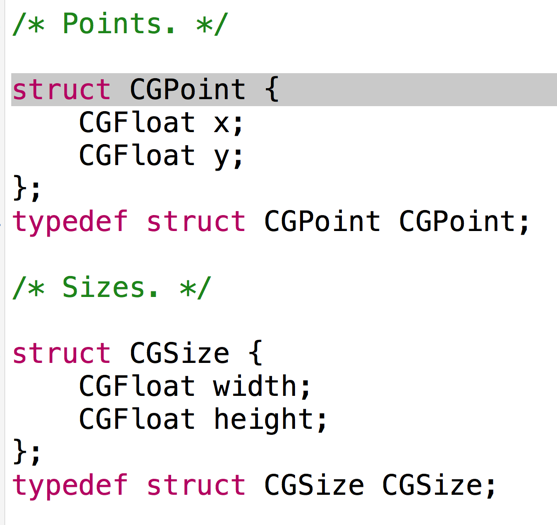
@property(nonatomic) CGPoint center;
控件中点的位置(以父控件的左上角为坐标原点)
CGRect的数据结构如下:CGRets是个结构体。
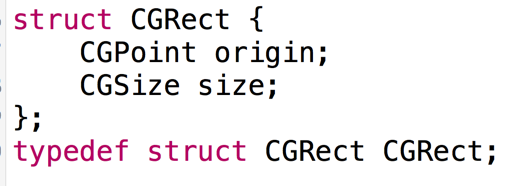
CGPoint表示UIView的坐标,CGSize表示UIView的宽度和高度。
4.UIView的常用方法
- (void)addSubview:(UIView *)view;
 添加一个子控件view

- (void)removeFromSuperview;
 从父控件中移除

- (UIView *)viewWithTag:(NSInteger)tag;
 根据一个tag标识找出对应的控件(一般都是子控件)

- (void)insertSubview:(UIView *)view atIndex:(NSInteger)index;
- (void)insertSubview:(UIView *)view aboveSubview:(UIView *)siblingSubview;
- (void)insertSubview:(UIView *)view belowSubview:(UIView *)siblingSubview;
三 UIKit坐标系
在UIKit中,坐标系的原点(0,0)在左上角,x值向右正向延伸,y值向下正向延伸。向右延伸,x值增加;向下延伸,y值增加。

例子1
 1 #import "ViewController.h"
 2
 3 @interface ViewController ()
 4 @property (weak, nonatomic) IBOutlet UIView *redView;
 5
 6 @end
 7
 8 @implementation ViewController
 9
10 - (void)viewDidLoad {
11     [super viewDidLoad];
12
13     UIView * view = [[UIView alloc]init];
14     view.backgroundColor = [UIColor blueColor];
15     view.frame = CGRectMake(10, 10, 50, 50);
16     [self.redView addSubview:view];
17
18 }
19
20 @end
例子2
 1 #import "ViewController.h"
 2
 3 @interface ViewController ()
 4
 5 @property (weak, nonatomic) IBOutlet UIView *blueView;
 6 @end
 7
 8 @implementation ViewController
 9
10 - (void)viewDidLoad {
11     [super viewDidLoad];
12
13 }
14
15 - (void)touchesBegan:(NSSet<UITouch *> *)touches withEvent:(UIEvent *)event{
16
17     UIView * redView = [[UIView alloc]init];
18     redView.backgroundColor = [UIColor redColor];
19     CGFloat w = 10 + arc4random_uniform(200);
20     CGFloat h = 10 + arc4random_uniform(200);
21     self.blueView.frame = CGRectMake(150, 150, w, h);
22 }
23
24 @end
四 UIButton
1.UIButton的状态
1)normal(普通状态)
默认情况(Default)
对应的枚举常量:UIControlStateNormal
2)highlighted(高亮状态)
按钮被按下去的时候(手指还未松开)
对应的枚举常量:UIControlStateHighlighted
3)disabled(失效状态,不可用状态)
如果enabled属性为NO,就是处于disable状态,代表按钮不可以被点击
对应的枚举常量:UIControlStateDisabled
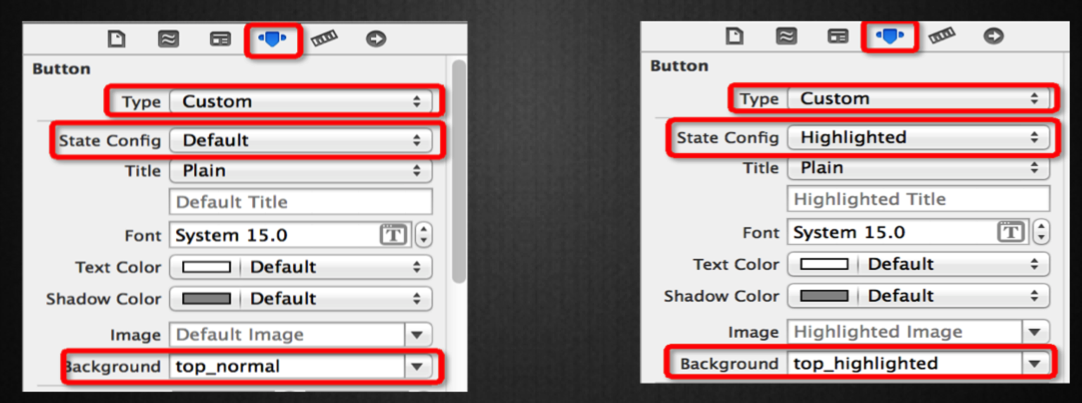
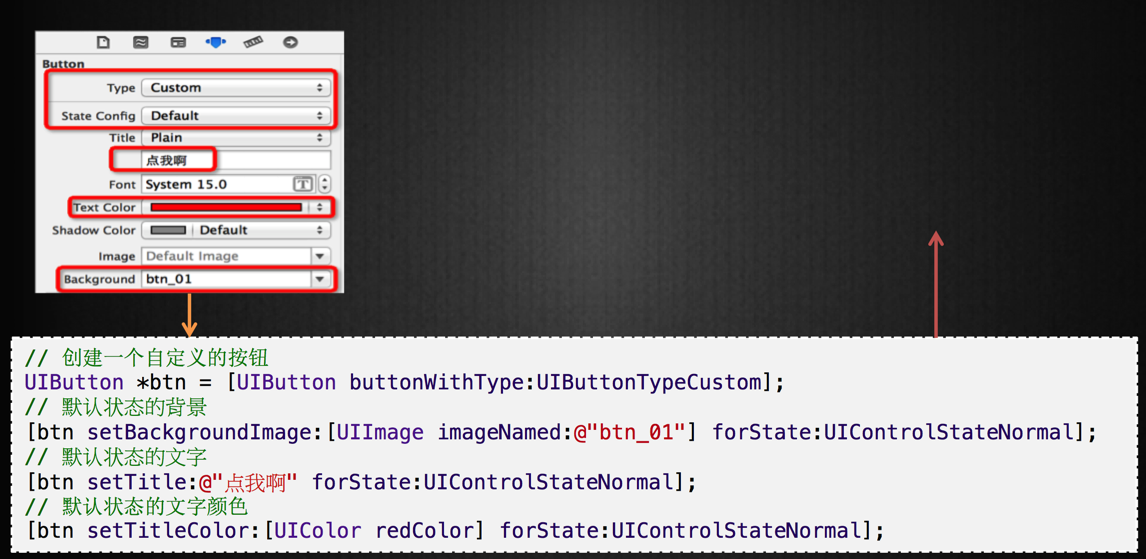
2设置按钮的背景图片
设置按钮在不同状态下的背景图片
(为了保证高亮状态下的图片正常显示,必须设置按钮的type为custom)
3 Storyboard到代码的转换
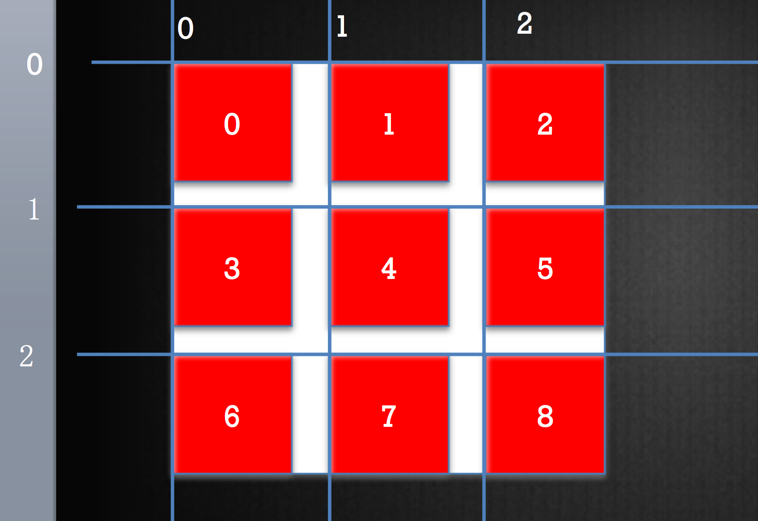
五 九宫格计算思路
 1 #import "ViewController.h"
 2
 3 @interface ViewController ()
 4
 5 @end
 6
 7 @implementation ViewController
 8
 9 - (void)viewDidLoad {
10     [super viewDidLoad];
11
12     //代码创建添加按钮
13     UIButton * addBtn = [[UIButton alloc]init];
14     [addBtn setImage:[UIImage imageNamed:@"add"] forState:UIControlStateNormal];
15     addBtn.tag = 99;
16     [addBtn setImage:[UIImage imageNamed:@"add_highlighted" ] forState:UIControlStateHighlighted];
17     addBtn.frame = CGRectMake(50, 50, 50, 50);
18     [self.view addSubview:addBtn];
19
20     //代码创建删除按钮
21     UIButton * removeBtn = [[UIButton alloc]init];
22     removeBtn.frame = CGRectMake(300, 50, 50, 50);
23     [removeBtn setImage:[UIImage imageNamed:@"remove"] forState: UIControlStateNormal];
24     [removeBtn setImage:[UIImage imageNamed:@"remove_highlighted"] forState:UIControlStateHighlighted];
25     removeBtn.tag = 98;
26     [self.view addSubview:removeBtn];
27
28     //代码添加监听 1. 监听者 2,方法名 3.什么事件
29     [addBtn addTarget:self action:@selector(addClick: ) forControlEvents: UIControlEventTouchUpInside];
30     [removeBtn addTarget:self action:@selector(removeClick:) forControlEvents:UIControlEventTouchUpInside];
31
32 }
33
34 - (void) addClick : (UIButton *) btn{
35     NSLog(@"添加");
36 }
37
38 - (void) removeClick : (UIButton *) btn{
39     NSLog(@"删除");
40 }
41
42 @end
对按钮进行封装:
 1 - (void)viewDidLoad {
 2     [super viewDidLoad];
 3
 4     [self addBtnWithImage:@"add" highlightedImage:@"add_highlighted" disableImage:@"add_disabled" frame:CGRectMake(50, 50, 50, 50) action:@selector(addClick: )];
 5     [self addBtnWithImage:@"remove" highlightedImage:@"remove_highlighted" disableImage:@"remove_disabled" frame: CGRectMake(300, 50, 50, 50) action:@selector( removeClick: )];
 6
 7 }
 8
 9 - (void) addBtnWithImage:(NSString *)image highlightedImage: (NSString *)highlightedImage disableImage: (NSString *)disableImage
10                    frame:(CGRect ) frame action:(SEL) action{
11     UIButton * btn = [[UIButton alloc]init];
12     btn.frame=  frame;
13     [btn setImage:[UIImage imageNamed:image] forState: UIControlStateNormal];
14     [btn setImage:[UIImage imageNamed:highlightedImage] forState:UIControlStateHighlighted];
15     [btn setImage:[UIImage imageNamed: disableImage] forState:UIControlStateDisabled];
16
17     [self.view addSubview:btn];
18     [btn addTarget:self action:action forControlEvents: UIControlEventTouchUpInside];
19 }
实现点击添加按钮的事件。
 1 - (void) addClick : (UIButton *) btn{
 2     //搞一个整体出来
 3     UIView * shopView = [[UIView alloc]init];
 4     shopView.frame = CGRectMake(0, 0, 70, 90);
 5     shopView.backgroundColor = [UIColor redColor];
 6
 7     //创建图片
 8     UIImageView * shop = [[UIImageView alloc]init];
 9     shop.image = [UIImage imageNamed:@"danjianbao"];
10     shop.frame = CGRectMake(0, 0, 70, 70);
11     [shopView addSubview:shop];
12
13     //创建文字
14     UILabel *label = [[UILabel alloc]init];
15     label.text = @"单肩背";
16     label.frame = CGRectMake(0, 70, 70, 20);
17     label.textAlignment = NSTextAlignmentCenter ;
18     label.font = [UIFont systemFontOfSize:14];
19     [shopView addSubview:label];
20
21     [self.shopsView addSubview:shopView];
22
23 }
经过优化后的按钮添加事件:
 1 - (void) addClick : (UIButton *) btn{
 2     //搞一个整体出来
 3     CGFloat shopW = 70;
 4     CGFloat shopH = 90;
 5     int cols = 3;
 6     NSInteger index = self.shopsView.subviews.count;
 7     NSLog(@"index=%ld" , index );
 8
 9     //计算X
10     //计算间距= (shopView的宽度 - 列数 * 单元格宽度 ) / (列数 -1)
11     CGFloat margin =  (self.shopsView.frame.size.width - cols * shopW) / (cols-1);
12
13     int col = index % cols;
14     int marginH = 25;
15     CGFloat shopX = col * (shopW + margin);
16     int row = index / cols;
17     CGFloat shopY = row * (shopH + marginH);
18
19     UIView * shopView = [[UIView alloc]init];
20     shopView.frame = CGRectMake( shopX , shopY , 70, shopH);
21     shopView.backgroundColor = [UIColor redColor];
22
23     //创建图片
24     UIImageView * shop = [[UIImageView alloc]init];
25     shop.image = [UIImage imageNamed:@"danjianbao"];
26     shop.frame = CGRectMake(0, 0, 70, 70);
27     [shopView addSubview:shop];
28
29     //创建文字
30     UILabel *label = [[UILabel alloc]init];
31     label.text = @"单肩背";
32     label.frame = CGRectMake(0, 70, 70, 20);
33     label.textAlignment = NSTextAlignmentCenter ;
34     label.font = [UIFont systemFontOfSize:14];
35     [shopView addSubview:label];
36
37     [self.shopsView addSubview:shopView];
38 }
知识点:
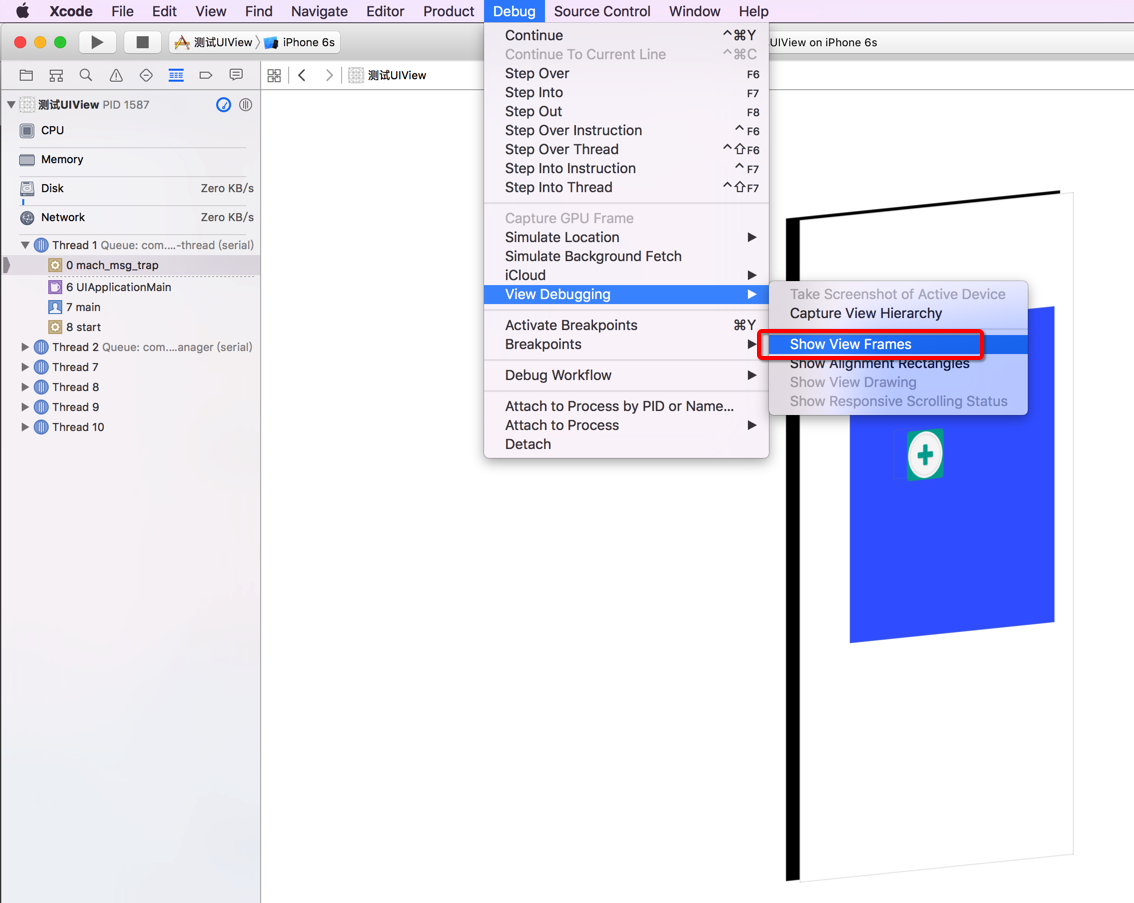
1. 在调试app时,显示 View Frames.
Debug -> View Debugging -> Show View Frames
XCode 快捷按钮
command + shift + N 新建文件
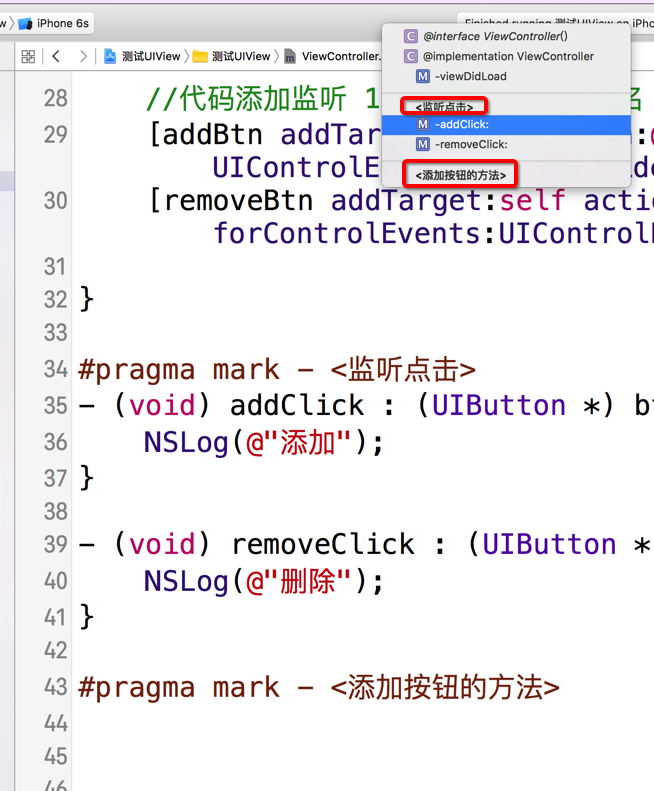
XCode中编写注释:
#pragma mark - <添加按钮的方法>
#pragma mark - <监听点击>
OC 中 字符串格式化:
1 int idx = 0 ;
2 idx ++;
3 NSString * indexStr = [NSString stringWithFormat:@"单肩背%d",idx];