MongoDB中集群有三种:主从复制、副本集、分片集群。目前副本集已经替代主从复制架构,成为官方建议采用的架构,而分片集群相较于前两种,更加复杂。
下面是生产环境中常用的分片集群架构:
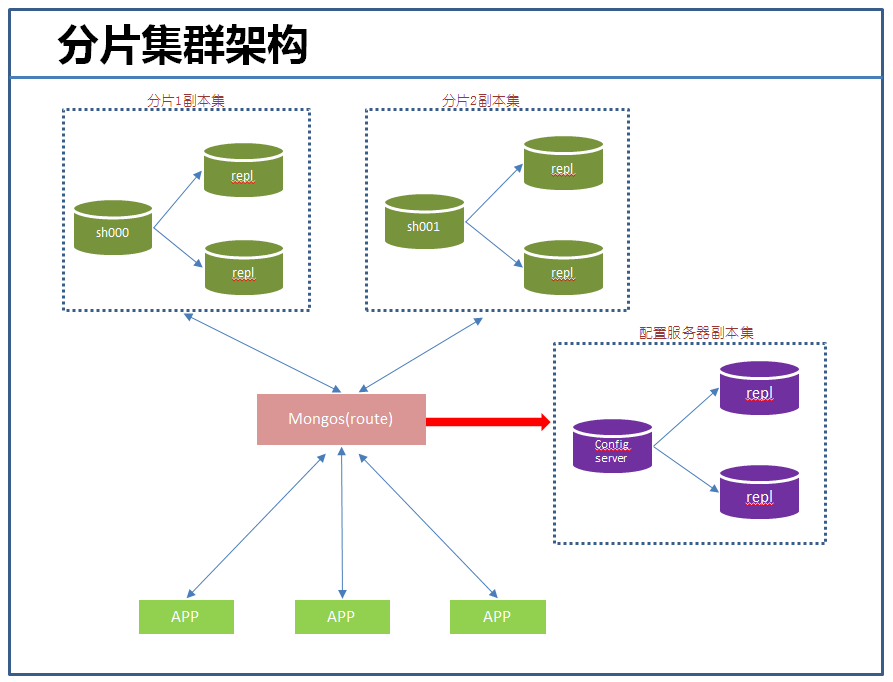
我们知道,分片集群由三个组件构成:
【分片】:官方建议采用副本集,提供数据冗余和高可用,主要存储业务数据。
【配置服务器】:官方建议采用副本集,存储集群的元数据。很重要,能够影响集群的使用。
【mongos instances】:是应用程序的接口,通过它,应用程序与整个集群是透明的,故一般每个应用服务器对应一个实例,可以跟应用部署到一台服务器上。它主要读取或缓存配置服务器中元数据,提供查询路由到每个分片的功能。
一、分片集群部署
下面我们就根据上面的架构搭建个用于开发测试的环境。当然作为测试环境,为了简单方便,这里就不用副本集了。具体测试环境描述如下:
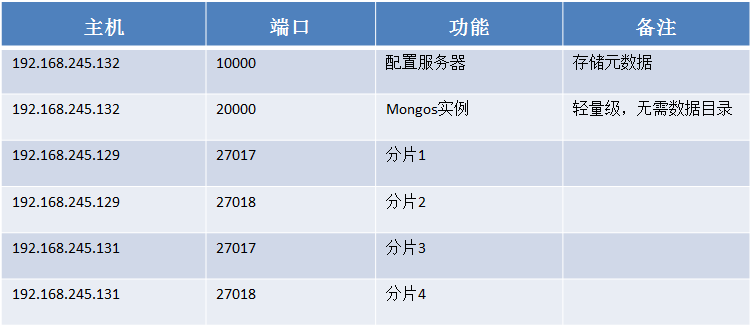
搭建本环境前提是:所有服务器上mongodb已经安装完成。
1、启动配置服务器(192.168.245.132:10000)
mongod --configsvr --port 10000 --dbpath /data/config/db --logpath /data/config/log/mongodb.log --fork
2、启动mongos实例(192.168.245.132:20000)
mongos --configdb 192.168.245.132:10000 --port 20000 --logpath /data/config/log/mongodb.log --fork
3、启动各个分片
mongod --dbpath=/data/27017/db --fork --logpath=/data/27017/log/mongodb.log --port 27017
mongod --dbpath=/data/27018/db --fork --logpath=/data/27018/log/mongodb.log --port 27018
4、添加分片到集群中

[root@node3 log]# mongo --host 192.168.245.132 --port 20000     #连接到mongos实例
mongos> sh.addShard("192.168.245.129:27017")                    #添加单个主机,如果要添加副本集:sh.addShard( "<repl_name>/<ip>:<port>" )
{ "shardAdded" : "shard0000", "ok" : 1 }
mongos> sh.addShard("192.168.245.129:27018")
{ "shardAdded" : "shard0001", "ok" : 1 }
mongos> sh.addShard("192.168.245.131:27018")
{ "shardAdded" : "shard0002", "ok" : 1 }
mongos> sh.addShard("192.168.245.131:27017")
{ "shardAdded" : "shard0003", "ok" : 1 }
mongos>
5、开启数据库分片功能
mongos> sh.enableSharding("test")     #让test库可以分片
{ "ok" : 1 }
在为collection分片前,必须让该集合所属的数据库具有分片的功能,一旦你开启了某个数据库的分片,MongoDB会分配一个主片。
6、为集合分片
mongos> sh.shardCollection("test.user",{"_id":1})    #以_id字段为shard key进行分片
{ "collectionsharded" : "test.user", "ok" : 1 }
#查看分片后的情况
mongos> use config
switched to db config
mongos> db.databases.find()
{ "_id" : "test", "primary" : "shard0000", "partitioned" : true }
mongos> db.chunks.find()
{ "_id" : "test.user-_id_MinKey", "ns" : "test.user", "min" : { "_id" : { "$minKey" : 1 } }, "max" : { "_id" : { "$maxKey" : 1 } }, "shard" : "shard0000", "lastmod" : Timestamp(1, 0), "lastmodEpoch" : ObjectId("5677cc4015fdf4f1ffbb15bd") }
mongos>
到这里,整个测试的分片集群就搭建完成了,下面进行测试。
二、分片集群测试
1、对新插入的数据是否正常分片测试
mongos> for(i=0;i<100000;i++){ db.user.insert({"_id":i,"Name":"darren","Age":20,"Date":new Date()}); }
WriteResult({ "nInserted" : 1 })
mongos> use config
switched to db config
mongos> db.chunks.find()      #
{ "_id" : "test.user-_id_MinKey", "lastmod" : Timestamp(2, 0), "lastmodEpoch" : ObjectId("5677cc4015fdf4f1ffbb15bd"), "ns" : "test.user", "min" : { "_id" : { "$minKey" : 1 } }, "max" : { "_id" : 1 }, "shard" : "shard0001" }
{ "_id" : "test.user-_id_1.0", "lastmod" : Timestamp(3, 0), "lastmodEpoch" : ObjectId("5677cc4015fdf4f1ffbb15bd"), "ns" : "test.user", "min" : { "_id" : 1 }, "max" : { "_id" : 17 }, "shard" : "shard0002" }
{ "_id" : "test.user-_id_17.0", "lastmod" : Timestamp(3, 1), "lastmodEpoch" : ObjectId("5677cc4015fdf4f1ffbb15bd"), "ns" : "test.user", "min" : { "_id" : 17 }, "max" : { "_id" : { "$maxKey" : 1 } }, "shard" : "shard0000" }
到此为止,貌似有点不正常啊,我明明有4个分片的,为什么这里仅仅有三个呢,而且数据的范围也不对啊,数据明显分配得不均匀,这是为什么呢?
通过查阅文档发现,默认chunk的大小是64M,config.settings.find()可以看到这个值,而我们刚才插入的数据量不大,估计也不会产生几个chunks,而且chunk迁移需要满足一定的条件:
所以,为了能够测试看的很清楚,我们调整下chunk的大小为1M:
mongos> db.settings.save( { _id:"chunksize", value: 1 } )
WriteResult({ "nMatched" : 1, "nUpserted" : 0, "nModified" : 1 })
mongos> db.settings.find()
{ "_id" : "chunksize", "value" : 1 }
这时再次进行测试:
mongos> use admin
switched to db admin
mongos> db.runCommand({"shardcollection":"test.students3","key":{"Uid":1}})
{ "collectionsharded" : "test.students3", "ok" : 1 }
mongos> use test
switched to db test
mongos> for(i=0;i<100000;i++){ db.students3.insert({"Uid":i,"Name":"darren","Age":21,"Date":new Date()}); }
WriteResult({ "nInserted" : 1 })
mongos> use config
switched to db config
mongos> db.chunks.find()
{ "_id" : "test.students3-Uid_MinKey", "lastmod" : Timestamp(6, 1), "lastmodEpoch" : ObjectId("5678e209e02c4f2c17a4bfeb"), "ns" : "test.students3", "min" : { "Uid" : { "$minKey" : 1 } }, "max" : { "Uid" : 1 }, "shard" : "shard0001" }
{ "_id" : "test.students3-Uid_1.0", "lastmod" : Timestamp(7, 1), "lastmodEpoch" : ObjectId("5678e209e02c4f2c17a4bfeb"), "ns" : "test.students3", "min" : { "Uid" : 1 }, "max" : { "Uid" : 13 }, "shard" : "shard0002" }
{ "_id" : "test.students3-Uid_13.0", "lastmod" : Timestamp(8, 1), "lastmodEpoch" : ObjectId("5678e209e02c4f2c17a4bfeb"), "ns" : "test.students3", "min" : { "Uid" : 13 }, "max" : { "Uid" : 6649 }, "shard" : "shard0000" }
{ "_id" : "test.students3-Uid_6649.0", "lastmod" : Timestamp(3, 3), "lastmodEpoch" : ObjectId("5678e209e02c4f2c17a4bfeb"), "ns" : "test.students3", "min" : { "Uid" : 6649 }, "max" : { "Uid" : 14804 }, "shard" : "shard0000" }
{ "_id" : "test.students3-Uid_14804.0", "lastmod" : Timestamp(9, 1), "lastmodEpoch" : ObjectId("5678e209e02c4f2c17a4bfeb"), "ns" : "test.students3", "min" : { "Uid" : 14804 }, "max" : { "Uid" : 21440 }, "shard" : "shard0003" }
{ "_id" : "test.students3-Uid_21440.0", "lastmod" : Timestamp(4, 3), "lastmodEpoch" : ObjectId("5678e209e02c4f2c17a4bfeb"), "ns" : "test.students3", "min" : { "Uid" : 21440 }, "max" : { "Uid" : 29158 }, "shard" : "shard0003" }
以上测试正常了,几个分片上都有数据了,比如shard0001分片有1个文档,shard0002有1到13个文档,shard0000有:13-14804个文档等等。mongodb分片并不能做到数据非常的均匀。也可以通过sh.status()直观的查看分片情况:
--- Sharding Status ---
  sharding version: {
    "_id" : 1,
    "minCompatibleVersion" : 5,
    "currentVersion" : 6,
    "clusterId" : ObjectId("5677bf1e37ac37662f7982ed")
}
  shards:
    {  "_id" : "shard0000",  "host" : "192.168.245.129:27017" }
    {  "_id" : "shard0001",  "host" : "192.168.245.129:27018" }
    {  "_id" : "shard0002",  "host" : "192.168.245.131:27018" }
    {  "_id" : "shard0003",  "host" : "192.168.245.131:27017" }
  active mongoses:
    "3.2.0" : 1
  balancer:
    Currently enabled:  yes
    Currently running:  no
    Failed balancer rounds in last 5 attempts:  0
    Migration Results for the last 24 hours:
        No recent migrations
  databases:
    {  "_id" : "test",  "primary" : "shard0000",  "partitioned" : true }
        test.students3
            shard key: { "Uid" : 1 }
            unique: false
            balancing: true
            chunks:
                shard0000    4
                shard0001    4
                shard0002    3
                shard0003    4
            { "Uid" : { "$minKey" : 1 } } -->> { "Uid" : 1 } on : shard0001 Timestamp(6, 1)
            { "Uid" : 1 } -->> { "Uid" : 13 } on : shard0002 Timestamp(7, 1)
            { "Uid" : 13 } -->> { "Uid" : 6649 } on : shard0000 Timestamp(8, 1)
            { "Uid" : 6649 } -->> { "Uid" : 14804 } on : shard0000 Timestamp(3, 3)
            { "Uid" : 14804 } -->> { "Uid" : 21440 } on : shard0003 Timestamp(9, 1)
            { "Uid" : 21440 } -->> { "Uid" : 29158 } on : shard0003 Timestamp(4, 3)
            { "Uid" : 29158 } -->> { "Uid" : 35794 } on : shard0001 Timestamp(5, 2)
            { "Uid" : 35794 } -->> { "Uid" : 42899 } on : shard0001 Timestamp(5, 3)
            { "Uid" : 42899 } -->> { "Uid" : 49535 } on : shard0002 Timestamp(6, 2)
            { "Uid" : 49535 } -->> { "Uid" : 56475 } on : shard0002 Timestamp(6, 3)
            { "Uid" : 56475 } -->> { "Uid" : 63111 } on : shard0000 Timestamp(7, 2)
            { "Uid" : 63111 } -->> { "Uid" : 71485 } on : shard0000 Timestamp(7, 3)
            { "Uid" : 71485 } -->> { "Uid" : 78121 } on : shard0003 Timestamp(8, 2)
            { "Uid" : 78121 } -->> { "Uid" : 85826 } on : shard0003 Timestamp(8, 3)
            { "Uid" : 85826 } -->> { "Uid" : { "$maxKey" : 1 } } on : shard0001 Timestamp(9, 0)
2、对已存在数据分片测试(最常用)
一般而言,数据是由少到多,架构发展也是一样,由简单到复杂。之前是直接搭建个分片集群,考虑到维护成本等原因,现实中这样的做法一般不常用。当一个服务器上的数据库增长到瓶颈时,需要对其进行分片,这个是我们常遇到的情况。
假设现在存在一个数据很大的children数据库,在192.168.245.129:27019上面,需要将这些数据进行分片,下面经过以下几个步骤:
1)连接到mongos实例,将192.168.245.129:27019添加到分片集群中。
mongos> sh.addShard("192.168.245.129:27019")
{ "shardAdded" : "shard0004", "ok" : 1 }
注意集群分片中不能与新添加的分片中有相同的数据库,否则报错。假如新加入的分片中有test库且有文档数据,集群分片中也存在一个test库,那么这时添加分片时就会报错了,这时可以删除test库。
mongos> sh.addShard("192.168.245.129:27019")
{
    "ok" : 0,
    "errmsg" : "can't add shard '192.168.245.129:27019' because a local database 'test' exists in another shard0000",
    "code" : 96
}
2)在需要的数据库上开启分片功能
mongos> sh.enableSharding("children")
{ "ok" : 1 }
3)对children数据库下的集合进行分片。注意:对已存在的数据进行分片,一定要保证shard key字段是索引,否则报下面的错误。
mongos> sh.shardCollection("children.children",{"Uid":1})
{
    "proposedKey" : {
        "Uid" : 1
    },
    "curIndexes" : [
        {
            "v" : 1,
            "key" : {
                "_id" : 1
            },
            "name" : "_id_",
            "ns" : "children.children"
        }
    ],
    "ok" : 0,
    "errmsg" : "please create an index that starts with the shard key before sharding."
}
在Uid上创建个索引,然后再进行分片:
#要到那个192.168.245.129:27019上创建
> db.children.createIndex({"Uid":1})
{
    "createdCollectionAutomatically" : false,
    "numIndexesBefore" : 1,
    "numIndexesAfter" : 2,
    "ok" : 1
}
#重新分片
mongos> sh.shardCollection("children.children",{"Uid":1})
{ "collectionsharded" : "children.children", "ok" : 1 }
这个时候查看具体分片情况:
mongos> db.shards.find()
{ "_id" : "shard0000", "host" : "192.168.245.129:27017" }
{ "_id" : "shard0001", "host" : "192.168.245.129:27018" }
{ "_id" : "shard0002", "host" : "192.168.245.131:27018" }
{ "_id" : "shard0003", "host" : "192.168.245.131:27017" }
{ "_id" : "shard0004", "host" : "192.168.245.129:27019" }   #新加入的分片
mongos> db.databases.find()
{ "_id" : "test", "primary" : "shard0000", "partitioned" : true }
{ "_id" : "OSSP10", "primary" : "shard0001", "partitioned" : true }
{ "_id" : "children", "primary" : "shard0004", "partitioned" : true }  #这个分片的大本营是0004


mongos> use config
switched to db config
mongos> db.chunks.find()
{ "_id" : "children.children-Uid_MinKey", "lastmod" : Timestamp(2, 0), "lastmodEpoch" : ObjectId("56790924e02c4f2c17a4c7c1"), "ns" : "children.children", "min" : { "Uid" : { "$minKey" : 1 } }, "max" : { "Uid" : 6316 }, "shard" : "shard0000" }
{ "_id" : "children.children-Uid_6316.0", "lastmod" : Timestamp(3, 0), "lastmodEpoch" : ObjectId("56790924e02c4f2c17a4c7c1"), "ns" : "children.children", "min" : { "Uid" : 6316 }, "max" : { "Uid" : 12633 }, "shard" : "shard0001" }
{ "_id" : "children.children-Uid_12633.0", "lastmod" : Timestamp(4, 0), "lastmodEpoch" : ObjectId("56790924e02c4f2c17a4c7c1"), "ns" : "children.children", "min" : { "Uid" : 12633 }, "max" : { "Uid" : 18950 }, "shard" : "shard0002" }
{ "_id" : "children.children-Uid_18950.0", "lastmod" : Timestamp(5, 0), "lastmodEpoch" : ObjectId("56790924e02c4f2c17a4c7c1"), "ns" : "children.children", "min" : { "Uid" : 18950 }, "max" : { "Uid" : 25267 }, "shard" : "shard0003" }
{ "_id" : "children.children-Uid_25267.0", "lastmod" : Timestamp(6, 0), "lastmodEpoch" : ObjectId("56790924e02c4f2c17a4c7c1"), "ns" : "children.children", "min" : { "Uid" : 25267 }, "max" : { "Uid" : 31584 }, "shard" : "shard0000" }
{ "_id" : "children.children-Uid_31584.0", "lastmod" : Timestamp(7, 0), "lastmodEpoch" : ObjectId("56790924e02c4f2c17a4c7c1"), "ns" : "children.children", "min" : { "Uid" : 31584 }, "max" : { "Uid" : 37901 }, "shard" : "shard0001" }
{ "_id" : "children.children-Uid_37901.0", "lastmod" : Timestamp(7, 1), "lastmodEpoch" : ObjectId("56790924e02c4f2c17a4c7c1"), "ns" : "children.children", "min" : { "Uid" : 37901 }, "max" : { "Uid" : 44218 }, "shard" : "shard0004" }
{ "_id" : "children.children-Uid_44218.0", "ns" : "children.children", "min" : { "Uid" : 44218 }, "max" : { "Uid" : { "$maxKey" : 1 } }, "shard" : "shard0004", "lastmod" : Timestamp(1, 7), "lastmodEpoch" : ObjectId("56790924e02c4f2c17a4c7c1") }
3、哈希分片测试
以上都是基于range的分片,这种方式优点是:对于一些基于范围的查询速度很快;缺点是在各分片上数据分配不均匀。而哈希分片恰恰相反,它牺牲了范围查询的性能,能够让数据相对均匀的分配到各个分片上。下面我们进行测试:
mongos> sh.enableSharding("HashTest")
{ "ok" : 1 }
mongos>  sh.shardCollection("HashTest.HashTest",{"Uid":"hashed"})   #与上面的范围分片就这个红色的区别
{ "collectionsharded" : "HashTest.HashTest", "ok" : 1 }
mongos> use HashTest
switched to db HashTest
mongos> for(i=0;i<100000;i++){ db.HashTest.insert({"Uid":i,"Name":"darren","Age":21,"Date":new Date()}); }   #插入10万条文档数据
WriteResult({ "nInserted" : 1 })
mongos> use config
switched to db config
mongos> db.chunks.find()  #不像范围分片那样,有具体的行数,hash貌似还看不出,都是hash值,那么就具体到每个分片上数数数据记录条数吧。
{ "_id" : "HashTest.HashTest-Uid_MinKey", "lastmod" : Timestamp(5, 2), "lastmodEpoch" : ObjectId("56790d30e02c4f2c17a4c89e"), "ns" : "HashTest.HashTest", "min" : { "Uid" : { "$minKey" : 1 } }, "max" : { "Uid" : NumberLong("-7378697629483820640") }, "shard" : "shard0000" }
{ "_id" : "HashTest.HashTest-Uid_-5534023222112865480", "lastmod" : Timestamp(5, 4), "lastmodEpoch" : ObjectId("56790d30e02c4f2c17a4c89e"), "ns" : "HashTest.HashTest", "min" : { "Uid" : NumberLong("-5534023222112865480") }, "max" : { "Uid" : NumberLong("-3689348814741910320") }, "shard" : "shard0001" }
{ "_id" : "HashTest.HashTest-Uid_-1844674407370955160", "lastmod" : Timestamp(5, 6), "lastmodEpoch" : ObjectId("56790d30e02c4f2c17a4c89e"), "ns" : "HashTest.HashTest", "min" : { "Uid" : NumberLong("-1844674407370955160") }, "max" : { "Uid" : NumberLong(0) }, "shard" : "shard0002" }
{ "_id" : "HashTest.HashTest-Uid_1844674407370955160", "lastmod" : Timestamp(5, 8), "lastmodEpoch" : ObjectId("56790d30e02c4f2c17a4c89e"), "ns" : "HashTest.HashTest", "min" : { "Uid" : NumberLong("1844674407370955160") }, "max" : { "Uid" : NumberLong("3689348814741910320") }, "shard" : "shard0003" }
{ "_id" : "HashTest.HashTest-Uid_5534023222112865480", "lastmod" : Timestamp(5, 10), "lastmodEpoch" : ObjectId("56790d30e02c4f2c17a4c89e"), "ns" : "HashTest.HashTest", "min" : { "Uid" : NumberLong("5534023222112865480") }, "max" : { "Uid" : NumberLong("7378697629483820640") }, "shard" : "shard0004" }
{ "_id" : "HashTest.HashTest-Uid_-7378697629483820640", "lastmod" : Timestamp(5, 3), "lastmodEpoch" : ObjectId("56790d30e02c4f2c17a4c89e"), "ns" : "HashTest.HashTest", "min" : { "Uid" : NumberLong("-7378697629483820640") }, "max" : { "Uid" : NumberLong("-5534023222112865480") }, "shard" : "shard0000" }
{ "_id" : "HashTest.HashTest-Uid_-3689348814741910320", "lastmod" : Timestamp(5, 5), "lastmodEpoch" : ObjectId("56790d30e02c4f2c17a4c89e"), "ns" : "HashTest.HashTest", "min" : { "Uid" : NumberLong("-3689348814741910320") }, "max" : { "Uid" : NumberLong("-1844674407370955160") }, "shard" : "shard0001" }
{ "_id" : "HashTest.HashTest-Uid_0", "lastmod" : Timestamp(5, 7), "lastmodEpoch" : ObjectId("56790d30e02c4f2c17a4c89e"), "ns" : "HashTest.HashTest", "min" : { "Uid" : NumberLong(0) }, "max" : { "Uid" : NumberLong("1844674407370955160") }, "shard" : "shard0002" }
{ "_id" : "HashTest.HashTest-Uid_3689348814741910320", "lastmod" : Timestamp(5, 9), "lastmodEpoch" : ObjectId("56790d30e02c4f2c17a4c89e"), "ns" : "HashTest.HashTest", "min" : { "Uid" : NumberLong("3689348814741910320") }, "max" : { "Uid" : NumberLong("5534023222112865480") }, "shard" : "shard0003" }
{ "_id" : "HashTest.HashTest-Uid_7378697629483820640", "lastmod" : Timestamp(5, 11), "lastmodEpoch" : ObjectId("56790d30e02c4f2c17a4c89e"), "ns" : "HashTest.HashTest", "min" : { "Uid" : NumberLong("7378697629483820640") }, "max" : { "Uid" : { "$maxKey" : 1 } }, "shard" : "shard0004" }
最后查了下:shard0000:19833 shard0001:20132 shard0002:20310 shard0003:19916 shard0004:19809 应该算是均匀分布了!!!
三、分片集群常用的管理命令
1、添加分片
sh.addShard( "<ip>:<27017>" )
2、删除分片
#需要运行两次,如果删除的是大本营,必须先要把数据库移到别的分片上或者删除该数据库
db.runCommand({"removeshard":"192.168.245.131:27017"})
3、修改chunk的大小
db.settings.save( { _id:"chunksize", value: 1 } )
db.settings.find()
4、刷新config服务器路由
use admin
db.runCommand("flushRouterConfig");
5、对数据库/集合进行分片
sh.enableSharding("HashTest") 或者  db.runCommand({"enablesharding":"test"})
sh.shardCollection("HashTest.HashTest",{"Uid":1}) 或者 db.runCommand({"shardcollection":"test.students2","key":{"Uid":1}})
sh.shardCollection("HashTest.HashTest",{"Uid":"hashed"})   #hash分片
6、查看分片集群的状态
sh.status()
7、查看config库信息
mongos> use config
switched to db config
mongos> show collections
actionlog
changelog
chunks
collections
databases
lockpings
locks
mongos
settings
shards
tags
testss
version

#查看分片信息
mongos> db.shards.find()
{ "_id" : "shard0000", "host" : "192.168.245.129:27017" }
{ "_id" : "shard0001", "host" : "192.168.245.129:27018" }
{ "_id" : "shard0002", "host" : "192.168.245.131:27018" }
{ "_id" : "shard0003", "host" : "192.168.245.131:27017" }
{ "_id" : "shard0004", "host" : "192.168.245.129:27019" }
#查看分片数据库信息
mongos> db.databases.find()
{ "_id" : "test", "primary" : "shard0000", "partitioned" : true }
{ "_id" : "OSSP10", "primary" : "shard0001", "partitioned" : true }
{ "_id" : "children", "primary" : "shard0004", "partitioned" : true }
{ "_id" : "HashTest", "primary" : "shard0002", "partitioned" : true }
#查看块信息
mongos> db.chunks.find()
{ "_id" : "test.user-_id_MinKey", "lastmod" : Timestamp(2, 0), "lastmodEpoch" : ObjectId("5677cc4015fdf4f1ffbb15bd"), "ns" : "test.user", "min" : { "_id" : { "$minKey" : 1 } }, "max" : { "_id" : 1 }, "shard" : "shard0001" }
{ "_id" : "test.user-_id_1.0", "lastmod" : Timestamp(3, 0), "lastmodEpoch" : ObjectId("5677cc4015fdf4f1ffbb15bd"), "ns" : "test.user", "min" : { "_id" : 1 }, "max" : { "_id" : 17 }, "shard" : "shard0002" }
{ "_id" : "test.user-_id_17.0", "lastmod" : Timestamp(3, 1), "lastmodEpoch" : ObjectId("5677cc4015fdf4f1ffbb15bd"), "ns" : "test.user", "min" : { "_id" : 17 }, "max" : { "_id" : { "$maxKey" : 1 } }, "shard" : "shard0000" }