通常我们会使用new 类名()的方法会去生成一个新的实例,但在开发过程中,有时候也会有“在不指定类名的前提下生成实例”的需求,那样,就只能根据现有实例来生成新的实例。
有三种情况,不能根据类来生成实例:
- 对象种类繁多,无法将它们整合到一个类中时;
- 难以根据类生成实例的时;
- 想解耦框架与生成的实例时。
不根据类来生成实例,而是根据实例来生成实例,就是Prototype模式,又叫原型模式。
实例程序是将字符串放入方框中或者加上下划线显示:
- Product接口
package site.wangxin520.gof.prototype.framework;

/**
 * 所有的需要new出来的对象全部需要实现Product接口
 * Product接口中,继承了Cloneable接口,方便子类调用clone()方法去复制本身对象
 * Product接口中,声明了use(String s)和createClone()抽象方法,具体实现通过子类进行
 * @author wangXgnaw
 *
 */
public interface Product extends Cloneable{
    /**
     * 修饰字符串
     * @param s 被修饰的字符串
     */
    public void use(String s);
    /**
     * 复制(克隆)一个对象出来
     * @return Product 返回一个新对象,这个返回的对象并不是通过new出来的
     */
    public Product createClone();
}
- Manager类
package site.wangxin520.gof.prototype.framework;

import java.util.HashMap;

import org.springframework.beans.factory.annotation.Autowired;

/**
 * 使用Product接口来复制实例
 * 采用HashMap集合,来保存/注册对象
 * 这里是模仿了Spring源码中的注册和创建bean的方法
 * @author wangXgnaw
 *
 */
@SuppressWarnings("all")
public class Manager {

    /**
     * 注册对象用
     */
    private HashMap showcase=new HashMap();
    /**
     * 注册对象,模仿了Spring源码中的注册
     * @param name 对象名,在spring源码中可以使用alian别名和beanname名
     * @param product 实例化的对象,这里是注册一个原型对象,方便后面调用的时候克隆/复制出新对象
     */
    public void register(String name,Product product){
        showcase.put(name, product);
    }
    /**
     * 重头戏
     * 根据传入的名字,获取到对象
     * 这里注意的是“返回对象”标注的那边,使用的是createclone()方法,来复制一个新实例。
     * @param protoname 需要实例化的对象名
     * @return Product 返回一个实现了Product接口的对象
     */
    public Product create(String protoname){
        Product product=(Product) showcase.get(protoname);
        //返回对象
        return product.createClone();
    }

}
- UnderlinePen类
package site.wangxin520.gof.prototype;

import site.wangxin520.gof.prototype.framework.Product;

/**
 * 显示一个下划线,具体不做赘述,同MessageBox
 * @author wangXgnaw
 *
 */
public class UnderlinePen implements Product{

    private char ulchar;
    public UnderlinePen(char ulchar){
        this.ulchar=ulchar;
    }
    public void use(String s){
        int length=s.getBytes().length;
        System.out.println("""+s+""");
        System.out.print(" ");
        for (int i = 0; i < length; i++) {
            System.out.print(ulchar);
        }
        System.out.println("");
    }

    public Product createClone(){
        Product product=null;
        try {
            product = (Product) clone();
        } catch (CloneNotSupportedException e) {
            e.printStackTrace();
        }
        return product;
    }

}
- MessageBox类
package site.wangxin520.gof.prototype;

import site.wangxin520.gof.prototype.framework.Product;

/**
 * 显示消息框,实现了Product接口
 * @author wangXgnaw
 * 逻辑不做过多赘述
 */
public class MessageBox implements Product{

    private char decochar;
    public MessageBox(char decochar){
        this.decochar=decochar;
    }
    public void use(String s){
        int lenght=s.getBytes().length;
        for (int i = 0; i < lenght+4; i++) {
            System.out.print(decochar);
        }
        System.out.println("");
        System.out.println(decochar+" "+s+" "+decochar);
        for (int i = 0; i < lenght+4; i++) {
            System.out.print(decochar);
        }
        System.out.println("");
    }

    /*
     * 创建一个克隆对象,由于继承了cloneable接口,所以采用的是clone()方法,直接克隆出自己本身出来
     * @see site.wangxin520.gof.prototype.framework.Product#createClone()
     */
    public Product createClone(){
        Product product=null;
        try {
            product = (Product) clone();
        } catch (CloneNotSupportedException e) {
            e.printStackTrace();
        }
        return product;
    }
}
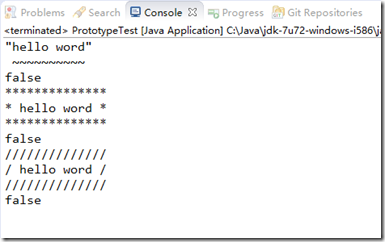
- Prototype测试类
package site.wangxin520.gof.prototype;

import site.wangxin520.gof.prototype.framework.Manager;
import site.wangxin520.gof.prototype.framework.Product;

/**
 * ProtoType模式的测试类
 * @author wangXgnaw
 *
 */
public class PrototypeTest {
    public static void main(String[] args) {

        //新建一个manager管理者,用于管理注册的bean,同Spring中一样
        Manager manager=new Manager();
        //先初始化一个类
        UnderlinePen ulpen=new UnderlinePen('~');
        MessageBox mbox1=new MessageBox('*');
        MessageBox mbox2=new MessageBox('/');
        //把初始化的类进行注册
        manager.register("strong message", ulpen);
        manager.register("warning box", mbox1);
        manager.register("slash box", mbox2);

        /**
         * 以上的方法,实现了spring框架中的注册容器的概念,可通过配置文件进行
         * 下面就是使用这个容器来为我们做事
         */

        //通过manager去创建一个新的product
        Product p1 = manager.create("strong message");
        p1.use("hello word");
        //为了方便观察,使用了一个地址值相同判断,看与之前初始化对象是否是一样的,后同
        System.out.println(p1==ulpen);

        Product p2 = manager.create("warning box");
        p2.use("hello word");
        System.out.println(p2==mbox1);
        Product p3 = manager.create("slash box");
        p3.use("hello word");
        System.out.println(p3==mbox2);


    }
}
- 控制台输出结果:
