1. SELINUX是可以理解为一种android上面的安全机制,是有美国国家安全局和一些公司设计的一个针对linux的安全加强系统
我们可以通过配置SELINUX的相关policy,来定制自己的手机的一些权限,比如,我们可以完全让root用户没有任何的权限和user一样
2. 在android里面,有两个类型,一种是文件,一种是进程。
针对这两种类型,我们可以先来看看他们的不同。
在android上面,adb shell之后进入手机,ps -Z可以查看当前进程所拥有的selinux的权限。
举例:
|
1
2
3
4
5
6
7
8
9
10
11
12
13
14
15
16
17
18
19
20
21
|
LABEL USER PID PPID NAMEu:r:init:s0 root 1 0 /initu:r:kernel:s0 root 2 0 kthreadd...u:r:kernel:s0 root 258 2 irq/322-HPH_R Ou:r:logd:s0 logd 259 1 /system/bin/logdu:r:healthd:s0 root 260 1 /sbin/healthdu:r:lmkd:s0 root 261 1 /system/bin/lmkdu:r:servicemanager:s0 system 262 1 /system/bin/servicemanageru:r:vold:s0 root 263 1 /system/bin/voldu:r:surfaceflinger:s0 system 264 1 /system/bin/surfaceflingeru:r:tctd:s0 root 265 1 /system/bin/tctdu:r:rfs_access:s0 system 268 1 /system/bin/rfs_accessu:r:tee:s0 system 271 1 /system/bin/qseecomdu:r:kernel:s0 root 280 2 kworker/3:1Hu:r:kernel:s0 root 290 2 kauditdu:r:rmt_storage:s0 nobody 291 1 /system/bin/rmt_storageu:r:shell:s0 shell 292 1 /system/bin/shu:r:netd:s0 root 295 1 /system/bin/netdu:r:debuggerd:s0 root 296 1 /system/bin/debuggerdu:r:tee:s0 system 297 271 /system/bin/qseecomd |
在这个例子中,我们可以进行分析。
在android中,只定义了一个user即为u. 另外,如果是进程的话,都会统一定义为r,如果是文件的话,会被定义为object_r. 第三个是这个进程type,在andorid里面,定义了100多个type.按照目前我的理解,这个是进程所属的>类型。第四个是s0,这个是一个安全的等级。但是暂时还没有接触到配置这个的地方。
另外就是文件,文件想要查看相关SELINUX权限的话,需要去执行ls -Z
|
1
2
3
4
5
6
7
8
|
drwxr-x--x root sdcard_r u:object_r:rootfs:s0 storagedrwx--x--x root root u:object_r:tmpfs:s0 synthesisdr-xr-xr-x root root u:object_r:sysfs:s0 sysdrwxr-xr-x root root u:object_r:system_file:s0 systemdrwxrwxr-x system tctpersist u:object_r:tct_persist_file:s0 tctpersistlrwxrwxrwx root root u:object_r:rootfs:s0 tombstones -> /data/tombstones-rw-r--r-- root root u:object_r:rootfs:s0 ueventd.qcom.rc-rw-r--r-- root root u:object_r:rootfs:s0 ueventd.rc |
在这个例子中,结合上面的分析,我们知道了object_r是代表的文件,u是android的唯一的用户,rootfs是这个文件所对应的类型,s0是一个安全的等级限制。
3. 如何配置selinux
首先,按照Google的官方文档:
需要linux内核首先是支持selinux的,另外需要android的selinux的配置文件,也就是extern/sepolicy里面的内容。
然后就是修改BoardConfig.mk
Google的nexus的sepolicy的支持就放在了device/lge/mako/sepolicy
首先会包含厂商定制的sepolicy的文件夹:BOARD_SEPOLICY_DIRS
然后将规则添加到了sepolicy中:BOARD_SEPOLICY_DIRS
这样的话,我们编译出来的image其实就是具有了selinux的功能。
其实如果没有厂商定制的话,也是会编译到external/sepolicy的,这样的话,就是使用andriod所有默认的sepolicy(It defines the domains and types for the AOSP services and apps common to all devices. )
然后理解了这个之后,我们可以看到其实很多的厂商也是有自己的配置规则在device/***/***/sepolicy下面的.
4. selinux的配置规则:
首先要了解sepolicy的结构:
a. App进程 -> mac_permissions.xml
b. App数据文件 -> seapp_contexts
c. 系统文件 -> file_contexts
d. 系统属性 -> property_contexts
在te文件中,我们一般遇到的语法是这样的:
rule_name source_type target_type:class perm_set
解读为: 为source_type设置一个rule_name的规则,规则是对target_type的class 进行 perm_set的操作。
然后是一些特殊的配置文件:
a. external/sepolicy/attributes -> 所有定义的attributes都在这个文件
b. external/sepolicy/access_vectors -> 对应了每一个class可以被允许执行的命令
c. external/sepolicy/roles -> Android中只定义了一个role,名字就是r,将r和attribute domain关联起来
d. external/sepolicy/users -> 其实是将user与roles进行了关联,设置了user的安全级别,s0为最低级是默认的级别,mls_systemHigh是最高的级别
e. external/sepolicy/security_classes -> 指的是上文命令中的class,个人认为这个class的内容是指在android运行过程中,程序或者系统可能用到的操作的模块
f. external/sepolicy/te_macros -> 系统定义的宏全在te_macros文件
g. external/sepolicy/***.te -> 一些配置的文件,包含了各种运行的规则
另外,selinux有两种工作模式:
“permissive”:所有操作都被允许(即没有MAC),但是如果有违反权限的话,会记录日志
“enforcing”:所有操作都会进行权限检查
最后,type的命令如下:
type type_id [alias alias_id,] [attribute_id] # 将type_id(别名为alias)关联到attribute. 这样的话,方便用attribute来管理不同的type中包含相同的属性的部分。
class命令的格式为:
class class_name [ inherits common_name ] { permission_name ... }
inherits表示继承了common定义的权限,然后自己额外实现了permission_name的权限
在te文件中常见的四种命名的规则:
allow:赋予某项权限。
allowaudit:audit含义就是记录某项操作。默认情况下是SELinux只记录那些权限检查失败的操作。allowaudit则使得权限检查成功的操作也被记录。注意,allowaudit只是允许记录,它和赋予权限没关系。赋予权限必须且只能使
用allow语句。
dontaudit:对那些权限检查失败的操作不做记录。
neverallow:前面讲过,用来检查安全策略文件中是否有违反该项规则的allow语句。如例子5所示:
举例:
|
1
|
type init, domain; |
将init关联到domain,即将domain设置为init类型的属性
|
1
|
allow init unlabeled:filesystem mount; |
允许init类型对unlabeled类型的filesystem进行mount的操作
|
1
|
allow init fotad:unix_stream_socket { bind create }; |
允许init类型对fotad类型的unix_stream_socket 进行bind和create的操作
|
1
2
|
allow appdomain anr_data_file:dir search;allow appdomain anr_data_file:file { open append }; |
首先appdomain是定义在te_macros里面的一个宏,很多的app规则会使用类似app_domain(shell)的命令将其添加进去
这两句话的意思是:1. 允许app去对anr_data_file类型的目录进行查找的操作
2. 允许app对anr_data_file类型的file进行打开和添加操作 其实就是规定了出现anr时候,app往/data/anr/里面写入的权限限制
|
1
|
neverallow { appdomain -unconfineddomain } kmem_device:chr_file { read write }; |
绝对不允许app(除了有unconfineddomain属性的app)对kmem_device类型的字符设备进行读写的操作
|
1
|
neverallow { appdomain -unconfineddomain } self:capability2 *; |
绝对不允许除了unconfineddomain以外的app对self类型的capability2进行任何的操作
|
1
|
type httpd_user_content_t, file_type, httpdcontent; |
声明一个httpd_user_content_t的类型,具有file_type和httpdcontent的属性
|
1
2
|
type httpd_user_content_t;typeattribute httpd_user_content_t file_type, httpdcontent; |
声明一个httpd_user_content_t的类型
定义httpd_user_content_t具有file_type, httpdcontent的属性
|
1
|
allow appdomain self:rawip_socket create_socket_perms; |
所有可以设置类型的地方其实都可以设置为属性。
比如这个例子,我们允许所有具有app属性的内容可以去对self属性的rawip_socket进行create的操作
|
1
|
allow {user_t domain} {bin_t file_type sbin_t}:file execute ; |
允许user_t和domain属性的类对bin_t, file_type, sbin_t类型的file进行可执行的操作
|
1
2
|
allow user_t user_t:process signal;allow user_t self:process signal; |
这两条语句的表述其实是一致的,其实self指的是目标的类型和发起人的类型是一致的
所以不能声明一个类型或者属性叫做self
|
1
|
allow user_t bin_t:file ~{ write setattr ioctl }; |
允许user_t对bin_t类型的file进行除了write setattr ioctl相关的操作
|
1
|
type_transition system wifi_data_file:sock_file system_wpa_socket; |
当一个类型为system的类别去进行wifi_data_file类型的sock_file访问时,类型默认切换到system_wpa_socket
如果下面这条语句想要执行成功
type_transition init_t apache_exec_t:process apache_t;
至少首先声明下面的三条规则:
allow init_t apache_exec_t:file execute;
allow init_t apache_t:process transition;
allow apache_t apache_exec_t:file entrypoint;
type_transition和type_change的语法规则是一样的, type_change规则的影响不会在内核中生效,而是依赖于用户空间应用程序,如login或sshd
Android SeLinux权限问题和解决方法
1. 确认 seLinux导致权限问题
1.1 标志性log 格式:
avc: denied { 操作权限 } for pid=7201 comm=“进程名” scontext=u:r:源类型:s0 tcontext=u:r:目标类型:s0 tclass=访问类别 permissive=0
1.2 举例:
Kenel log:
avc: denied { execheap } for pid=7201 comm="com.baidu.input" scontext=u:r:untrusted_app:s0tcontext=u:r:untrusted_app:s0tclass=processpermissive=0
Logcat log:
com.baidu.input:
type=1400audit(0.0:29): avc: denied { execheap } for
scontext=u:r:untrusted_app:s0tcontext=u:r:untrusted_app:s0tclass=processpermissive=0
1.3 方法1:adb在线修改
关闭 seLinux:

打开seLinux:
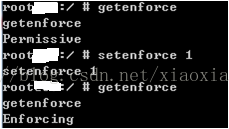
Enforcing:seLinux已经打开;
Permissive:seLinux已经关闭;
1.4 方法2: 从kernel中彻底关闭 (用于开机初始化时的seLinux权限问题,要重编bootimage)
修改LINUX/android/kernel/arch/arm64/configs/XXXdefconfig文件(找相应config文件)
去掉CONFIG_SECURITY_SELINUX=y 的配置项
2.1 修改依据:
log 信息:
avc: denied { 操作权限 } for pid=7201 comm=“进程名” scontext=u:r:源类型:s0 tcontext=u:r:目标类型:s0
tclass=访问类别 permissive=0
2.2 修改步骤:
找相应的“源类型.te ”文件
有两个位置可能存在相应的te文件:
位置一:LINUX/android/external/sepolicy
位置二:LINUX/android/device/qcom/sepolicy/common
2.3 按如下格式在该文件中添加:
allow 源类型 目标类型:访问类别 {权限};
2.4 举例
Kernel Log:
avc: denied { execheap } for pid=7201
comm="com.baidu.input"
scontext=u:r:untrusted_app:s0tcontext=u:r:untrusted_app:s0tclass=processpermissive=0
修改:
在LINUX/android/external/sepolicy/untrusted_app.te 中添加:
allow untrusted_app untrusted_app:process { execheap };备注:
在这个例子中,由于源类型和目标类型都是untreated_app, 所以也可以写成:
allow untrusted_app self:process { execheap };3. 添加权限后的neverallowed冲突
3.1 编译报错:
libsepol.check_assertion_helper: neverallow on line xxx ofexternal/sepolicy/domain.te ……
3.2 原因:
新添加的sepolicy项目违反了domain.te 中规定的的总策略原则。所以该条权限策略不能添加,如果强行添加的话有CTS测试失败的风险。
3.3 解决方法:
avc: denied { read write } for pid=303 comm="mediaserver" name="tfa9890"dev="tmpfs" ino=3880 scontext=u:r:mediaserver:s0tcontext=u:object_r:device:s0tclass=chr_file permissive=0
一般有file_contexts, genfs_contexts, property_contexts, service_contexts 等文件
如:在file_contexts中添加: /dev/tfa9890 u:object_r:audio_device:s0
3.4 举例
添加权限:
在mediaserver.te中添加allow mediaserver device:chr_file { read write open};
编译报错:
libsepol.check_assertion_helper: neverallow on line 258 ofexternal/sepolicy/domain.te (or line 5252 of policy.conf) violated byallow mediaserver device:chr_file { read write open};
违反了domain.te 258的:
neverallow {domain –unconfineddomain –ueventd } device:chr_file { open read write}
运行Log:
avc: denied { read write } for pid=303
comm="mediaserver"name="tfa9890" dev="tmpfs" ino=3880
scontext=u:r:mediaserver:s0 tcontext=u:object_r:device:s0tclass=chr_file
permissive=0
修改步骤:
1.目标名称是: tfa9890, 其在系统中的路径是: /dev/tfa9890, 是audio相关的设备文件
2.源类型是mediaserver, 在mediaserver.te 文件中发现其具有 audio_device 目标类型的权限
3.所以在file_contexts 中添加 “/dev/tfa9890 u:object_r:audio_device:s0” 可以解决问题0
userdebug_or_eng关键字可以限定版本,例如:
userdebug_or_eng(`
allow system_app sysfs_battery_supply:dir search;
allow system_app sysfs_battery_supply:file {read open getattr};
allow system_app sysfs_usb_supply:dir search;
allow system_app sysfs_usb_supply:file {read open getattr};
allow system_app sysfs:file {read write open getattr};
allow system_app sysfs_leds:dir search;
allow system_app sysfs_leds:file write;
allow system_app system_data_file:file {write create setattr};
allow system_app system_data_file:dir {write add_name};
allow system_app vendor_audioftm_exec:file {getattr execute read open execute_no_trans};
allow system_app vendor_default_prop:file {read open getattr};
allow system_app proc_asound:dir search;
allow system_app proc_audiod:file {read write open getattr execute};
allow system_app audio_device:chr_file { read write open ioctl };
allow system_app audio_device:dir { search };
allow system_app proc:file { read open getattr };
allow system_app vendor_file:file {read open};
allow system_app sysfs_graphics:file rw_file_perms;
allow system_app sysfs_graphics:dir search;
allow system_app vendor_gles_data_file:dir search;
allow system_app vendor_camera_prop:file { read open getattr };
')
userdebug_or_eng(`permissive ft_diag;') //打开ft_diag在userdebug或者eng版本上的所有关于se_Android的权限
内置一个脚本,调用该脚本时不成功,需要在file_contexts中定义该脚本的类型,然后在其他程序的te文件中加入对该脚本的执行权限。
1. device/xxx/common/sepolicy/file_contexts 添加
/system/bin/preinstall.sh u:object_r:preinstall_exec:s0
要添加该脚本对其他的权限
2.创建device/amlogic/common/sepolicy/preinstall.te
type preinstall, domain;
type preinstall_exec, exec_type, file_type;
3.init.rc添加脚本运行服务
service preinstall /system/bin/preinstall.sh
user root
group root
disabled
oneshot
seclabel u:r:preinstall:s0
解决seAndroid权限,可以适用audit2allow工具
作用:可以根据avc错误日志自动生成需要添加te权限
目录:external/selinux/prebuilts/bin/
适用条件:依赖libselinux.so库,所以需要代码全编译完成才可以用
适用方法:将avc错误日志拷贝到文本文档中,执行命令:audit2allow –i test.txt >test.te
分析过程:
- 缺少什么权限: { write }权限,
- 谁缺少权限: scontext=u:r:kernel:s0,
- 对哪个文件缺少权限:tcontext=u:object_r:block_device
- 什么类型的文件: tclass=blk_file
- 解决方法:kernel.te
allow kernel block_device:blk_file write;

对于类型文件可以在system/sepolicy/public/global_macros来查看