NumPy是什么?
NumPy是科学计算的基本包在Python中。 这是一个Python库,它提供了一个多维数组对象, 各种派生的对象(如蒙面数组和矩阵),和一个 快速操作数组的各式各样的例程,包括 数学、逻辑、形状操作、排序选择、I / O, 离散傅里叶变换,基本的线性代数,基本统计 操作,随机模拟和更多。
1、Numpy数组对象:
NumPy中的 ndarray 是一个多维数组对象,该对象由两部分组成:
实际的数据
描述这些数据的元数据
大部分的数组操作仅仅修改元数据部分,而不改变底层的实际数据NumPy数组一般是同质的(但有一种特殊的数组类型例外,它是异质的),即数组中的所有元素类型必须是一致的。
NumPy数组类的ndarray。 也是已知的别名array。 请注意,numpy.array不一样的标准吗 Python库类array.array,它只处理一维 数组和提供功能比较少。 更重要的一个属性 象是ndarray:
#ndarray类的属性,别名为array

ndarray.ndim #(也可以为array.ndim下面类似)数组的维度
ndarray.shape #数组的行数和列数
ndarray.size#数组的大小,数组元素的总和
ndarray.dtype#对象数组的数据类型
ndarray.itemsize#每个数组元素的字节大小
ndarray.data#缓冲区包含实际的元素的数组。 通常,我们 不需要使用这个属性,因为我们将访问元素 在使用数组索引设施。
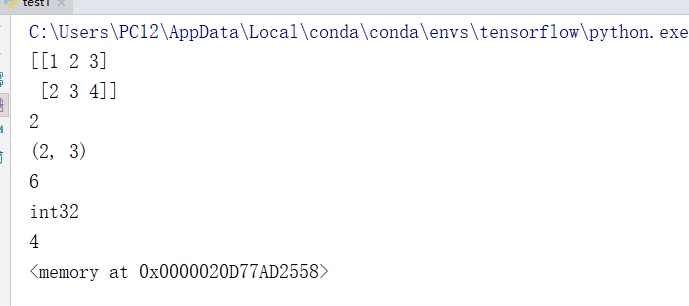
1 import numpy as np
2 array = np.array([[1,2,3],[2,3,4]])
3 print(array)
4 print(array.ndim)
5 print(array.shape)
6 print(array.size)
7 print(array.dtype)
8 print(array.itemsize)
9 print(array.data)
结果:
2、创建数组:
array:创建数组dtype:指定数据类型zeros:创建数据全为0ones:创建数据全为1empty:创建数据接近0arrange:按指定范围创建数据linspace:创建线段
- 创建普通的数组:
1 import numpy as np
2 array = np.array([[1,2,3],[2,3,4]])#数组的类型为默认类型
3 array1 = np.array([[1,2,3],[2,3,4]],dtype=np.int16)#设置自己想要的数据类型
4 print(array.dtype)
5 print(array1.dtype)
结果;
Numpy支持的数据类型;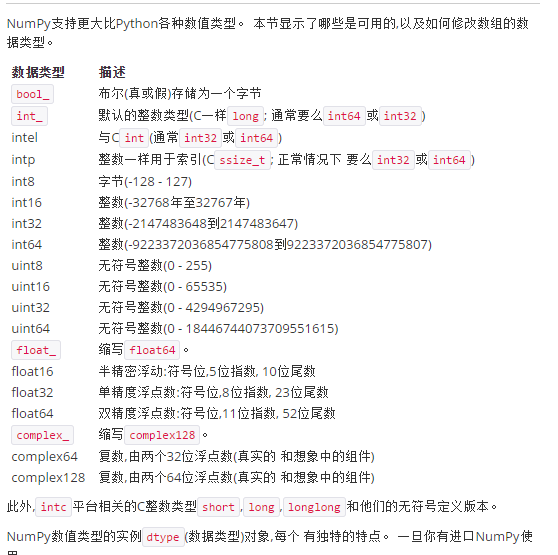
-
创建全为零和全为一的数组:empty创建全空数组,
 1 >>> np.zeros( (3,4) )
 2 array([[ 0.,  0.,  0.,  0.],
 3        [ 0.,  0.,  0.,  0.],
 4        [ 0.,  0.,  0.,  0.]])
 5 >>> np.ones( (2,3,4), dtype=np.int16 )                # dtype can also be specified
 6 array([[[ 1, 1, 1, 1],
 7         [ 1, 1, 1, 1],
 8         [ 1, 1, 1, 1]],
 9        [[ 1, 1, 1, 1],
10         [ 1, 1, 1, 1],
11         [ 1, 1, 1, 1]]], dtype=int16)
12 >>> np.empty( (2,3) )                                 # uninitialized, output may vary
13 array([[  3.73603959e-262,   6.02658058e-154,   6.55490914e-260],
14        [  5.30498948e-313,   3.14673309e-307,   1.00000000e+000]])
- 用
arange创建连续数组: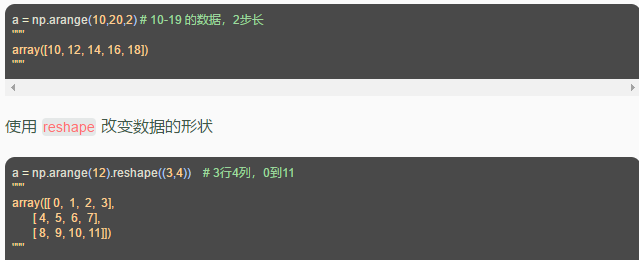
- 用
linspace创建线段型数据: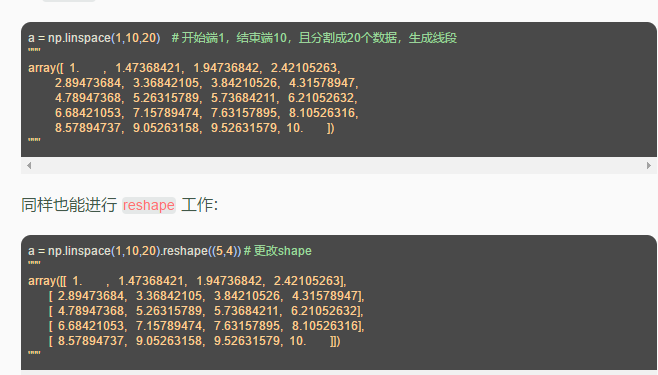
3、创建自定义数据类型:
自定义数据类型是一种异构数据类型,与C语言和C++语言的结构体类似,可以用来实现结构体
1.创建数据类型:
1 import numpy as np
2 t = np.dtype({'names':['name','numitems','price'],
3               'formats':[np.str,np.uint32,np.float32]})
4 a = np.array([("jhf",54, 78.2),('hvgh',89,12.2)],dtype=t)
5 print(a.dtype)
6 print(a[1])
结果:

2.一维数组的索引和切片
In [2]: a  = np.arange(9)
        print(a[3:7])
   结果:[3 4 5 6]


3.多维数组的切片与索引
1 # -*- coding: utf-8 -*-
2 import numpy as np
3 b = np.arange(24).reshape(2,3,4)
4 print(b.shape)
5 print(b)
结果:
(2, 3, 4)
[[[ 0  1  2  3]
  [ 4  5  6  7]
  [ 8  9 10 11]]

 [[12 13 14 15]
  [16 17 18 19]
  [20 21 22 23]]]
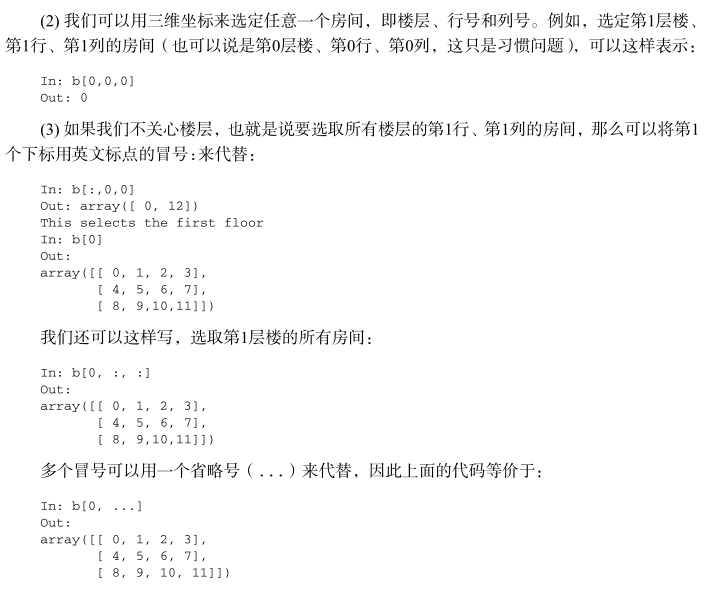
多维数组 b 中有 0 ~ 23 的整数,共 24 个元素,是一个2×3×4的三维数组。我们可以形象地把它看做一个两层楼建筑,每层楼有12个房间,并排列成3行4列。或者,我们也可以将其看成是电子表格中工作表(sheet)、行和列的关系。你可能已经猜到, reshape 函数的作用是改变数组的“形状”,也就是改变数组的维度,其参数为一个正整数元组,分别指定数组在每个维度上的大小。如果指定的维度和数组的元素数目不相吻合,函数将抛出异常
4. 改变数组的维度:
- (ravel()函数)将数组展平
1 # -*- coding: utf-8 -*-
2 import numpy as np
3 b = np.arange(24).reshape(2,3,4)
4 print(b)
5 print(b.ravel())
结果:
[[[ 0  1  2  3]
  [ 4  5  6  7]
  [ 8  9 10 11]]

 [[12 13 14 15]
  [16 17 18 19]
  [20 21 22 23]]]
[ 0  1  2  3  4  5  6  7  8  9 10 11 12 13 14 15 16 17 18 19 20 21 22 23]
- (flatten()函数) 这个函数恰如其名, flatten 就是展平的意思,与 ravel 函数的功能相同。不过, flatten 函数会请求分配内存来保存结果,而 ravel 函数只是返回数组的一个视图(view):
# -*- coding: utf-8 -*-
import numpy as np
b = np.arange(24).reshape(2,3,4)
print(b)
print(b.ravel())
a=b.flatten()
print(a)
结果:
[[[ 0  1  2  3]
  [ 4  5  6  7]
  [ 8  9 10 11]]

 [[12 13 14 15]
  [16 17 18 19]
  [20 21 22 23]]]
[ 0  1  2  3  4  5  6  7  8  9 10 11 12 13 14 15 16 17 18 19 20 21 22 23]
[ 0  1  2  3  4  5  6  7  8  9 10 11 12 13 14 15 16 17 18 19 20 21 22 23]
-
用元组设置维度 除了可以使用 reshape 函数,我们也可以直接用一个正整数元组来设置数组的维度,如下所示:
# -*- coding: utf-8 -*-
import numpy as np
b = np.arange(24).reshape(2,3,4)
b.shape = (6,4)
print(b)
结果:
[[ 0  1  2  3]
 [ 4  5  6  7]
 [ 8  9 10 11]
 [12 13 14 15]
 [16 17 18 19]
 [20 21 22 23]]
- (transpose()函数或者array.T )在线性代数中,转置矩阵是很常见的操作。对于多维数组,我们也可以这样做:
# -*- coding: utf-8 -*-
import numpy as np
b = np.arange(24).reshape(6,4)
print(b)
print('
')
print(b.transpose())
print('
')
#或者b.T
print(b.T)
结果:
[[ 0  1  2  3]
 [ 4  5  6  7]
 [ 8  9 10 11]
 [12 13 14 15]
 [16 17 18 19]
 [20 21 22 23]]


[[ 0  4  8 12 16 20]
 [ 1  5  9 13 17 21]
 [ 2  6 10 14 18 22]
 [ 3  7 11 15 19 23]]


[[ 0  4  8 12 16 20]
 [ 1  5  9 13 17 21]
 [ 2  6 10 14 18 22]
 [ 3  7 11 15 19 23]]
- ( resize()函数) resize 和 reshape 函数的功能一样,但 resize 会直接修改所操作的数组:
# -*- coding: utf-8 -*-
import numpy as np
b = np.arange(24).reshape(6,4)
print(b)
b.resize((2,12))
print(b)
结果:
[[ 0  1  2  3]
 [ 4  5  6  7]
 [ 8  9 10 11]
 [12 13 14 15]
 [16 17 18 19]
 [20 21 22 23]]
[[ 0  1  2  3  4  5  6  7  8  9 10 11]
 [12 13 14 15 16 17 18 19 20 21 22 23]]
5.组合数组
- 创建两个数组:
# -*- coding: utf-8 -*-
import numpy as np
a = np.arange(9).reshape(3,3)
print(a)
print('
')
b = 2*a
print(b)
结果:
[[0 1 2]
 [3 4 5]
 [6 7 8]]


[[ 0  2  4]
 [ 6  8 10]
 [12 14 16]]
- 水平组合:
1.hstack 函数实现
# -*- coding: utf-8 -*-
import numpy as np
a = np.arange(9).reshape(3,3)
b = 2*a
print(np.hstack((a,b)))
结果:
2. concatenate 函数来实现[[ 0 1 2 0 2 4] [ 3 4 5 6 8 10] [ 6 7 8 12 14 16]]
# -*- coding: utf-8 -*- import numpy as np a = np.arange(9).reshape(3,3) b = 2*a print(np.concatenate((a,b),axis=1))
结果:
[[ 0  1  2  0  2  4]
 [ 3  4  5  6  8 10]
 [ 6  7  8 12 14 16]]
- 垂直组合:
1.vstack函数实现:
# -*- coding: utf-8 -*-
import numpy as np
a = np.arange(9).reshape(3,3)
b = 2*a
print(a)
print()
print(b)
print()
print(np.vstack((a,b)))
结果:
[[0 1 2]
 [3 4 5]
 [6 7 8]]

[[ 0  2  4]
 [ 6  8 10]
 [12 14 16]]

[[ 0  1  2]
 [ 3  4  5]
 [ 6  7  8]
 [ 0  2  4]
 [ 6  8 10]
 [12 14 16]]
2. concatenate 函数的 axis 参数设置为0即可实现
# -*- coding: utf-8 -*-
import numpy as np
a = np.arange(9).reshape(3,3)
b = 2*a
print(a)
print()
print(b)
print()
print(np.concatenate((a,b),axis= 0))
结果;
[[0 1 2]
 [3 4 5]
 [6 7 8]]

[[ 0  2  4]
 [ 6  8 10]
 [12 14 16]]

[[ 0  1  2]
 [ 3  4  5]
 [ 6  7  8]
 [ 0  2  4]
 [ 6  8 10]
 [12 14 16]]
-
深度组合 将相同的元组作为参数传给 dstack 函数,即可完成数组的深度组合.深度组合,就是将一系列数组沿着纵轴(深度)方向进行层叠组合。举个例子,有若干张二维平面内的图像点阵数据,我们可以将这些图像数据沿纵轴方向层叠在一起,这就形象地解释了什么是深度组合。
1 # -*- coding: utf-8 -*-
2 import numpy as np
3 a = np.arange(9).reshape(3,3)
4 b = 2*a
5 print(a)
6 print()
7 print(b)
8 print()
9 print(np.dstack((a,b)))
结果:
[[0 1 2]
 [3 4 5]
 [6 7 8]]

[[ 0  2  4]
 [ 6  8 10]
 [12 14 16]]

[[[ 0  0]
  [ 1  2]
  [ 2  4]]

 [[ 3  6]
  [ 4  8]
  [ 5 10]]

 [[ 6 12]
  [ 7 14]
  [ 8 16]]]
- 列组合 column_stack 函数对于一维数组将按列方向进行组合
1 # -*- coding: utf-8 -*-
2 import numpy as np
3 noed  =np.arange(2)
4 twod = noed *2
5 c = np.column_stack((noed,twod))
6 print(noed)
7 print()
8 print(twod)
9 print()
结果:
[0 1]

[0 2]

[[0 0]
 [1 2]]
而对于二维数组, column_stack 与 hstack 的效果是相同的
 1 # -*- coding: utf-8 -*-
 2 import numpy as np
 3 a = np.arange(9).reshape(3,3)
 4 b = 2*a
 5 print(a)
 6 print()
 7 print(b)
 8 print()
 9 c = np.column_stack((a,b))
10 print(c)
11 print(c==np.hstack((a,b)))
结果:
[[0 1 2]
 [3 4 5]
 [6 7 8]]

[[ 0  2  4]
 [ 6  8 10]
 [12 14 16]]

[[ 0  1  2  0  2  4]
 [ 3  4  5  6  8 10]
 [ 6  7  8 12 14 16]]
[[ True  True  True  True  True  True]
 [ True  True  True  True  True  True]
 [ True  True  True  True  True  True]]
-
行组合 当然,NumPy中也有按行方向进行组合的函数,它就是 row_stack 。对于两
个一维数组,将直接层叠起来组合成一个二维数组1 # -*- coding: utf-8 -*- 2 import numpy as np 3 noed =np.arange(2) 4 twod = noed *2 5 c = np.row_stack((noed,twod)) 6 print(noed) 7 print() 8 print(twod) 9 print() 10 print(c)
结果:
[0 1]

[0 2]

[[0 1]
 [0 2]]
对于二维数组, row_stack 与 vstack 的效果是相同的
 1 # -*- coding: utf-8 -*-
 2 import numpy as np
 3 a = np.arange(9).reshape(3,3)
 4 b = 2*a
 5 print(a)
 6 print()
 7 print(b)
 8 print()
 9 print(np.row_stack((a,b)))
10 print()
11 print(np.row_stack((a,b)) == np.vstack((a,b)))
结果:
[[0 1 2]
 [3 4 5]
 [6 7 8]]

[[ 0  2  4]
 [ 6  8 10]
 [12 14 16]]

[[ 0  1  2]
 [ 3  4  5]
 [ 6  7  8]
 [ 0  2  4]
 [ 6  8 10]
 [12 14 16]]

[[ True  True  True]
 [ True  True  True]
 [ True  True  True]
 [ True  True  True]
 [ True  True  True]
 [ True  True  True]]
6.数组分割
NumPy数组可以进行水平、垂直或深度分割,相关的函数有 hsplit 、 vsplit 、 dsplit 和split 。我们可以将数组分割成相同大小的子数组,也可以指定原数组中需要分割的位置。
- 水平分割
1 # -*- coding: utf-8 -*-
2 import numpy as np
3 a = np.arange(9).reshape(3,3)
4 b = 2*a
5 print(a)
6 print()
7 print(np.hsplit(a,3))
结果:
[[0 1 2]
 [3 4 5]
 [6 7 8]]

[array([[0],
       [3],
       [6]]),
array([[1],
       [4],
       [7]]),
 array([[2],
       [5],
       [8]])]
对同样的数组,调用 split 函数并在参数中指定参数 axis=1
1 # -*- coding: utf-8 -*-
2 import numpy as np
3 a = np.arange(9).reshape(3,3)
4 b = 2*a
5 print(a)
6 print()
7 print(np.split(a,3,axis = 1))
结果:
[[0 1 2] [3 4 5] [6 7 8]] [array([[0], [3], [6]]), array([[1], [4], [7]]), array([[2], [5], [8]])] -
垂直分割
vsplit 函数将把数组沿着垂直方向分割:
In: vsplit(a, 3)
Out: [array([[0, 1, 2]]), array([[3, 4, 5]]), array([[6, 7, 8]])]
同样,调用 split 函数并在参数中指定参数 axis=0 ,也可以得到同样的结果:
In: split(a, 3, axis=0)
Out: [array([[0, 1, 2]]), array([[3, 4, 5]]), array([[6, 7, 8]])] - 深度分割 不出所料, dsplit 函数将按深度方向分割数组
1 # -*- coding: utf-8 -*-
2 import numpy as np
3 a = np.arange(27).reshape(3,3,3)
4 print(a.shape)
5 print(a)
6 b = np.dsplit(a,3)
7 print(b)
8 print(type(b))
结果:
 View Code
 1 (3, 3, 3)
 2 [[[ 0  1  2]
 3   [ 3  4  5]
 4   [ 6  7  8]]
 5
 6  [[ 9 10 11]
 7   [12 13 14]
 8   [15 16 17]]
 9
10  [[18 19 20]
11   [21 22 23]
12   [24 25 26]]]
13 [array([[[ 0],
14         [ 3],
15         [ 6]],
16
17        [[ 9],
18         [12],
19         [15]],
20
21        [[18],
22         [21],
23         [24]]]), array([[[ 1],
24         [ 4],
25         [ 7]],
26
27        [[10],
28         [13],
29         [16]],
30
31        [[19],
32         [22],
33         [25]]]), array([[[ 2],
34         [ 5],
35         [ 8]],
36
37        [[11],
38         [14],
39         [17]],
40
41        [[20],
42         [23],
43         [26]]])]
44 <class 'list'>
我们用 hsplit 、 vsplit 、 dsplit 和 split 函数进行了分割数组的操作
- 水平分割
