
用Arduino类库驱动舵机并不是一件难事,如果需要驱动很多电机,就需要要占用更多的引脚,也会影响到Arduino的处理能力。专门的舵机驱动板很好的解决了这个问题。
此舵机驱动板使用PCA9685芯片,是16通道12bit PWM舵机驱动,用2个引脚通过I2C就可以驱动16个舵机。不仅如此,你还可以通过级联的方式最多级联62个驱动板,总共可以驱动992个舵机!
大多数的舵机设计电压都是在5~6V,尤其在多个舵机同时运行时,跟需要有大功率的电源供电。如果直接使用Arduino 5V引脚直接为舵机供电,会出现一些难以预测的问题,所以我们建议你能有个合适的外部电源为驱动板供电。
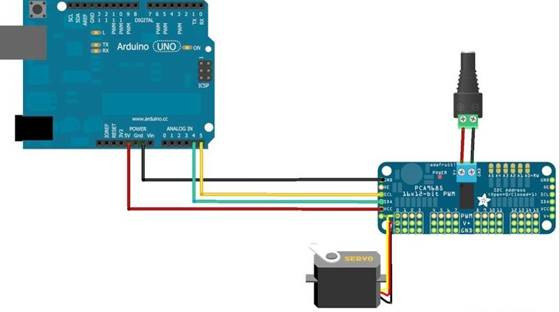
驱动板与Arduino连接
此PWM驱动板采用I2C方式,所以只需要4根线就可以连接到Arduino设备:
为驱动板分配地址
级联的每个驱动板都需要有一个唯一的访问地址。每个驱动板的初始I2C地址是0×40,可以通过右上角的跳线修改I2C地址。用焊锡将一个跳线连上就表示一个二进制数字“1”。
按以下方式连接
Arduino uno PCA9685
+5v -> VCC
GND -> GND
Analog 4 -> SDAAnalog 5 -> SCL
外接电源
为驱动板分配地址
级联的每个驱动板都需要有一个唯一的访问地址。每个驱动板的初始I2C地址是0×40,可以通过右上角的跳线修改I2C地址。用焊锡将一个跳线连上就表示一个二进制数字“1”。
使用自带的例程(只接2个舵机):
/***************************************************
This is an example for our Adafruit 16-channel PWM & Servo driver
Servo test - this will drive 16 servos, one after the other
Pick one up today in the adafruit shop!
------> http://www.adafruit.com/products/815
These displays use I2C to communicate, 2 pins are required to
interface. For Arduino UNOs, thats SCL -> Analog 5, SDA -> Analog 4
Adafruit invests time and resources providing this open source code,
please support Adafruit and open-source hardware by purchasing
products from Adafruit!
Written by Limor Fried/Ladyada for Adafruit Industries.
BSD license, all text above must be included in any redistribution
****************************************************/
#include <Wire.h>
#include <Adafruit_PWMServoDriver.h>
// called this way, it uses the default address 0x40
Adafruit_PWMServoDriver pwm = Adafruit_PWMServoDriver();
// you can also call it with a different address you want
//Adafruit_PWMServoDriver pwm = Adafruit_PWMServoDriver(0x41);
// Depending on your servo make, the pulse width min and max may vary, you
// want these to be as small/large as possible without hitting the hard stop
// for max range. You'll have to tweak them as necessary to match the servos you
// have!
#define SERVOMIN 150 // this is the 'minimum' pulse length count (out of 4096)
#define SERVOMAX 600 // this is the 'maximum' pulse length count (out of 4096)
// our servo # counter
//uint8_t servonum = 0;
void setup()
{
Serial.begin(9600);
Serial.println("16 channel Servo test!!!!");
pwm.begin();
pwm.setPWMFreq(60); // Analog servos run at ~60 Hz updates
}
// you can use this function if you'd like to set the pulse length in seconds
// e.g. setServoPulse(0, 0.001) is a ~1 millisecond pulse width. its not precise!
void setServoPulse(uint8_t n, double pulse)
{
double pulselength;
pulselength = 1000000; // 1,000,000 us per second
pulselength /= 60; // 60 Hz
Serial.print(pulselength); Serial.println(" us per period");
pulselength /= 4096; // 12 bits of resolution
Serial.print(pulselength); Serial.println(" us per bit");
pulse *= 1000;
pulse /= pulselength;
Serial.println(pulse);
pwm.setPWM(n, 0, pulse);
}
void loop()
{
// Drive each servo one at a time
//Serial.println(servonum);
for (uint16_t pulselen = SERVOMIN; pulselen < SERVOMAX; pulselen++)
{
pwm.setPWM(0, 0, pulselen);
pwm.setPWM(1, 0, pulselen);
}
delay(500);
for (uint16_t pulselen = SERVOMAX; pulselen > SERVOMIN; pulselen--)
{
pwm.setPWM(0, 0, pulselen);
pwm.setPWM(1, 0, pulselen);
}
delay(500);
}