之前就一直有写博客的想法,别人也建议写一写,但一直没有动手写,自己想了一下原因,就一个字:懒、懒、懒。为了改掉这个毛病,决定从今天开始写博客了,一方面对自己掌握的知识做一个梳理,另一方面和大家做一个交流,更能深化对问题的理解。废话好像有点多,好了,各位乘客,收起小桌板,系好安全带,要发车喽。
Cesium作为一个开源的webgl三维地球渲染引擎,具备很多的基础功能和高级功能。之前已经有很多文章对Cesium做了相关的介绍以及如何使用API等等,我想和大家分享的是Cesium一些功能的底层实现。作为一个源码研究爱好者,希望能将底层优秀代码和大家分享。我们不是代码的生产者,我们只是代码世界的搬运工,哈哈。听说Cesium最近集成了平面剪裁功能,我们赶紧去看一看。
一 Cesium平面裁剪效果
Cesium裁剪模型的效果如下:
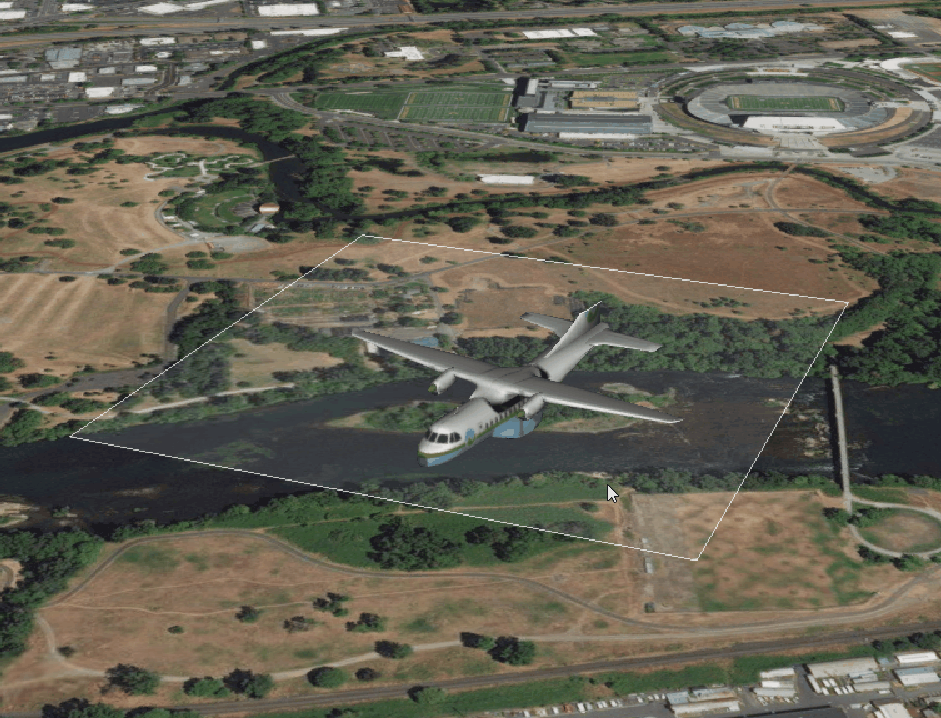
这就是Cesium中根据一个平面对模型进行裁剪的效果,看上去很神奇。除了可以对单个模型进行裁剪,还支持对3D Tiles模型、地形进行裁剪,裁剪面可以定义成单个面也可以设置成多个面。
二 Cesium平面裁剪调用
在Cesium中添加模型以及对模型进行裁剪非常简单好用,只需下面几行代码就可以实现:
 1 var modelEntityClippingPlanes;//定义的裁剪平面集合
 2 function loadModel(url) {
 3     var clippingPlanes = [
 4         new Cesium.ClippingPlane(new Cesium.Cartesian3(0.0, 0.0, -1.0), -100.0)
 5     ];//裁剪平面数组
 6
 7     modelEntityClippingPlanes = new Cesium.ClippingPlaneCollection({
 8         planes : clippingPlanes,
 9         edgeWidth : viewModel.edgeStylingEnabled ? 1.0 : 0.0
10     });
11   //更新裁剪平面的位置
12     function updateClippingPlanes() {
13         return modelEntityClippingPlanes;
14     }
15   //添加要裁剪的飞机模型,并设置裁剪平面
16     var position = Cesium.Cartesian3.fromDegrees(-123.0744619, 44.0503706, 100.0);
17     var heading = Cesium.Math.toRadians(135.0);
18     var pitch = 0.0;
19     var roll = 0.0;
20     var hpr = new Cesium.HeadingPitchRoll(heading, pitch, roll);
21     var orientation = Cesium.Transforms.headingPitchRollQuaternion(position, hpr);
22     var entity = viewer.entities.add({
23         name : url,
24         position : position,
25         orientation : orientation,
26         model : {
27             uri : url,
28             scale : 8,
29             minimumPixelSize : 100.0,
30             clippingPlanes : new Cesium.CallbackProperty(updateClippingPlanes, false)//重要,设置裁剪平面的地方
31         }
32     });
33
34     viewer.trackedEntity = entity;
35   //将绘制的裁剪平面绘制到场景中
36     for (var i = 0; i < clippingPlanes.length; ++i) {
37         var plane = clippingPlanes[i];
38         var planeEntity = viewer.entities.add({
39             position : position,
40             plane : {
41                 dimensions : new Cesium.Cartesian2(300.0, 300.0),
42                 material : Cesium.Color.WHITE.withAlpha(0.1),
43                 plane : new Cesium.CallbackProperty(createPlaneUpdateFunction(plane, Cesium.Matrix4.IDENTITY), false),
44                 outline : true,
45                 outlineColor : Cesium.Color.WHITE
46             }
47         });
48
49         planeEntities.push(planeEntity);
50     }
51 }
三 实现原理剖析
通过分析Cesium源码发现裁剪的实现是在片源着色器中,在视空间坐标系下通过判断模型与裁剪位置构成向量与裁剪平面法向量点乘的正负来判断片源是否剔除。如果点乘为正,说明两个向量的夹角小于90度,在裁剪面要显示的一侧,保留,否则剔除。通过下面这张图应该能更容易理解一点。
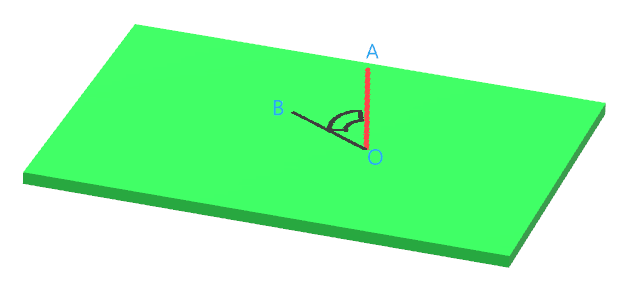
其中,绿色为裁剪平面,O点为裁剪平面的位置点,OA是裁剪平面的法向量,B点为模型的某个顶点,通过判断向量OA与OB点乘的结果就可以判断模型顶点是否需要剔除。下面分析一下Cesium中代码的实现。Cesium通过在绘制Model的片源着色器代码中追加一段代码实现平面裁剪,追加后的代码如下:
 1 precision highp float;
 2 varying vec3 v_normal;
 3 varying vec2 v_texcoord0;
 4 uniform sampler2D u_diffuse;
 5 uniform vec4 u_specular;
 6 uniform float u_shininess;
 7 void gltf_clip_main() {
 8 vec3 normal = normalize(v_normal);
 9 vec4 color = vec4(0., 0., 0., 0.);
10 vec4 diffuse = vec4(0., 0., 0., 1.);
11 vec4 specular;
12 diffuse = texture2D(u_diffuse, v_texcoord0);
13 specular = u_specular;
14 diffuse.xyz *= max(dot(normal,vec3(0.,0.,1.)), 0.);
15 color.xyz += diffuse.xyz;
16 color = vec4(color.rgb * diffuse.a, diffuse.a);
17 gl_FragColor = color;
18 }
19 vec4 getClippingPlane(sampler2D packedClippingPlanes, int clippingPlaneNumber, mat4 transform)
20 {
21     int pixY = clippingPlaneNumber / 1;
22     int pixX = clippingPlaneNumber - (pixY * 1);
23     float u = (float(pixX) + 0.5) * 1.0;
24     float v = (float(pixY) + 0.5) * 0.5;
25     vec4 plane = texture2D(packedClippingPlanes, vec2(u, v));
26     return czm_transformPlane(plane, transform);
27 }
28
29 float clip(vec4 fragCoord, sampler2D clippingPlanes, mat4 clippingPlanesMatrix)
30 {
31     bool clipped = true;
32     vec4 position = czm_windowToEyeCoordinates(fragCoord);
33     vec3 clipNormal = vec3(0.0);
34     vec3 clipPosition = vec3(0.0);
35     float clipAmount = 0.0;
36     float pixelWidth = czm_metersPerPixel(position);
37     for (int i = 0; i < 1; ++i)
38     {
39         vec4 clippingPlane = getClippingPlane(clippingPlanes, i, clippingPlanesMatrix);
40         clipNormal = clippingPlane.xyz;
41         clipPosition = -clippingPlane.w * clipNormal;
42         float amount = dot(clipNormal, (position.xyz - clipPosition)) / pixelWidth;
43         clipAmount = max(amount, clipAmount);
44         clipped = clipped && (amount <= 0.0);
45     }
46     if (clipped)
47     {
48         discard;
49     }
50     return clipAmount;
51 }
52
53 uniform sampler2D gltf_clippingPlanes;
54 uniform mat4 gltf_clippingPlanesMatrix;
55 uniform vec4 gltf_clippingPlanesEdgeStyle;
56 void main()
57 {
58     gltf_clip_main();
59     float clipDistance = clip(gl_FragCoord, gltf_clippingPlanes, gltf_clippingPlanesMatrix);
60     vec4 clippingPlanesEdgeColor = vec4(1.0);
61     clippingPlanesEdgeColor.rgb = gltf_clippingPlanesEdgeStyle.rgb;
62     float clippingPlanesEdgeWidth = gltf_clippingPlanesEdgeStyle.a;
63     if (clipDistance > 0.0 && clipDistance < clippingPlanesEdgeWidth)
64     {
65         gl_FragColor = clippingPlanesEdgeColor;
66     }
67 }
其中,gltf_clip_main函数中的内容是没有追加平面裁剪之前片源着色器中的main函数中的代码,主要是负责绘制模型本身。我们看到和平面裁剪相关的uniform变量有gltf_clippingPlanes、gltf_clippingPlanesMatrix、gltf_clippingPlanesEdgeStyle三个,其中gltf_clippingPlanes是sampler2D类型,将所有的裁剪平面的position、normal放到一张图片中;gltf_clippingPlanesMatrix变量是将平面从世界坐标转换到视空间下的变换矩阵;gltf_clippingPlanesEdgeStyle存储了裁剪的样式信息,其中gltf_clippingPlanesEdgeStyle.rgb存储了裁剪衔接处模型的颜色,gltf_clippingPlanesEdgeStyle.a存储了裁剪边界处的像素宽度。
在调用gltf_clip_main函数后,通过clip函数实现裁剪,并在像素没有剔除的情况下返回该片源与裁剪平面的像素距离。clip函数是整个裁剪功能实现的关键所在,我们将精力重点放在clip这个函数上。通过czm_windowToEyeCoordinates这个Cesium自带函数计算当前片源在视空间下的三维坐标position,然后通过czm_metersPerPixel这个函数计算视空间下position这个位置每个像素代表的空间长度。接下来就是通过一个for循环计算每个裁剪平面对该像素的影响。我们来分析一下for循环中的内部代码。首先通过getClippingPlane这个函数计算出在视空间下的平面坐标,clipNormal表示平面的法线,clipPosition代表平面的位置,然后position.xyz - clipPosition计算出了模型顶点和平面位置之间的向量,此处暂记为向量m,dot(clipNormal, (position.xyz - clipPosition))得到该向量和平面法线的点乘结果,由于clipNormal为单位向量,所以dot(clipNormal, (position.xyz - clipPosition))的结果就是向量m在法线方向上的投影长度,用这个长度除以pixelWidth转换为像素,记为amount。clipAmount取每次平面计算结果的最大值,对于单个的平面裁剪当amount < 0时,将该片源剔除,对于多个平面,通过clipped && (amount <= 0.0)进行判断,最后在没剔除的情况下返回clipAmount,这就是clip函数的所有内容。
通过clip函数计算出了clipDistance(模型顶点和平面的像素距离),最后就是设置裁剪处的颜色gl_FragColor = clippingPlanesEdgeColor。好了,这就是模型平面裁剪的所有内容了。
四 总结
模型的平面裁剪都是在片源着色器中完成的,空间位置的计算都是在视空间下进行。视空间在一些GPU效果实现中发挥着很大作用,很多计算都是在视空间下进行的。第一篇博客,语言组织,页面布局都没有经验,不足之处请大家谅解,哈哈。睡觉,睡觉,睡觉!!!
PS:Cesium交流可以扫码加群,期待你的加入!!!