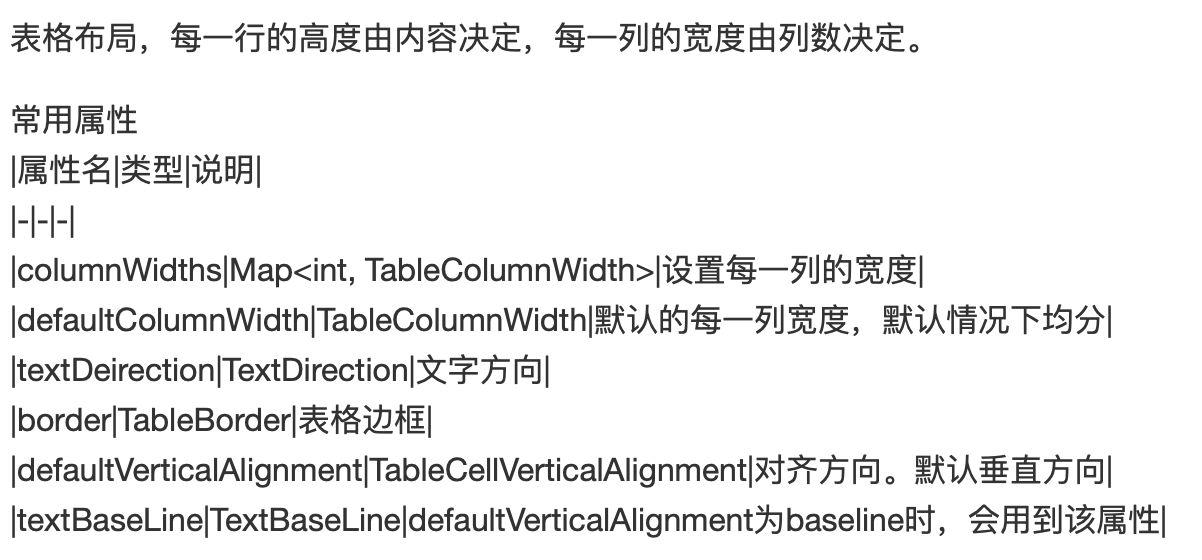
表格:
在上一次https://www.cnblogs.com/webor2006/p/12578218.html学习了Flutter布局,这里再来学习一个表格布局,这个在早期HTML的布局中是经常被用的,先来了解一下它:
下面来使用一下:

其中Table看一下它的命名构造的定义:

所以咱们来定义一下:
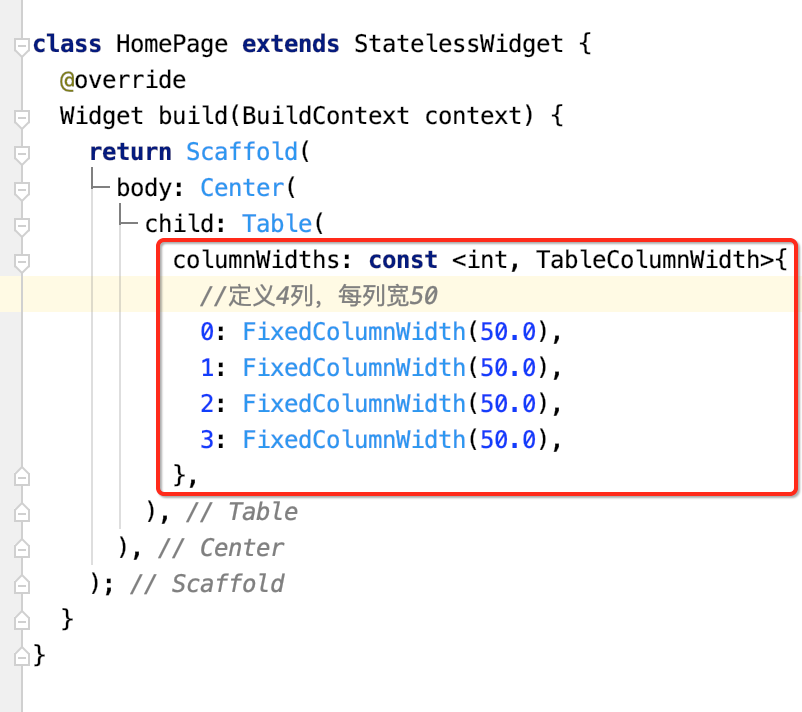

class HomePage extends StatelessWidget {
  @override
  Widget build(BuildContext context) {
    return Scaffold(
      body: Center(
        child: Table(
          columnWidths: const <int, TableColumnWidth>{
            //定义4列,每列宽50
            0: FixedColumnWidth(50.0),
            1: FixedColumnWidth(50.0),
            2: FixedColumnWidth(50.0),
            3: FixedColumnWidth(50.0),
          },
          border: TableBorder.all(
            //定义表格边框是红色,宽度为5
            color: Colors.red,
             2.0,
          ),
          children: const <TableRow>[
            //定义每行的具体内容
            TableRow(//第一行,定义表头
                children: [
              Text("头像"),
              Text("姓名"),
              Text("年龄"),
              Text("身高"),
            ]),
            TableRow(//第二行
                children: [
              Icon(Icons.account_circle),
              Text("张三"),
              Text("21"),
              Text("160"),
            ]),
            TableRow(//第三行
                children: [
              Icon(Icons.account_circle),
              Text("李四"),
              Text("24"),
              Text("170"),
            ]),
            TableRow(//第四行
                children: [
              Icon(Icons.account_circle),
              Text("王五"),
              Text("40"),
              Text("178"),
            ]),
          ],
        ),
      ),
    );
  }
}
运行:

这里简单的使用一下既可,具体在实际项目中进行操练。
手势:
概述:
Flutter中的手势分为两层:
第一层是触摸原始指针(Pointer)事件,描述了屏幕上指针(如触摸、鼠标和触控笔)的位置和移动。
指针(Pointer)代表用户与屏幕交互的原始数据,有四种事件类型:
- PointerDownEvent: 指针接触到屏幕
- PointerMoveEvent: 指针从屏幕上的一个位置移动到另一个位置
- PointerUpEvent: 指针停止接触屏幕
- PointerCancelEvent: 指针的输入事件不再针对此应用(事件取消)
第二层就是我们可以检测到的手势,主要分为三大类:轻击、拖动和缩放。
GestureDetector:
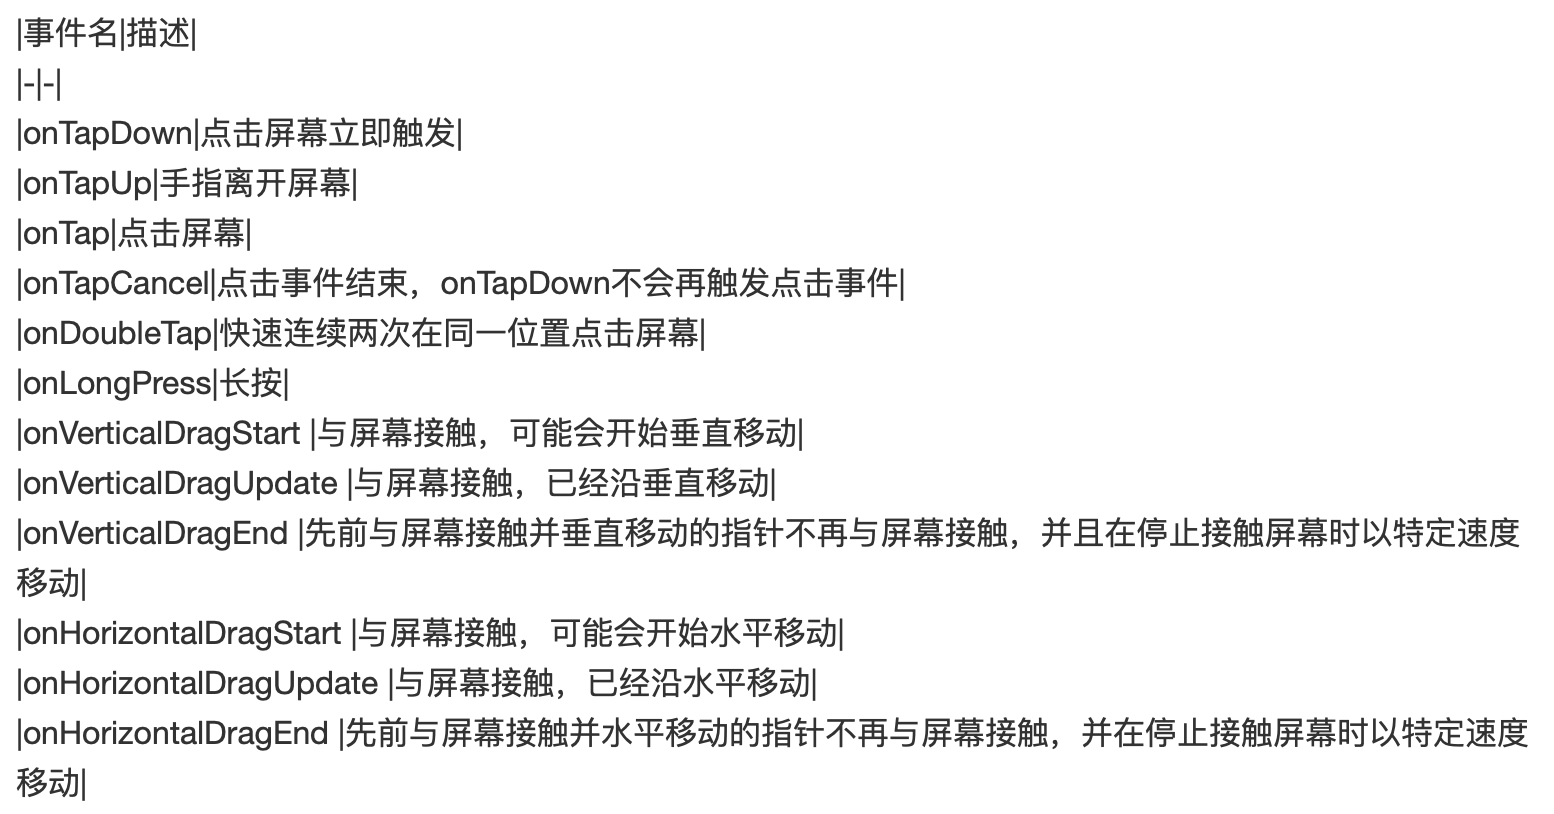
GestureDetector可以进行手势检测,如单击,双击,长按,垂直、水平拖动等。它的事件描述如下:
下面来使用一下:
import 'package:flutter/material.dart';

void main() => runApp(MyApp());

class MyApp extends StatelessWidget {
  @override
  Widget build(BuildContext context) {
    return MaterialApp(
      home: HomePage(),
    );
  }
}

class HomePage extends StatelessWidget {
  @override
  Widget build(BuildContext context) {
    return Scaffold(
      body: Center(
        child: MyButton(),
      ),
    );
  }
}

class MyButton extends StatelessWidget {
  @override
  Widget build(BuildContext context) {
    return GestureDetector(

    );
  }
}
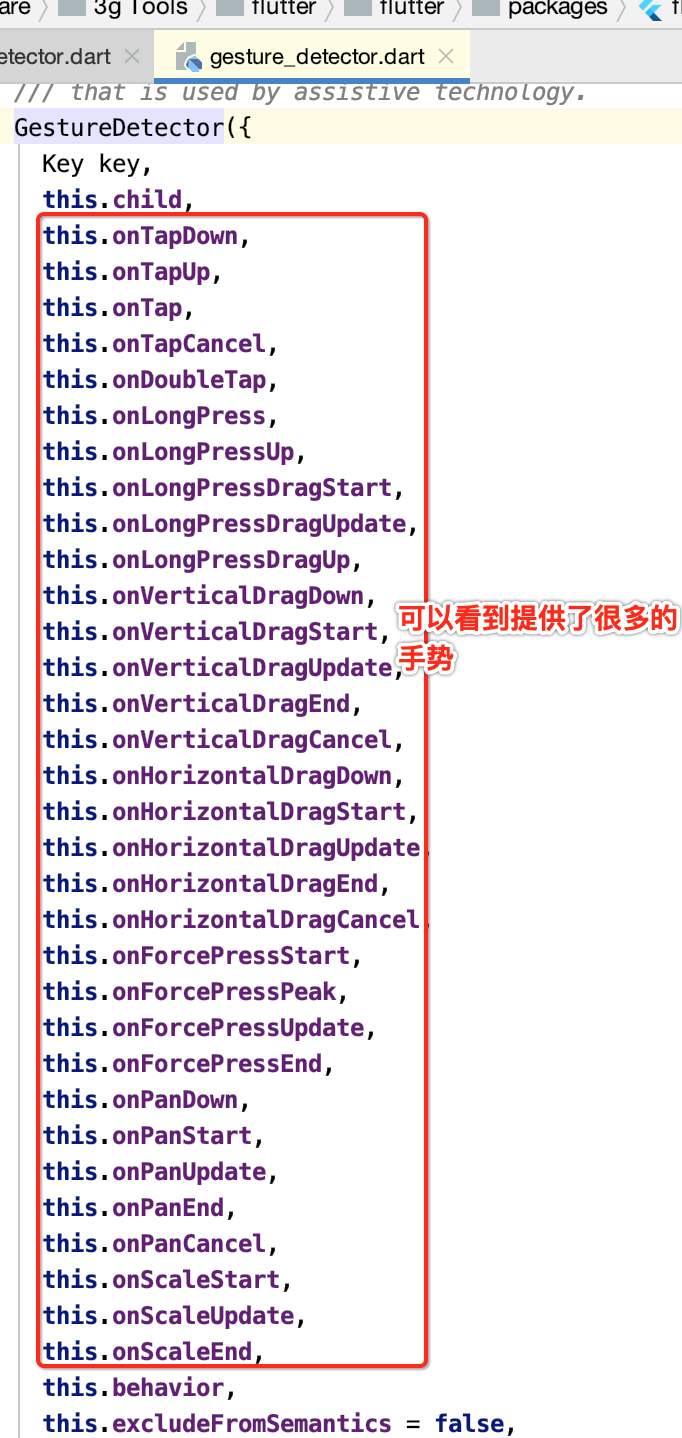
其中简单看一下GestureDetector的命名构造:
咱们定义一个child:


接下来则给咱们的这个Container添加一个事件:

运行:
还有更多的事件就待实际项目中再来熟悉。
Dissmissible:
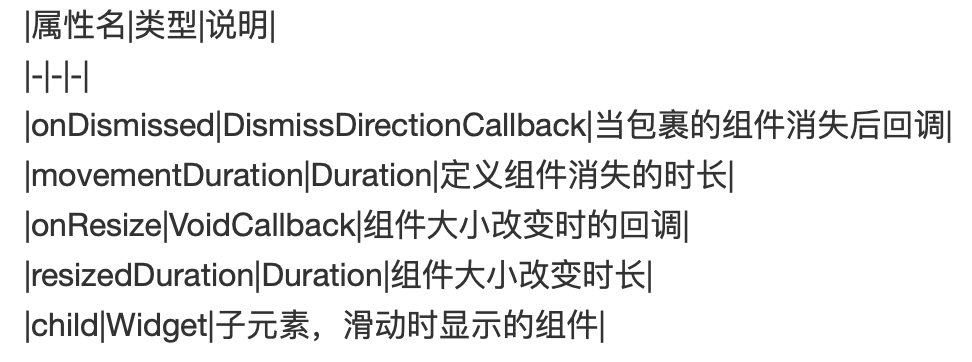
像典型列表中的左测删除效果就可以用它来实现,先看一下它的属性:
下面具体来看一下,先来显示一个列表:
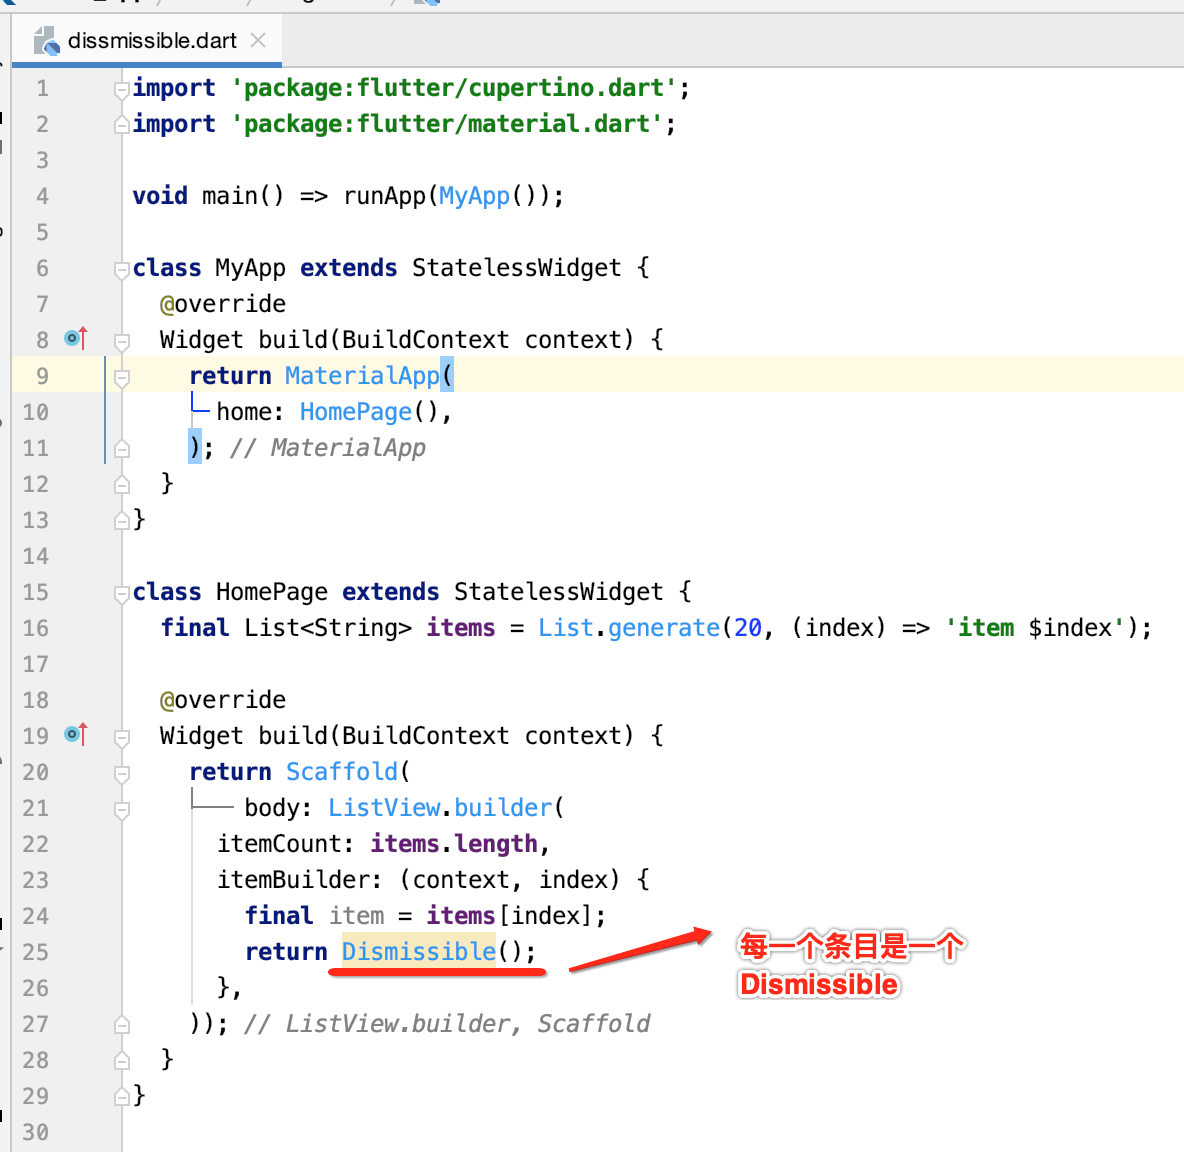
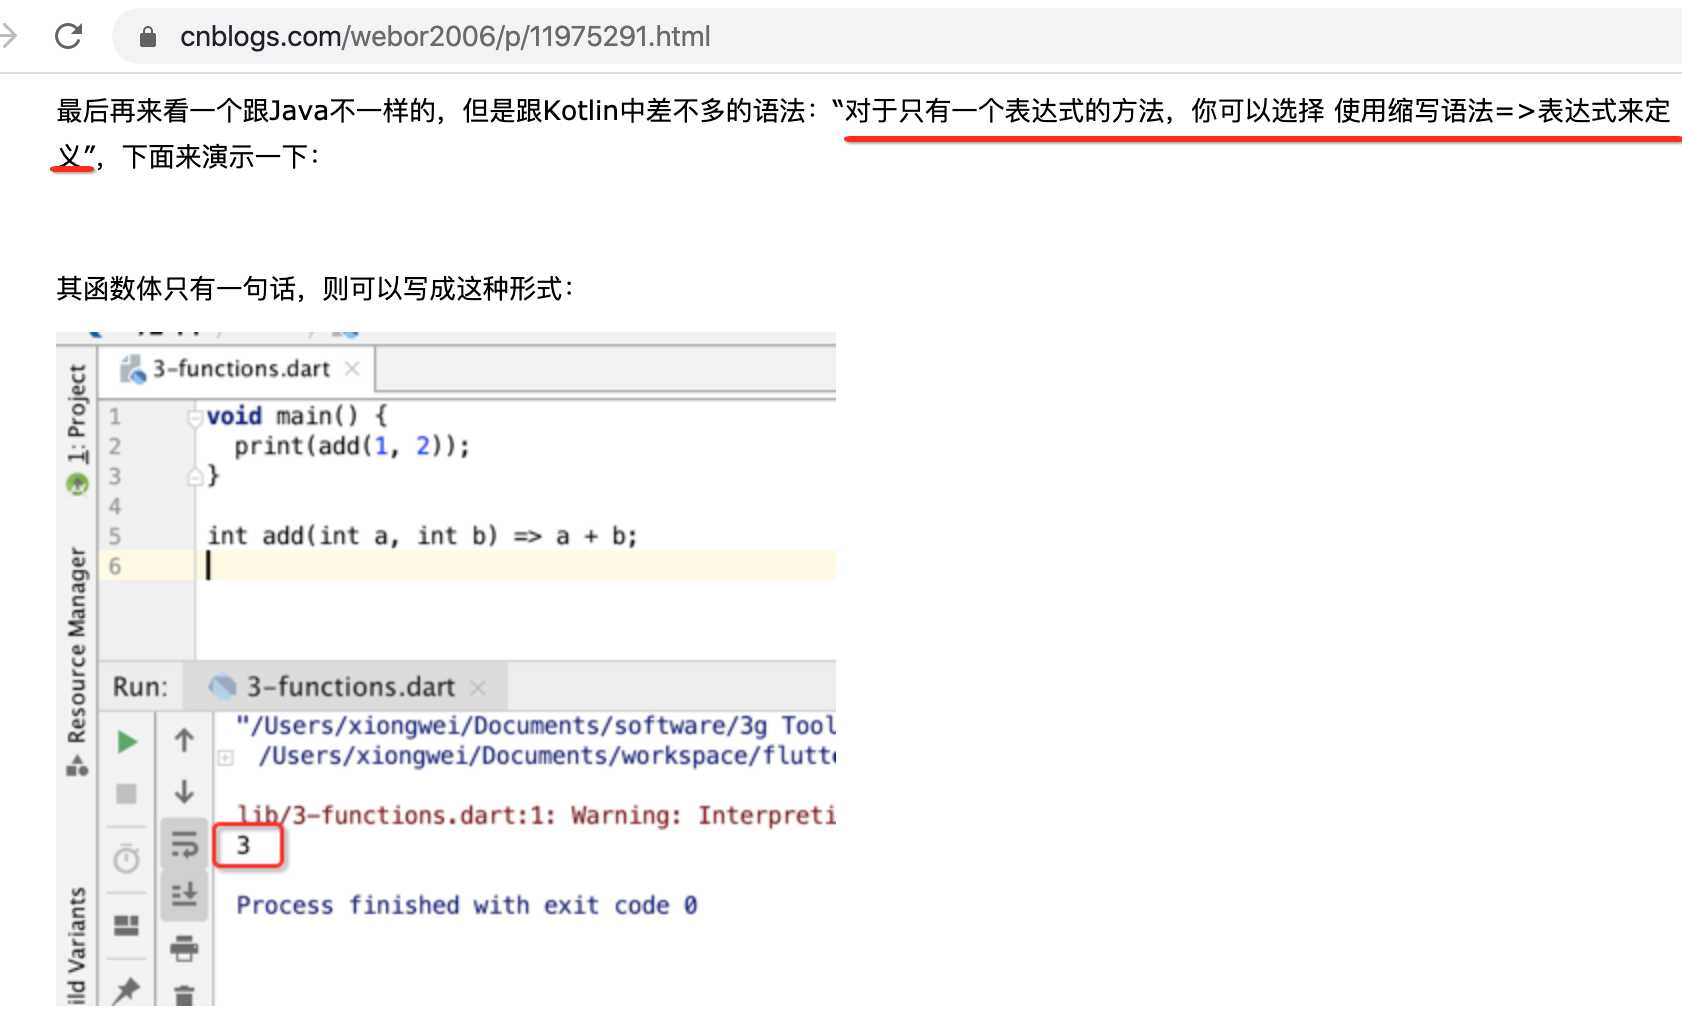
其中代码上有一个语法再回忆一下:

对应语法如:
接下来则需要构建Dissmissible这个View了,先看一下它的命名构造:
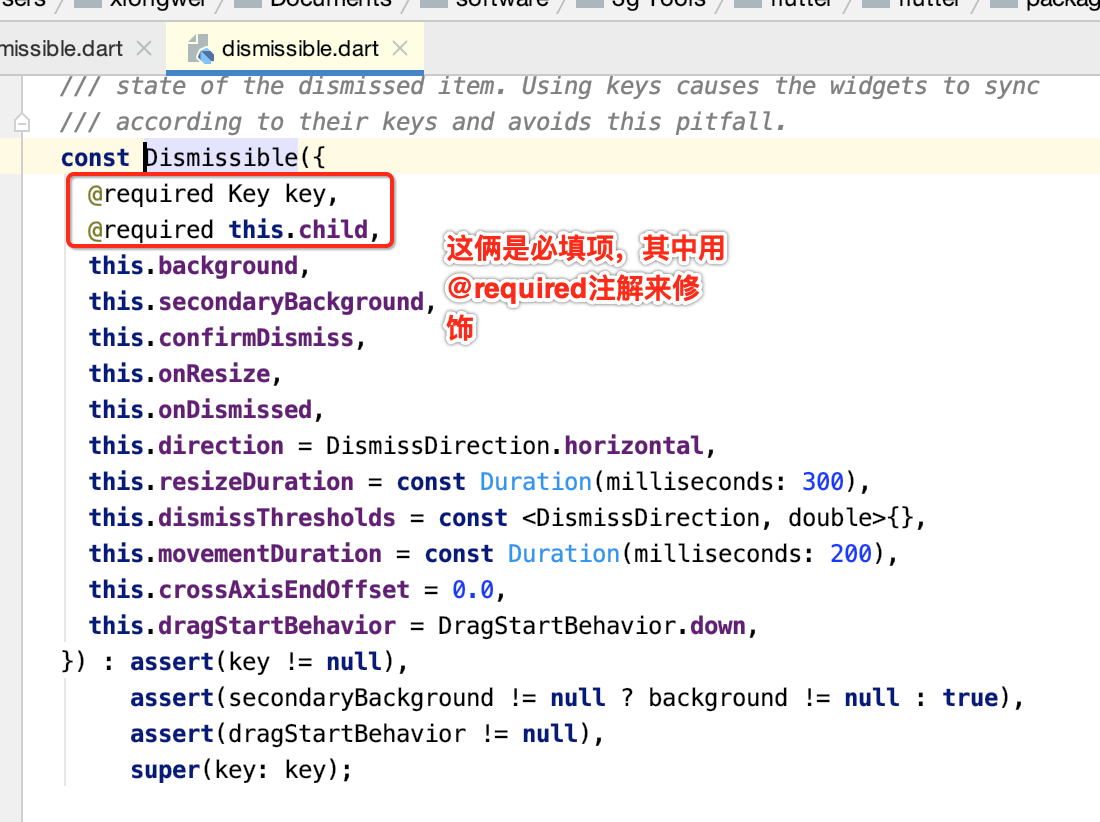
那咱们来定义一下,先来定义这个Key,先看一下它的定义:

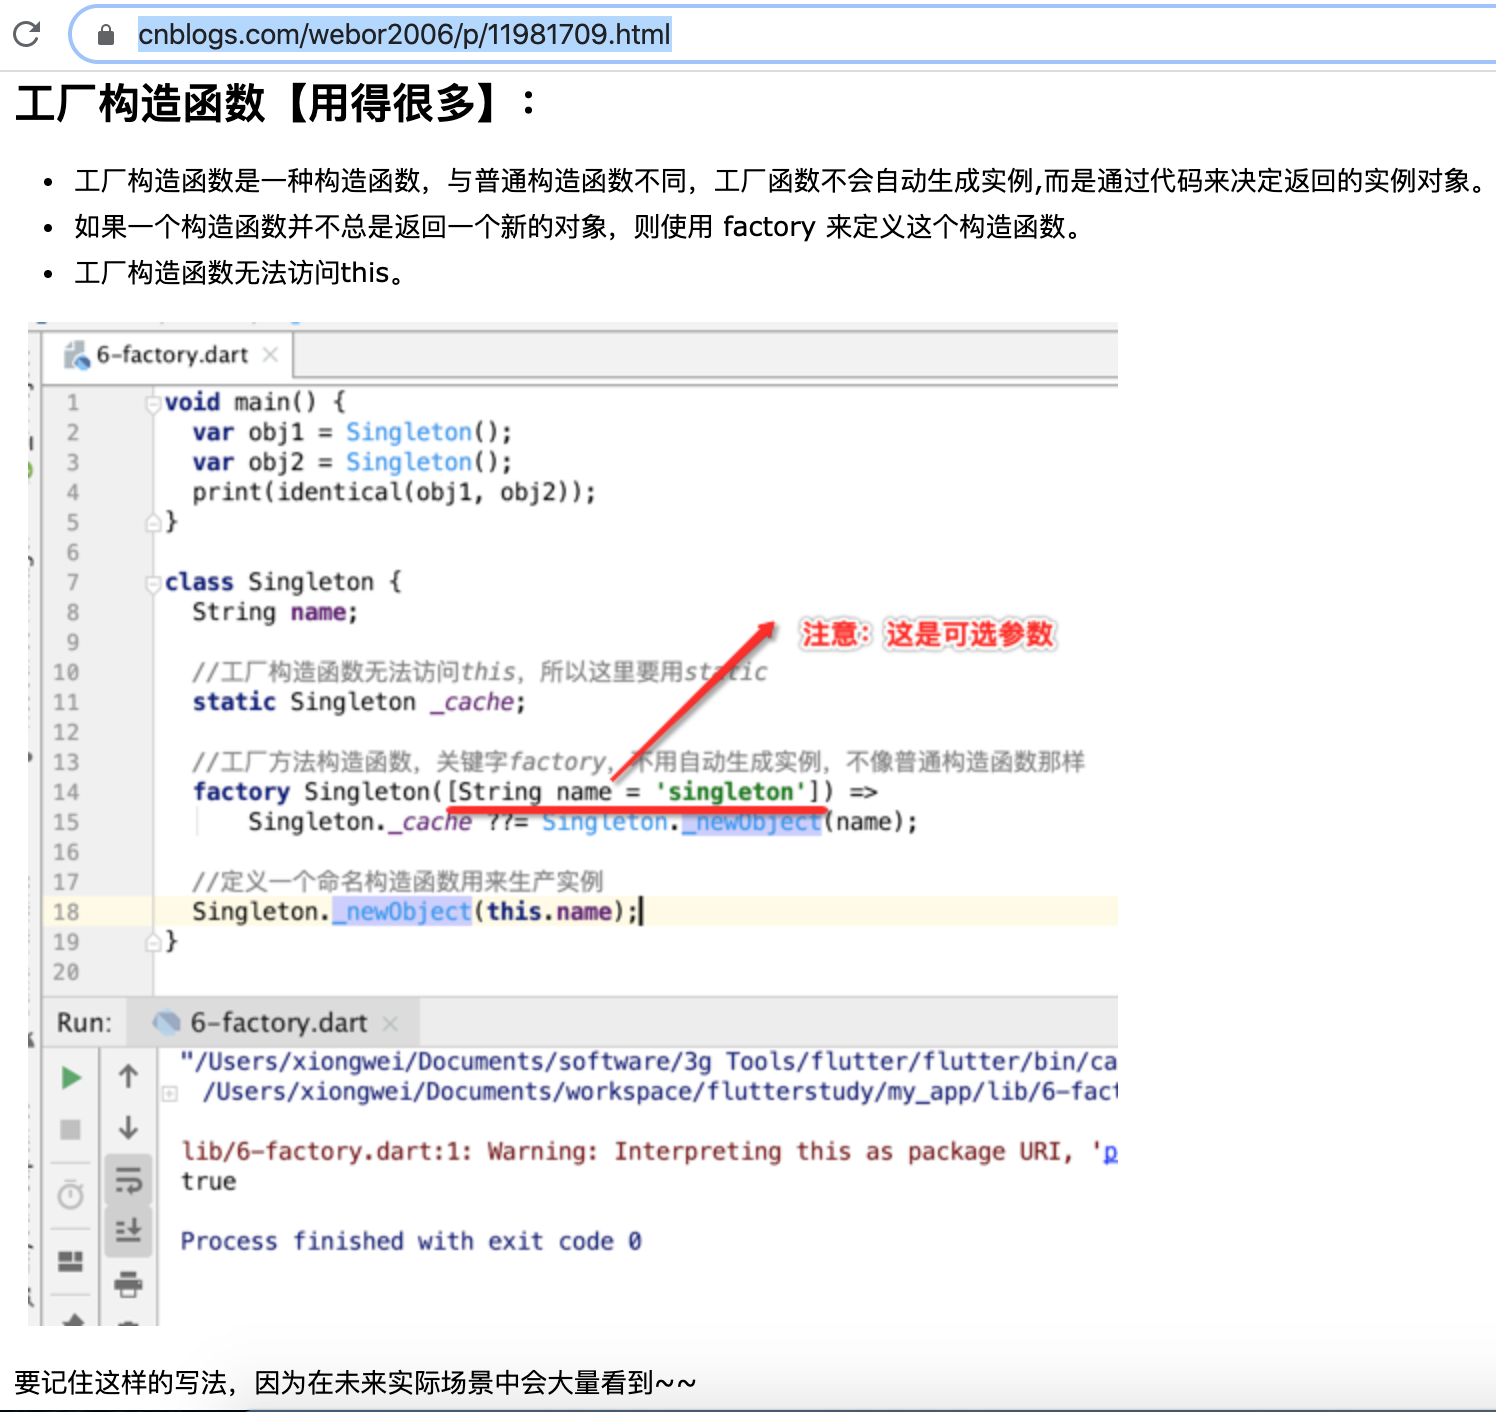
那还记得这个factory工厂构建的语法么?可以参考:https://www.cnblogs.com/webor2006/p/11981709.html,回忆一下:
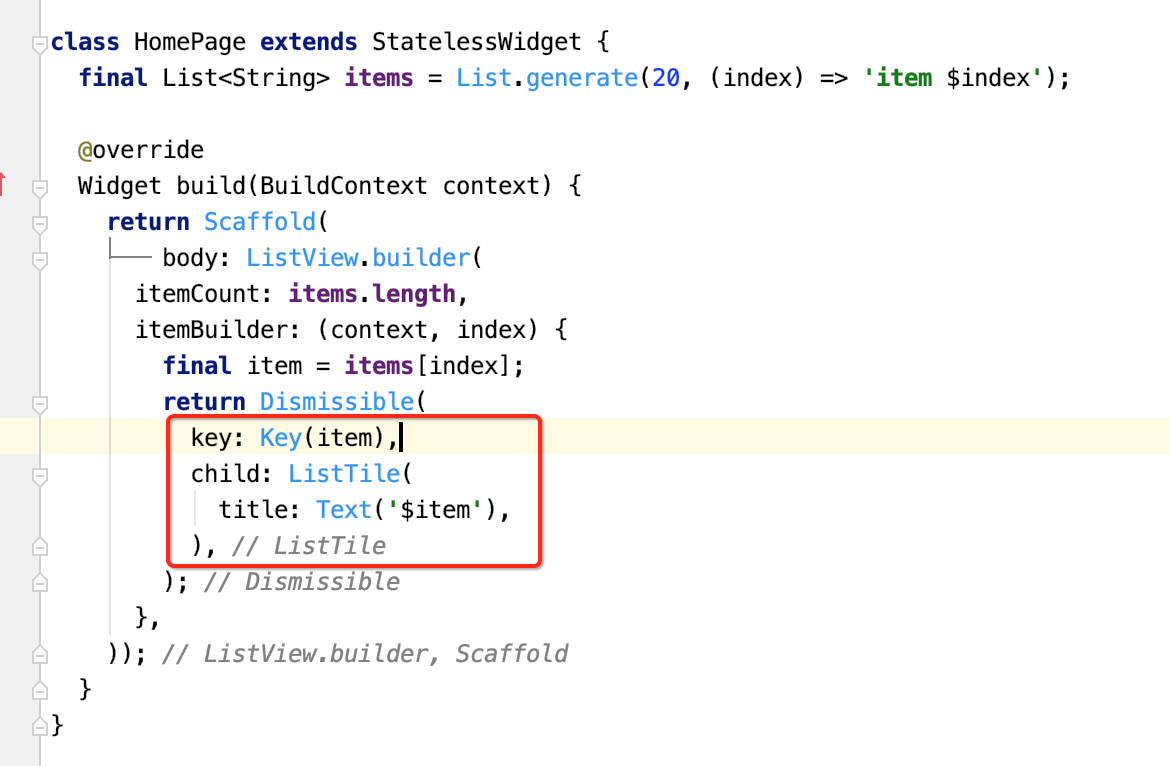
那咱们来定义一下:
运行看一下效果:

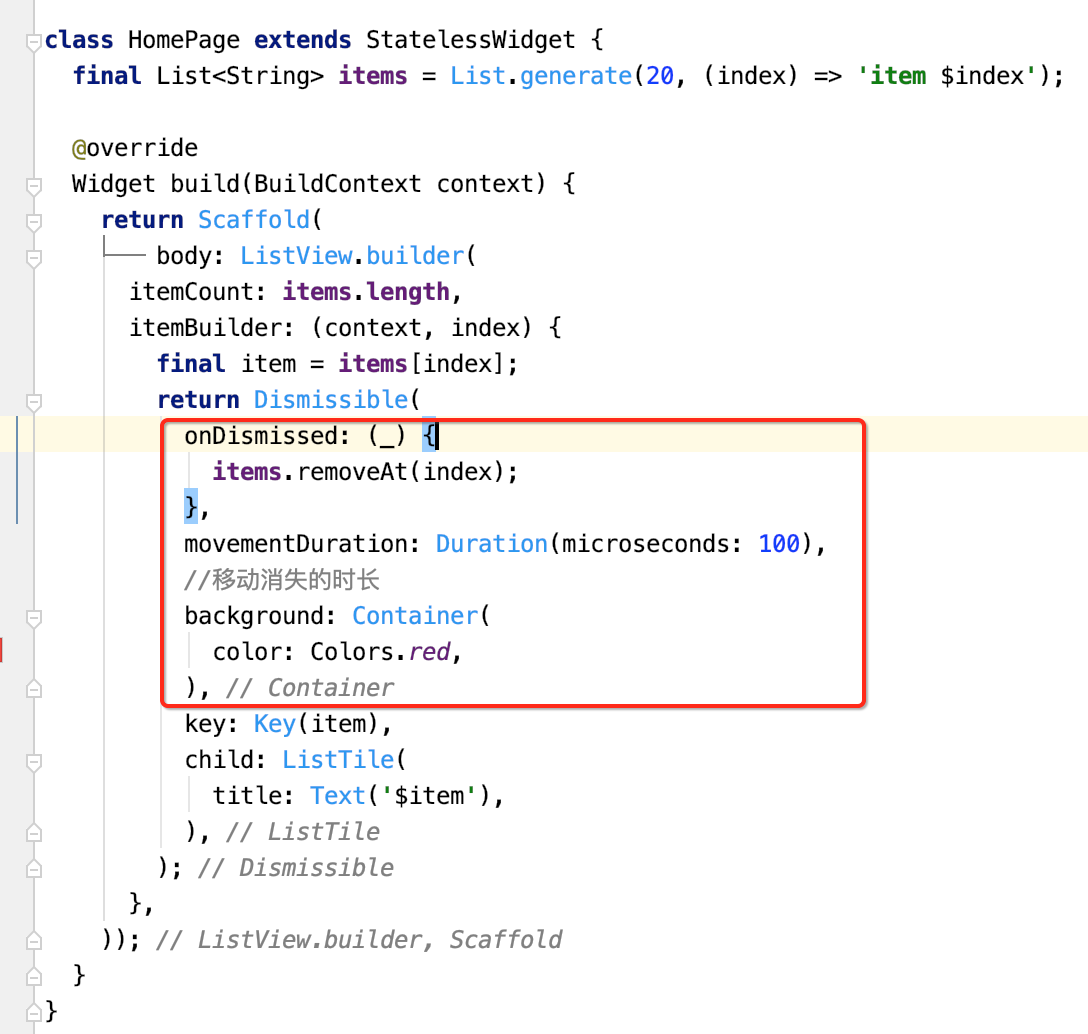
可以看到滑动就删除了,但是呢其列表的数据是没有删除的,所以这里可以做一个监听,另外增加一下背景效果看得明显一点:
其实这个列表的左滑删除跟平常我们通常所的那个效果还是有区别的,要实现那种效果就需要自定义了,这种效果在之后再来学习。
动画:
概述:
Flutter中的动画分为补间(Tween)动画和基于物理(Physics-based)的动画。
- 在补间动画中,定义了开始点和结束点、时间线以及定义转换时间和速度的曲线,然后由框架自动计算如何从开始点过渡到结束点。
- 在基于物理的动画(遵循物理学定律)中,运动被模拟为与真实世界的行为相似,可以模拟弹簧、阻尼、重力等物理效果。例如,当你掷球时,它在何处落地,取决于抛球速度有多快、球有多重、距离地面有多远。类似地,将连接在弹簧上的球落下(并弹起)与连接到绳子上的球放下的方式也是不同。
Animation:
Animation类是Flutter动画中核心的抽象类,它包含动画的当前值和状态两个属性。定义了动画的一系列监听回调,如:
- 值监听:addListener、removeListener
- 状态监听:addStatusListener、removeStatusListener
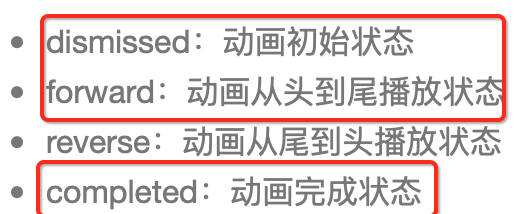
另外它有四种状态:
- dismissed:动画初始状态
- forward:动画从头到尾播放状态
- reverse:动画从尾到头播放状态
- completed:动画完成状态
其中Animation是一个抽象类:

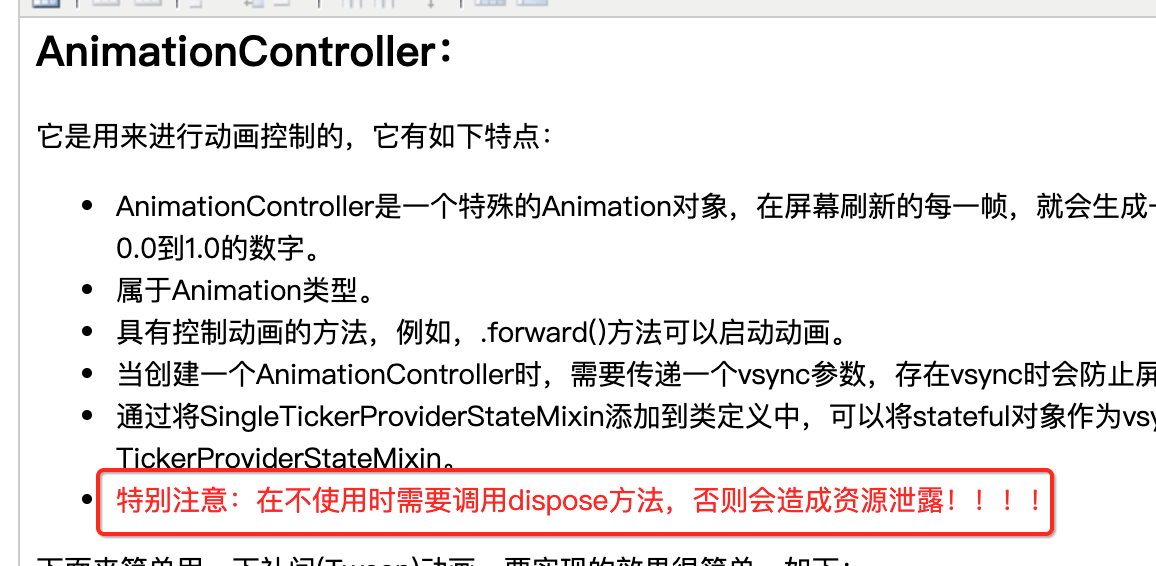
AnimationController:
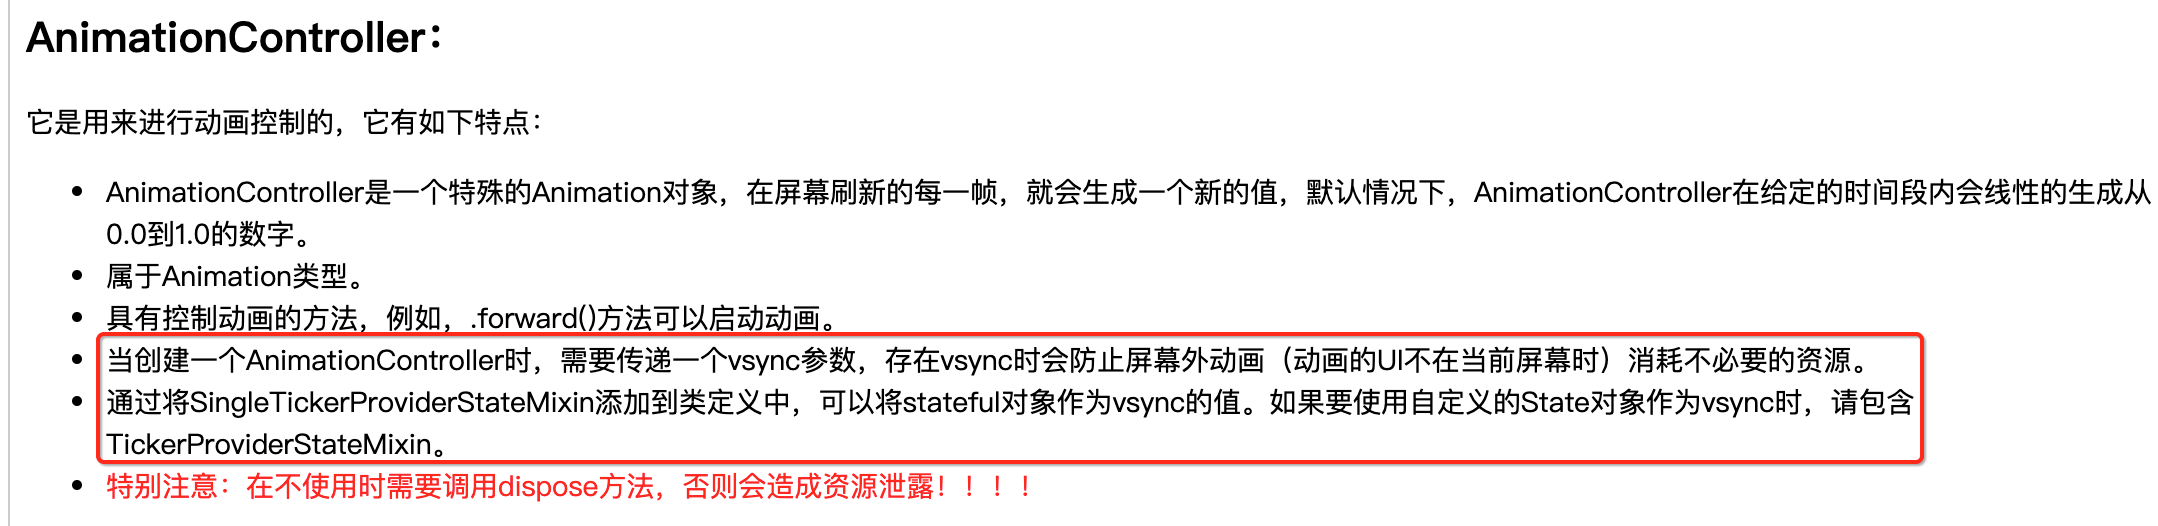
它是用来进行动画控制的,它有如下特点:
- AnimationController是一个特殊的Animation对象,在屏幕刷新的每一帧,就会生成一个新的值,默认情况下,AnimationController在给定的时间段内会线性的生成从0.0到1.0的数字。
- 属于Animation类型。
- 具有控制动画的方法,例如,.forward()方法可以启动动画。
- 当创建一个AnimationController时,需要传递一个vsync参数,存在vsync时会防止屏幕外动画(动画的UI不在当前屏幕时)消耗不必要的资源。
- 通过将SingleTickerProviderStateMixin添加到类定义中,可以将stateful对象作为vsync的值。如果要使用自定义的State对象作为vsync时,请包含TickerProviderStateMixin。
- 特别注意:在不使用时需要调用dispose方法,否则会造成资源泄露!!!!
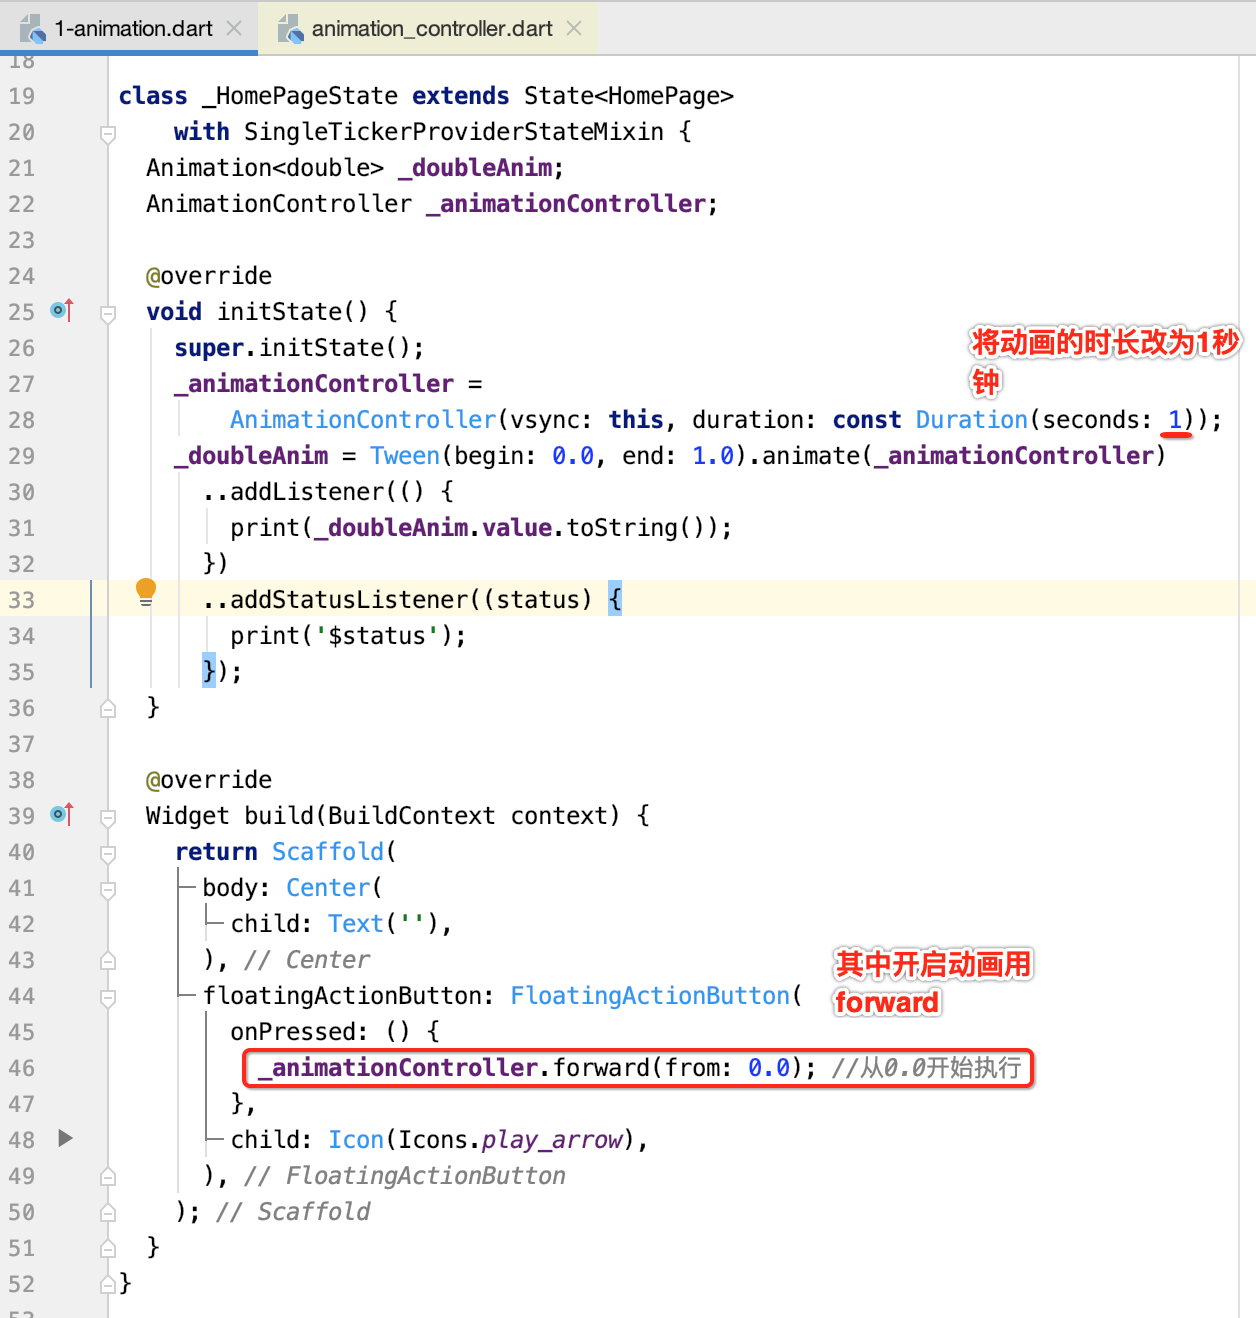
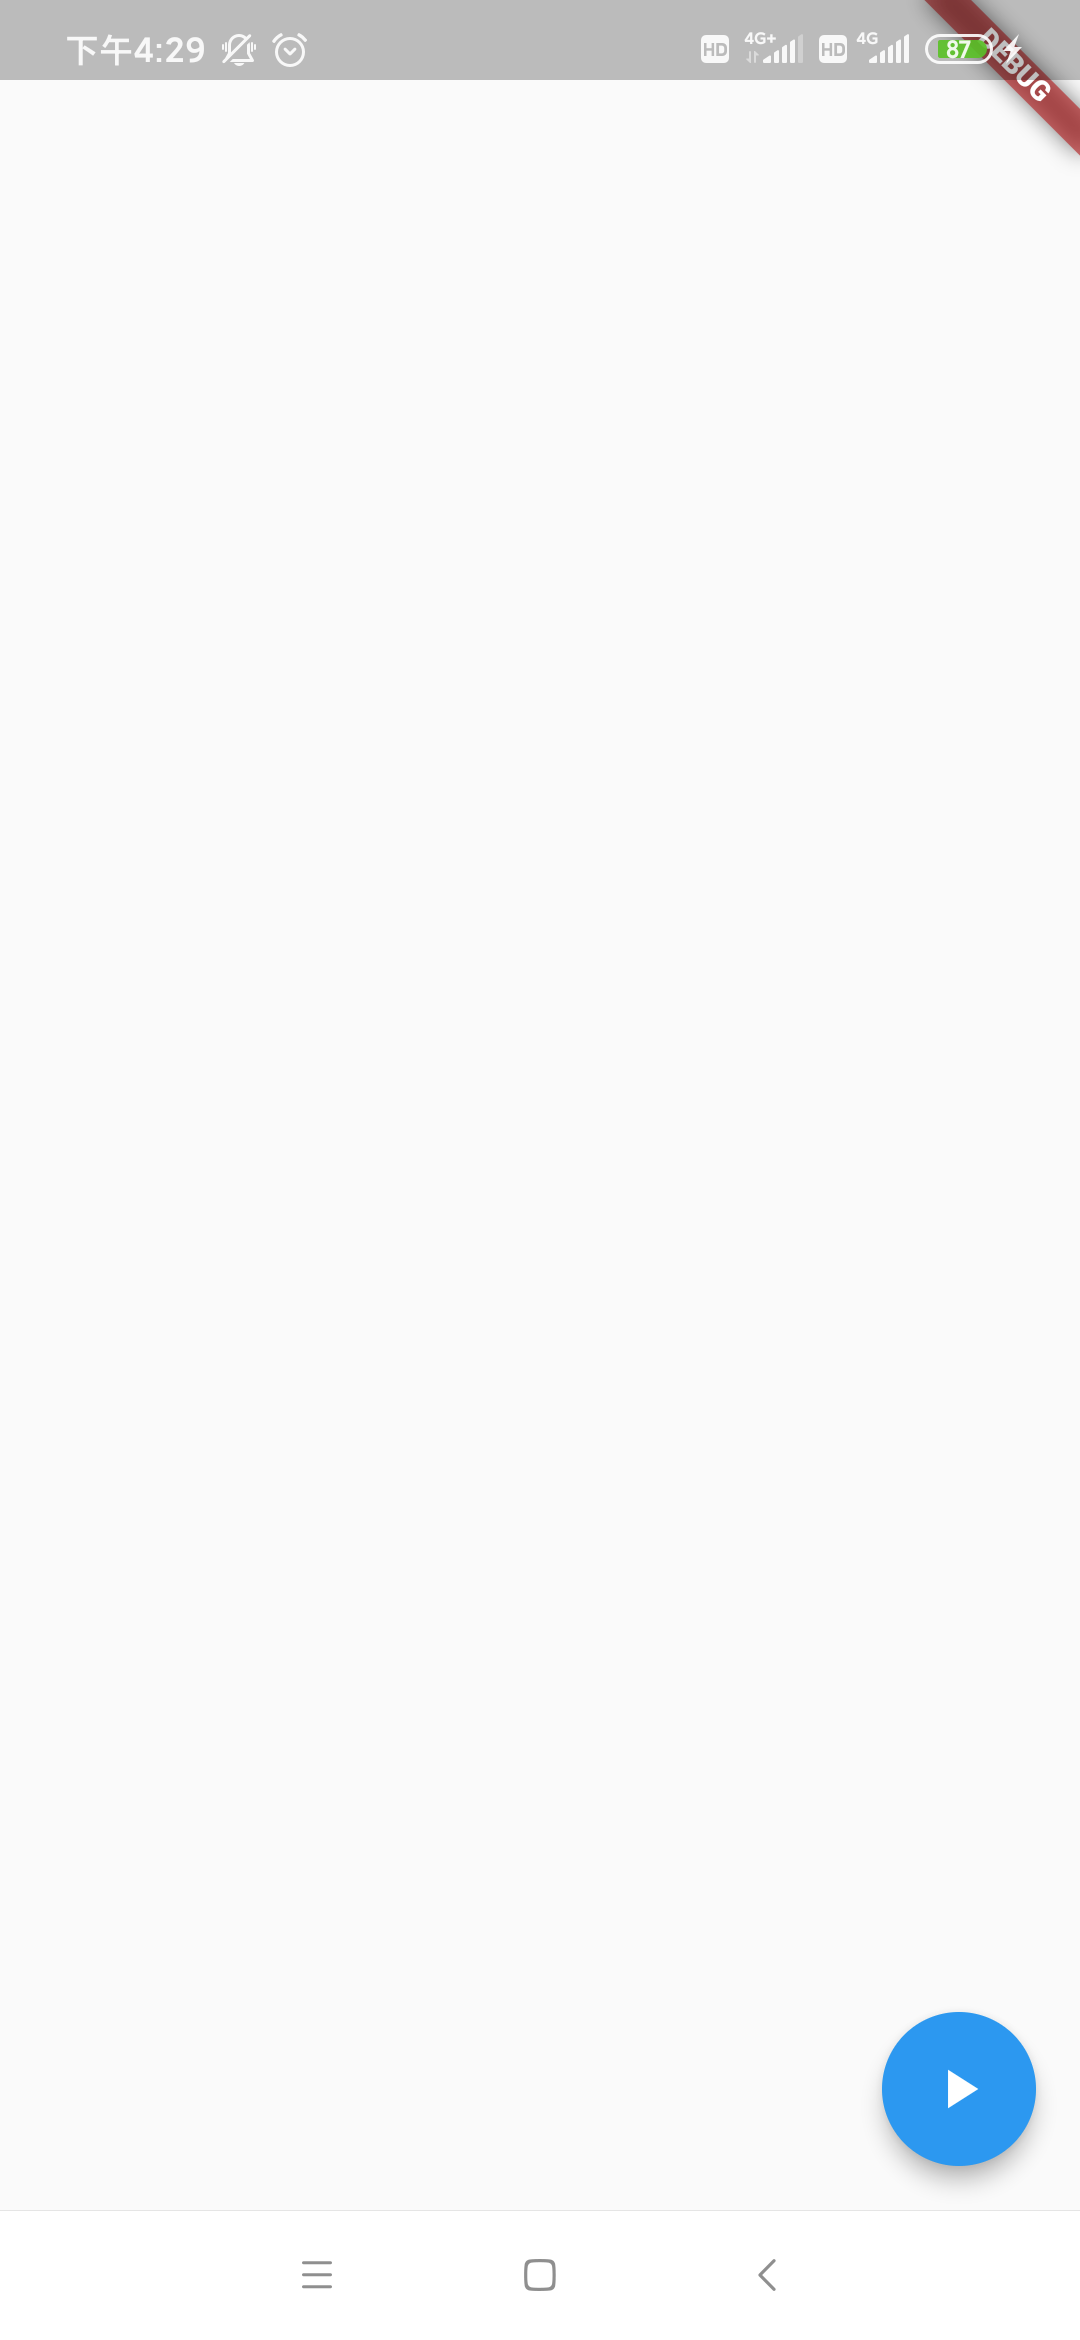
下面来简单用一下补间(Tween)动画,要实现的效果很简单,如下:

也就是从0~1之间在指定时间进行增加,先来搭个骨架:
import 'package:flutter/material.dart';

void main() => runApp(MyApp());

class MyApp extends StatelessWidget {
  @override
  Widget build(BuildContext context) {
    return MaterialApp(
      home: HomePage(),
    );
  }
}

class HomePage extends StatefulWidget {
  @override
  _HomePageState createState() => _HomePageState();
}

class _HomePageState extends State<HomePage> {
  Animation<double> _doubleAnim;

  @override
  Widget build(BuildContext context) {
    return Scaffold(
      body: Center(
        child: Text(''),
      ),
      floatingActionButton: FloatingActionButton(
        onPressed: () {
          //TODO
        },
      ),
    );
  }
}
其中要控制动画就需要用到AnimationController了:

接下来就需要对它进行初始化了,而在使用化AnimationController时,如之前的理论:
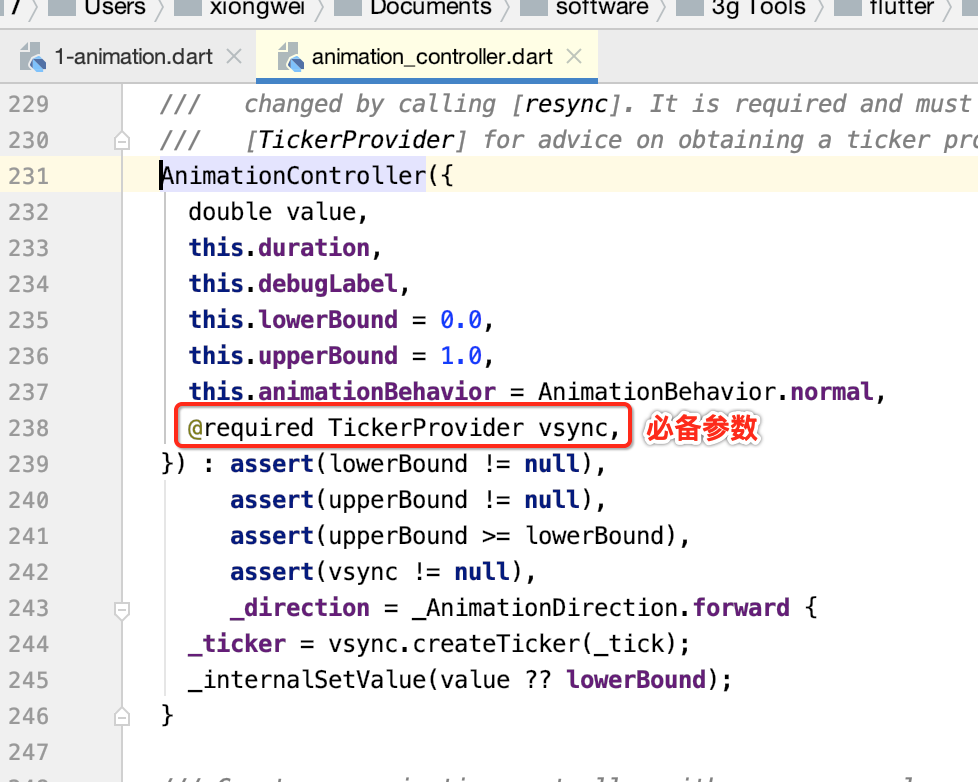
具体传参为:

其中with这是啥语法呢?可以参考:https://www.cnblogs.com/webor2006/p/11981709.html,回忆一下:
而对于vsync这个参数,这里直接传当前的Stateful对象,其理论规则是:

接下来再来初始化Animation,由于它是抽象的,需要用到子类,这里会用到Tween,先来对它有个了解:
Tween:
线性估值器。Flutter还封装定义了不同类型的估值器:
- ReverseTween
- ColorTween
- SizeTween
- RectTween
- IntTween
- StepTween
- ConstantTween
下面则来初始化一下Animation:

然后此时咱们还可以给动画做个监听:
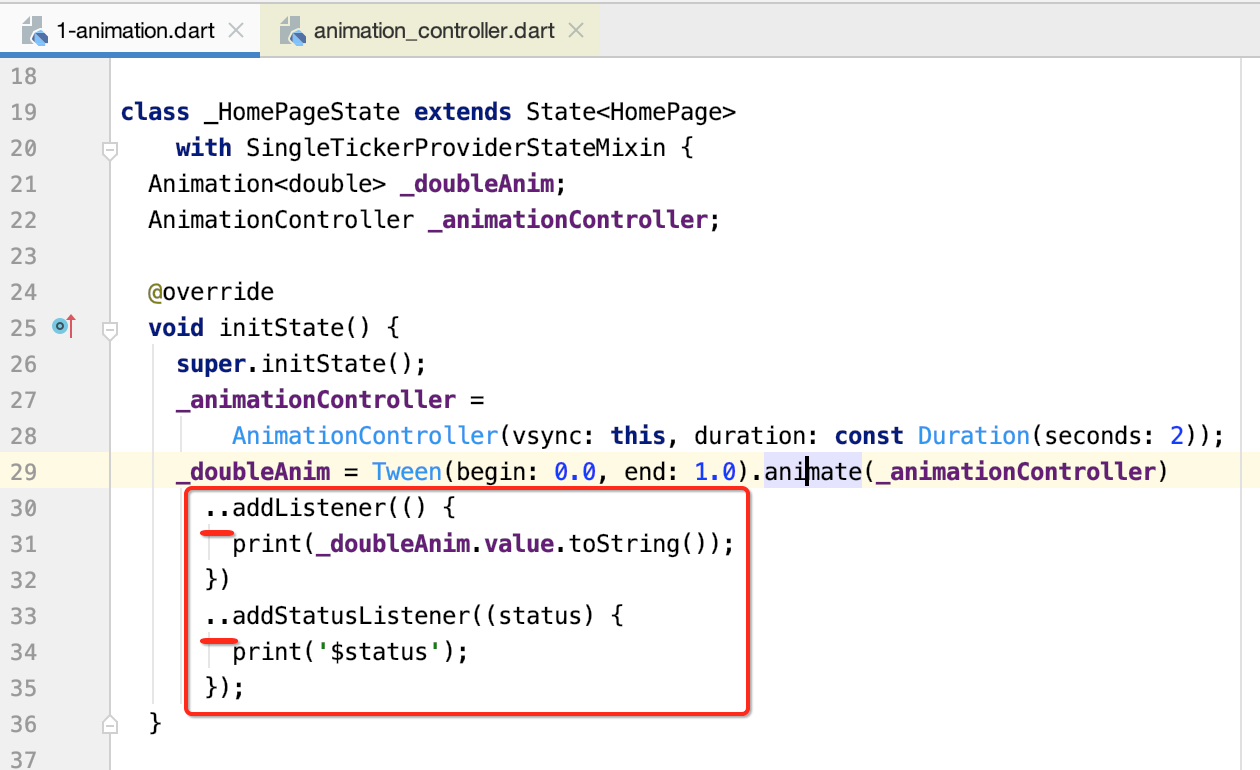
这里又用到了一个知识点,标了下划线的,回忆一下:

好,接下来动画的启动则放在按钮事件里,如下:
那下面运行看一下日志输出:
2020-04-21 16:30:06.056 7116-7195/com.example.flutter_app I/flutter: 0.0
2020-04-21 16:30:06.057 7116-7195/com.example.flutter_app I/flutter: AnimationStatus.dismissed
2020-04-21 16:30:06.057 7116-7195/com.example.flutter_app I/flutter: AnimationStatus.forward
2020-04-21 16:30:06.060 7116-7195/com.example.flutter_app I/flutter: 0.0
2020-04-21 16:30:06.085 7116-7195/com.example.flutter_app I/flutter: 0.03334
2020-04-21 16:30:06.102 7116-7195/com.example.flutter_app I/flutter: 0.050009
2020-04-21 16:30:06.117 7116-7195/com.example.flutter_app I/flutter: 0.066682
2020-04-21 16:30:06.135 7116-7195/com.example.flutter_app I/flutter: 0.083354
2020-04-21 16:30:06.151 7116-7195/com.example.flutter_app I/flutter: 0.100027
2020-04-21 16:30:06.167 7116-7195/com.example.flutter_app I/flutter: 0.1167
2020-04-21 16:30:06.184 7116-7195/com.example.flutter_app I/flutter: 0.133373
2020-04-21 16:30:06.200 7116-7195/com.example.flutter_app I/flutter: 0.150046
2020-04-21 16:30:06.217 7116-7195/com.example.flutter_app I/flutter: 0.166718
2020-04-21 16:30:06.234 7116-7195/com.example.flutter_app I/flutter: 0.183391
2020-04-21 16:30:06.252 7116-7195/com.example.flutter_app I/flutter: 0.200063
2020-04-21 16:30:06.268 7116-7195/com.example.flutter_app I/flutter: 0.216734
2020-04-21 16:30:06.284 7116-7195/com.example.flutter_app I/flutter: 0.233406
2020-04-21 16:30:06.301 7116-7195/com.example.flutter_app I/flutter: 0.250079
2020-04-21 16:30:06.318 7116-7195/com.example.flutter_app I/flutter: 0.266751
2020-04-21 16:30:06.335 7116-7195/com.example.flutter_app I/flutter: 0.283423
2020-04-21 16:30:06.352 7116-7195/com.example.flutter_app I/flutter: 0.300096
2020-04-21 16:30:06.368 7116-7195/com.example.flutter_app I/flutter: 0.316769
2020-04-21 16:30:06.385 7116-7195/com.example.flutter_app I/flutter: 0.333441
2020-04-21 16:30:06.401 7116-7195/com.example.flutter_app I/flutter: 0.350113
2020-04-21 16:30:06.418 7116-7195/com.example.flutter_app I/flutter: 0.366785
2020-04-21 16:30:06.436 7116-7195/com.example.flutter_app I/flutter: 0.383458
2020-04-21 16:30:06.451 7116-7195/com.example.flutter_app I/flutter: 0.400129
2020-04-21 16:30:06.468 7116-7195/com.example.flutter_app I/flutter: 0.416798
2020-04-21 16:30:06.484 7116-7195/com.example.flutter_app I/flutter: 0.433468
2020-04-21 16:30:06.501 7116-7195/com.example.flutter_app I/flutter: 0.450138
2020-04-21 16:30:06.518 7116-7195/com.example.flutter_app I/flutter: 0.466808
2020-04-21 16:30:06.534 7116-7195/com.example.flutter_app I/flutter: 0.48348
2020-04-21 16:30:06.552 7116-7195/com.example.flutter_app I/flutter: 0.500149
2020-04-21 16:30:06.585 7116-7195/com.example.flutter_app I/flutter: 0.533494
2020-04-21 16:30:06.601 7116-7195/com.example.flutter_app I/flutter: 0.550165
2020-04-21 16:30:06.619 7116-7195/com.example.flutter_app I/flutter: 0.566836
2020-04-21 16:30:06.635 7116-7195/com.example.flutter_app I/flutter: 0.583508
2020-04-21 16:30:06.652 7116-7195/com.example.flutter_app I/flutter: 0.600177
2020-04-21 16:30:06.667 7116-7195/com.example.flutter_app I/flutter: 0.616846
2020-04-21 16:30:06.684 7116-7195/com.example.flutter_app I/flutter: 0.633516
2020-04-21 16:30:06.701 7116-7195/com.example.flutter_app I/flutter: 0.650186
2020-04-21 16:30:06.718 7116-7195/com.example.flutter_app I/flutter: 0.666856
2020-04-21 16:30:06.734 7116-7195/com.example.flutter_app I/flutter: 0.683528
2020-04-21 16:30:06.751 7116-7195/com.example.flutter_app I/flutter: 0.700201
2020-04-21 16:30:06.767 7116-7195/com.example.flutter_app I/flutter: 0.716874
2020-04-21 16:30:06.784 7116-7195/com.example.flutter_app I/flutter: 0.733546
2020-04-21 16:30:06.801 7116-7195/com.example.flutter_app I/flutter: 0.750219
2020-04-21 16:30:06.818 7116-7195/com.example.flutter_app I/flutter: 0.766891
2020-04-21 16:30:06.834 7116-7195/com.example.flutter_app I/flutter: 0.783564
2020-04-21 16:30:06.853 7116-7195/com.example.flutter_app I/flutter: 0.800236
2020-04-21 16:30:06.870 7116-7195/com.example.flutter_app I/flutter: 0.816908
2020-04-21 16:30:06.884 7116-7195/com.example.flutter_app I/flutter: 0.83358
2020-04-21 16:30:06.901 7116-7195/com.example.flutter_app I/flutter: 0.850252
2020-04-21 16:30:06.918 7116-7195/com.example.flutter_app I/flutter: 0.866924
2020-04-21 16:30:06.935 7116-7195/com.example.flutter_app I/flutter: 0.883597
2020-04-21 16:30:06.952 7116-7195/com.example.flutter_app I/flutter: 0.900269
2020-04-21 16:30:06.969 7116-7195/com.example.flutter_app I/flutter: 0.916941
2020-04-21 16:30:06.984 7116-7195/com.example.flutter_app I/flutter: 0.933614
2020-04-21 16:30:07.002 7116-7195/com.example.flutter_app I/flutter: 0.950286
2020-04-21 16:30:07.018 7116-7195/com.example.flutter_app I/flutter: 0.966958
2020-04-21 16:30:07.034 7116-7195/com.example.flutter_app I/flutter: 0.983631
2020-04-21 16:30:07.051 7116-7195/com.example.flutter_app I/flutter: 1.0
2020-04-21 16:30:07.052 7116-7195/com.example.flutter_app I/flutter: AnimationStatus.completed
其中可以看到动画值从0.0到1.0在1秒内的变化过程,另外还能看到动画经过了三个状态,如之前理论所说:
但是!!这个程序还是有个写法上的问题:
所以,咱们在State中生命回调中需要进行调用一下:

关于State生命周期可以参考:https://www.cnblogs.com/webor2006/p/11996535.html,这里复习一下:

接下来则让这个变化显示在文件上:

运行:
案例二:扩大View动画效果:
接下来还是利用Tween来对Widget进行宽高进行改变达成动画的效果,具体如下:
import 'package:flutter/material.dart';

void main() => runApp(MyApp());

class MyApp extends StatelessWidget {
  @override
  Widget build(BuildContext context) {
    return MaterialApp(
      home: HomePage(),
    );
  }
}

class HomePage extends StatefulWidget {
  @override
  _HomePageState createState() => _HomePageState();
}

class _HomePageState extends State<HomePage>
    with SingleTickerProviderStateMixin {
  Animation<double> _doubleAnim;
  AnimationController _animationController;

  @override
  void initState() {
    super.initState();
    _animationController =
        AnimationController(vsync: this, duration: const Duration(seconds: 1))
          ..forward();
    _doubleAnim = Tween(begin: 20.0, end: 100.0).animate(_animationController)
      ..addListener(() {
        setState(() {});//让其widget进行更新
      })
      ..addStatusListener((status) {
        //监听动画状态让其动画循环播放
        if (status == AnimationStatus.completed) {
          _animationController.reverse();
        } else if (status == AnimationStatus.dismissed) {
          _animationController.forward();
        }
      });
  }

  @override
  void dispose() {
    super.dispose();
    _animationController.dispose();
  }

  @override
  Widget build(BuildContext context) {
    return Scaffold(
      body: Center(
        child: Container(
           _doubleAnim.value,
          height: _doubleAnim.value,
          color: Colors.red,
        ),
      ),
    );
  }
}
程序比较简单,运行一下:
案例三:通过ColorTween实现颜色渐变效果
基本上写法依葫芦画瓢就成了:
import 'package:flutter/material.dart';

void main() => runApp(MyApp());

class MyApp extends StatelessWidget {
  @override
  Widget build(BuildContext context) {
    return MaterialApp(
      home: HomePage(),
    );
  }
}

class HomePage extends StatefulWidget {
  @override
  _HomePageState createState() => _HomePageState();
}

class _HomePageState extends State<HomePage>
    with SingleTickerProviderStateMixin {
  Animation<Color> _colorAnim;
  AnimationController _animationController;

  @override
  void initState() {
    super.initState();
    _animationController =
        AnimationController(vsync: this, duration: const Duration(seconds: 1))
          ..forward();
    _colorAnim = ColorTween(begin: Colors.red, end: Colors.white)
        .animate(_animationController)
          ..addListener(() {
            setState(() {});
          })
          ..addStatusListener((status) {
            //监听动画状态让其动画循环播放
            if (status == AnimationStatus.completed) {
              _animationController.reverse();
            } else if (status == AnimationStatus.dismissed) {
              _animationController.forward();
            }
          });
  }

  @override
  void dispose() {
    super.dispose();
    _animationController.dispose();
  }

  @override
  Widget build(BuildContext context) {
    return Scaffold(
      body: Center(
        child: Container(
           200.0,
          height: 200.0,
          color: _colorAnim.value,
        ),
      ),
    );
  }
}

案例四:AnimatedWidget
先来看一下效果:
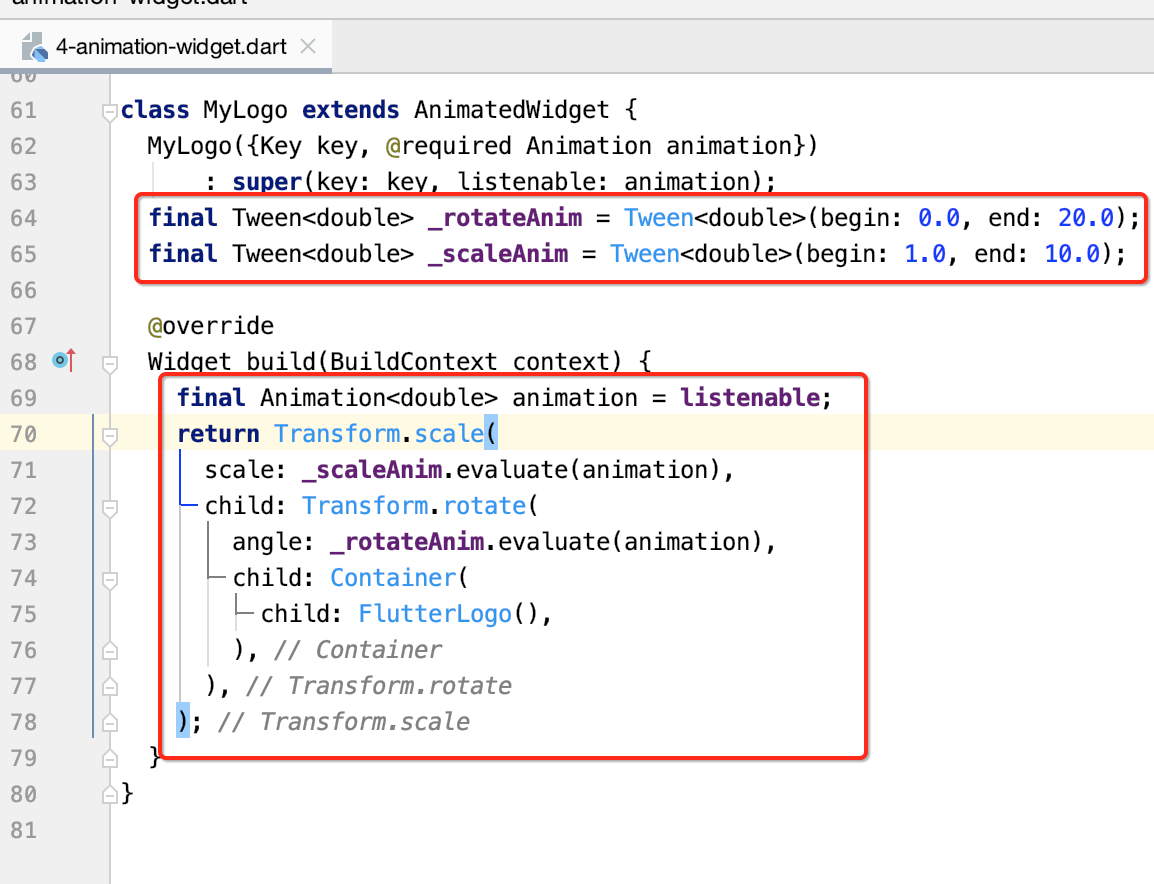
这个录屏有点卡,其实是旋转+放大动画的组合,下面来看一下如何实现的:
import 'package:flutter/material.dart';

void main() => runApp(MyApp());

class MyApp extends StatelessWidget {
  @override
  Widget build(BuildContext context) {
    return MaterialApp(
      home: HomePage(),
    );
  }
}

class HomePage extends StatefulWidget {
  @override
  _HomePageState createState() => _HomePageState();
}

class _HomePageState extends State<HomePage>
    with SingleTickerProviderStateMixin {
  Animation<double> _doubleAnim;
  AnimationController _animationController;

  @override
  void initState() {
    super.initState();
    _animationController =
        AnimationController(vsync: this, duration: const Duration(seconds: 1))
          ..forward();
    _doubleAnim = Tween(begin: 0.0, end: 1.0).animate(_animationController)
      ..addListener(() {
        setState(() {});
      })
      ..addStatusListener((status) {
        if (status == AnimationStatus.completed) {
          _animationController.reverse();
        } else if (status == AnimationStatus.dismissed) {
          _animationController.forward();
        }
      });
  }

  @override
  void dispose() {
    super.dispose();
    _animationController.dispose();
  }

  @override
  Widget build(BuildContext context) {
    return Scaffold(
      body: Center(
        child: MyLogo(
          animation: _doubleAnim,
        ),
      ),
    );
  }
}

class MyLogo extends AnimatedWidget {
  MyLogo({Key key, @required Animation animation})
      : super(key: key, listenable: animation);

  @override
  Widget build(BuildContext context) {
    return Container(
       200.0,
      height: 200.0,
      child: FlutterLogo(),
    );
  }
}
目前还木有动画,运行就是一个Flutter静态的LOGO:
接下为则给这张LOGO增加两个混合的动画效果,如下:
最终的效果就如之前所看到的那样了。
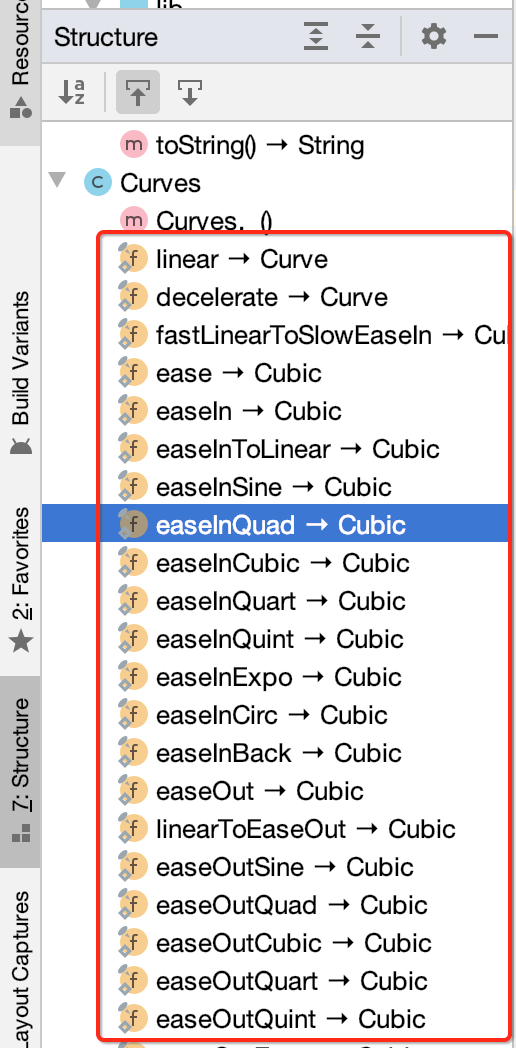
Curve:
定义了时间和数值的抽象类。Flutter封装定义了一系列的插值器,如linear、decelerate、ease、bounce、cubic等。当然Flutter提供的不满足需求的话,也可以自定义插值器。 在Android中动画也有插值器的概念,看一下Curve类中定义的各种插值器:
下面来使用一下,先看一下最终效果:

具体来看一下如何来实现:
import 'package:flutter/material.dart';

void main() => runApp(MyApp());

class MyApp extends StatelessWidget {
  @override
  Widget build(BuildContext context) {
    return MaterialApp(
      home: HomePage(),
    );
  }
}

class HomePage extends StatefulWidget {
  @override
  _HomePageState createState() => _HomePageState();
}

class _HomePageState extends State<HomePage>
    with SingleTickerProviderStateMixin {
  Animation<double> _doubleAnim;
  AnimationController _animationController;

  @override
  void initState() {
    super.initState();
    _animationController =
        AnimationController(vsync: this, duration: const Duration(seconds: 1))
          ..forward();
    _doubleAnim = Tween(begin: 0.0, end: 1.0).animate(_animationController)
      ..addListener(() {
        setState(() {});
      })
      ..addStatusListener((status) {
        if (status == AnimationStatus.completed) {
          _animationController.reverse();
        } else if (status == AnimationStatus.dismissed) {
          _animationController.forward();
        }
      });
  }

  @override
  void dispose() {
    super.dispose();
    _animationController.dispose();
  }

  @override
  Widget build(BuildContext context) {
    return Scaffold(
      body: AnimatedBuilder(
        animation: _animationController,
      ),
    );
  }
}
而AnimatedBuilder还有一个参数需要设置:
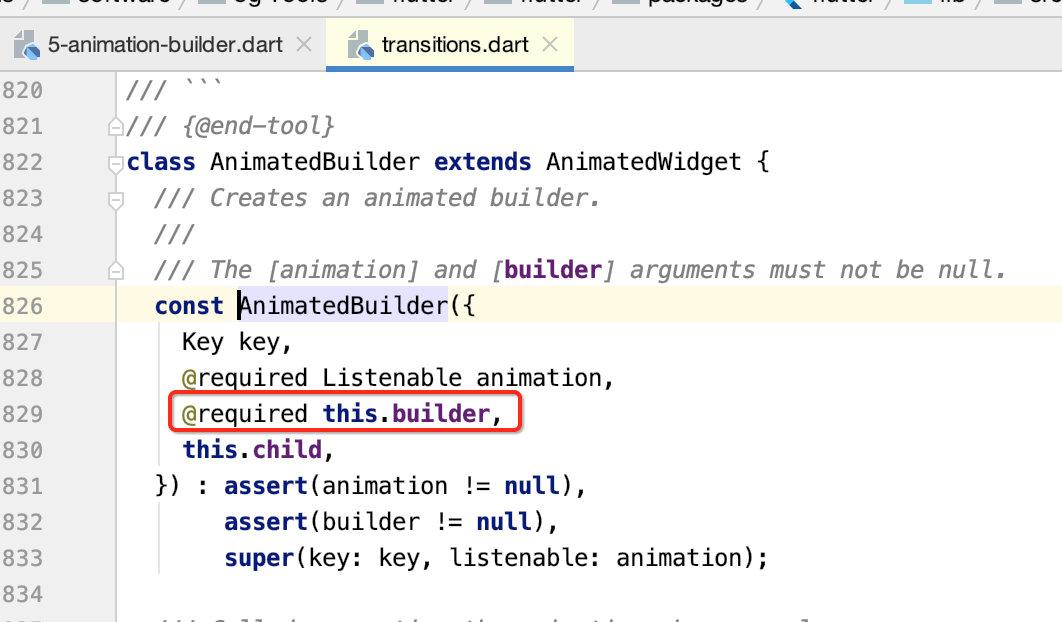
而该builder是一个函数,形态为:

所以咱们传递一下:
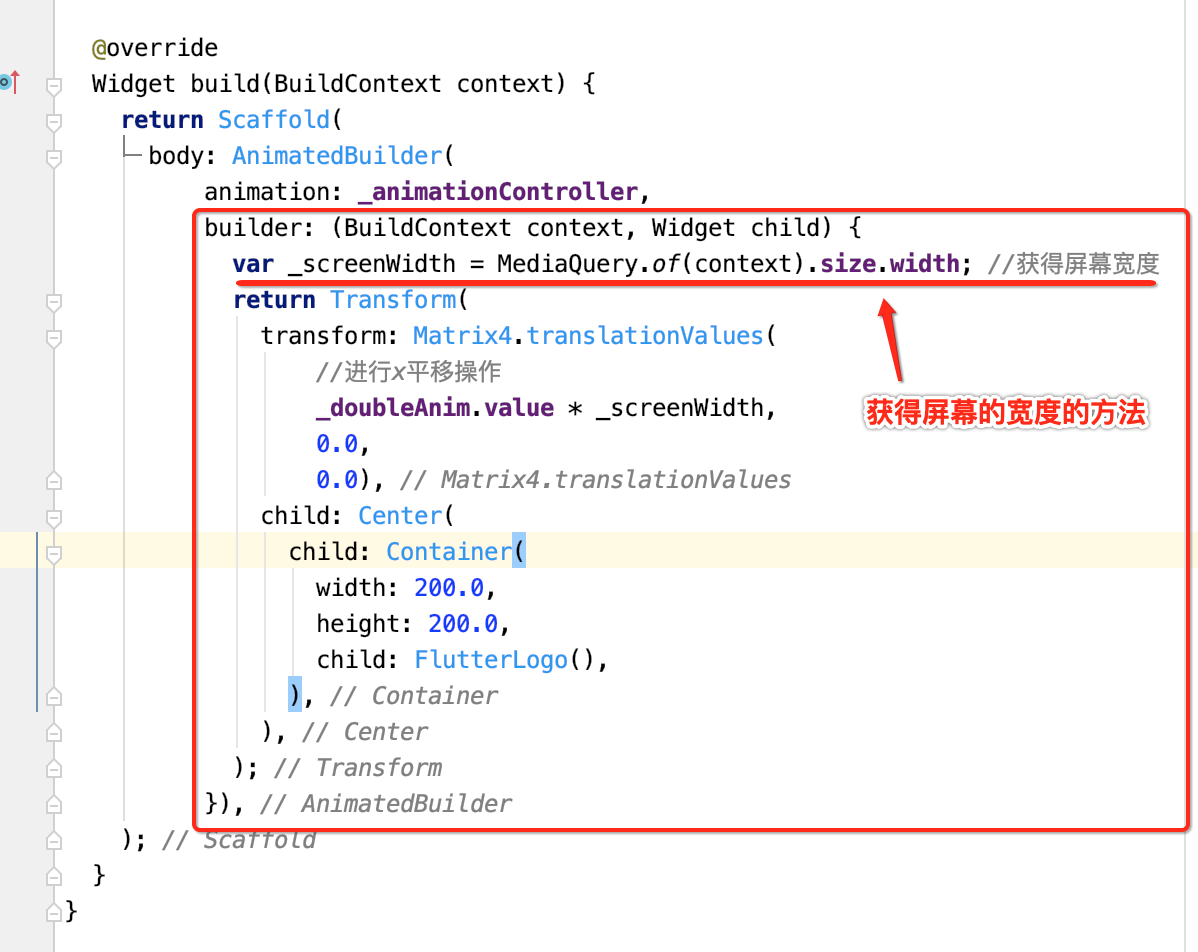
然后这里对于动画的初始化需要修改一下,因为是从左到右进行平移,然后此次增加了一个慢进快出的插值器,具体如下:
class _HomePageState extends State<HomePage>
    with SingleTickerProviderStateMixin {
  Animation<double> _doubleAnim;
  AnimationController _animationController;

  void myListener(status) {
    if (status == AnimationStatus.completed) {
      //当动画执行完毕之后,将监听去掉,并将其恢复,不然还是会重复执行这个完成的回调监听的
      _animationController.removeStatusListener(myListener);
      _animationController.reset();
      _doubleAnim = Tween(begin: 0.0, end: 1.0).animate(CurvedAnimation(
          parent: _animationController, curve: Curves.fastOutSlowIn));
      _animationController.forward();
    }
  }

  @override
  void initState() {
    super.initState();
    _animationController =
        AnimationController(vsync: this, duration: const Duration(seconds: 2));
    _doubleAnim = Tween(begin: -1.0, end: 0.0).animate(CurvedAnimation(
        parent: _animationController, curve: Curves.fastOutSlowIn))
      ..addStatusListener(myListener);
    _animationController.forward();
  }

  @override
  void dispose() {
    super.dispose();
    _animationController.dispose();
  }

  @override
  Widget build(BuildContext context) {
    return Scaffold(
      body: AnimatedBuilder(
          animation: _animationController,
          builder: (BuildContext context, Widget child) {
            var _screenWidth = MediaQuery.of(context).size.width; //获得屏幕宽度
            return Transform(
              transform: Matrix4.translationValues(
                  //进行x平移操作
                  _doubleAnim.value * _screenWidth,
                  0.0,
                  0.0),
              child: Center(
                child: Container(
                   200.0,
                  height: 200.0,
                  child: FlutterLogo(),
                ),
              ),
            );
          }),
    );
  }
}
关于动画这块要想熟练掌握只能是在实际项目中不断进行操练才行,这里先对其入个门,知道动画的一个基本实现步骤既可。