前言:
从今天起开启一门全新的课程学习,就是React Native,远在18年https://www.cnblogs.com/webor2006/p/9350428.html其实当时就已经做过开篇,然而很遗憾,这块的学习彻底给放弃了,造成三四年过去了,此技能依然完全不懂。。那为啥又突然要拣起它呢?原因是最近在学习这个系列课程时【我的博客】:
![]()
既将要学习到在Android项目中混编RN,这门课程的学习是花了大的心血的,为了继续学好它当然不能马虎,所欠缺的知识点该补的就得补,容不得半点偷懒,另外对我来说通过学习一门优质课程,然后课程中发现自己所缺失的再进行技能专项练习,是一个非常舒服的学习过程,因为是带着目标的,学习起来的动力也会比较充足,所以接下来准备从0开始攻克RN,作为2021年的一个新目标中的一员,希望到了明年Flutter+RN自己会觉得非常之亲切,加油!!!
在之前的第一篇其实已经完整的介绍了如何搭建RN的环境了,当时也成功的运行起来了,那干嘛这里又从开发环境学起呢?回到当时的项目工程,可以试着再运行一下便知:
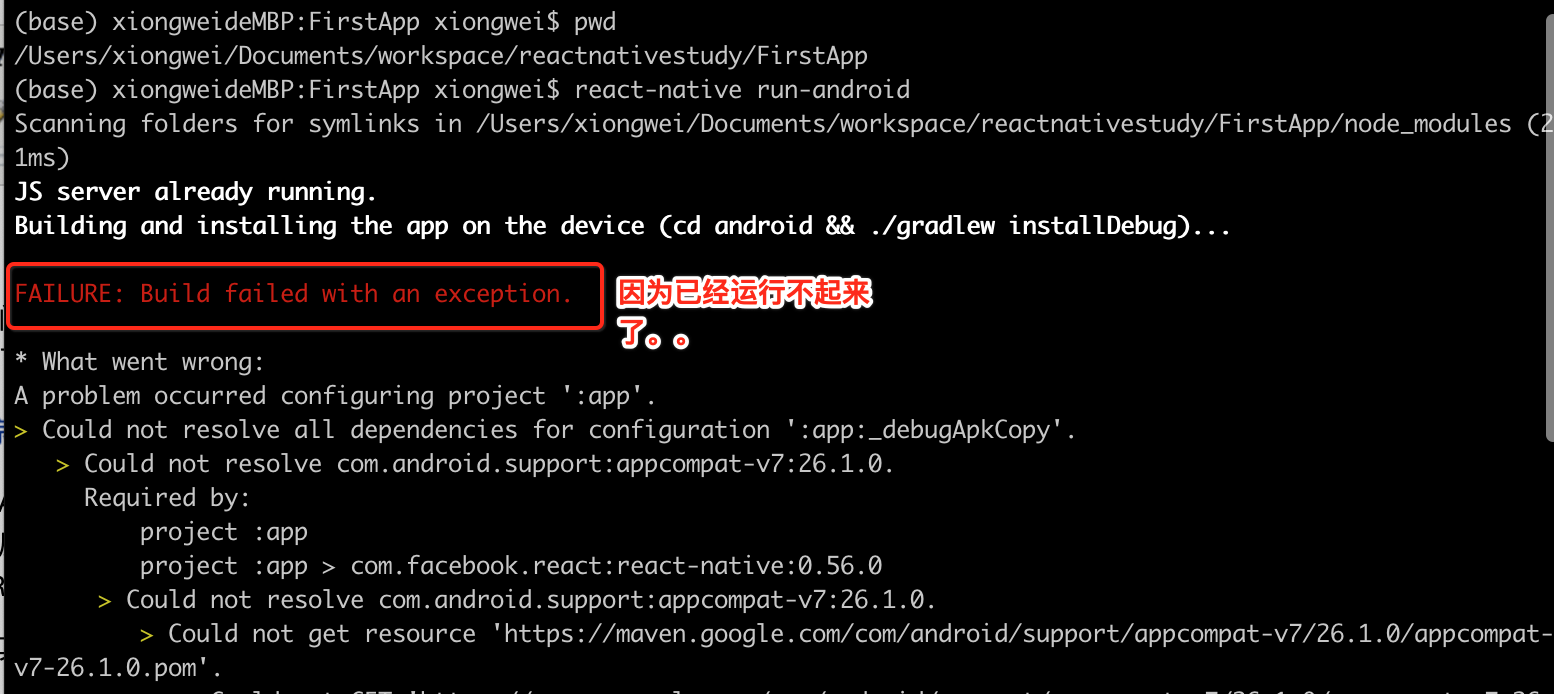
所以知道原因了吧,当时RN的版本用的是:

而官方的最新版本已经到了:
毕竟是横跨了3年多的时间了,所以这里以一个全新的起点,从0起步,以官方最新的方式再来对RN的环境进行一个完整的配置【由于我电脑是mac,只考虑这个平台的搭建】,为后续的学习打下坚实的基础。
开发工具的选择:
- WebStorm/Nuclide/Vs Code/Subline。
由于RN的开发语言是js,其实是跟前端相关的一个技术栈,开发工具的话有如上这些可供选择,不过这里会使用大名鼎鼎Jetbrains的WebStorm,用过的都知道。 - Android Studio。
这个对于我来说最熟悉不过了,开发Android的标配,构建RN的Android工程需要它。 - XCode。
既然是跨平台的技术,当然与Android对立的就是IOS的喽,开发IOS的标题,构建RN的IOS工程需要它。 - Node.js/NPM。
作为RN的基础,Node.js是必备的,目前本机安装的版本为:
而最新官网的版本为:
没关系,目前先用稍老的版本,如果在学习过程中发现需要升级,到时再来升也不迟,先尽快感受RN的魅力是重点。
搭建开发环境:
接下来则正式进入开发环境的搭建,依照官网的介绍,其实是有两种安装方式的:

下面分别来看一下。
Expo CLI QuikStart:
概述:
这种形式的构建场景就是当工程中只有js代码时,而不像之前学习时看到还有android和ios native的代码: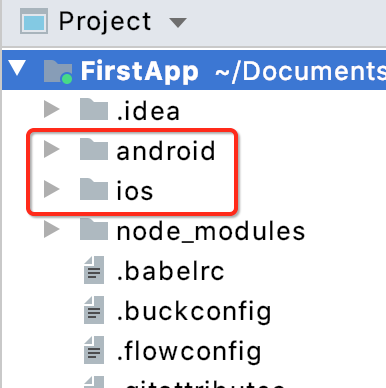
此时就可以用这种方式来进行环境搭建。
安装Expo:
首先需要先来安装Expo工具,先来看一下Expo是啥?
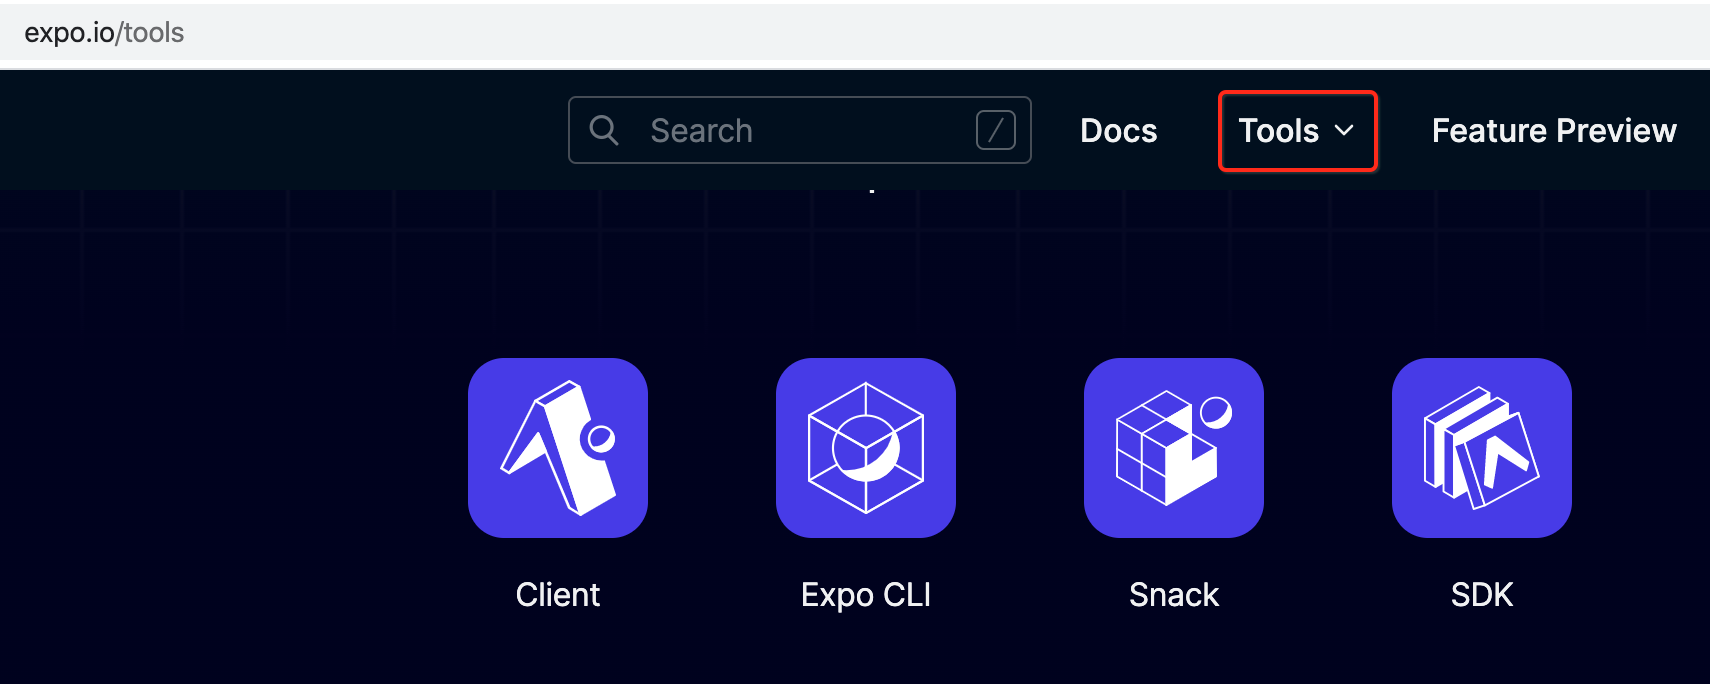
然后点击“Get Started”,发现网页打不开。。

呃,咋整,度娘,https://blog.csdn.net/zhaoxiaoruiR/article/details/82459788,发现需要给咱们的网络添加两个dns:
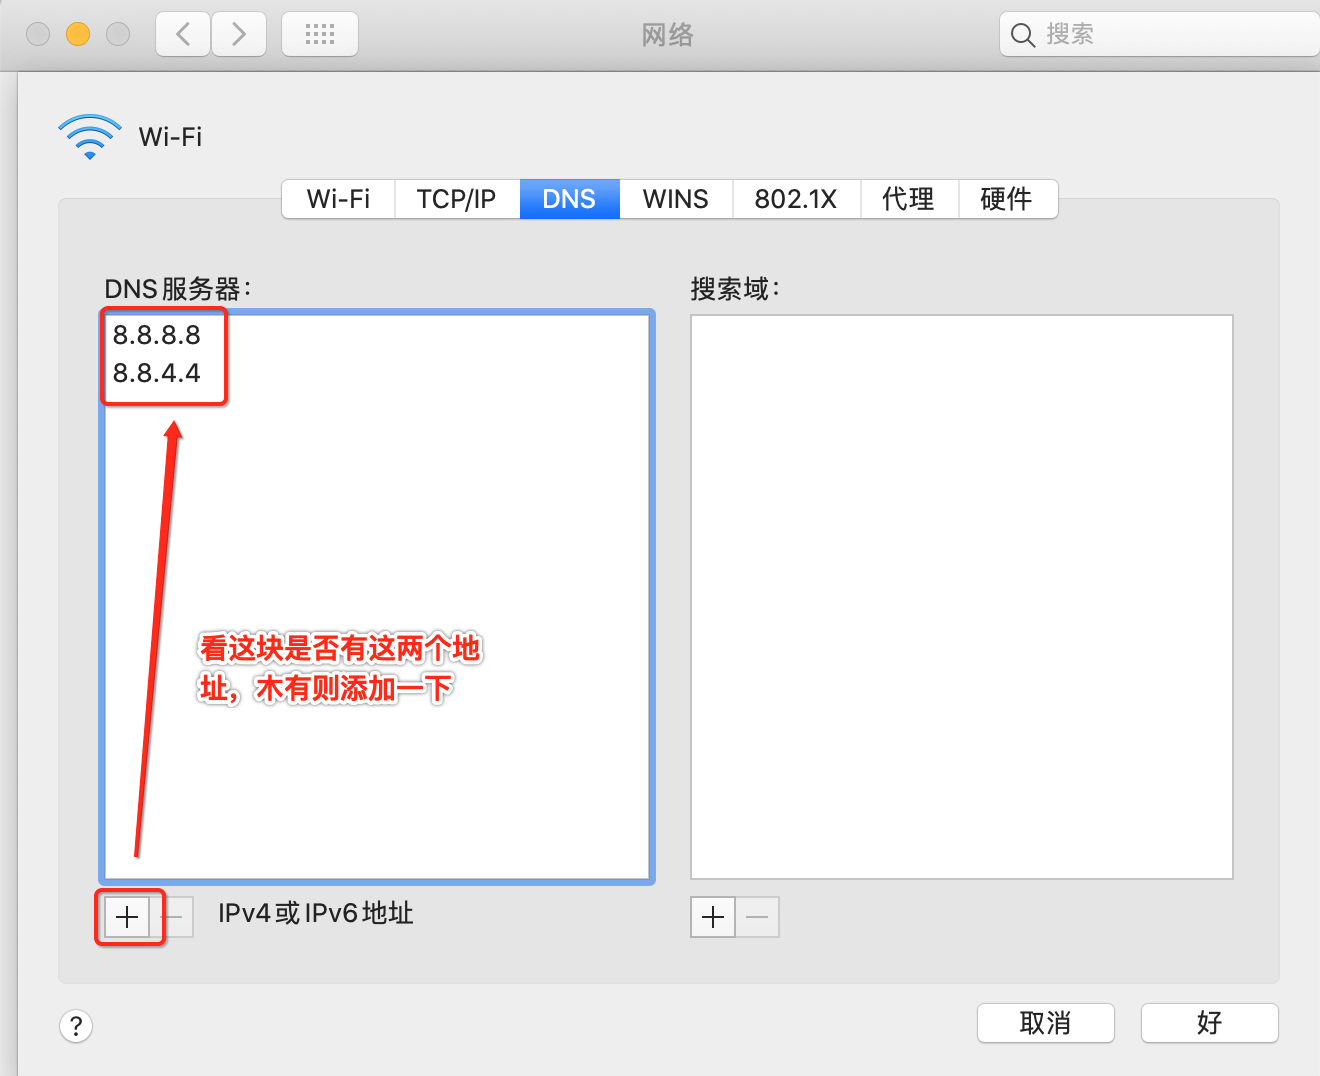
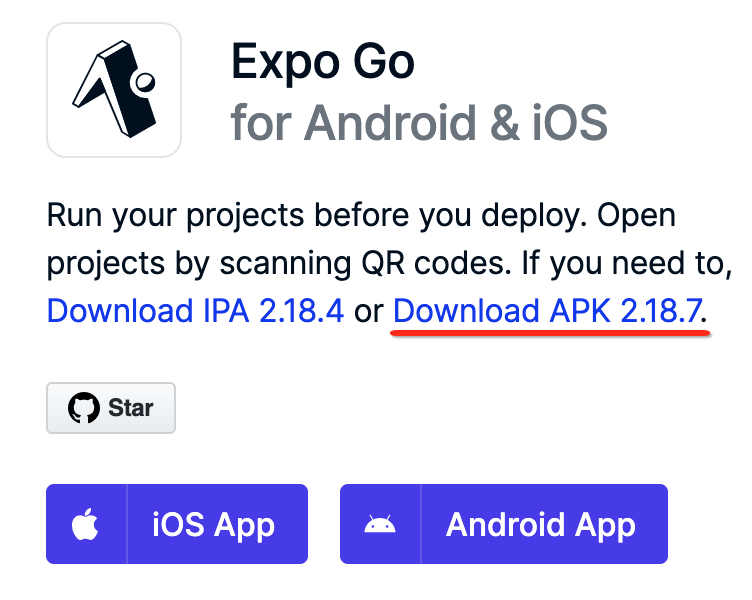
而博主所说:8.8.8.8是一个IP地址,是Google提供的免费DNS服务器的IP地址,Google提供的另外一个免费DNS服务器的IP地址是:8.8.4.4 。用户可以使用Google提供的DNS服务器上网。配置好之后再运行果然就ok了,不过这里点击它:
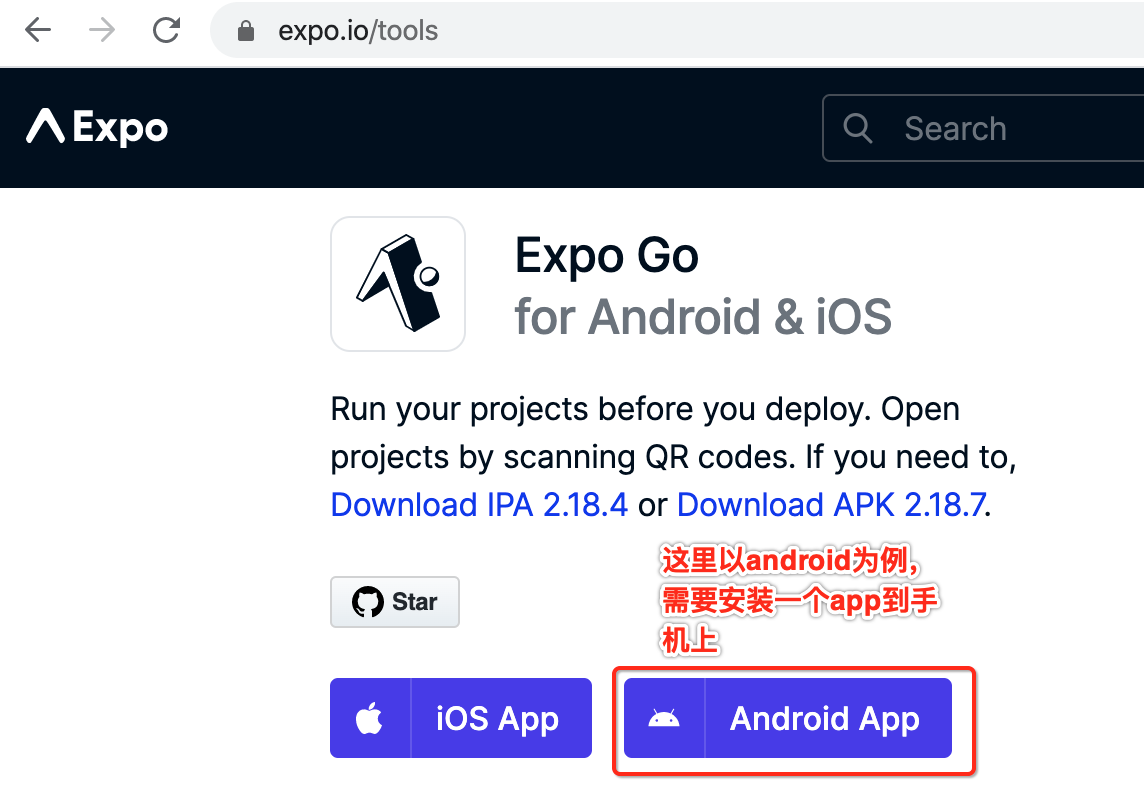
哇,好神奇,还需要先安装到个app到手机上,先不管这么多,按照官方流程走一遍,点击它进行apk的下载:
![]()
安装打开之后app长这样:

其中看到有一个要扫描二维码的按钮,这块在之后会用到的。
升级node.js:
由于官网已经明确提示需要使用node这个版本以上:

而本机目前是:
![]()
所以咱们选一个12最大的一个版本升级一下:

安装完之后,确保版本号输出的是它:
![]()
npm install -g expo-cli:
接下来则需要使用nmp来安装expo的客户端,脚手架工具,如下:

此安装需要稍等一会,安装结束之后如下:
安装成功的效果就是可以使用expo这个命令了,查看一下它的版本号:
![]()
expo init AwesomeProject:
接下来就可以使用expo命令来创建项目了,如下:
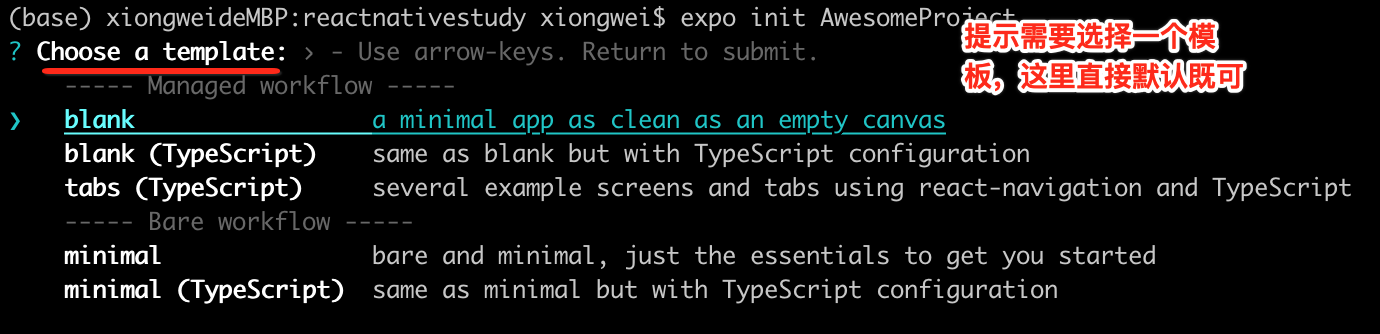
可以用上下方向键进行相关选择,其实就是选择创建项目的模板工程,选好之后直接回车,则就开始安装了:

过一会安装结束之后则会显示:
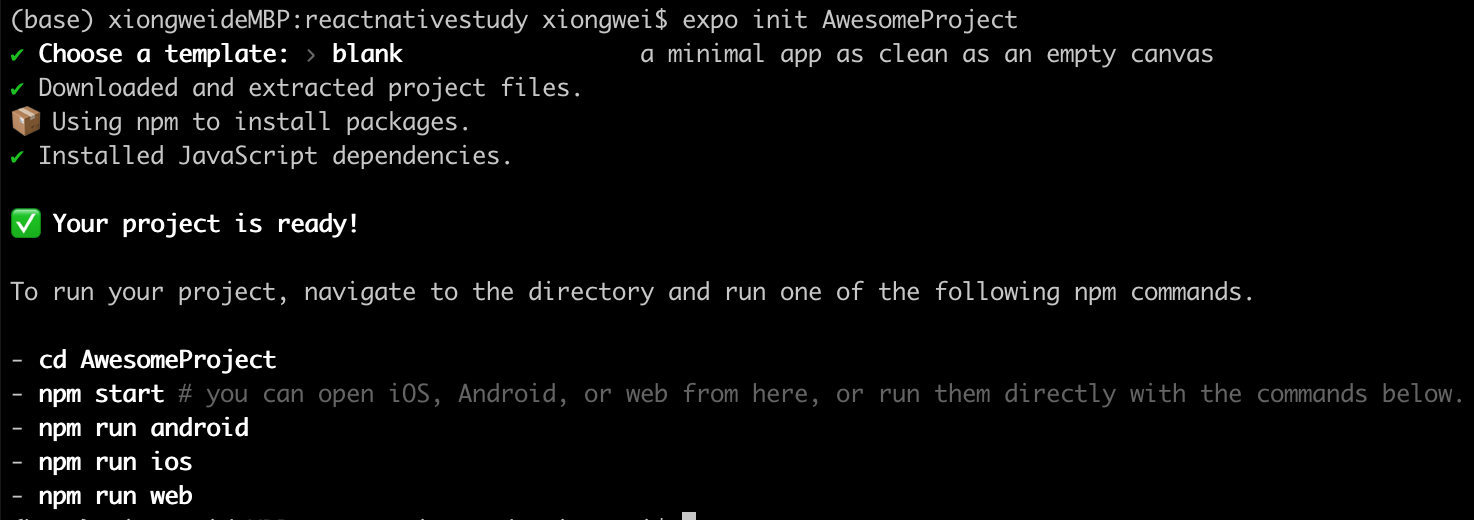
此时本地就有这个项目文件了:
![]()
start a development server:
接下来进入到创建的工程中执行npm start:
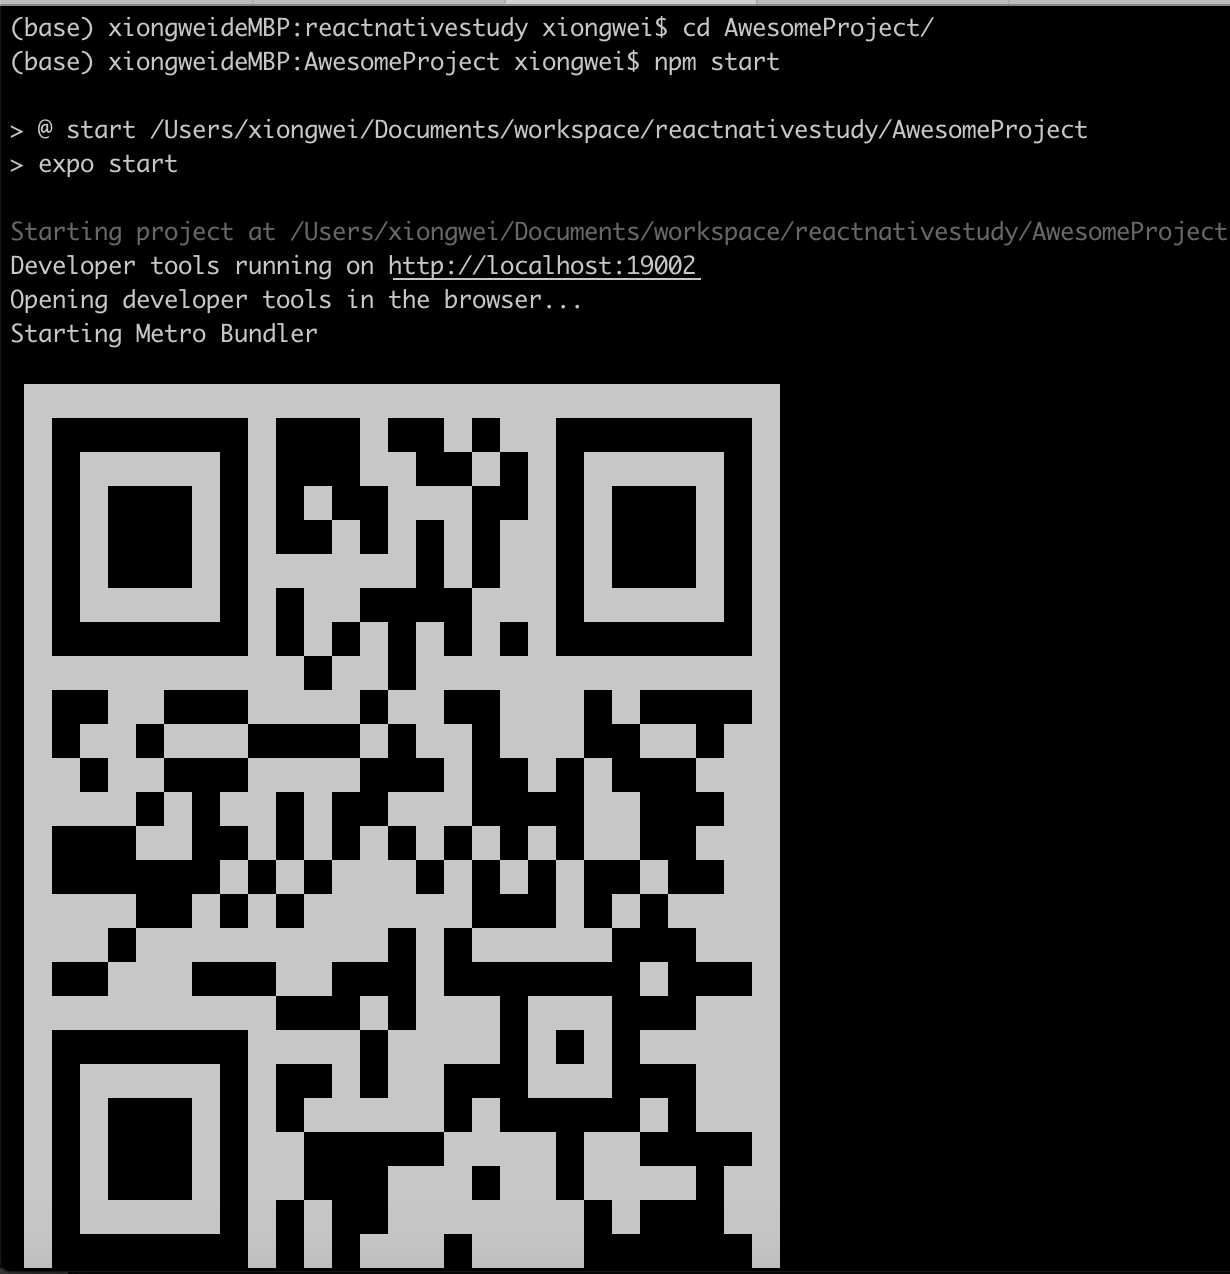
其完整的日志如下:
(base) xiongweideMBP:reactnativestudy xiongwei$ cd AwesomeProject/
(base) xiongweideMBP:AwesomeProject xiongwei$ npm start

> @ start /Users/xiongwei/Documents/workspace/reactnativestudy/AwesomeProject
> expo start

Starting project at /Users/xiongwei/Documents/workspace/reactnativestudy/AwesomeProject
Developer tools running on http://localhost:19002
Opening developer tools in the browser...
Starting Metro Bundler
此处是一个上图的二维码图,略过。。
 › Waiting on exp://192.168.0.100:19000
 › Scan the QR code above with Expo Go (Android) or the Camera app (iOS)

 › Press a │ open Android
 › Press i │ open iOS simulator
 › Press w │ open web

 › Press d │ open developer tools
 › shift+d │ toggle auto opening developer tools on startup (enabled)

 › Press ? │ show all commands

Logs for your project will appear below. Press Ctrl+C to exit.
Error: EMFILE: too many open files, watch
    at FSEvent.FSWatcher._handle.onchange (internal/fs/watchers.js:168:28)
npm ERR! code ELIFECYCLE
npm ERR! errno 1
npm ERR! @ start: `expo start`
npm ERR! Exit status 1
npm ERR!
npm ERR! Failed at the @ start script.
npm ERR! This is probably not a problem with npm. There is likely additional logging output above.

npm ERR! A complete log of this run can be found in:
npm ERR!     /Users/xiongwei/.npm/_logs/2021-03-14T22_09_53_337Z-debug.log
报错了。。然后此时会自动跳到一个网页:
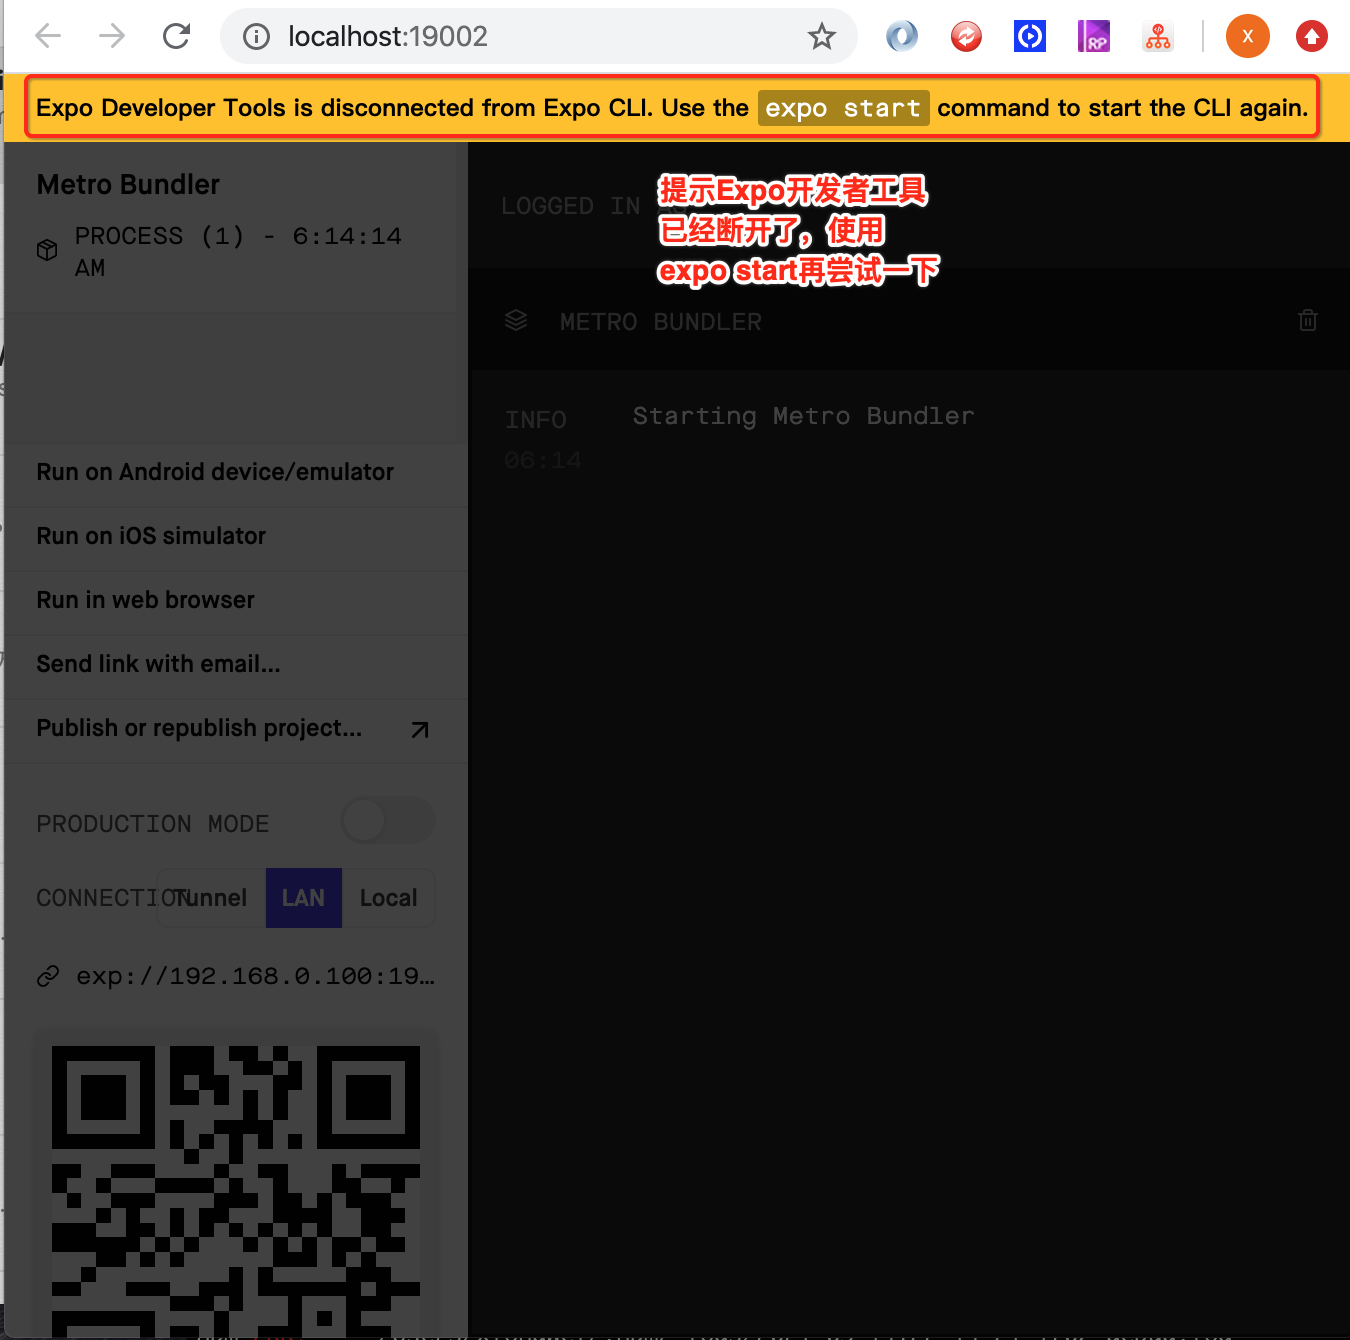
此时提示需要用“expo start”尝试一下,那试一下吧:
(base) xiongweideMBP:AwesomeProject xiongwei$ expo start
Starting project at /Users/xiongwei/Documents/workspace/reactnativestudy/AwesomeProject
Developer tools running on http://localhost:19002
Opening developer tools in the browser...
Starting Metro Bundler
此处是二维码。。
 › Waiting on exp://192.168.0.100:19000
 › Scan the QR code above with Expo Go (Android) or the Camera app (iOS)

 › Press a │ open Android
 › Press i │ open iOS simulator
 › Press w │ open web

 › Press d │ open developer tools
 › shift+d │ toggle auto opening developer tools on startup (enabled)

 › Press ? │ show all commands

Logs for your project will appear below. Press Ctrl+C to exit.
Error: EMFILE: too many open files, watch
    at FSEvent.FSWatcher._handle.onchange (internal/fs/watchers.js:168:28)
还是报错。。此时用expo在Android机上的app扫一下二维码,看到的也是报错: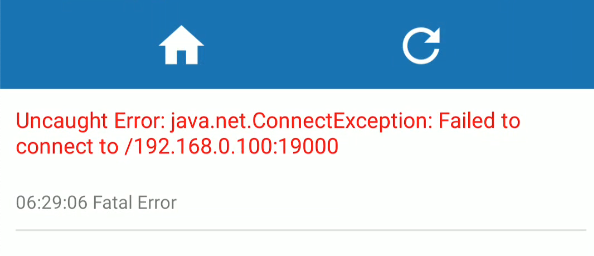
此时带着“Error: EMFILE: too many open files, watch”这个错误关键词上expo的官方论坛去搜一下解决方案:
在这搜到了解决方法:https://forums.expo.io/t/error-emfile-too-many-open-files/35564,
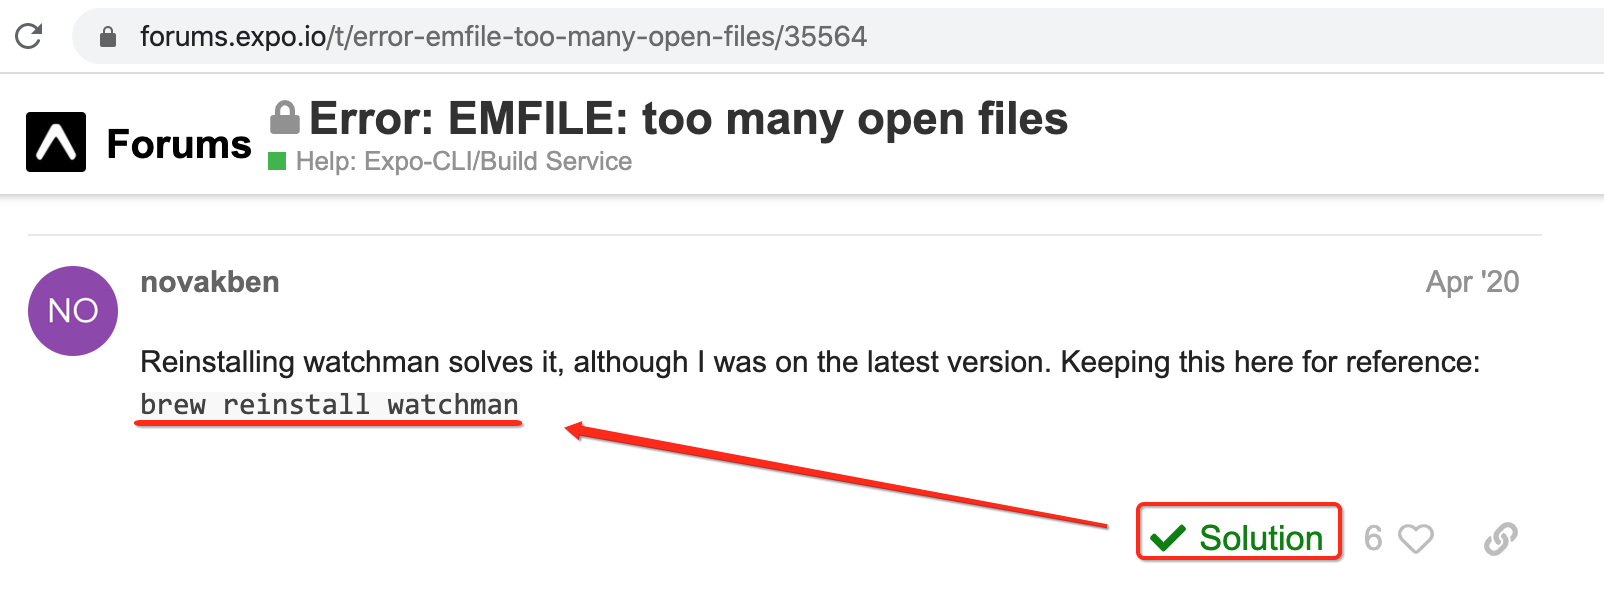
哦,需要重新安装一下watchman这个工具哟,试一下呗:

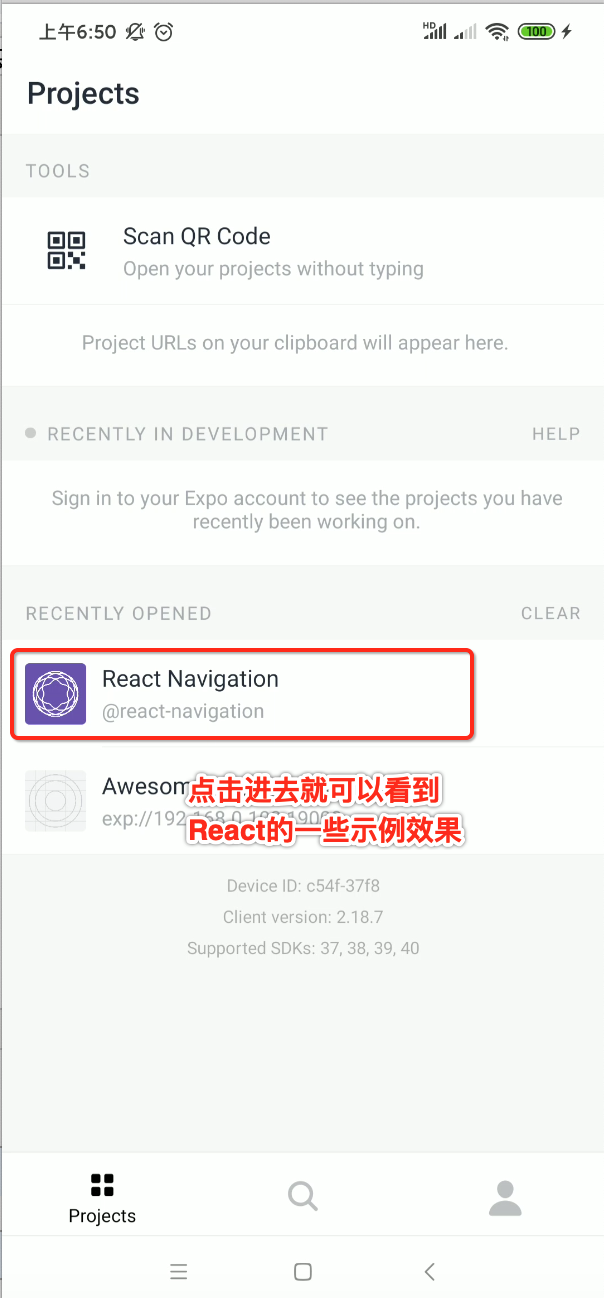
再来“expo start”,发现确实是木有报错了,此时用手机的expo app扫码网页中的二维码,就可以正常的预览reactive native工程了:


此时就可以看到创建的DEMO工程了:
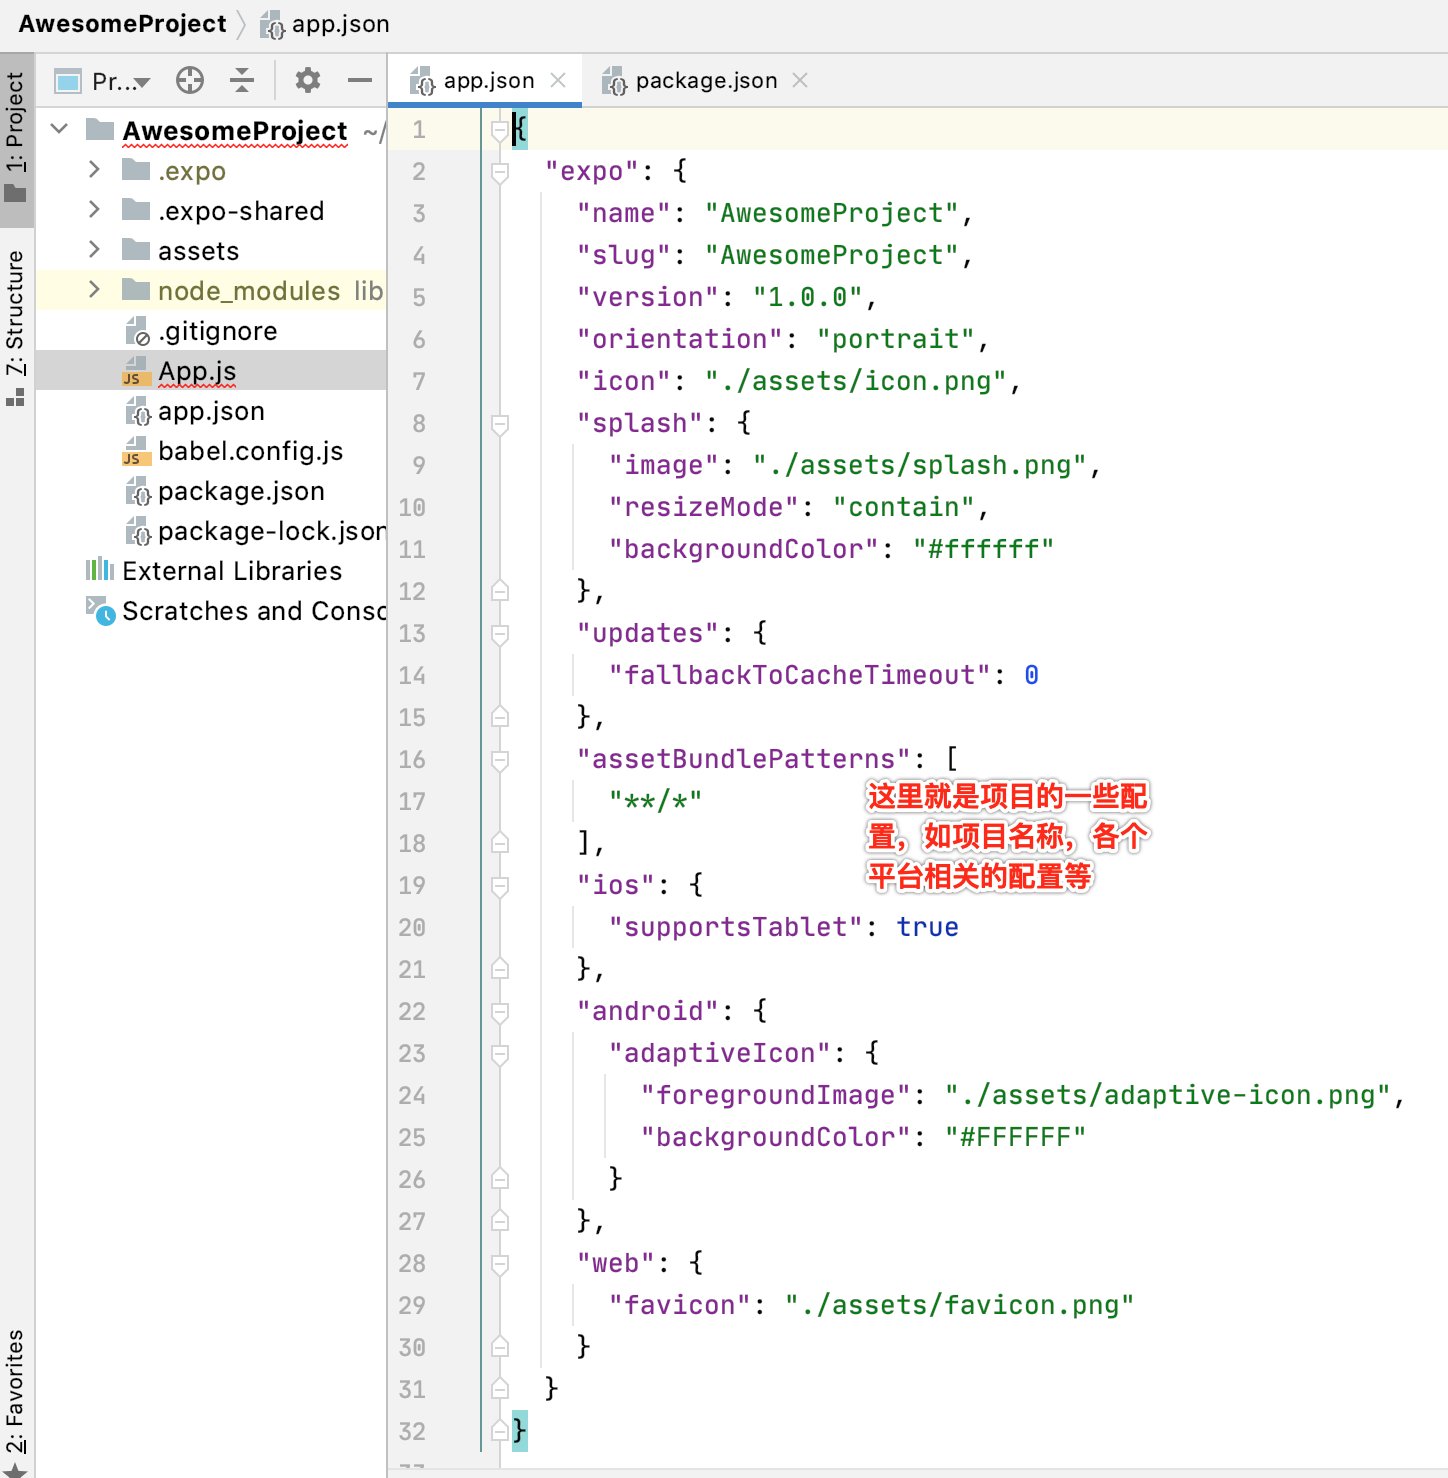
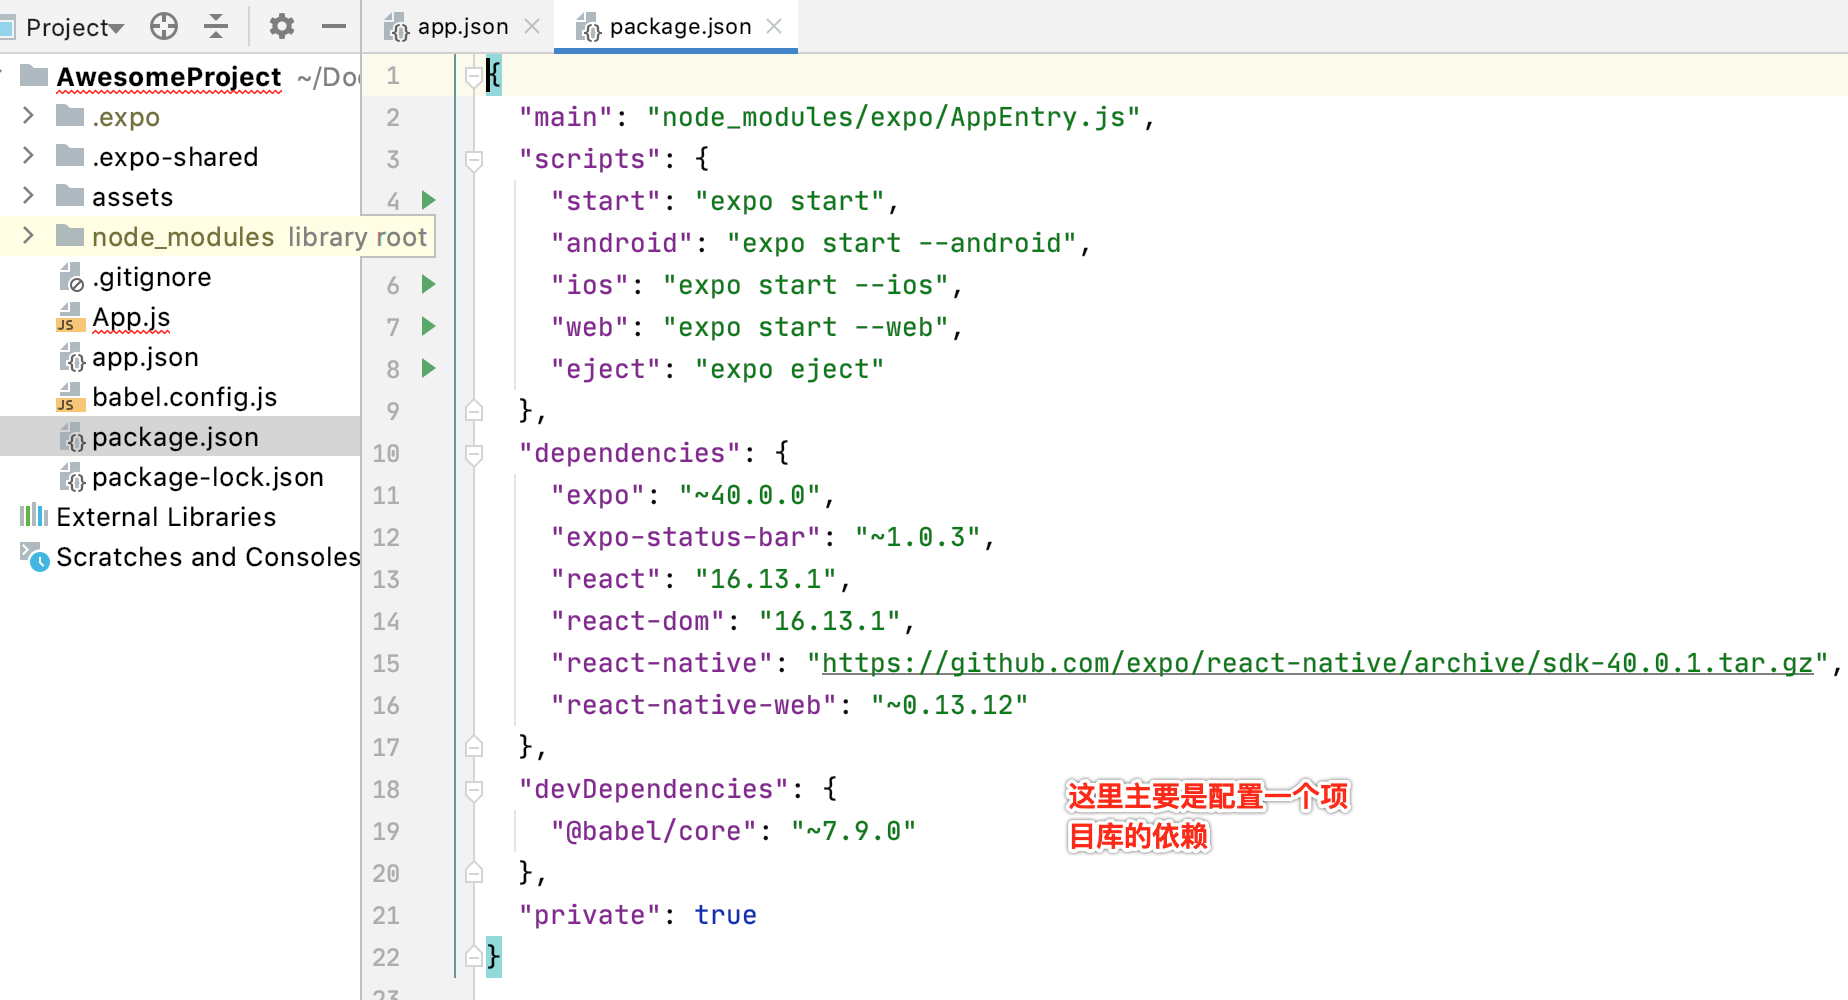
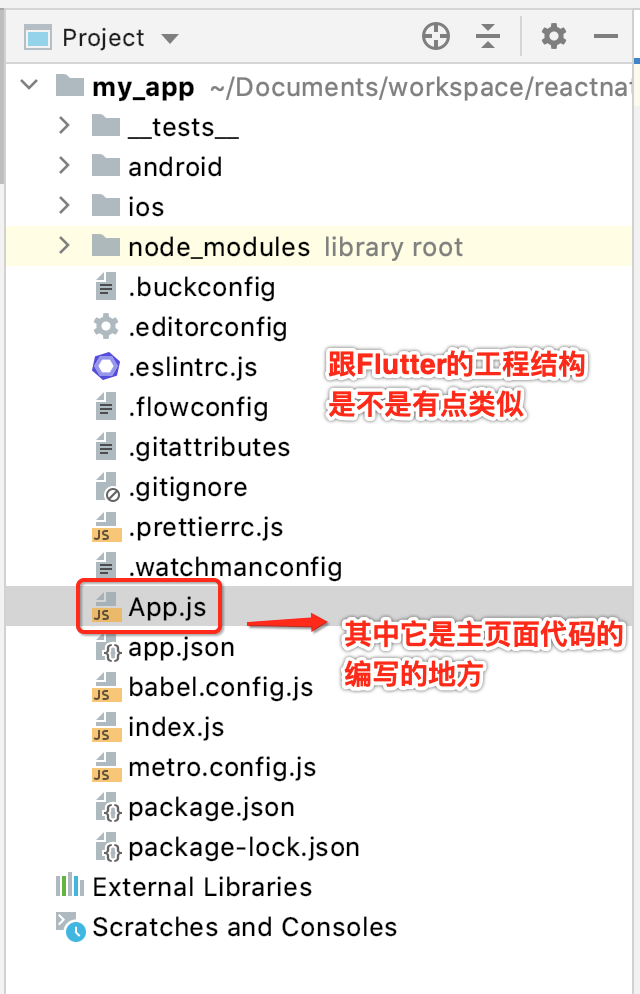
工程结构简览:
接下来用WebStorm打开工程,瞅一下大概的工程结构:
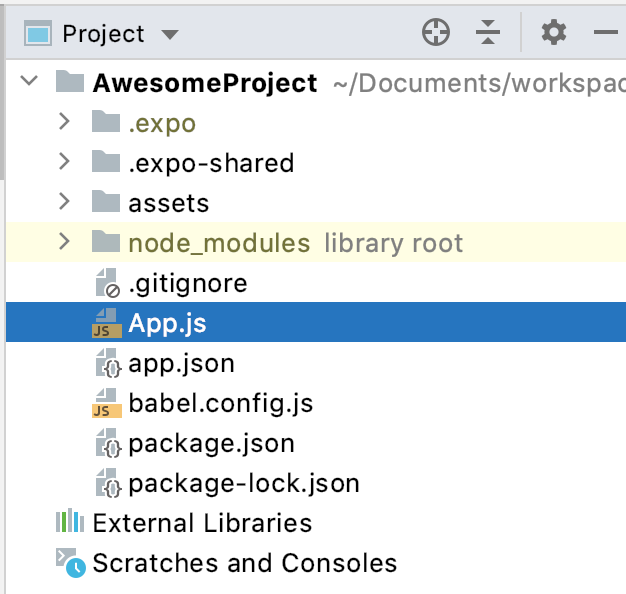
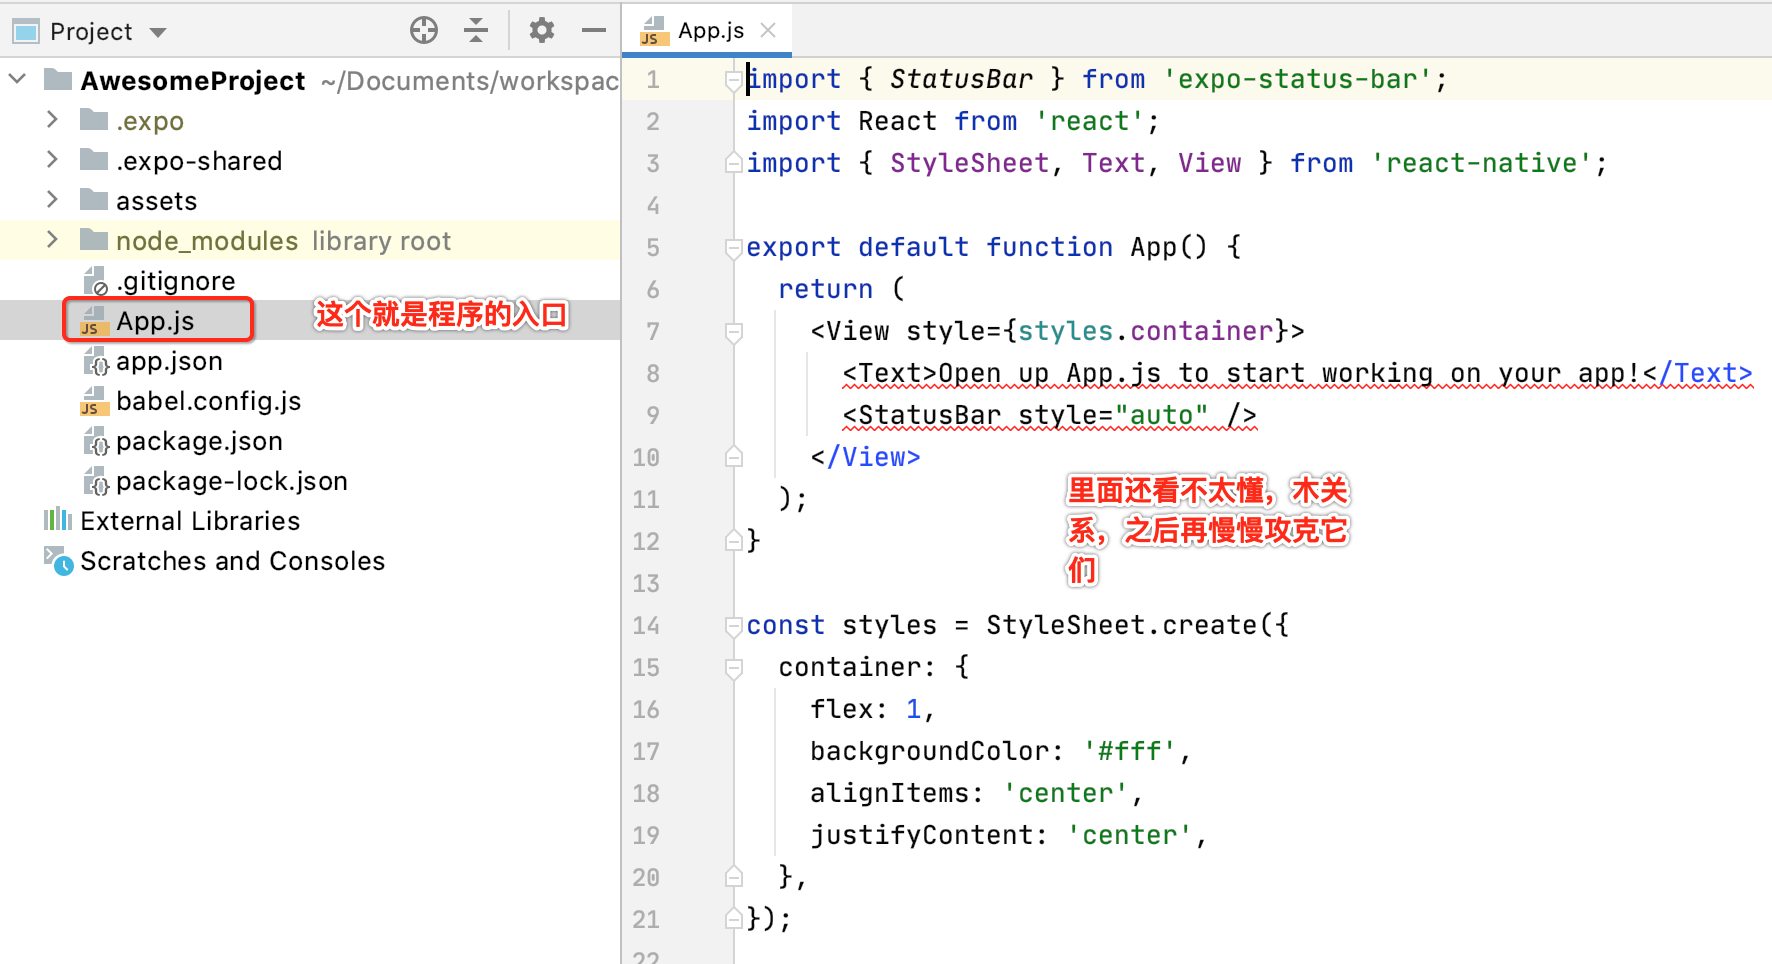
另外还有两个配置文件:
React Native CLI QuikStart:
接下来看第二种安装方式:
很显然这种方式是最为常见的,混编嘛,下面具体来看一下:
Node & Watchman:
这俩其实已经安装好了,其中说一下Watchman是干嘛的呢?https://github.com/facebook/watchman,瞅一下:
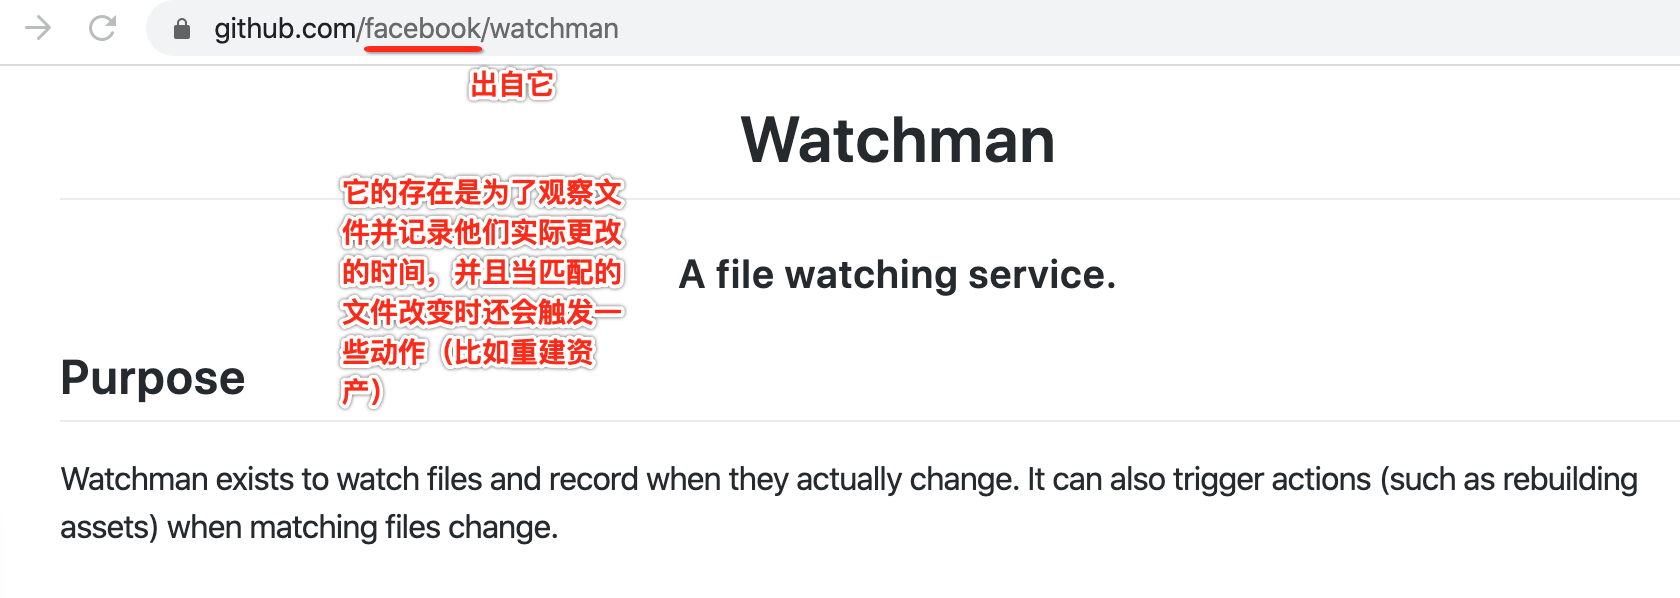
也就是进行文件变化监听用的,目前安装的版本为:
![]()
具体平台搭建:
接下来则从Android和IOS两个角度分别进行搭建:
Android环境:
1、JDK安装,这块就不多说了。
2、Android Sutdio安装,并配置好相关Android环境 ,具体网上一大堆,略过。
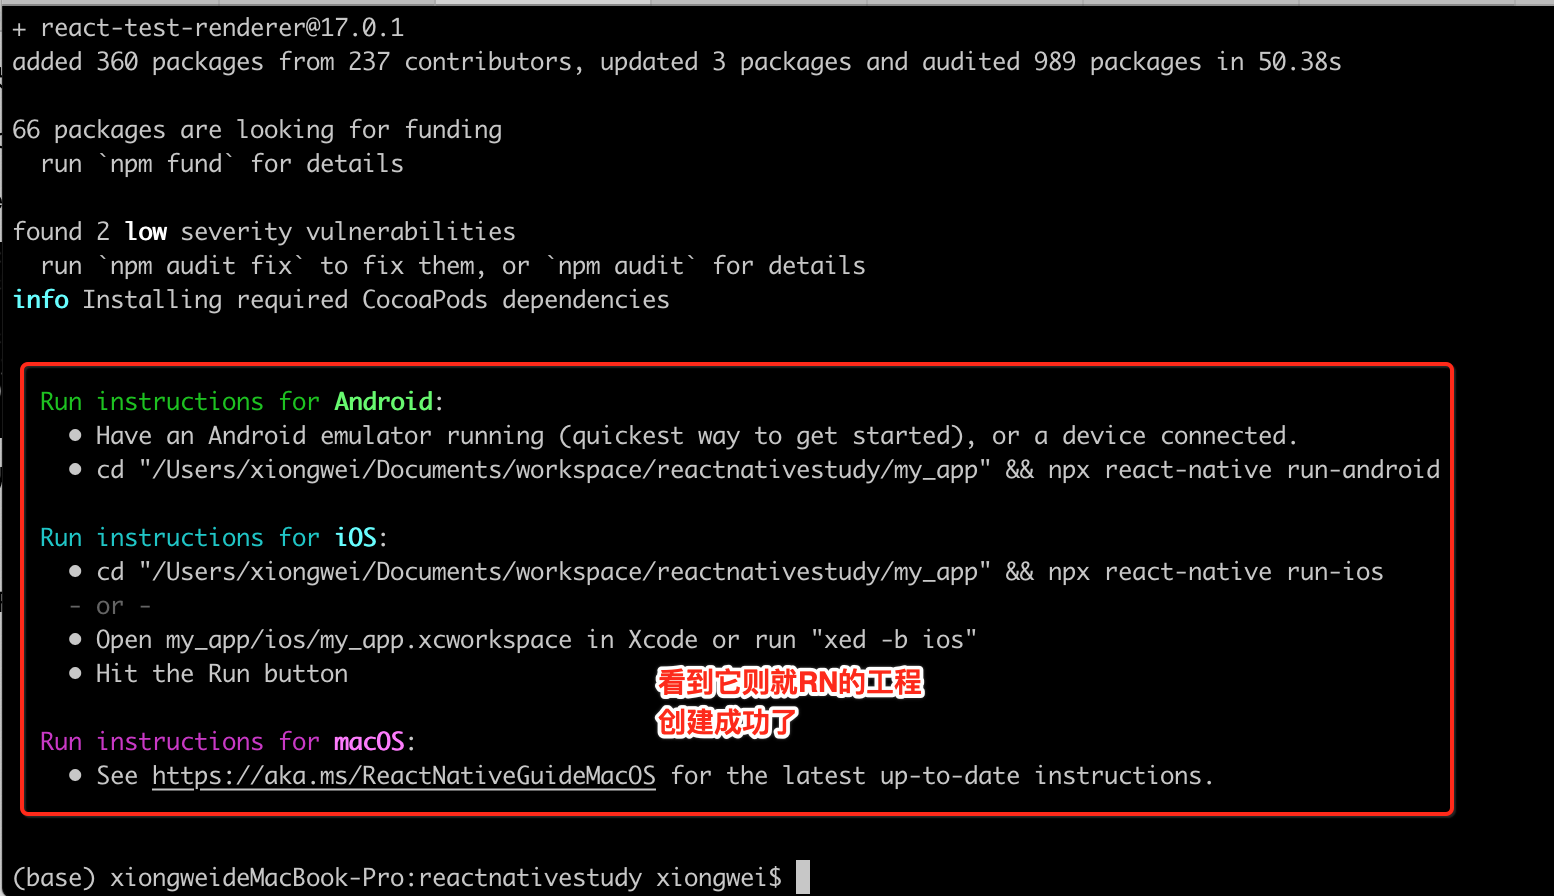
3、 Creating a new application:

需要等待一会,然后最后创建完则会显示它:

4、Running your React Native application:
-
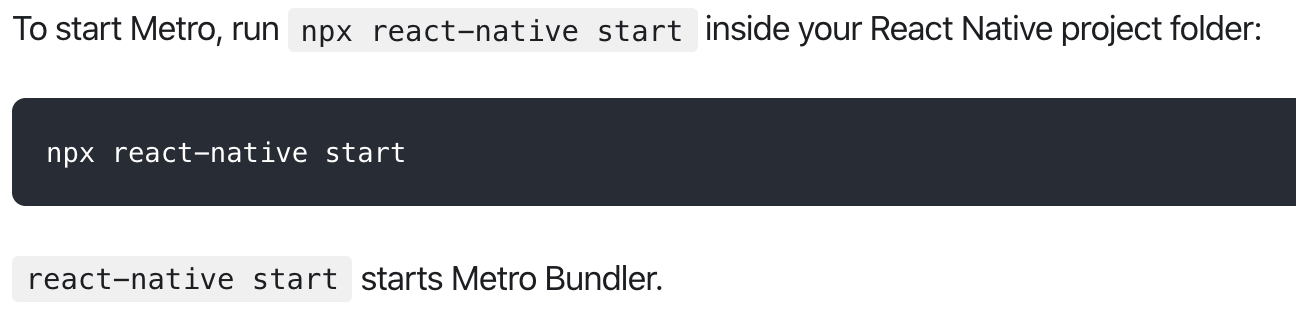
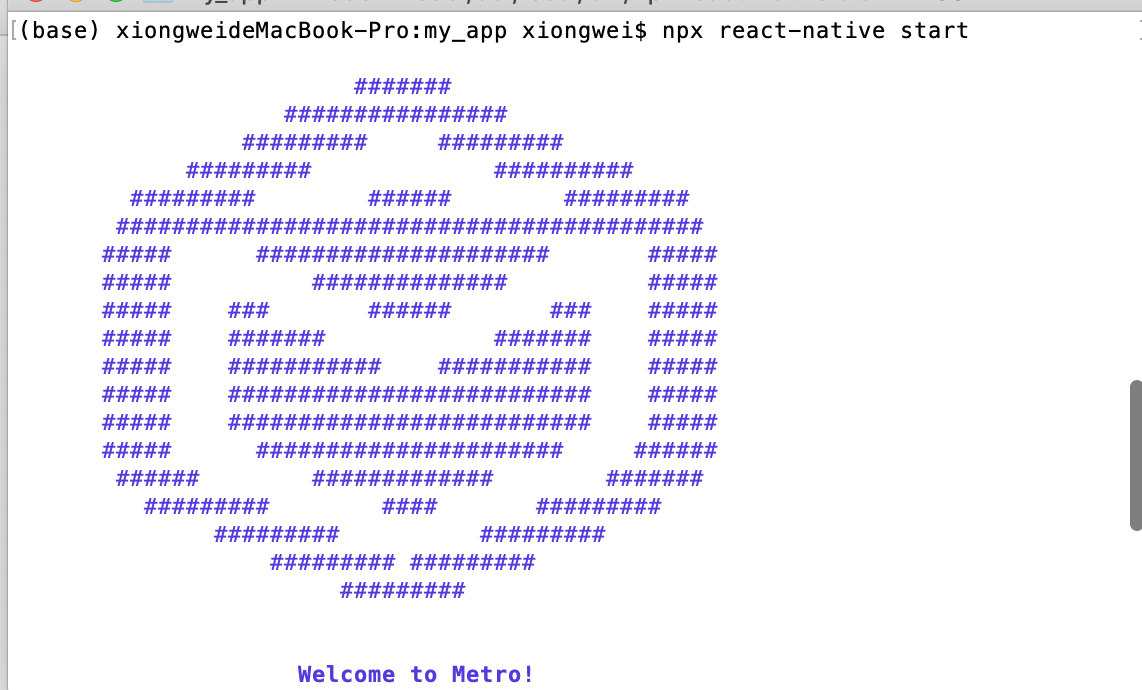
Step 1: Start Metro:
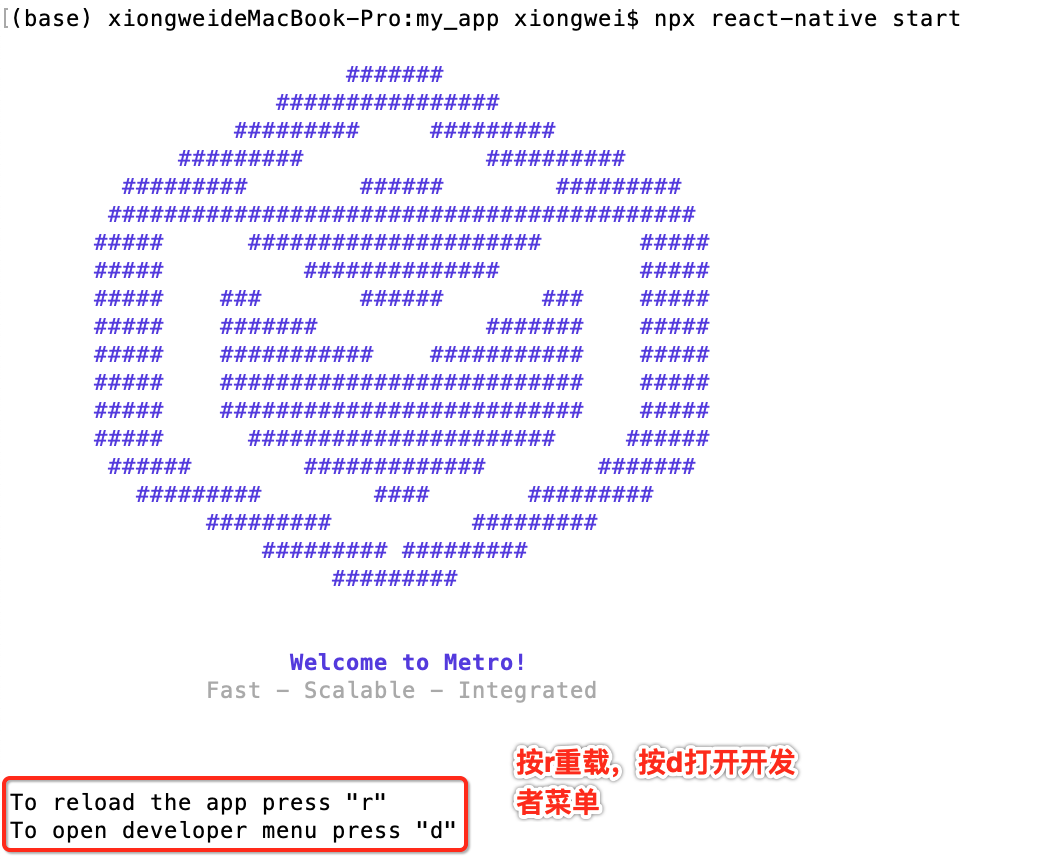
看到上面这个提示就代表成功启动。
-
Step 2: Start your application:

这里直接用真机来运行,然后执行一下上面的命令,看能否正常的运行到Adnroid手机上:
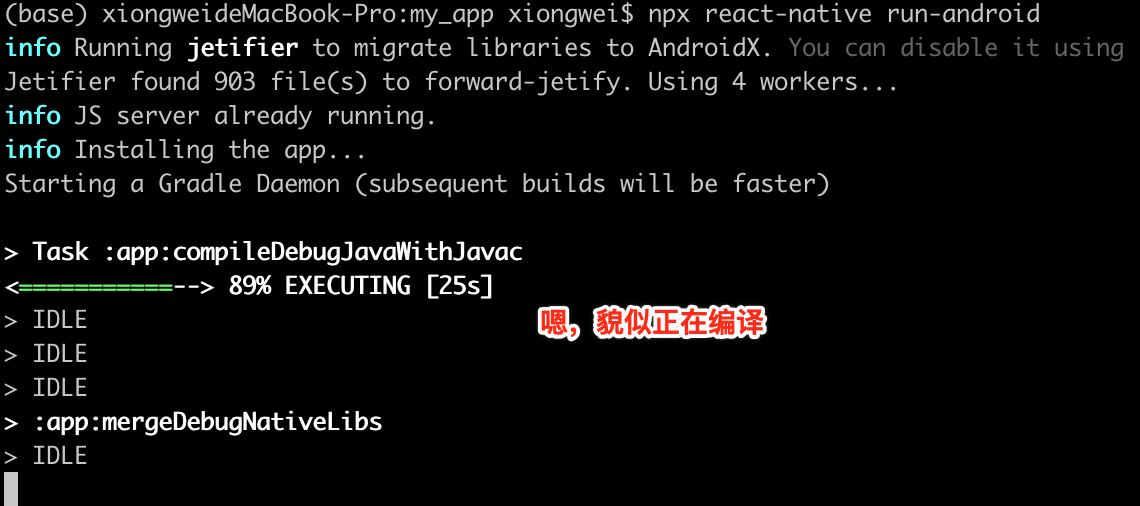
但是!!!最后报错了。。
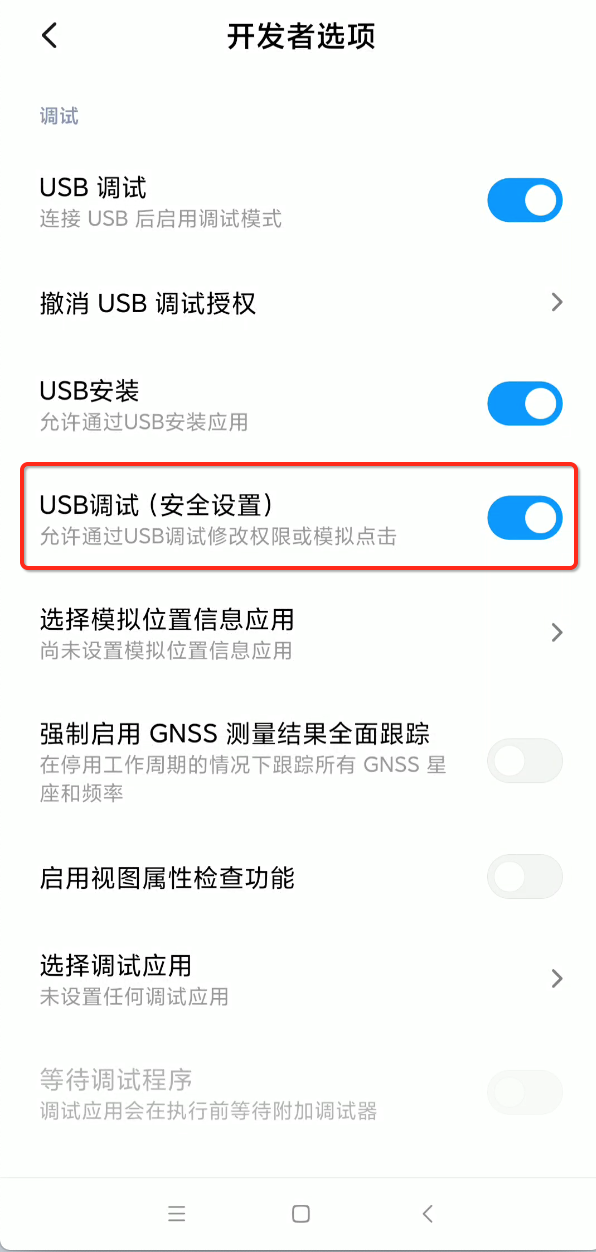
* What went wrong: Execution failed for task ':app:installDebug'. > java.util.concurrent.ExecutionException: com.android.builder.testing.api.DeviceException: com.android.ddmlib.InstallException: Unknown failure: Security exception: You need the android.permission.INSTALL_GRANT_RUNTIME_PERMISSIONS permission to use the PackageManager.INSTALL_GRANT_RUNTIME_PERMISSIONS flag java.lang.SecurityException: You need the android.permission.INSTALL_GRANT_RUNTIME_PERMISSIONS permission to use the PackageManager.INSTALL_GRANT_RUNTIME_PERMISSIONS flag at com.android.server.pm.PackageInstallerService.createSessionInternal(PackageInstallerService.java:459) at com.android.server.pm.PackageInstallerService.createSession(PackageInstallerService.java:417) at com.android.server.pm.PackageManagerShellCommand.doCreateSession(PackageManagerShellCommand.java:2418) at com.android.server.pm.PackageManagerShellCommand.runInstall(PackageManagerShellCommand.java:907) at com.android.server.pm.PackageManagerShellCommand.onCommand(PackageManagerShellCommand.java:158) at android.os.ShellCommand.exec(ShellCommand.java:103) at com.android.server.pm.PackageManagerService.onShellCommand(PackageManagerService.java:21933) at android.os.Binder.shellCommand(Binder.java:634) at android.os.Binder.onTransact(Binder.java:532) at android.content.pm.IPackageManager$Stub.onTransact(IPackageManager.java:2809) at com.android.server.pm.PackageManagerService.onTransact(PackageManagerService.java:4023) at android.os.Binder.execTransact(Binder.java:735) * Try: Run with --stacktrace option to get the stack trace. Run with --info or --debug option to get more log output. Run with --scan to get full insights. * Get more help at https://help.gradle.org BUILD FAILED in 35s at makeError (/Users/xiongwei/Documents/workspace/reactnativestudy/my_app/node_modules/execa/index.js:174:9) at /Users/xiongwei/Documents/workspace/reactnativestudy/my_app/node_modules/execa/index.js:278:16 at processTicksAndRejections (internal/process/task_queues.js:97:5) at async runOnAllDevices (/Users/xiongwei/Documents/workspace/reactnativestudy/my_app/node_modules/@react-native-community/cli-platform-android/build/commands/runAndroid/runOnAllDevices.js:94:5) at async Command.handleAction (/Users/xiongwei/Documents/workspace/reactnativestudy/my_app/node_modules/react-native/node_modules/@react-native-community/cli/build/index.js:186:9) info Run CLI with --verbose flag for more details.报木有权限,这是啥原因呢?度娘一下:https://www.jianshu.com/p/0dde41a26231,原来是需要打开开发者的这个选项【我调试的设备是红米7,MIUI11.0.7,不同的手机设置地方可能不太一样】:
再来执行一下安装命令:
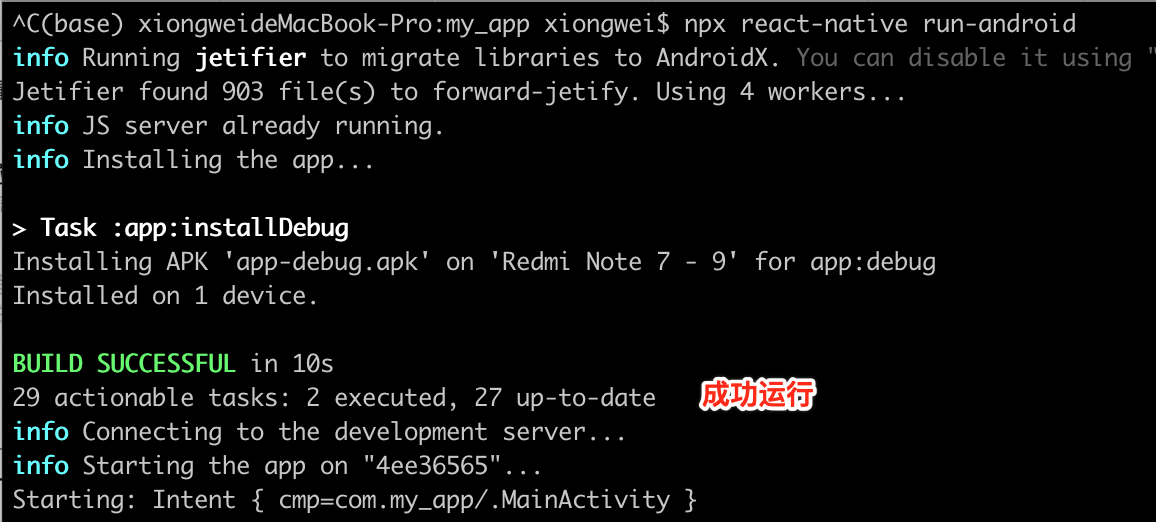
此时手机上会出现正在构建的提示:
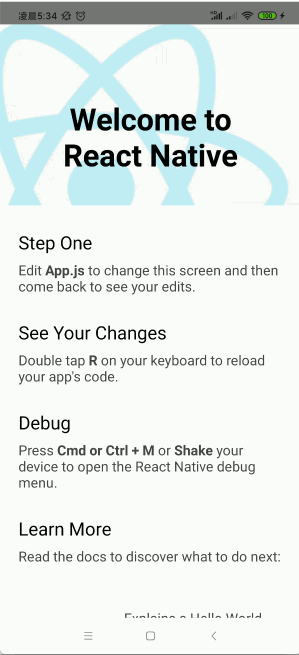
构建完成之后,标准的RN的DEMO页面就出现了: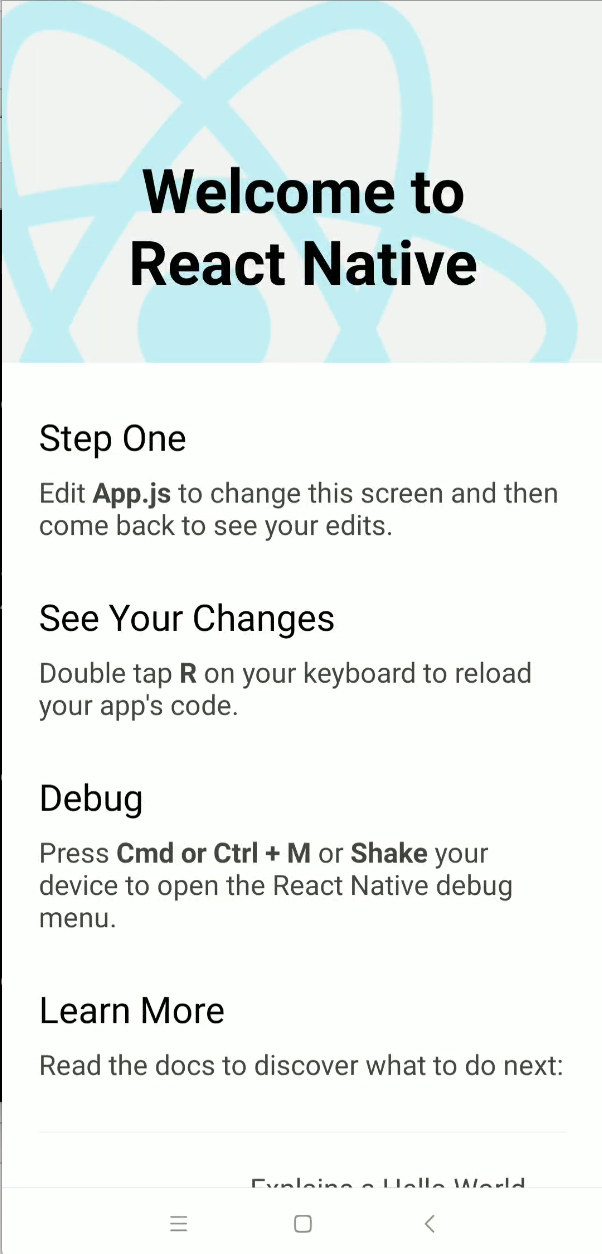
其中提示按键盘可以重新加载和调出开发者菜单,注意:如果是真机此时的按键一定要在这个命令窗口进行按键操作:
下面来试一下效果:
另外对于真机还有摇一摇手机的方式来调出,也就是如界面提示所示:
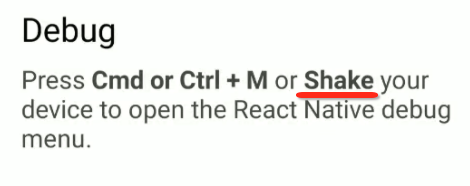
咱们来试一下:
由于录屏看不到手摇的效果,这里得自行体会一下,注意要左右摇,上下摇貌似不太灵敏。
5、Modifying your app:
接下来用webstorm打开创建的工程,打算修改一下来看一下效果:
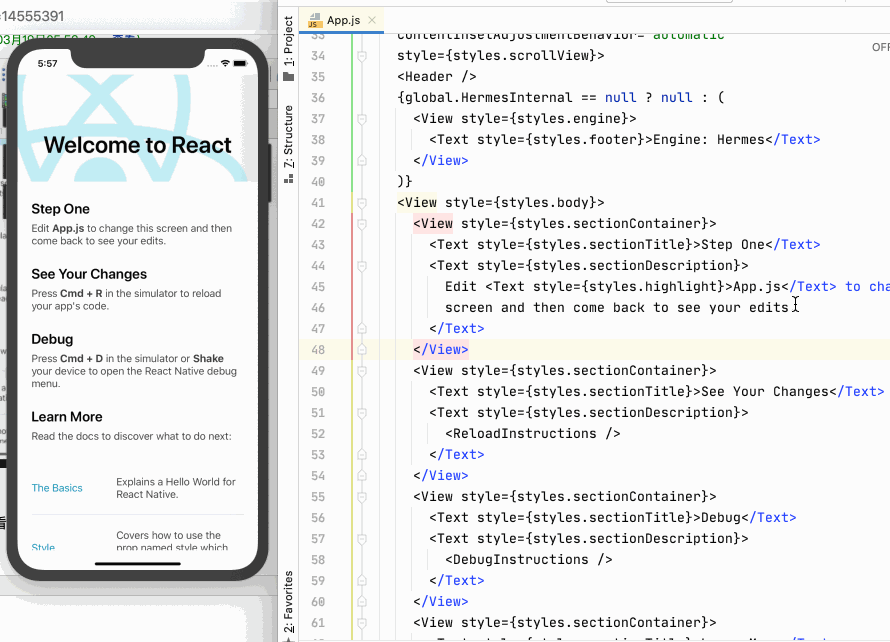
然后修改一下App.js文件,先来贴一下官方生成的代码:
/**
 * Sample React Native App
 * https://github.com/facebook/react-native
 *
 * @format
 * @flow strict-local
 */

import React from 'react';
import type {Node} from 'react';
import {
  SafeAreaView,
  ScrollView,
  StatusBar,
  StyleSheet,
  Text,
  useColorScheme,
  View,
} from 'react-native';

import {
  Colors,
  DebugInstructions,
  Header,
  LearnMoreLinks,
  ReloadInstructions,
} from 'react-native/Libraries/NewAppScreen';

const Section = ({children, title}): Node => {
  const isDarkMode = useColorScheme() === 'dark';
  return (
    <View style={styles.sectionContainer}>
      <Text
        style={[
          styles.sectionTitle,
          {
            color: isDarkMode ? Colors.white : Colors.black,
          },
        ]}>
        {title}
      </Text>
      <Text
        style={[
          styles.sectionDescription,
          {
            color: isDarkMode ? Colors.light : Colors.dark,
          },
        ]}>
        {children}
      </Text>
    </View>
  );
};

const App: () => Node = () => {
  const isDarkMode = useColorScheme() === 'dark';

  const backgroundStyle = {
    backgroundColor: isDarkMode ? Colors.darker : Colors.lighter,
  };

  return (
    <SafeAreaView style={backgroundStyle}>
      <StatusBar barStyle={isDarkMode ? 'light-content' : 'dark-content'} />
      <ScrollView
        contentInsetAdjustmentBehavior="automatic"
        style={backgroundStyle}>
        <Header />
        <View
          style={{
            backgroundColor: isDarkMode ? Colors.black : Colors.white,
          }}>
          <Section title="Step One">
            Edit <Text style={styles.highlight}>App.js</Text> to change this
            screen and then come back to see your edits.
          </Section>
          <Section title="See Your Changes">
            <ReloadInstructions />
          </Section>
          <Section title="Debug">
            <DebugInstructions />
          </Section>
          <Section title="Learn More">
            Read the docs to discover what to do next:
          </Section>
          <LearnMoreLinks />
        </View>
      </ScrollView>
    </SafeAreaView>
  );
};

const styles = StyleSheet.create({
  sectionContainer: {
    marginTop: 32,
    paddingHorizontal: 24,
  },
  sectionTitle: {
    fontSize: 24,
    fontWeight: '600',
  },
  sectionDescription: {
    marginTop: 8,
    fontSize: 18,
    fontWeight: '400',
  },
  highlight: {
    fontWeight: '700',
  },
});

export default App;
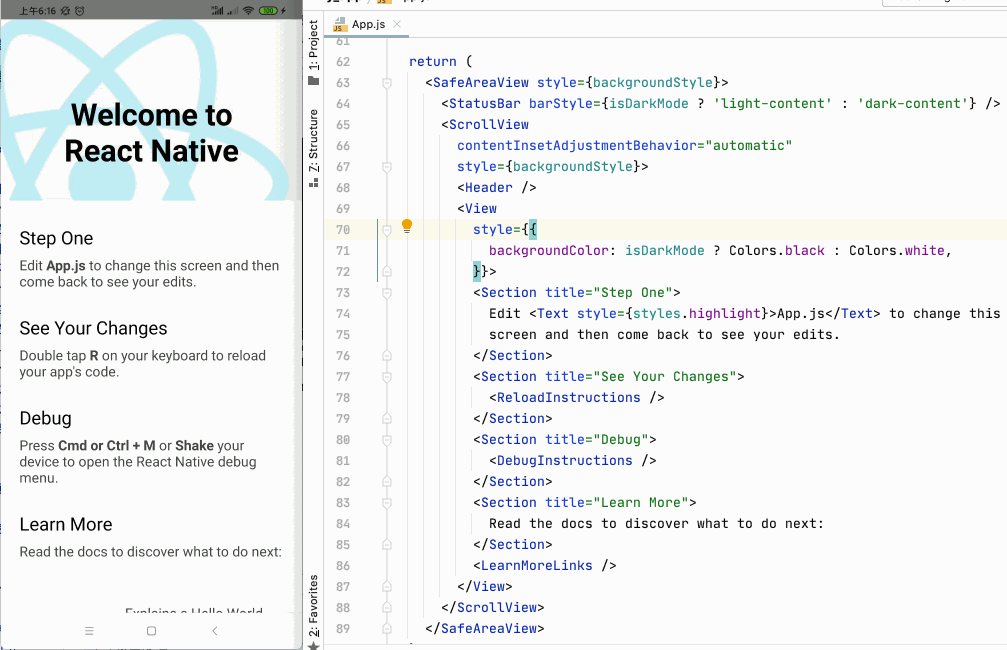
这里简单修改一下: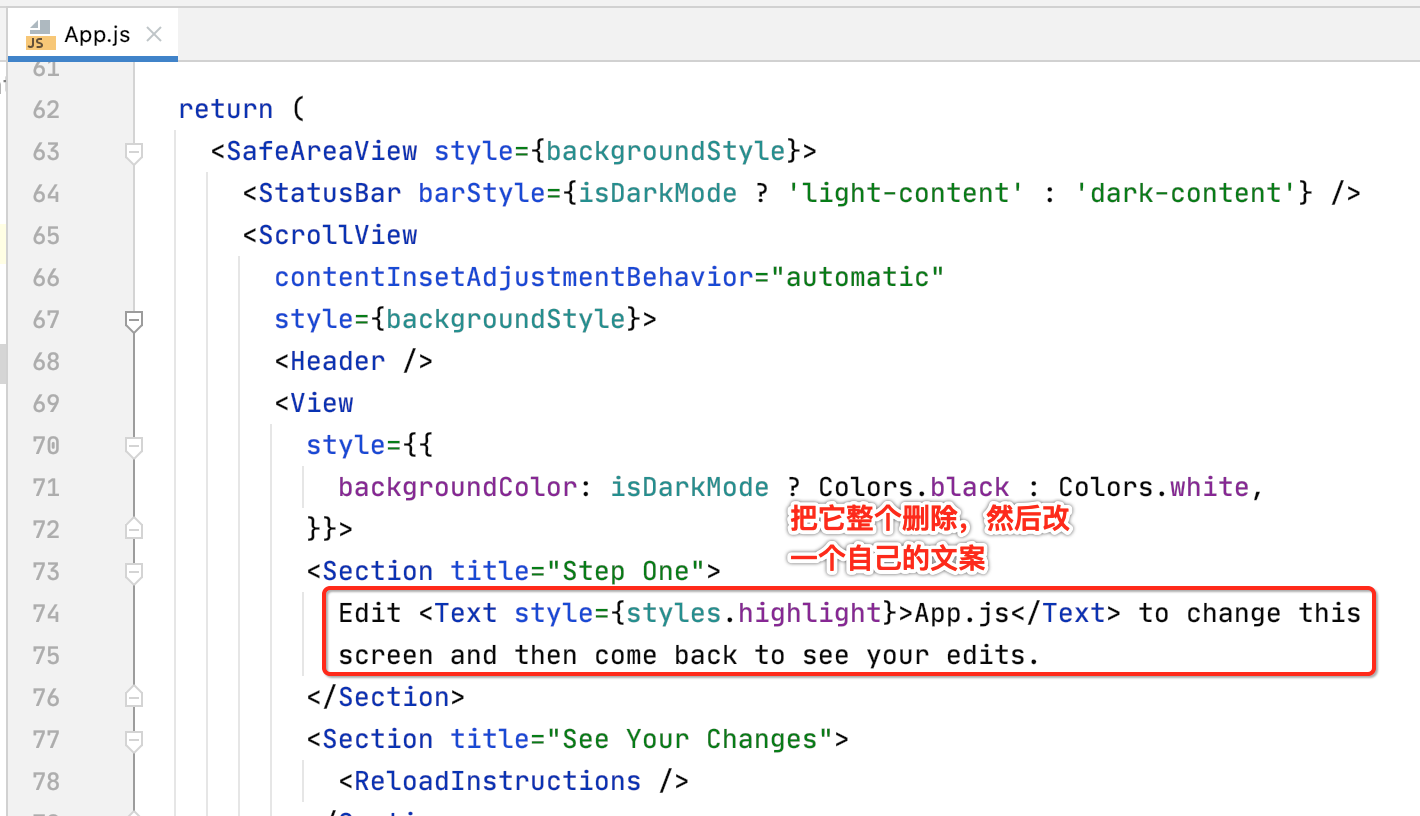
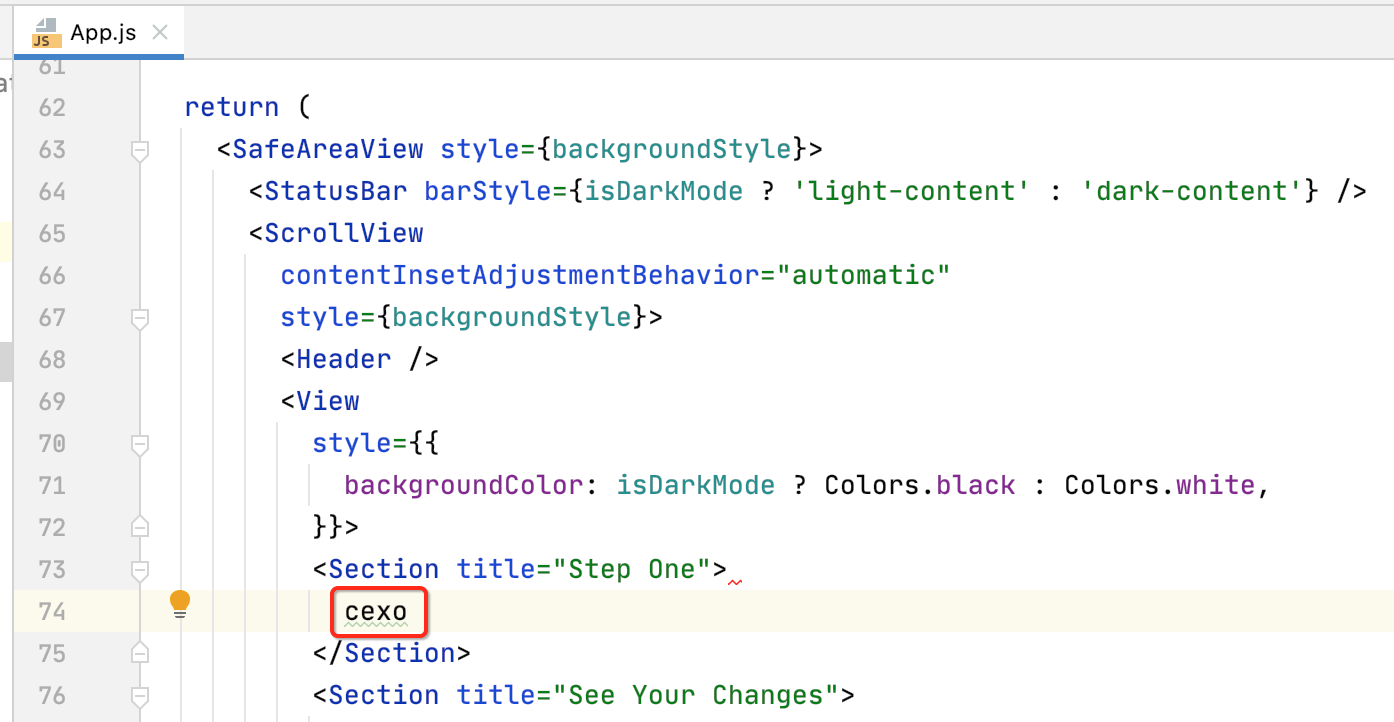
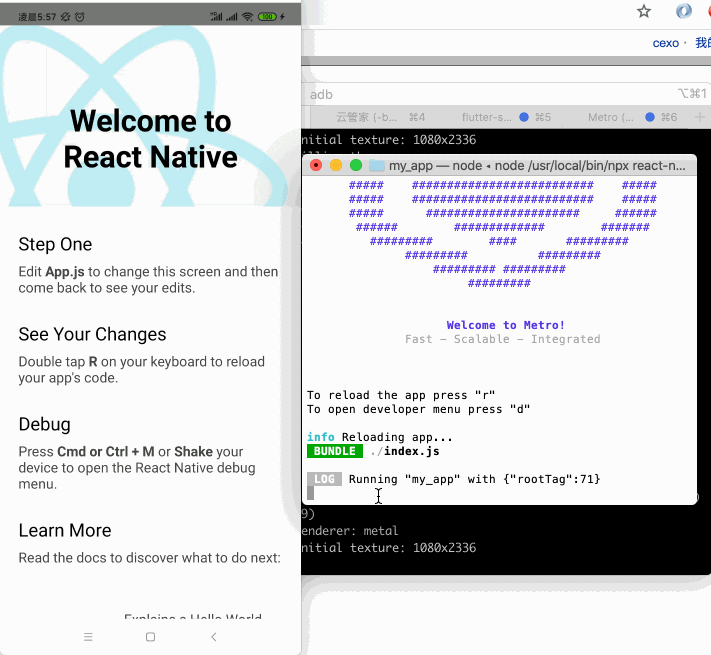
好,看一下它的热重载效果,还是回到metro终端,按r键,发现有时候会出现这个情况:
明明我改了代码呀,此时我们用摇一摇调出开发者菜单的reload试一下,发现直接报错了:
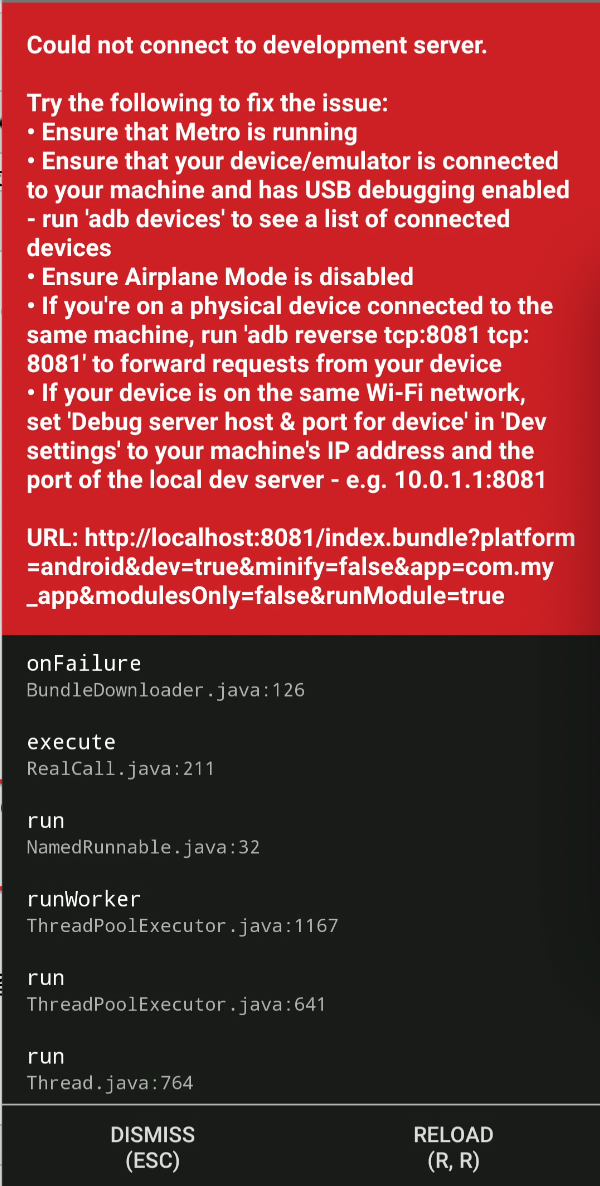
遇到这种情况,不要慌,重新用“npx react-native run-android”强制运行一次,然后再来到metro终端执行一下既可,而其实编辑代码就可以自动刷新了,都不用到metro窗口控r键,看一下:
每次修改代码之后,按"ctrl+s"就自动刷新了,不管怎样,可能热重载会有不生效的情况,当遇到时直接用“npx react-native run-android”重新编译运行定能解决。
IOS环境:
接下来看一下IOS环境。
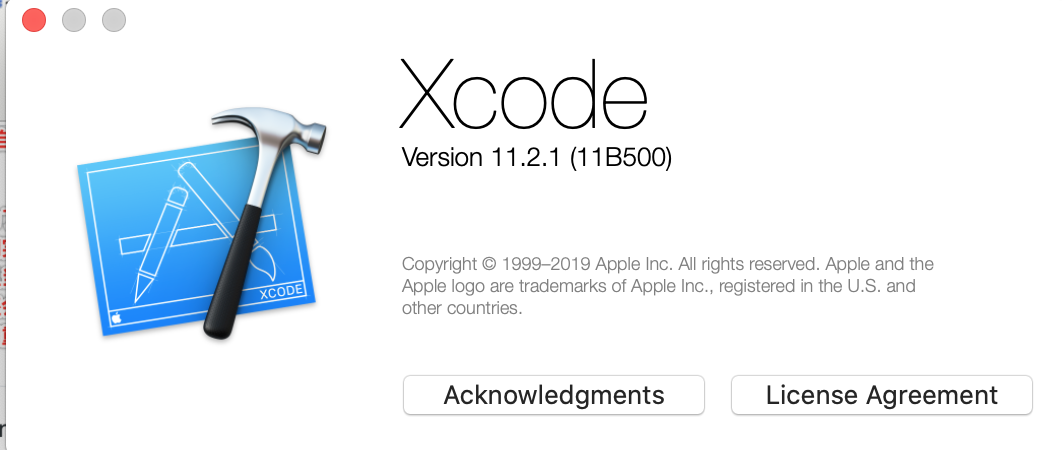
1、Xcode:
这块的安装就不多说了,直接上appstore进行安装既可。我本机的版本如下:
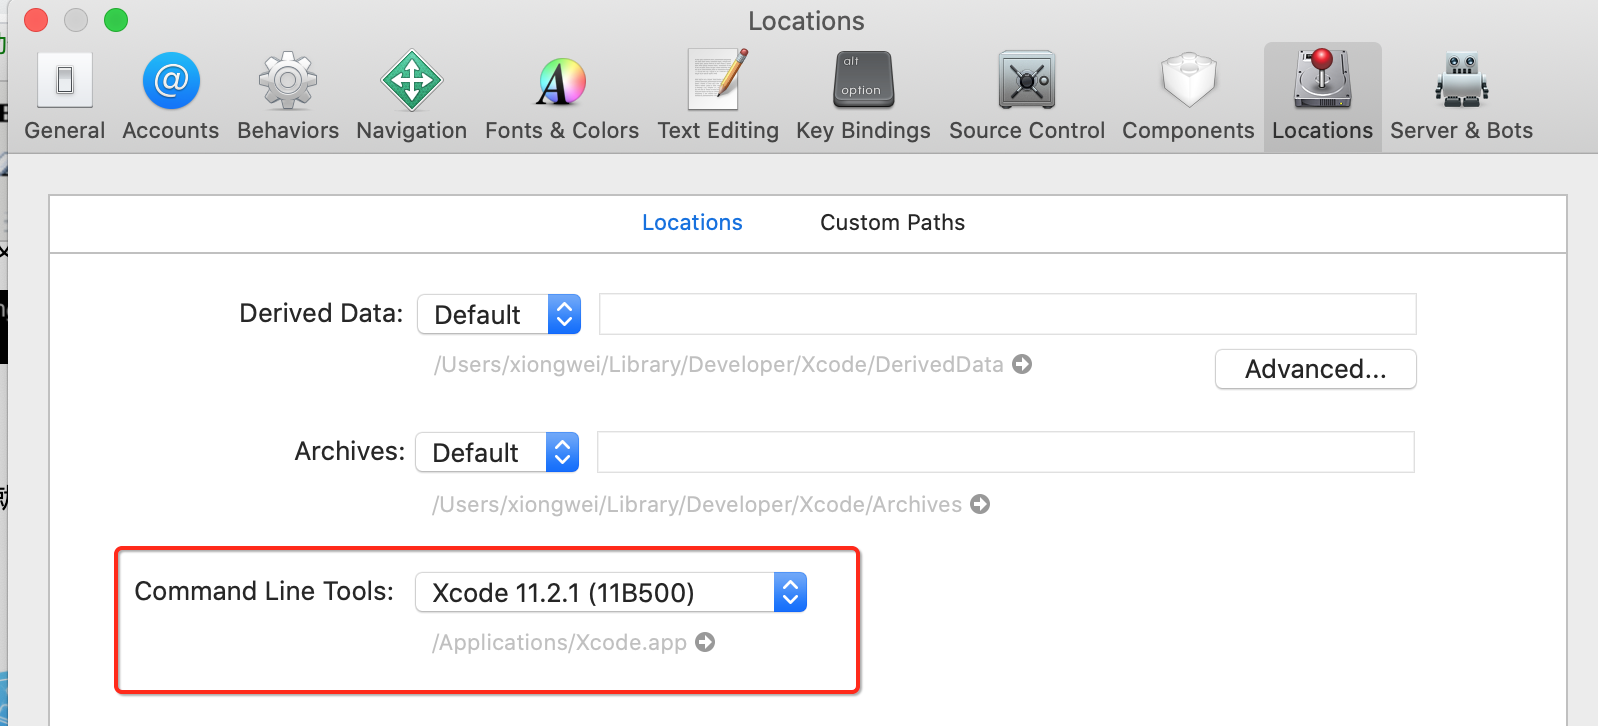
2、Command Line Tools:
打开"Preferences..." ,确保安装了它:
3、Installing an iOS Simulator in Xcode:
安装一个ios模拟器,由于我没有真机,这步肯定是必备的,当然如果有真机的小伙伴这一步可有可无。
4、CocoaPods:
如官网所示使用该命令进行安装:
![]()
整个安装过程日志如下:
(base) xiongweideMBP:reactnativestudy xiongwei$ sudo gem install cocoapods
Password:
Fetching concurrent-ruby-1.1.8.gem
Fetching i18n-1.8.9.gem
Fetching thread_safe-0.3.6.gem
Fetching tzinfo-1.2.9.gem
Fetching nap-1.1.0.gem
Fetching fuzzy_match-2.0.4.gem
Fetching activesupport-5.2.4.5.gem
Fetching httpclient-2.8.3.gem
Fetching algoliasearch-1.27.5.gem
Fetching ffi-1.15.0.gem
Fetching ethon-0.12.0.gem
Fetching typhoeus-1.4.0.gem
Fetching netrc-0.11.0.gem
Fetching public_suffix-4.0.6.gem
Fetching addressable-2.7.0.gem
Fetching cocoapods-core-1.10.1.gem
Fetching claide-1.0.3.gem
Fetching cocoapods-deintegrate-1.0.4.gem
Fetching cocoapods-downloader-1.4.0.gem
Fetching cocoapods-plugins-1.0.0.gem
Fetching cocoapods-search-1.0.0.gem
Fetching cocoapods-trunk-1.5.0.gem
Fetching cocoapods-try-1.2.0.gem
Fetching molinillo-0.6.6.gem
Fetching atomos-0.1.3.gem
Fetching colored2-3.1.2.gem
Fetching nanaimo-0.3.0.gem
Fetching xcodeproj-1.19.0.gem
Fetching escape-0.0.4.gem
Fetching fourflusher-2.3.1.gem
Fetching gh_inspector-1.1.3.gem
Fetching ruby-macho-1.4.0.gem
Fetching cocoapods-1.10.1.gem
Successfully installed concurrent-ruby-1.1.8
Successfully installed i18n-1.8.9
Successfully installed thread_safe-0.3.6
Successfully installed tzinfo-1.2.9
Successfully installed activesupport-5.2.4.5
Successfully installed nap-1.1.0
Successfully installed fuzzy_match-2.0.4
Successfully installed httpclient-2.8.3
A new major version is available for Algolia! Please now use the https://rubygems.org/gems/algolia gem to get the latest features.
Successfully installed algoliasearch-1.27.5
Building native extensions. This could take a while...
Successfully installed ffi-1.15.0
Successfully installed ethon-0.12.0
Successfully installed typhoeus-1.4.0
Successfully installed netrc-0.11.0
Successfully installed public_suffix-4.0.6
Successfully installed addressable-2.7.0
Successfully installed cocoapods-core-1.10.1
Successfully installed claide-1.0.3
Successfully installed cocoapods-deintegrate-1.0.4
Successfully installed cocoapods-downloader-1.4.0
Successfully installed cocoapods-plugins-1.0.0
Successfully installed cocoapods-search-1.0.0
Successfully installed cocoapods-trunk-1.5.0
Successfully installed cocoapods-try-1.2.0
Successfully installed molinillo-0.6.6
Successfully installed atomos-0.1.3
Successfully installed colored2-3.1.2
Successfully installed nanaimo-0.3.0
xcodeproj's executable "xcodeproj" conflicts with /usr/local/bin/xcodeproj
Overwrite the executable? [yN]  ^[y
xcodeproj's executable "xcodeproj" conflicts with /usr/local/bin/xcodeproj
Overwrite the executable? [yN]  y
Successfully installed xcodeproj-1.19.0
Successfully installed escape-0.0.4
Successfully installed fourflusher-2.3.1
Successfully installed gh_inspector-1.1.3
Successfully installed ruby-macho-1.4.0
cocoapods's executable "pod" conflicts with /usr/local/bin/pod
Overwrite the executable? [yN]  y
Successfully installed cocoapods-1.10.1
Parsing documentation for concurrent-ruby-1.1.8
Installing ri documentation for concurrent-ruby-1.1.8
Parsing documentation for i18n-1.8.9
Installing ri documentation for i18n-1.8.9
Parsing documentation for thread_safe-0.3.6
Installing ri documentation for thread_safe-0.3.6
Parsing documentation for tzinfo-1.2.9
Installing ri documentation for tzinfo-1.2.9
Parsing documentation for activesupport-5.2.4.5
Installing ri documentation for activesupport-5.2.4.5
Parsing documentation for nap-1.1.0
Installing ri documentation for nap-1.1.0
Parsing documentation for fuzzy_match-2.0.4
Installing ri documentation for fuzzy_match-2.0.4
Parsing documentation for httpclient-2.8.3
Installing ri documentation for httpclient-2.8.3
Parsing documentation for algoliasearch-1.27.5
Installing ri documentation for algoliasearch-1.27.5
Parsing documentation for ffi-1.15.0
Installing ri documentation for ffi-1.15.0
Parsing documentation for ethon-0.12.0
Installing ri documentation for ethon-0.12.0
Parsing documentation for typhoeus-1.4.0
Installing ri documentation for typhoeus-1.4.0
Parsing documentation for netrc-0.11.0
Installing ri documentation for netrc-0.11.0
Parsing documentation for public_suffix-4.0.6
Installing ri documentation for public_suffix-4.0.6
Parsing documentation for addressable-2.7.0
Installing ri documentation for addressable-2.7.0
Parsing documentation for cocoapods-core-1.10.1
Installing ri documentation for cocoapods-core-1.10.1
Parsing documentation for claide-1.0.3
Installing ri documentation for claide-1.0.3
Parsing documentation for cocoapods-deintegrate-1.0.4
Installing ri documentation for cocoapods-deintegrate-1.0.4
Parsing documentation for cocoapods-downloader-1.4.0
Installing ri documentation for cocoapods-downloader-1.4.0
Parsing documentation for cocoapods-plugins-1.0.0
Installing ri documentation for cocoapods-plugins-1.0.0
Parsing documentation for cocoapods-search-1.0.0
Installing ri documentation for cocoapods-search-1.0.0
Parsing documentation for cocoapods-trunk-1.5.0
Installing ri documentation for cocoapods-trunk-1.5.0
Parsing documentation for cocoapods-try-1.2.0
Installing ri documentation for cocoapods-try-1.2.0
Parsing documentation for molinillo-0.6.6
Installing ri documentation for molinillo-0.6.6
Parsing documentation for atomos-0.1.3
Installing ri documentation for atomos-0.1.3
Parsing documentation for colored2-3.1.2
Installing ri documentation for colored2-3.1.2
Parsing documentation for nanaimo-0.3.0
Installing ri documentation for nanaimo-0.3.0
Parsing documentation for xcodeproj-1.19.0
Installing ri documentation for xcodeproj-1.19.0
Parsing documentation for escape-0.0.4
Installing ri documentation for escape-0.0.4
Parsing documentation for fourflusher-2.3.1
Installing ri documentation for fourflusher-2.3.1
Parsing documentation for gh_inspector-1.1.3
Installing ri documentation for gh_inspector-1.1.3
Parsing documentation for ruby-macho-1.4.0
Installing ri documentation for ruby-macho-1.4.0
Parsing documentation for cocoapods-1.10.1
Installing ri documentation for cocoapods-1.10.1
Done installing documentation for concurrent-ruby, i18n, thread_safe, tzinfo, activesupport, nap, fuzzy_match, httpclient, algoliasearch, ffi, ethon, typhoeus, netrc, public_suffix, addressable, cocoapods-core, claide, cocoapods-deintegrate, cocoapods-downloader, cocoapods-plugins, cocoapods-search, cocoapods-trunk, cocoapods-try, molinillo, atomos, colored2, nanaimo, xcodeproj, escape, fourflusher, gh_inspector, ruby-macho, cocoapods after 72 seconds
33 gems installed
5、Creating a new application:
tips:这一步如果已经创建过了可以省略,在上面android环境中已经创建了一个项目了,为啥在ios中又拎出来呢,因为有一些异常情况在上面忘了说明了,这里再创建一次,真实对于一个RN项目只需要创建一次既可,这一点一定要注意哦~~
如官网所示:

执行一下命令:

稍等片刻之后,安装最后发现有一些小问题:
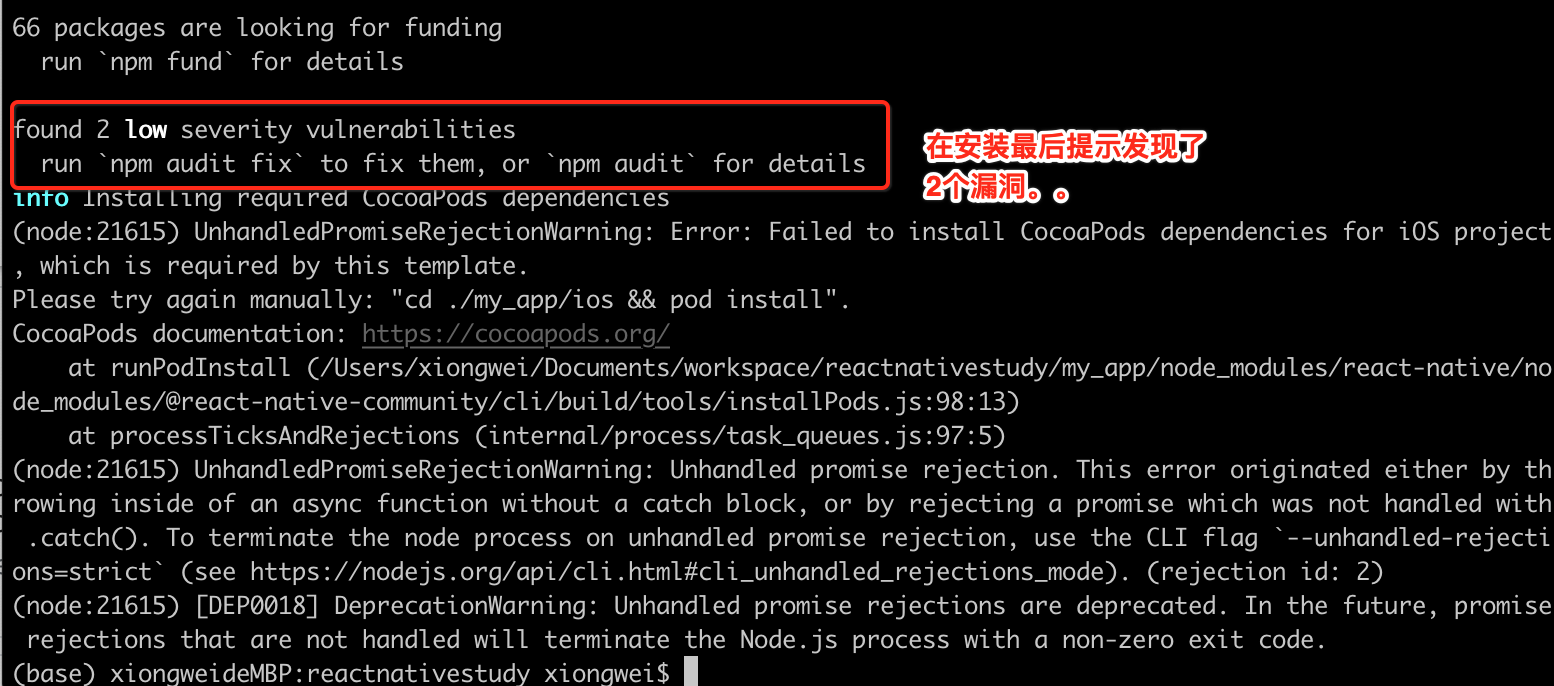
好吧,按提示来修复一下:
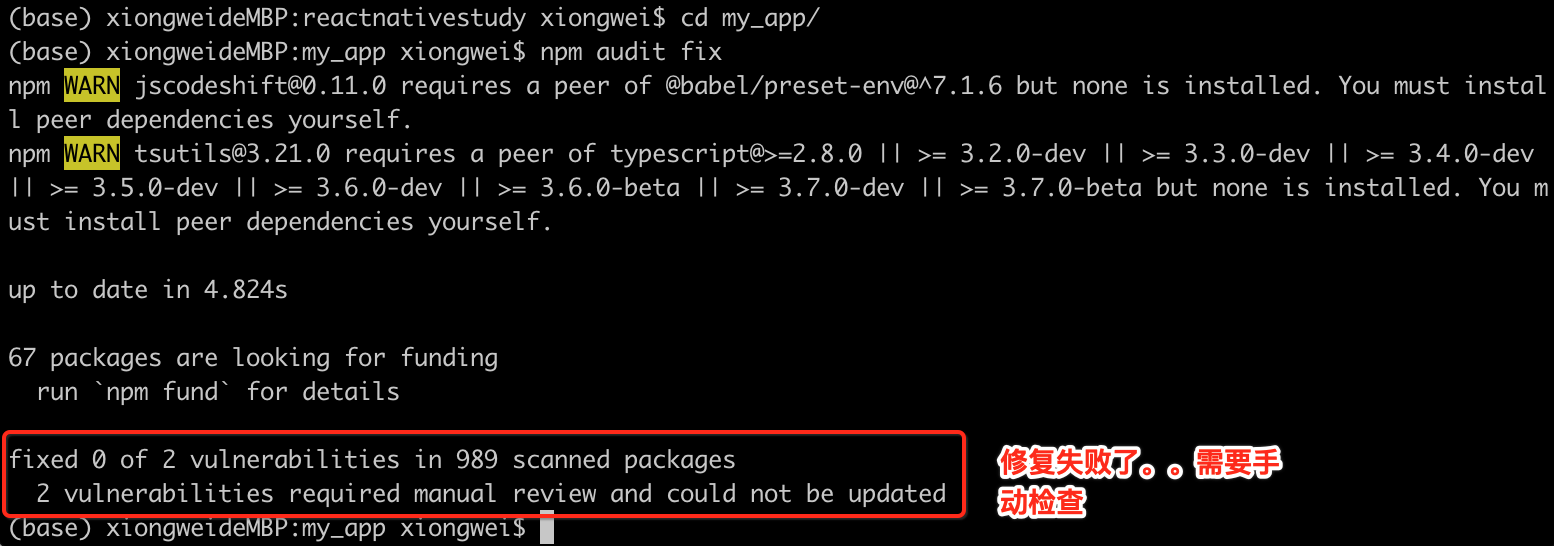
呃,先不管这么多吧,其实项目是已经创建成功了:

这里直接尝试运行到ios试一下效果。
6、Running your React Native application:
- Step 1: Start Metro:
这一步骤跟上面Android环境搭建的一样,目前已经启动了:
- Step 2: Start your application:

看接下来整个运行的一个曲折过程,各种错。。
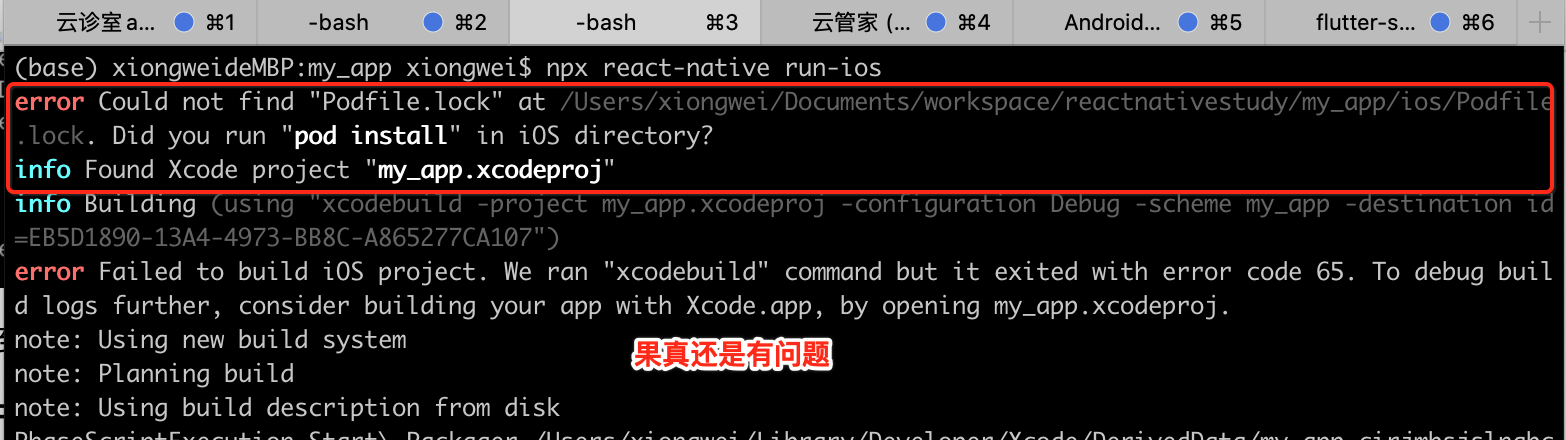
然后在日志最后看到如下错误:
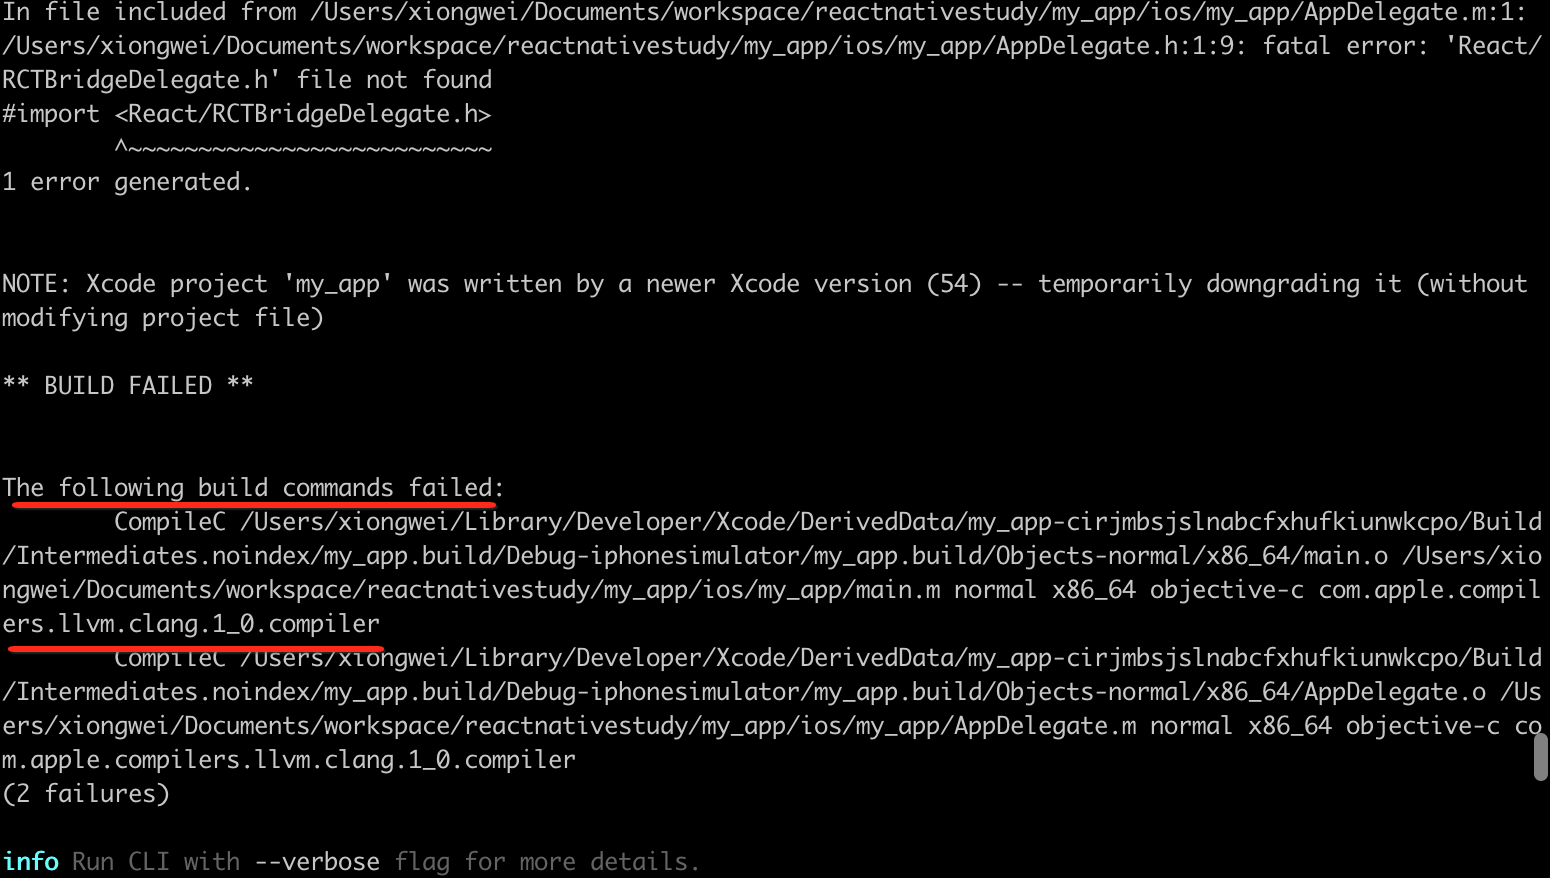
带着这样的关键字去google一下,搜到这么一个贴子:https://github.com/react-native-community/cli/issues/1311,
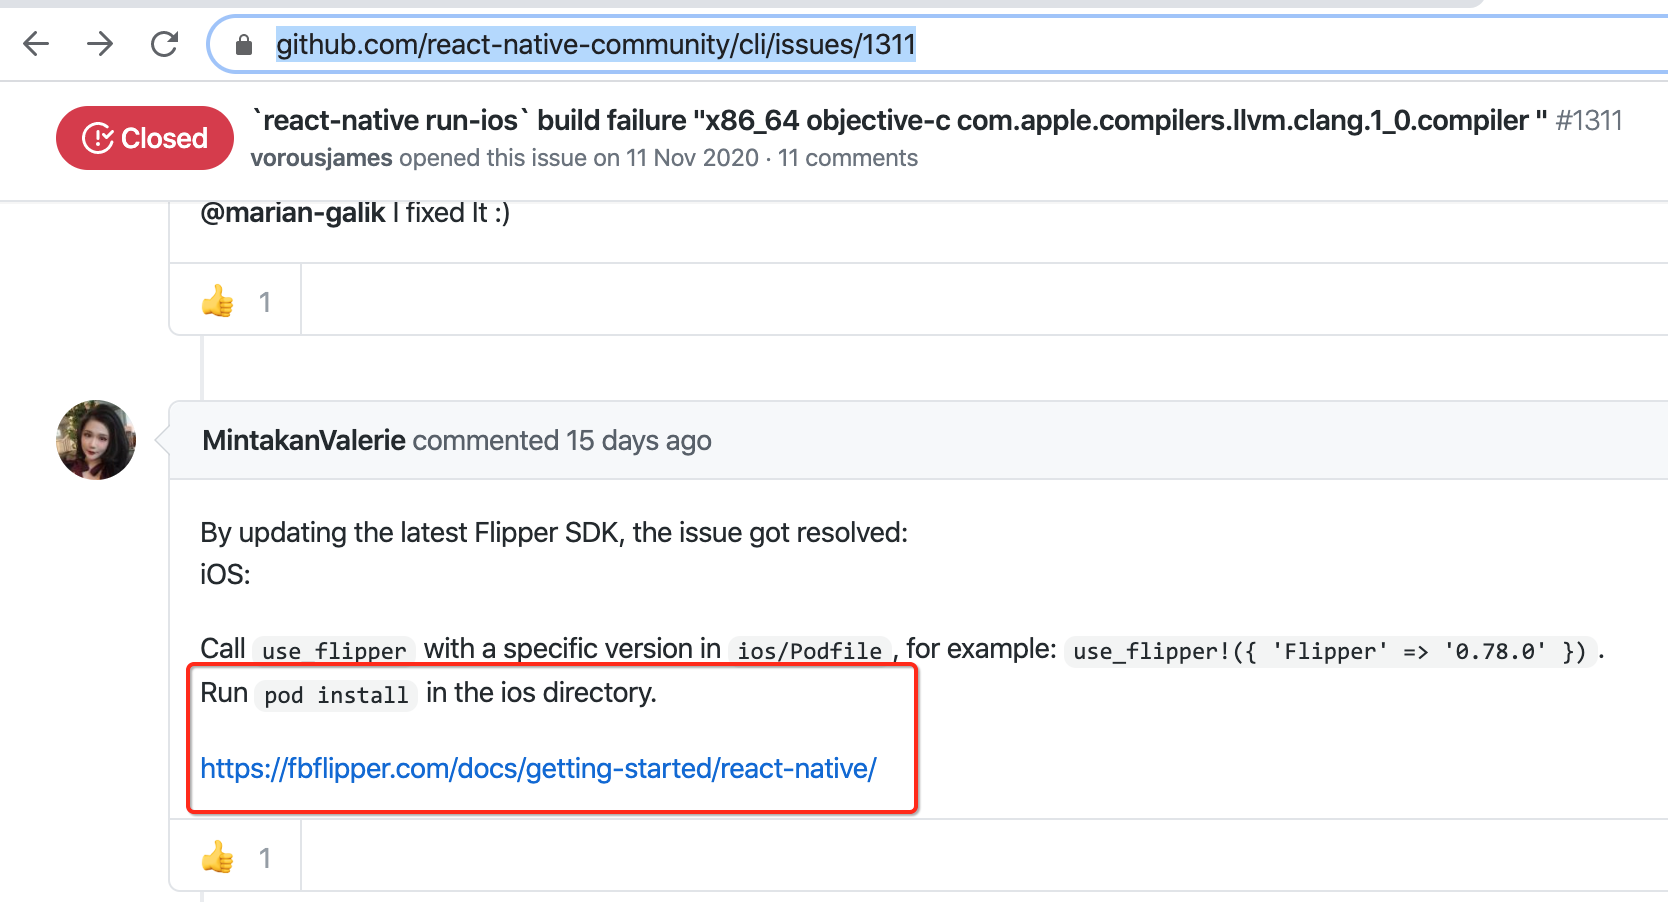
哦,到ios目录中运行一下"pob install",试一下:
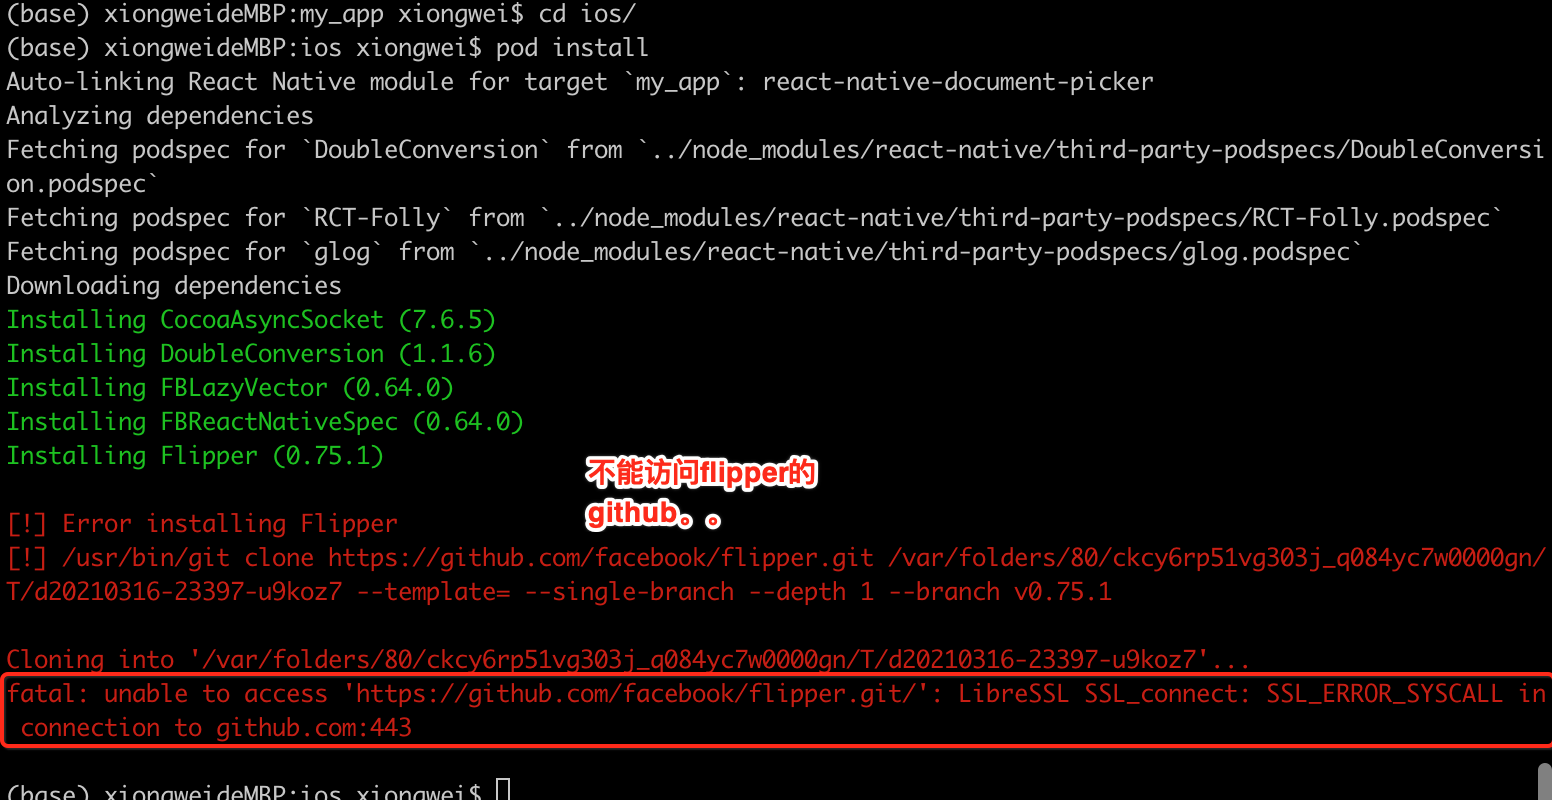
用网页访问一下,貌似确实是连不上:
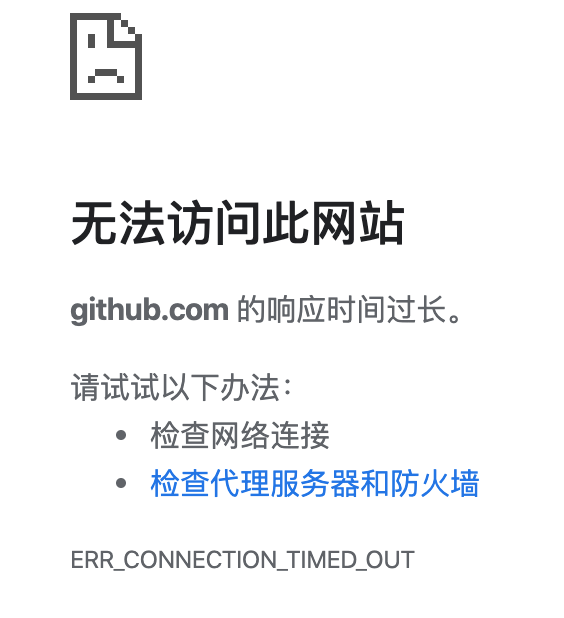
关于github上不去看了此贴https://blog.csdn.net/Hodors/article/details/103226958之后,发现取消一下全局代理貌似就可以了:
取消全局代理:
git config --global --unset http.proxy
git config --global --unset https.proxy
但是!!!还是不行,最后在贴子这个评论上看到了这句话才意识到,就是需要设置代理才行:

我的梯子用的是它:

然后对应的代理端口为【具体的代理端口得依赖于本机代理软件】:
git config --global http.proxy http://127.0.0.1:58591
git config --global https.proxy http://127.0.0.1:58591
然后再来进行安装,不要太顺:
(base) xiongweideMBP:ios xiongwei$ git config --global http.proxy http://127.0.0.1:58591
(base) xiongweideMBP:ios xiongwei$ git config --global https.proxy http://127.0.0.1:58591
(base) xiongweideMBP:ios xiongwei$ pod install
Auto-linking React Native module for target `my_app`: react-native-document-picker
Analyzing dependencies
Fetching podspec for `DoubleConversion` from `../node_modules/react-native/third-party-podspecs/DoubleConversion.podspec`
Fetching podspec for `RCT-Folly` from `../node_modules/react-native/third-party-podspecs/RCT-Folly.podspec`
Fetching podspec for `glog` from `../node_modules/react-native/third-party-podspecs/glog.podspec`
Downloading dependencies
Installing CocoaAsyncSocket (7.6.5)
Installing DoubleConversion (1.1.6)
Installing FBLazyVector (0.64.0)
Installing FBReactNativeSpec (0.64.0)
Installing Flipper (0.75.1)
Installing Flipper-DoubleConversion (1.1.7)
Installing Flipper-Folly (2.5.1)
Installing Flipper-Glog (0.3.6)
Installing Flipper-PeerTalk (0.0.4)
Installing Flipper-RSocket (1.3.0)
Installing FlipperKit (0.75.1)
Installing OpenSSL-Universal (1.1.180)
Installing RCT-Folly (2020.01.13.00)
Installing RCTRequired (0.64.0)
Installing RCTTypeSafety (0.64.0)
Installing React (0.64.0)
Installing React-Core (0.64.0)
Installing React-CoreModules (0.64.0)
Installing React-RCTActionSheet (0.64.0)
Installing React-RCTAnimation (0.64.0)
Installing React-RCTBlob (0.64.0)
Installing React-RCTImage (0.64.0)
Installing React-RCTLinking (0.64.0)
Installing React-RCTNetwork (0.64.0)
Installing React-RCTSettings (0.64.0)
Installing React-RCTText (0.64.0)
Installing React-RCTVibration (0.64.0)
Installing React-callinvoker (0.64.0)
Installing React-cxxreact (0.64.0)
Installing React-jsi (0.64.0)
Installing React-jsiexecutor (0.64.0)
Installing React-jsinspector (0.64.0)
Installing React-perflogger (0.64.0)
Installing React-runtimeexecutor (0.64.0)
Installing ReactCommon (0.64.0)
Installing Yoga (1.14.0)
Installing YogaKit (1.18.1)
Installing boost-for-react-native (1.63.0)
Installing glog (0.3.5)
Installing libevent (2.1.12)
Installing react-native-document-picker (5.0.1)
Generating Pods project
Integrating client project

[!] Please close any current Xcode sessions and use `my_app.xcworkspace` for this project from now on.
Pod installation complete! There are 50 dependencies from the Podfile and 41 total pods installed.

[!] FBReactNativeSpec has added 1 script phase. Please inspect before executing a build. See `https://guides.cocoapods.org/syntax/podspec.html#script_phases` for more information.
其中最后提示需要关闭一下xcode,然后此时咱们再来rn运行看一下:

然后google了这么一个贴子:https://developer.apple.com/forums/thread/656509,然后发现个大佬说了这句话:
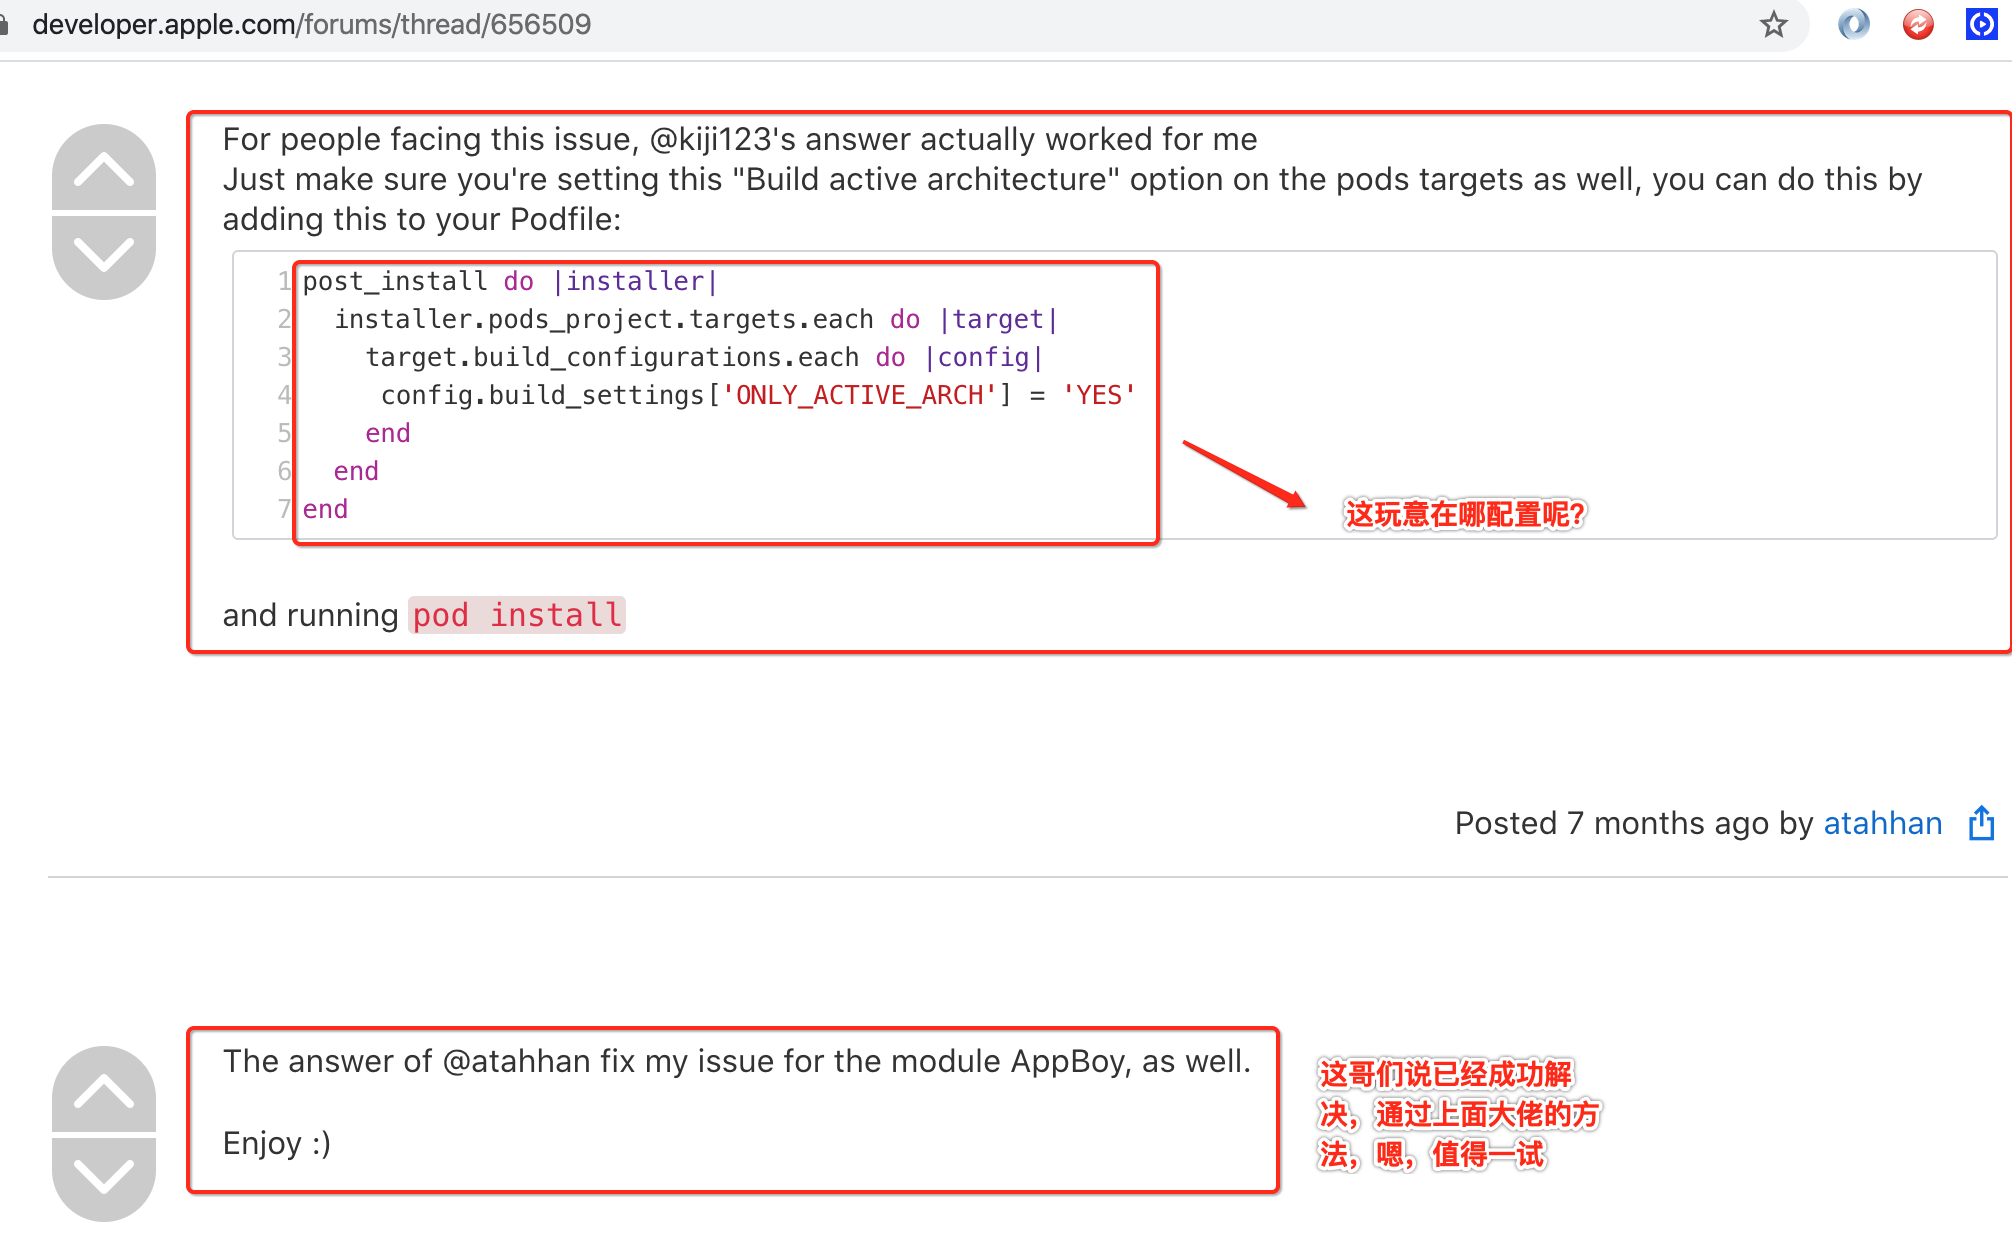
很遗憾,还是报错。。而且经过2天的各种网上的搜寻在我的机子上并未解决,编译解决了,但是就是无法在模拟器安装,总是报如下错:(base) xiongweideMacBook-Pro:my_app xiongwei$ npx react-native run-ios info Found Xcode workspace "my_app.xcworkspace" info Building (using "xcodebuild -workspace my_app.xcworkspace -configuration Debug -scheme my_app -destination id=4B986B00-DB5C-4BC2-88E8-9208EECCE46D") success Successfully built the app//这里编译成功了 info Installing "/Users/xiongwei/Library/Developer/Xcode/DerivedData/my_app-demfxoevpcgjzffobcmwsnnltnvh/Build/Products/Debug-iphonesimulator/my_app.app" An error was encountered processing the command (domain=IXUserPresentableErrorDomain, code=1): This app could not be installed at this time. Could not install at this time. Failed to chmod /Users/xiongwei/Library/Developer/CoreSimulator/Devices/4B986B00-DB5C-4BC2-88E8-9208EECCE46D/data/Bundle/Application/D643368A-9DED-46A0-A933-EF30ADF5EFD5/my_app.app/my_app : No such file or directory Underlying error (domain=MIInstallerErrorDomain, code=4): Failed to chmod /Users/xiongwei/Library/Developer/CoreSimulator/Devices/4B986B00-DB5C-4BC2-88E8-9208EECCE46D/data/Bundle/Application/D643368A-9DED-46A0-A933-EF30ADF5EFD5/my_app.app/my_app : No such file or directory info Launching "org.reactjs.native.example.my-app" error Failed to launch the app on simulator, An error was encountered processing the command (domain=FBSOpenApplicationServiceErrorDomain, code=1): The request to open "org.reactjs.native.example.my-app" failed. The request was denied by service delegate (SBMainWorkspace) for reason: NotFound ("Application "org.reactjs.native.example.my-app" is unknown to FrontBoard"). Underlying error (domain=FBSOpenApplicationErrorDomain, code=4): The operation couldn’t be completed. Application "org.reactjs.native.example.my-app" is unknown to FrontBoard. Application "org.reactjs.native.example.my-app" is unknown to FrontBoard.//运行总是报错
然后带着这样的错误在StackOverFlow上看到这么一个提示https://stackoverflow.com/questions/57510972/unable-to-install-reactnative-app-on-ios-simulator:
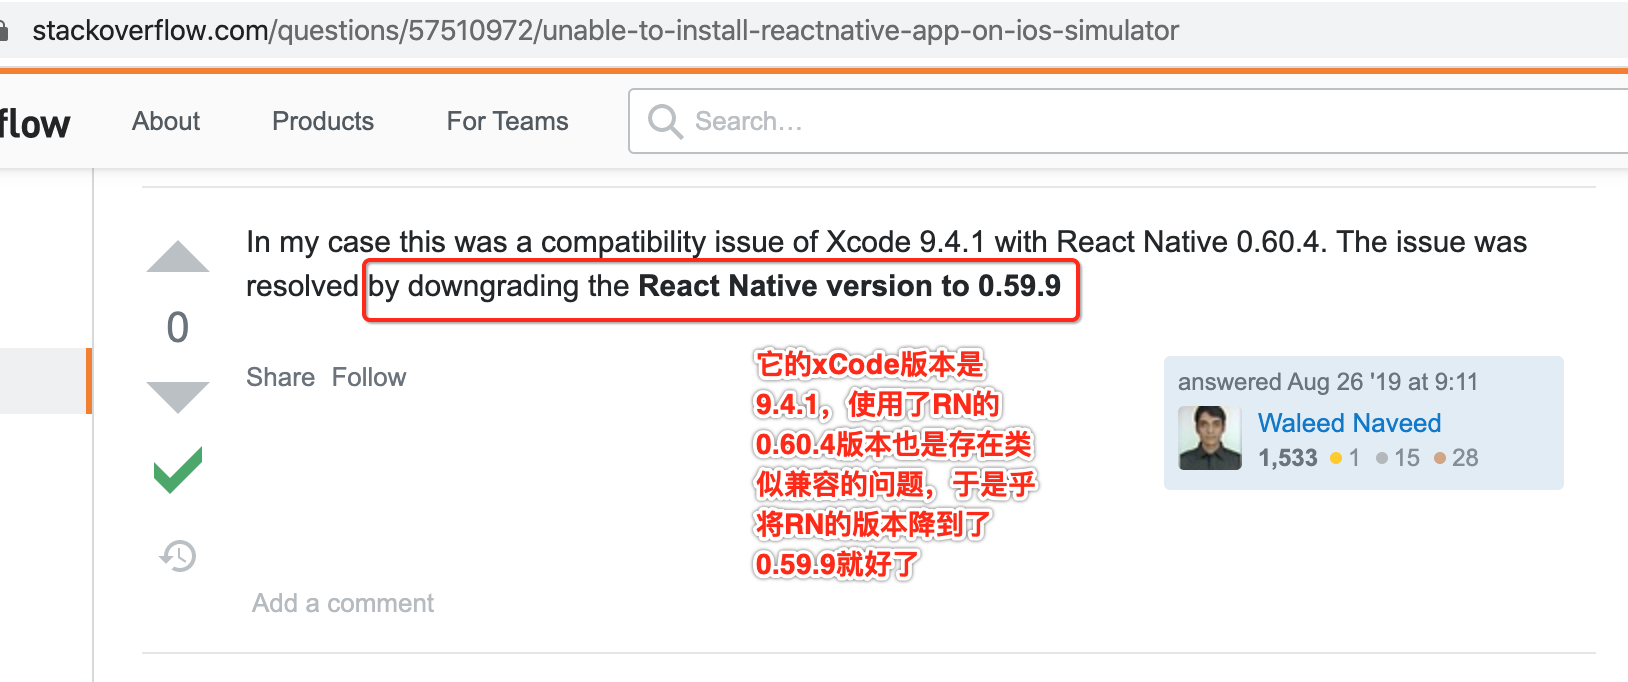
而且还有一个贴子https://stackoverflow.com/questions/59856755/ios-react-native-app-build-succeeded-but-app-not-getting-open-in-ios-device-si说需要将xCode进行升级,升到12以上版本。。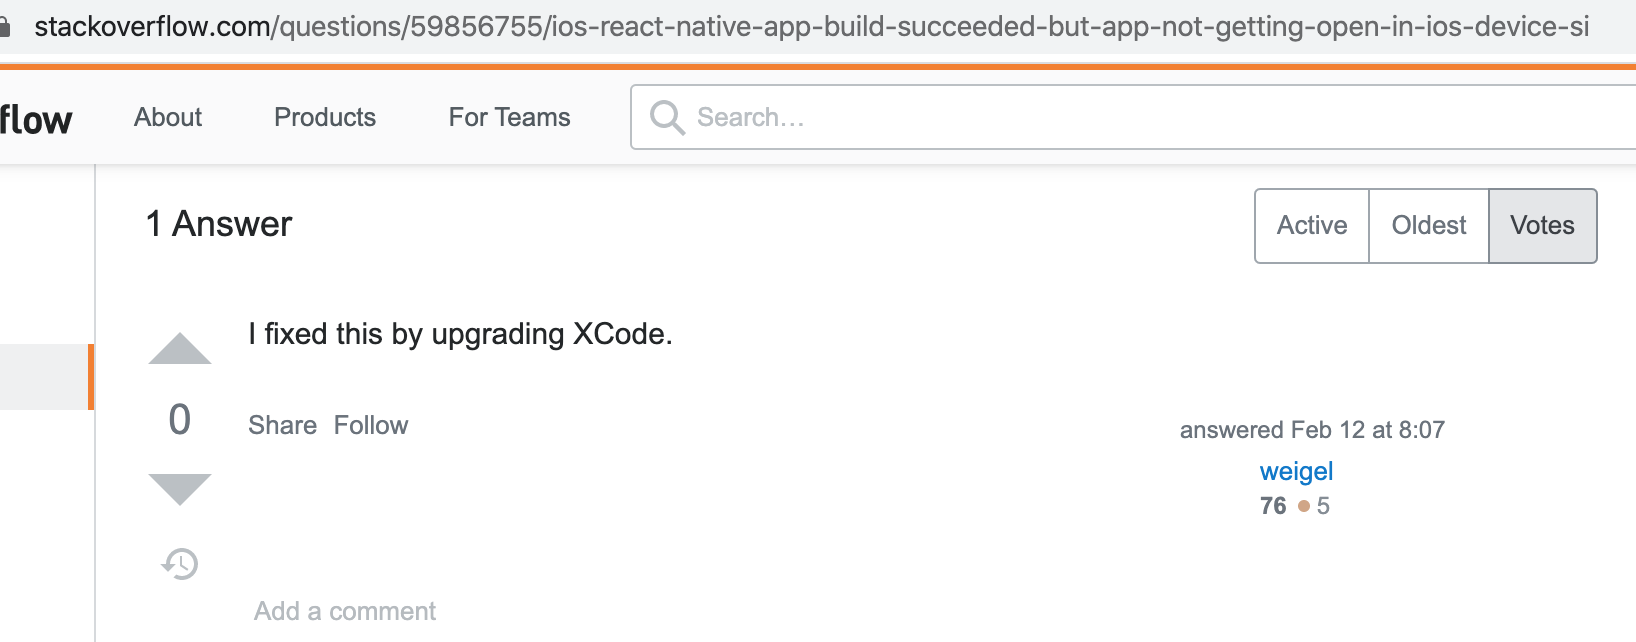
由于xCode12有11.6g的大小。。目前我的版本为:

升级Xcoder的方案不太想采纳,于是乎决定采用RN的降级策略,而实际工作中对于软件版本的选择也并不是越新越好,而对于学习来说,弄个次新版本完全不影响学习,所以接下来就是选择哪个次新版本的问题了,经过本地多次尝试,最后发现降为它就可以了【注意:每个人机器的环境不一样,可能适用的版本也会有差别,当遇到运行不了的,可以采用类似的降级策略进行尝试】:

那如何在创建工程时指定版本呢?官网有说明:
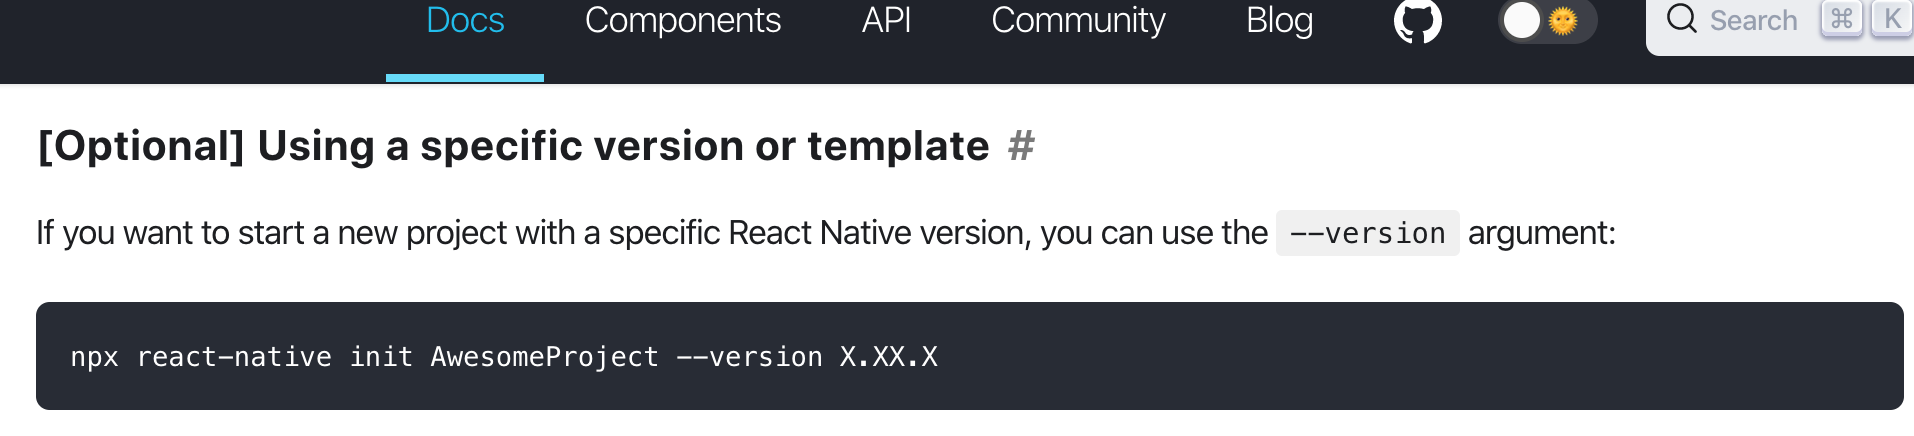
所以将之前创建的RN工程给删除掉,重新使用指定版本来创建: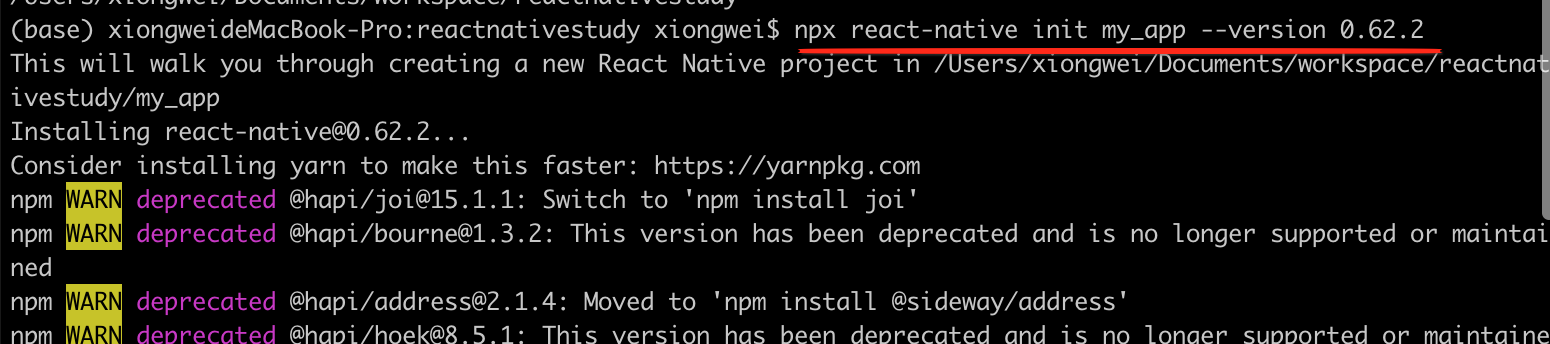
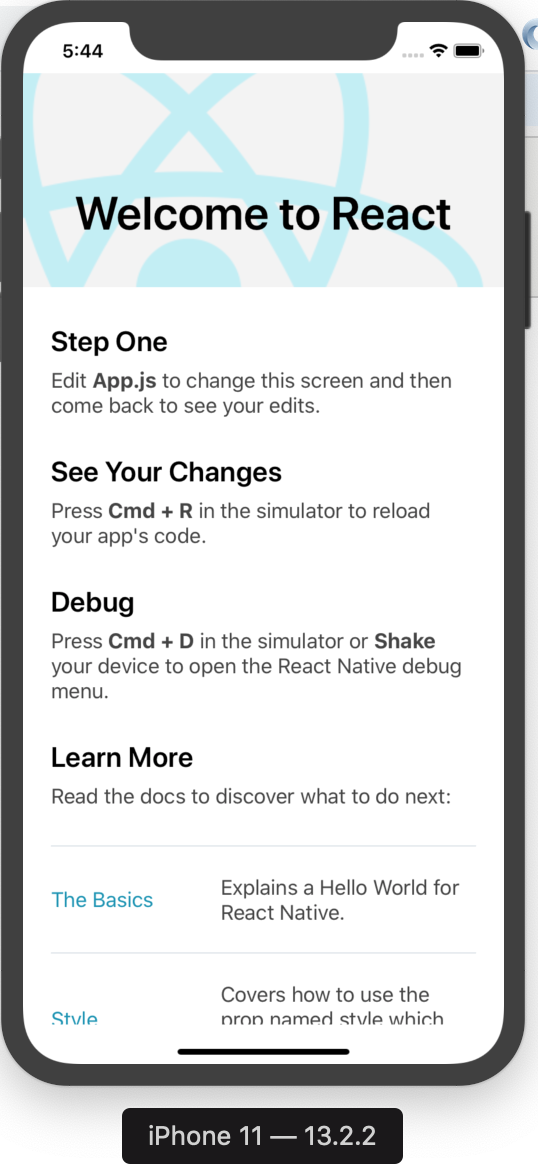
创建成功则可以进行运行了:

此过程需要耐心等待一下,最终就运行成功了,跟上面Android的效果一样:

其中会自动打开metro窗口的:
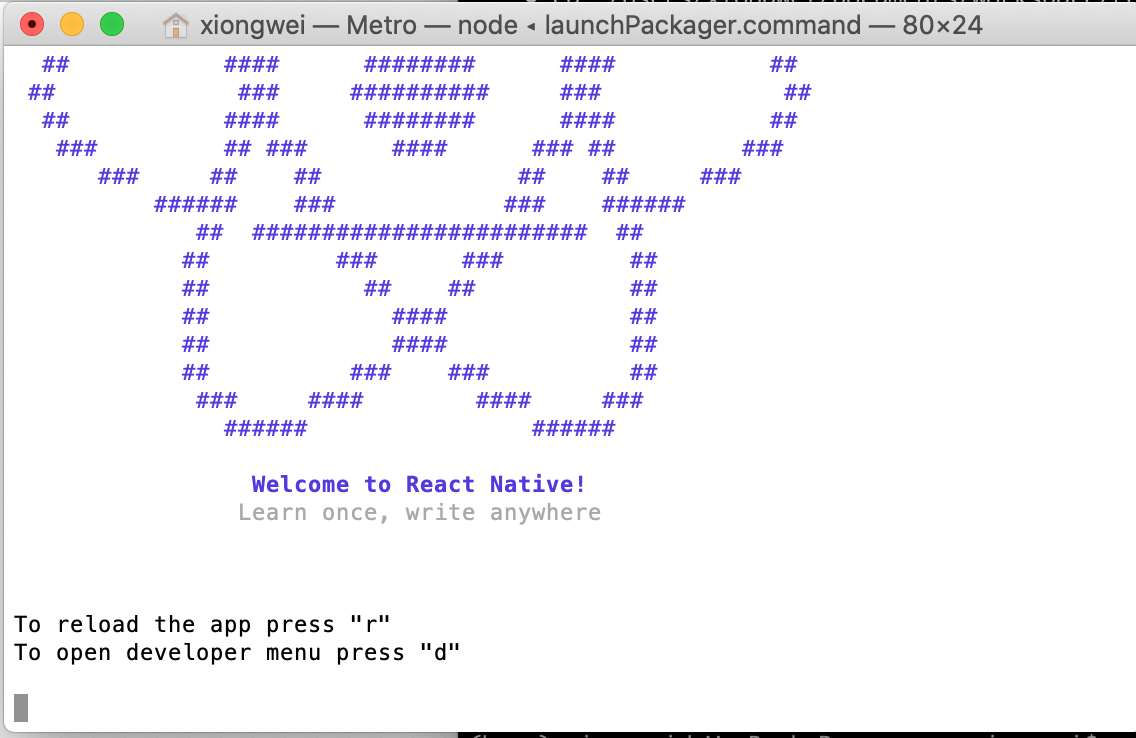
由于是模拟器,所以此时不用像上面运行真机Android那样对于热重载需要对着metro终端来进行按键,这里直接对模拟器上进行“cmd+r”和“cmd+d”既可: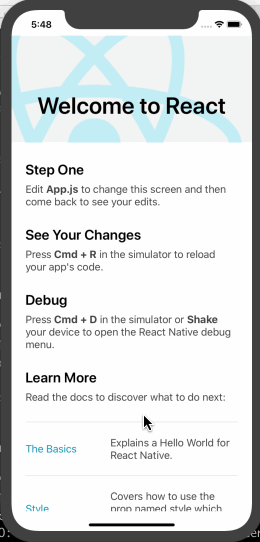
那选的这个版本在android运行上也正常么,测一下:(base) xiongweideMacBook-Pro:my_app xiongwei$ react-native run-android info Running jetifier to migrate libraries to AndroidX. You can disable it using "--no-jetifier" flag. Jetifier found 960 file(s) to forward-jetify. Using 4 workers... info JS server already running. info Installing the app... Downloading https://services.gradle.org/distributions/gradle-6.0.1-all.zip ...................................................................................................................................... Welcome to Gradle 6.0.1! Here are the highlights of this release: - Substantial improvements in dependency management, including - Publishing Gradle Module Metadata in addition to pom.xml - Advanced control of transitive versions - Support for optional features and dependencies - Rules to tweak published metadata - Support for Java 13 - Faster incremental Java and Groovy compilation - New Zinc compiler for Scala - VS2019 support - Support for Gradle Enterprise plugin 3.0 For more details see https://docs.gradle.org/6.0.1/release-notes.html Starting a Gradle Daemon (subsequent builds will be faster) > Task :app:compileDebugJavaWithJavac > Task :app:installDebug 06:04:36 V/ddms: execute: running am get-config 06:04:36 V/ddms: execute 'am get-config' on '4ee36565' : EOF hit. Read: -1 06:04:36 V/ddms: execute: returning Installing APK 'app-debug.apk' on 'Redmi Note 7 - 9' for app:debug 06:04:36 D/app-debug.apk: Uploading app-debug.apk onto device '4ee36565' 06:04:36 D/Device: Uploading file onto device '4ee36565' 06:04:36 D/ddms: Reading file permision of /Users/xiongwei/Documents/workspace/reactnativestudy/my_app/android/app/build/outputs/apk/debug/app-debug.apk as: rw-r--r-- 06:04:37 V/ddms: execute: running pm install -r -t "/data/local/tmp/app-debug.apk" 06:04:41 V/ddms: execute 'pm install -r -t "/data/local/tmp/app-debug.apk"' on '4ee36565' : EOF hit. Read: -1 06:04:41 V/ddms: execute: returning 06:04:41 V/ddms: execute: running rm "/data/local/tmp/app-debug.apk" 06:04:41 V/ddms: execute 'rm "/data/local/tmp/app-debug.apk"' on '4ee36565' : EOF hit. Read: -1 06:04:41 V/ddms: execute: returning Installed on 1 device. Deprecated Gradle features were used in this build, making it incompatible with Gradle 7.0. Use '--warning-mode all' to show the individual deprecation warnings. See https://docs.gradle.org/6.0.1/userguide/command_line_interface.html#sec:command_line_warnings BUILD SUCCESSFUL in 2m 25s 27 actionable tasks: 27 executed info Connecting to the development server... info Starting the app on "4ee36565"... Starting: Intent { cmp=com.my_app/.MainActivity }
妥妥的,所以在接下来的RN学习中,版本就由目前最新的0.64改为次新的0.62.2。
7、Modifying your app:
最后再来修改一下代码来看一下在ios实时变更的效果:
总结:
这次学习就是纯环境搭建了,本以为很轻松愉悦的【android平台确实是很轻松,基本没遇到啥问题】,木有想到在ios上栽了好多跟头,最后不得以降为次新版本来解决ios平台的问题,当然可能还有其它办法能完全解决最新版本在ios运行不了的问题,但!!!我放弃了,因为折腾几天了,时间上不值,而且对于一门全新的技术学习得尽快往下进行,不然挫败感太强导致都没有信心继续往下前行了,环境已经搞好,下次则正式进入RN的基础篇喽~~