在于C语言指针的相关知识点算是已经学得差不多了,当然,语言的学习是一个终生的,所以还需慢慢去学习,今天就以一个非常经典,也是体现指针应用的一个例子,来操作练一下所学的指针相关的知识点-----链表
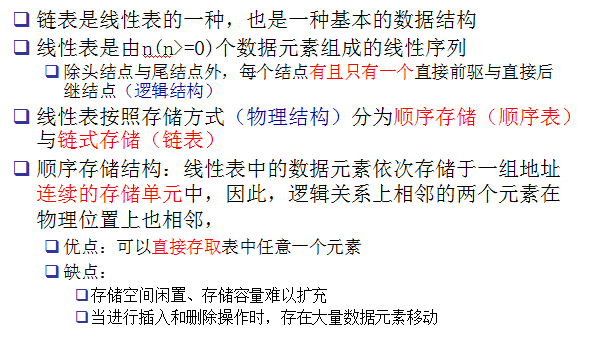
对于链表,我想学过编程的应该都对它有比较清楚的了解,下面简单对它进行回顾一下:


链表的基本操作:

下面自己动手利用指针的知识一点一点来实现链表,同时学习一下C语言多文件的编译风格:
第一步:搭建好基础开发框架:
首先需要定义一个结构体,来代表一个结点,结点里面的数据域和指针域两个构成,将其定义放到头文件(.h)中【至于放到.h头中的好处,请参考http://www.cnblogs.com/webor2006/p/3460345.html博文】如下:
list.h:
#ifndef _LIST_H_
#define _LIST_H_

typedef struct node
{
    int data;
    struct node* next;
} node_t;

#endif /* _LIST_H_ */
然后定义一个它的实现list:c,这里只去包含list.h文件,目前啥都不做,之后会慢慢去填充的:
list:c:

最后,再定义一个主入口文件,它会去包含list.h,也就是把具体实现放在list.c中,main.c只关心主干流程,目前也啥都不做:
main.c:

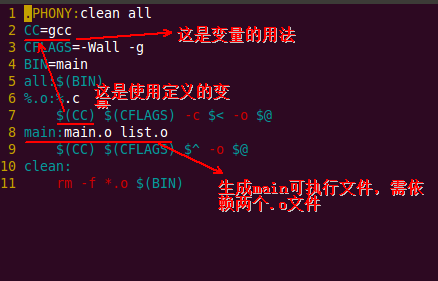
对于这个程序,由两个.c文件和一个.h文件组成,为了更方便去编译程序,这时需要用到Makefile【关于它的编写,会有专门篇幅来学习它,目前先简单理解下】如下:
Makefile:

好了,框架已经搭建完毕,下面进行编译,看能否正常生成可执行文件main:

第二步:实现链表的插入方法:
首先定义一个头节点:
main.c:

然后定义一个插入方法:
list.h:
#ifndef _LIST_H_
#define _LIST_H_

typedef struct node
{
    int data;
    struct node* next;
} node_t;

node_t* list_insert_front(node_t* head, int data);

#endif /* _LIST_H_ */
提示:对于这个函数,其实还有另外一种实现方法,可以不返回指针,直接用指针的指针去改为head的指针地址,这个之后会有实现。
插入方法具体实现【关于链表的插入的基本概念这里就不多说了,就是将新的元素链接到前一个元素的next上】:
list.c:
#include "list.h"
#include <stdlib.h>

node_t* list_insert_front(node_t* head, int data)
{
    node_t* n = (node_t*)malloc(sizeof(node_t));
    assert(n != NULL);
    n->data = data;
    n->next = NULL;

    if (head == NULL)
        head = n;
    else
    {
        n->next = head;
        head = n;
    }

    return head;
}
注意:这里是采用的头插法。
然后这时多插入几个节点:
main.c:
#include "list.h"
#include <stdio.h>

int main(void){

    node_t* head = NULL;
    head = list_insert_front(head, 30);
    head = list_insert_front(head, 20);
    head = list_insert_front(head, 10);

    return 0;
}
对于上面的插入流程,用一个图例来解释一下这个插入方法的实现原理:
第一次插入:head = list_insert_front(head, 30);

第二次插入:head = list_insert_front(head, 20);

第三次插入:head = list_insert_front(head, 10);

接下来,为了验证结点是否插入正常,再实现第三步的方法。
第三步:实现链表的遍历方法:
首先定义遍历的方法,这里为了更好的实现,采用函数指针来实现,如下:
list.h:
#ifndef _LIST_H_
#define _LIST_H_

typedef struct node
{
    int data;
    struct node* next;
} node_t;

typedef void (*FUNC)(node_t*);//函数指针,它专门是打印结点的

node_t* list_insert_front(node_t* head, int data);

void list_for_each(node_t* head, FUNC f);//最终这里面遍历到结点之后,回调打印函数,而不用将打印实现也放到这个遍历函数中,代码上更加整洁

#endif /* _LIST_H_ */
接着,我们来实现这个遍历的方法
list.c:
#include "list.h"
#include <stdlib.h>

node_t* list_insert_front(node_t* head, int data)
{
    node_t* n = (node_t*)malloc(sizeof(node_t));
    assert(n != NULL);
    n->data = data;
    n->next = NULL;

    if (head == NULL)
        head = n;
    else
    {
        n->next = head;
        head = n;
    }

    return head;
}
//遍历链表
void list_for_each(node_t* head, FUNC f)
{
    while (head)
    {
        f(head);
        head = head->next;
    }
}
遍历方法中可能我们会这样来写:
void list_for_each(node_t* head, FUNC f)
{
  node_t* tempPoint = head;//定义一个临时变量去遍历,我们知道指针作为参数传递实际上是值传递,所以不用担心直接赋值会修改实参指针的指向,完全不需要这个临时变量
    while (tempPoint)
    {
        f(head);
        tempPoint = tempPoint->next;
    }
}
这种写法虽然也是可以的,但是有点多此一举,从另外一面来讲,是指针理解得不够透,所以避勉这样的写法!
注意:我们将具体的打印函数放到main.c中,而不用写在list.c中,因为,这个函数最终是在main调用传递过去的。
main.c:
#include "list.h"
#include <stdio.h>

void print_node(node_t* n)
{
    printf("data=%d ", n->data);
}

int main(void){

    node_t* head = NULL;
    head = list_insert_front(head, 30);
    head = list_insert_front(head, 20);
    head = list_insert_front(head, 10);

    list_for_each(head, print_node);//开始遍历
    putchar('
');

    return 0;
}
好了,遍历方法也已经写好了,接着编译运行来验证一下我们插入的结点是否生效了:

于是在list.h中加入头文件:
list.h:

再次make:

第四步:实现链表的销毁方法:
接着,我们来实现链表的销毁方法,由于每个链表都是在堆上申请的,所以最后用完了肯定是需要销毁的,还是老规距,在头文件中定义接口:
list.h:
#ifndef _LIST_H_
#define _LIST_H_

typedef struct node
{
    int data;
    struct node* next;
} node_t;

typedef void (*FUNC)(node_t*);

node_t* list_insert_front(node_t* head, int data);

void list_for_each(node_t* head, FUNC f);

void list_free(node_t* head);//销毁链表

#endif /* _LIST_H_ */
具体实现,当然还是在list.c文件中:
#include "list.h"
#include <stdlib.h>
#include <assert.h>

node_t* list_insert_front(node_t* head, int data)
{
    node_t* n = (node_t*)malloc(sizeof(node_t));
    assert(n != NULL);
    n->data = data;
    n->next = NULL;

    if (head == NULL)
        head = n;
    else
    {
        n->next = head;
        head = n;
    }

    return head;
}

void list_for_each(node_t* head, FUNC f)
{
    while (head)
    {
        f(head);
        head = head->next;
    }
}

void list_free(node_t* head)
{
    node_t* tmp = head;
    while (head)
    {
        head = head->next;
        free(tmp);
        tmp = head;
    }
}
释放方法也是需要遍历,但这次需要借助临时变量,其实现过程用简单的图来描述如下:

这时,main.c调用之:
#include "list.h"
#include <stdio.h>

void print_node(node_t* n)
{
    printf("data=%d ", n->data);
}

int main(void){

    node_t* head = NULL;
    head = list_insert_front(head, 30);
    head = list_insert_front(head, 20);
    head = list_insert_front(head, 10);

    list_for_each(head, print_node);
    putchar('
');

    list_free(head);
    assert(head == NULL);//这里断言一下,看是否真正释放了

    return 0;
}
编译:

如图上所示,在main.c中用到了assert,需要包含assert.h,我们知道main.c中包含了list.h文件,而list.c中已经包含了assert.h:

这时,我们不应该在main.c中又再次包含assert.h,而应该将这个头文件由list.c中的包含放到list.h中,这样main.c又包含了list.h,所以就可以共用了:
list.h:
#ifndef _LIST_H_
#define _LIST_H_

#include <assert.h>//将list.c中的移到头文件中来,以便在main.c中可以共用

typedef struct node
{
    int data;
    struct node* next;
} node_t;

typedef void (*FUNC)(node_t*);

node_t* list_insert_front(node_t* head, int data);

void list_for_each(node_t* head, FUNC f);

void list_free(node_t* head);

#endif /* _LIST_H_ */
这时,再次make:

其实原因还是出在:指针作为参数传递是值传递
看main.c,将head传递到list_free之后,由于list_free不会改变head的指向(当然如果是二级指针,那就没这个问题了),因为它是一级指针,所以,应该list_free最后需将head传回给main.c,然后再赋值给main.c中的head既可:
list.h:
#ifndef _LIST_H_
#define _LIST_H_

#include <assert.h>

typedef struct node
{
    int data;
    struct node* next;
} node_t;

typedef void (*FUNC)(node_t*);

node_t* list_insert_front(node_t* head, int data);

void list_for_each(node_t* head, FUNC f);

node_t* list_free(node_t* head);//添加一个返回值

#endif /* _LIST_H_ */
list.c:
node_t* list_free(node_t* head)
{
    node_t* tmp = head;
    while (head)
    {
        head = head->next;
        free(tmp);
        tmp = head;
    }
    return head;//最终遍历完之后head会指向NULL
}
main.c:
#include "list.h"
#include <stdio.h>

void print_node(node_t* n)
{
    printf("data=%d ", n->data);
}

int main(void)
{
    node_t* head = NULL;
    head = list_insert_front(head, 30);
    head = list_insert_front(head, 20);
    head = list_insert_front(head, 10);

    list_for_each(head, print_node);
    putchar('
');

    head = list_free(head);//由于一级指针的原因,需将head重新赋值才能改变它的指向,之后可用二级指针解决
    assert(head == NULL);


    return 0;
}
再次编译,运行:

实际上,对于销毁方法的实现,还可以更精简,如下:
node_t* list_free(node_t* head)
{
    node_t* tmp;//这里不需要初始化
    while (head)
    {
        tmp = head;//里面的赋值也只要一句话既可
        head = head->next;
        free(tmp);
    }
    return head;
}
对于一个功能的实现,能用最精简的方法实现是最好的,能不多一行就不多一行代码,这也是我写代码一直追求的,好了,关于链表其它的操作,下回再分解,再见!