了解更多请参阅 v4 文档
一.介绍
1.说明
react-router4是React官方推挤路由库,4是最新版本。和之前版本不兼容,浏览器和RN均兼容React Router 4.0 (以下简称 RR4) 已经正式发布,它遵循React的设计理念,即万物皆组件。所以 RR4 只是一堆 提供了导航功能的组件(还有若干对象和方法),具有声明式(引入即用),可组合性的特点。http://www.jianshu.com/p/e3adc9b5f75c
React开发单页面应用必备的,践行路由即组件的概念。核心概念:动态路由,Route,Link,Switch。
2.安装
npm install react-router-dom --save
Router4使用react-router-dom作为浏览器端的路由
3.引用
import {BrowserRouter,Route,Link} from 'react-router-dom'
4.比较react-router 还是 react-router-dom?
在 React 的使用中,我们一般要引入两个包,react 和 react-dom,那么 react-router 和 react-router-dom 是不是两个都要引用呢?
非也,坑就在这里。他们两个只要引用一个就行了,不同之处就是后者比前者多出了 <Link> <BrowserRouter> 这样的 DOM 类组件。
因此我们只需引用 react-router-dom 这个包就行了。当然,如果搭配 redux ,你还需要使用 react-router-redux。
what is the diff between react-router-dom & react-router?
二.基本用法-组件
1.<BrowserRouter>
一个使用了 HTML5 history API 的高阶路由组件,保证你的 UI 界面和 URL 保持同步。此组件拥有以下属性:
a).basename: string
作用:为所有位置添加一个基准URL
使用场景:假如你需要把页面部署到服务器的二级目录,你可以使用 basename 设置到此目录。
<BrowserRouter basename="/minooo">
    <Link to="/react" />
</BrowserRouter>
// 最终渲染为 <a href="/minooo/react">
b).getUserConfirmation: func
作用:导航到此页面前执行的函数,默认使用 window.confirm
使用场景:当需要用户进入页面前执行什么操作时可用,不过一般用到的不多。
const getConfirmation = (message, callback) => {
  const allowTransition = window.confirm(message)
  callback(allowTransition)
}

<BrowserRouter getUserConfirmation={getConfirmation('Are you sure?', yourCallBack)} />
c).forceRefresh: bool
作用:当浏览器不支持 HTML5 的 history API 时强制刷新页面。
使用场景:同上。
const supportsHistory = 'pushState' in window.history
<BrowserRouter forceRefresh={!supportsHistory} />
d).keyLength: number
作用:设置它里面路由的 location.key 的长度。默认是6。(key的作用:点击同一个链接时,每次该路由下的 location.key都会改变,可以通过 key 的变化来刷新页面。)
使用场景:按需设置。
<BrowserRouter keyLength={12} />
e).children: node
作用:渲染唯一子元素。
使用场景:作为一个 Reac t组件,天生自带 children 属性。
2.<HashRouter>
Hash history 不支持 location.key 和 location.state。另外由于该技术只是用来支持旧版浏览器,因此更推荐大家使用 BrowserRouter,此API不再作多余介绍。
3.<Route>
<Route> 也许是 RR4 中最重要的组件了,重要到你必须理解它,学会它,用好它。它最基本的职责就是当页面的访问地址与 Route 上的 path 匹配时,就渲染出对应的 UI 界面。
<Route> 自带三个 render method 和三个 props 。
a).render methods 分别是:
①<Route component>
②<Route render>
③<Route children>
每种 render method 都有不同的应用场景,同一个<Route> 应该只使用一种 render method ,大部分情况下你将使用 component 。
b).props 分别是:
①match
②location
③history
所有的 render method 无一例外都将被传入这些 props。
c).component
只有当访问地址和路由匹配时,一个 React component 才会被渲染,此时此组件接受 route props (match, location, history)。
当使用 component 时,router 将使用 React.createElement 根据给定的 component 创建一个新的 React 元素。这意味着如果你使用内联函数(inline function)传值给 component将会产生不必要的重复装载。对于内联渲染(inline rendering), 建议使用 renderprop。
const User =function(match){
    return <h1>Hello {match.params.username}!</h1>
}
或是es6
const ClassOne = ({ match }) => {
  return <h1>Hello {match.params.username}!</h1>
}

<BrowserRouter>
    <div>
        <Link to ='/classOne'>初三(1)班</Link>
        <Route path='/:username' exact component={ClassOne} ></Route>
    </div>
</BrowserRouter>
//Hello classOne!
d).render: func
此方法适用于内联渲染,而且不会产生上文说的重复装载问题。
import React from 'react';
import ReactDOM from 'react-dom';
import { createStore ,applyMiddleware} from 'redux';
import thunk from 'redux-thunk';
import { Provider } from 'react-redux'
import {BrowserRouter,Route,Link} from 'react-router-dom'
import Home from './components/home';
import {counter} from './index.redux';
const store = createStore(counter,applyMiddleware(thunk));
ReactDOM.render(
    (<Provider  store={store}>
        <BrowserRouter>
            <div>
                <Link to ='/home'>主页</Link>
                <Route path='/home' component={Home}></Route>
            </div>
        </BrowserRouter>
    </Provider>),
    document.getElementById('root')
)
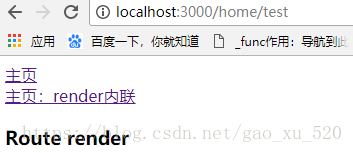
home.js
import React from 'react';
import {BrowserRouter,Route,Link} from 'react-router-dom'

class Home extends React.Component {
    render() {
        return (
            <div>
                <Link to="/home/test">主页:render内联</Link>
                <Route path="/home/test" render={() => <h3>Route  render</h3>}/>
            </div>
        );
    }
}
export default Home
e).children: func
有时候你可能只想知道访问地址是否被匹配,然后改变下别的东西,而不仅仅是对应的页面。
注意:

f).path属性指定路由的匹配规则
path 匹配:通配符
(1):paramName
:paramName匹配URL的一个部分,直到遇到下一个/、?、#为止。这个路径参数可以通过this.props.params.paramName取出。
(2)()
()表示URL的这个部分是可选的。
(3)*
*匹配任意字符,直到模式里面的下一个字符为止。匹配方式是非贪婪模式。
(4) **
** 匹配任意字符,直到下一个/、?、#为止。匹配方式是贪婪模式。
<Route path="/hello/:name">
// 匹配 /hello/michael
// 匹配 /hello/ryan

<Route path="/hello(/:name)">
// 匹配 /hello
// 匹配 /hello/michael
// 匹配 /hello/ryan

<Route path="/files/*.*">
// 匹配 /files/hello.jpg
// 匹配 /files/hello.html

<Route path="/files/*">
// 匹配 /files/
// 匹配 /files/a
// 匹配 /files/a/b

<Route path="/**/*.jpg">
// 匹配 /files/hello.jpg
// 匹配 /files/path/to/file.jpg
此外,URL的查询字符串/foo?bar=baz,可以用this.props.location.query.bar获取。
g).exact
是完全匹配 的意思,这样跳转到到其他页面的时候就不会显示此时路由下的内容
h).strict: bool
对路径末尾斜杠的匹配。如果为 true。path 为 '/one/' 将不能匹配 '/one' 但可以匹配 '/one/two'。
如果要确保路由没有末尾斜杠,那么 strict 和exact 都必须同时为 true
4.<Link>
Link组件用于取代<a>元素,生成一个链接,允许用户点击后跳转到另一个路由。它基本上就是<a>元素的React 版本,可以接收Router的状态。
a).to: string
作用:跳转到指定路径
使用场景:如果只是单纯的跳转就直接用字符串形式的路径。
b).to: object
作用:携带参数跳转到指定路径
作用场景:比如你点击的这个链接将要跳转的页面需要展示此链接对应的内容,又比如这是个支付跳转,需要把商品的价格等信息传递过去。
c).replace: bool
为 true 时,点击链接后将使用新地址替换掉上一次访问的地址,什么意思呢,比如:你依次访问 '/one' '/two' '/three' ’/four' 这四个地址,如果回退,将依次回退至 '/three' '/two' '/one' ,这符合我们的预期,假如我们把链接 '/three' 中的 replace 设为 true 时。依次点击 one two three four 然后再回退会发生什么呢?会依次退至 '/three' '/one'! 为此我做了个在线 demo,大家可以调试体会一下 !
// Link组件示例

// to为string
<Link to="/about">关于</Link>

// to为obj
<Link to={{
  pathname: '/courses',
  search: '?sort=name',
  hash: '#the-hash',
  state: { fromDashboard: true }
}}/>

// replace
<Link to="/courses" replace />
demo
import React from 'react';
import ReactDOM from 'react-dom';
import { createStore ,applyMiddleware} from 'redux';
import thunk from 'redux-thunk';
import { Provider } from 'react-redux'
import {BrowserRouter,Route,Link} from 'react-router-dom'
import {counter} from './index.redux';

const store = createStore(counter,applyMiddleware(thunk));
const Links = () => (
  <nav>
    <Link to="/">Home</Link>
    <Link to="/about">About</Link>
    <Link replace to="/contact">Contact</Link>
    <Link to="/nested">Nested</Link>
  </nav>
)
const Nested = () => (
  <div>
    <Link to="/nested/one">One</Link>
    <Link to="/nested/two">Two</Link>
    <Link replace to="/nested/Three">Three</Link>
    <div>选择一个点击</div>
    <Route path="/nested/:minooo?" render={({match}) => <h2>URL: {match.params.minooo || 'minooo'}</h2>} />
  </div>
)

ReactDOM.render(
    (<Provider  store={store}>
        <BrowserRouter>
              <div>
                  <Links />
                  <Route exact path="/" render={() => <h1>Home</h1>} />
                  <Route path="/about" render={() => <h1>About</h1>} />
                  <Route path="/contact" render={() => <h1>Contact</h1>} />
                  <Route path="/nested" render={Nested} />
            </div>
        </BrowserRouter>
    </Provider>),
    document.getElementById('root')
)
5.<NavLink>
这是 <Link> 的特殊版,顾名思义这就是为页面导航准备的。因为导航需要有 “激活状态”。<NavLink>是<Link> 的一个特定版本, 会在匹配上当前 URL 的时候会给已经渲染的元素添加样式参数,组件属性:
a).activeClassName: string
导航选中激活时候应用的样式名,默认样式名为 active
b).activeStyle: object
如果不想使用样式名就直接写style
c).exact: bool
若为 true,只有当访问地址严格匹配时激活样式才会应用
d).strict: bool
若为 true,只有当访问地址后缀斜杠严格匹配(有或无)时激活样式才会应用
e).isActive: func
决定导航是否激活,或者在导航激活时候做点别的事情。不管怎样,它不能决定对应页面是否可以渲染。函数,判断链接是否激活的额外逻辑的功能;
import React from 'react';
import ReactDOM from 'react-dom';
import { createStore ,applyMiddleware} from 'redux';
import thunk from 'redux-thunk';
import { Provider } from 'react-redux'
import {BrowserRouter,Route,Link,NavLink} from 'react-router-dom'
import {counter} from './index.redux';
require('./assets/css/App.css');

const store = createStore(counter,applyMiddleware(thunk));

const isActiveFunc = (match, location) => {
  console.log(match,'contact')
  return match
}
/*
1.activeClassName  为高亮的类名
2.activeStyle  直接设置样式
3.isActive是函数 判断链接是否激活的额外逻辑的功能;
*/
const Links = () => (
  <nav>
    <NavLink exact activeClassName="active" to="/">Home</NavLink>
    <NavLink activeStyle={{fontSize:'30px',color: 'green'}} to={{pathname: '/about'}}>About</NavLink>
    <NavLink
      isActive={isActiveFunc}
      activeClassName="active"
      to="/contact">Contact</NavLink>
  </nav>
)

ReactDOM.render(
    (<Provider  store={store}>
        <BrowserRouter>
              <div>
                  <Links />
                <Route exact path="/" render={() => <h1>Home</h1>} />
                <Route path="/about" render={() => <h1>About</h1>} />
                <Route path="/contact" render={() => <h1>Contact</h1>} />
            </div>
        </BrowserRouter>
    </Provider>),
    document.getElementById('root')
)

6.<Switch>
该组件用来渲染匹配地址的第一个<Route>或者<Redirect>。那么它与使用一堆route又有什么区别呢?
<Switch>的独特之处是独它仅仅渲染一个路由。相反地,每一个包含匹配地址(location)的<Route>都会被渲染。
在上面的列子上补充:
import React from 'react';
import ReactDOM from 'react-dom';
import { createStore ,applyMiddleware} from 'redux';
import thunk from 'redux-thunk';
import { Provider } from 'react-redux'
import {BrowserRouter,Route,Link,NavLink,Switch} from 'react-router-dom'
import {counter} from './index.redux';
require('./assets/css/App.css');

const store = createStore(counter,applyMiddleware(thunk));

const isActiveFunc = (match, location) => {
  console.log(match,'contact')
  return match
}
/*
1.activeClassName  为高亮的类名
2.activeStyle  直接设置样式
3.isActive是函数 判断链接是否激活的额外逻辑的功能;
*/
const Links = () => (
  <nav>
    <NavLink exact activeClassName="active" to="/">Home</NavLink>
    <NavLink activeStyle={{fontSize:'30px',color: 'green'}} to={{pathname: '/about'}}>About</NavLink>
    <NavLink
      isActive={isActiveFunc}
      activeClassName="active"
      to="/contact">Contact</NavLink>
  </nav>
)

ReactDOM.render(
    (<Provider  store={store}>
        <BrowserRouter>
              <div>
                  <Links />
                  <Switch>
                    <Route exact path="/" render={() => <h1>Home</h1>} />
                    <Route path="/about" render={() => <h1>About</h1>} />
                    <Route path="/contact" render={() => <h1>Contact</h1>} />
                    <Route path="/contact/:add" render={() => <h1>add</h1>} />
                </Switch>
            </div>
        </BrowserRouter>
    </Provider>),
    document.getElementById('root')
)

7.<Redirect>
<Redirect> 渲染时将导航到一个新地址,这个新地址覆盖在访问历史信息里面的本该访问的那个地址。
a).to: string
重定向的 URL 字符串
b).to: object
重定向的 location 对象
c).push: bool
若为真,重定向操作将会把新地址加入到访问历史记录里面,并且无法回退到前面的页面。
d).from: string
需要匹配的将要被重定向路径。
8.Prompt
当用户离开当前页面前做出一些提示。
a).message: string
当用户离开当前页面时,设置的提示信息。
<Prompt message="确定要离开?" />
d).message: func
当用户离开当前页面时,设置的回掉函数
<Prompt message={location => (
  `Are you sue you want to go to ${location.pathname}?`
)} />
c).when: bool
通过设置一定条件要决定是否启用 Prompt
三.对象和方法
(1).history
histoty 是 RR4 的两大重要依赖之一(另一个当然是 React 了),在不同的 javascript 环境中, history 以多种能够行驶实现了对会话(session)历史的管理。
我们会经常使用以下术语:
- "browser history" - history 在 DOM 上的实现,用于支持 HTML5 history API 的浏览器
- "hash history" - history 在 DOM 上的实现,用于旧版浏览器。
- "memory history" - history 在内存上的实现,用于测试或非 DOM 环境(例如 React Native)。
history 对象通常具有以下属性和方法:
- length: number 浏览历史堆栈中的条目数
- action: string 路由跳转到当前页面执行的动作,分为 PUSH, REPLACE, POP
- location: object 当前访问地址信息组成的对象,具有如下属性:
- pathname: string URL路径
- search: string URL中的查询字符串
- hash: string URL的 hash 片段
- state: string 例如执行 push(path, state) 操作时,location 的 state 将被提供到堆栈信息里,state 只有在 browser 和 memory history 有效。
- push(path, [state]) 在历史堆栈信息里加入一个新条目。
- replace(path, [state]) 在历史堆栈信息里替换掉当前的条目
- go(n) 将 history 堆栈中的指针向前移动 n。
- goBack() 等同于 go(-1)
- goForward 等同于 go(1)
- block(prompt) 阻止跳转
history 对象是可变的,因为建议从 <Route> 的 prop 里来获取 location,而不是从 history.location 直接获取。这样可以保证 React 在生命周期中的钩子函数正常执行,例如以下代码:
class Comp extends React.Component {
  componentWillReceiveProps(nextProps) {
    // locationChanged
    const locationChanged = nextProps.location !== this.props.location

    // 错误方式,locationChanged 永远为 false,因为history 是可变的
    const locationChanged = nextProps.history.location !== this.props.history.location
  }
}
(2).location
location 是指你当前的位置,将要去的位置,或是之前所在的位置
{
  key: 'sdfad1'
  pathname: '/about',
  search: '?name=minooo'
  hash: '#sdfas',
  state: {
    price: 123
  }
}
在以下情境中可以获取 location 对象
- 在 Route component 中,以 this.props.location 获取
- 在 Route render 中,以 ({location}) => () 方式获取
- 在 Route children 中,以 ({location}) => () 方式获取
- 在 withRouter 中,以 this.props.location 的方式获取
location 对象不会发生改变,因此可以在生命周期的回调函数中使用 location 对象来查看当前页面的访问地址是否发生改变。这种技巧在获取远程数据以及使用动画时非常有用
componentWillReceiveProps(nextProps) {
  if (nextProps.location !== this.props.location) {
    // 已经跳转了!
  }
}
可以在不同情境中使用 location:
- <Link to={location} />
- <NaviveLink to={location} />
- <Redirect to={location />
- history.push(location)
- history.replace(location)
(3).match
match 对象包含了 <Route path> 如何与 URL 匹配的信息,具有以下属性:
- params: object 路径参数,通过解析 URL 中的动态部分获得键值对
- isExact: bool 为 true 时,整个 URL 都需要匹配
- path: string 用来匹配的路径模式,用于创建嵌套的 <Route>
- url: string URL 匹配的部分,用于嵌套的 <Link>
在以下情境中可以获取 match 对象
- 在 Route component 中,以 this.props.match获取
- 在 Route render 中,以 ({match}) => () 方式获取
- 在 Route children 中,以 ({match}) => () 方式获取
- 在 withRouter 中,以 this.props.match的方式获取
- matchPath 的返回值
当一个 Route 没有 path 时,它会匹配一切路径。
四.demo
(1).基本跳转
BrowserRouteR 包裹整个应用; Router路由对应渲染的组件,可嵌套; Link跳转专用
import React from 'react';
import ReactDOM from 'react-dom';
import { createStore ,applyMiddleware} from 'redux';
import thunk from 'redux-thunk';
import { Provider } from 'react-redux'
import {BrowserRouter,Route,Link} from 'react-router-dom'
import App from './App';
import {counter} from './index.redux';

const store = createStore(counter,applyMiddleware(thunk));

function ClassOne(){
    return <p>初三(1)班:有90个人</p>
}
function ClassTwo(){
    return <p>初三(2)班:有50个人</p>
}
function ClassThree(){
    return <p>初三(3)班:有30个人</p>
}
ReactDOM.render(
    (<Provider  store={store}>
        <BrowserRouter>
            <div>
                <h1>初三年段各个班有多少人</h1>
                <ul>
                    <li>
                        <Link to ='/'>初三(1)班</Link>
                    </li>
                    <li>
                        <Link to ='/classTwo'>初三(2)班</Link>
                    </li>
                    <li>
                        <Link to ='/classThree'>初三(3)班</Link>
                    </li>
                </ul>
                <Route path='/' exact component={ClassOne} ></Route>
                <Route path='/classTwo' component={ClassTwo}></Route>
                <Route path='/classThree' component={ClassThree}></Route>
            </div>
        </BrowserRouter>
    </Provider>),
    document.getElementById('root')
)

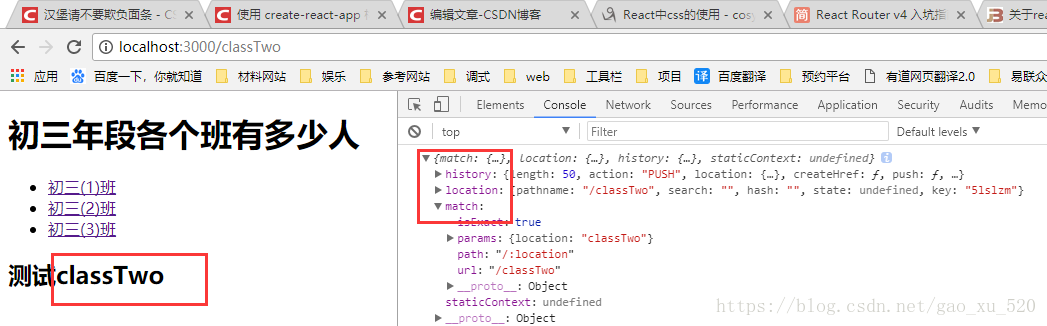
(2).url参数,Route组件参数可用冒号标识参数
import React from 'react';
import ReactDOM from 'react-dom';
import { createStore ,applyMiddleware} from 'redux';
import thunk from 'redux-thunk';
import { Provider } from 'react-redux'
import {BrowserRouter,Route,Link} from 'react-router-dom'
import App from './App';
import {counter} from './index.redux';

const store = createStore(counter,applyMiddleware(thunk));

function ClassOne(){
    return <p>初三(1)班:有90个人</p>
}
function ClassTwo(){
    return <p>初三(2)班:有50个人</p>
}
function ClassThree(){
    return <p>初三(3)班:有30个人</p>
}
class Test extends React.Component{
    constructor(props){
        super(props)
    }
    render(){
        console.log(this.props)
        return <h2>测试{this.props.match.params.location}</h2>
    }
}
ReactDOM.render(
    (<Provider  store={store}>
        <BrowserRouter>
            <div>
                <h1>初三年段各个班有多少人</h1>
                <ul>
                    <li>
                        <Link to ='/'>初三(1)班</Link>
                    </li>
                    <li>
                        <Link to ='/classTwo'>初三(2)班</Link>
                    </li>
                    <li>
                        <Link to ='/classThree'>初三(3)班</Link>
                    </li>
                </ul>
                <Route path='/' exact component={ClassOne} ></Route>
                <Route path='/:location'  component={Test} ></Route>
            </div>
        </BrowserRouter>
    </Provider>),
    document.getElementById('root')
)
(3).嵌套路由
import React from 'react';
import ReactDOM from 'react-dom';
import { createStore ,applyMiddleware} from 'redux';
import thunk from 'redux-thunk';
import { Provider } from 'react-redux'
import {BrowserRouter,Route,Link} from 'react-router-dom'
import {counter} from './index.redux';


const Users = ({ match }) => {
    return (
            <div>
                <Link to ='/users/:userId'>用户列表</Link>
                <Route path={`${match.url}/:userId`} component={Profile}/>
              </div>
        )
}
const Profile = () =>{
    return (
            <div>
                <h4>高必,20岁</h4>
            </div>
        )
}
const store = createStore(counter,applyMiddleware(thunk));
ReactDOM.render(
    (<Provider  store={store}>
        <BrowserRouter>
            <div>
                <Link to ='/users'>用户主页</Link>
                <Route  path='/users'  component={Users}></Route>
            </div>
        </BrowserRouter>
    </Provider>),
    document.getElementById('root')
)
(4).Switch小案例
import React from 'react';
import ReactDOM from 'react-dom';
import { createStore ,applyMiddleware} from 'redux';
import thunk from 'redux-thunk';
import { Provider } from 'react-redux'
import {BrowserRouter,Route,Link,Redirect,Switch} from 'react-router-dom'
import App from './App';
import {counter} from './index.redux';

const store = createStore(counter,applyMiddleware(thunk));

function ClassOne(){
    return <p>初三(1)班:有90个人</p>
}
function ClassTwo(){
    return <p>初三(2)班:有50个人</p>
}
function ClassThree(){
    return <p>初三(3)班:有30个人</p>
}
class Test extends React.Component{
    constructor(props){
        super(props)
    }
    render(){
        console.log(this.props)
        return <h2>测试{this.props.match.params.location}</h2>
    }
}
ReactDOM.render(
    (<Provider  store={store}>
        <BrowserRouter>
            <div>
                <h1>初三年段各个班有多少人</h1>
                <ul>
                    <li>
                        <Link to ='/'>初三(1)班</Link>
                    </li>
                    <li>
                        <Link to ='/classTwo'>初三(2)班</Link>
                    </li>
                    <li>
                        <Link to ='/classThree'>初三(3)班</Link>
                    </li>

                </ul>
                <Switch>
                    {/*Switch只渲染第一路由 它的子路由是不渲染的*/}
                    <Route path='/' exact component={ClassOne} ></Route>
                    <Route path='/classTwo' component={ClassTwo}></Route>
                    <Route path='/classThree' component={ClassThree}></Route>
                    <Route path='/:location' component={Test}></Route>
                </Switch>
            </div>
        </BrowserRouter>
    </Provider>),
    document.getElementById('root')
)
(5)结合redux一起使用 :登录校验
效果:没有登录信息 统一跳转login;有登录这显示“”初三年段各个班有多少人“的页面
index.js 入口文件
import React from 'react';
import { connect } from 'react-redux'
import { BrowserRouter, Route, Redirect,Switch,Link} from 'react-router-dom'
import { login} from './auth.redux'
class Login extends React.Component {
    render() {
        return (
            <div>
                { this.props.users.isAuth? <Redirect to='/dashboard' /> : null}
                <h2>你没有权限,需要登录才能看</h2>
                <button onClick={this.props.login}>登录</button>
            </div>
        )
    }
}
const mapStateToProps = (state) =>{
    return {users:state.auth}
}
//Connect负责从外部获取组件需要的参数
Login = connect(mapStateToProps,{login})(Login);
export default Login;
login.js
import React from 'react';
import { connect } from 'react-redux'
import { BrowserRouter, Route, Redirect,Switch,Link} from 'react-router-dom'
import { login} from './auth.redux'
class Login extends React.Component {
    render() {
        return (
            <div>
                { this.props.users.isAuth? <Redirect to='/dashboard' /> : null}
                <h2>你没有权限,需要登录才能看</h2>
                <button onClick={this.props.login}>登录</button>
            </div>
        )
    }
}
const mapStateToProps = (state) =>{
    return {users:state.auth}
}
//Connect负责从外部获取组件需要的参数
Login = connect(mapStateToProps,{login})(Login);
export default Login;
Dashboard.js 主页
import React from 'react';
import { BrowserRouter, Route, Redirect,Switch,Link} from 'react-router-dom'
import { connect } from 'react-redux'
import { logout} from './auth.redux'
function ClassOne(){
    return <p>初三(1)班:有90个人</p>
}
function ClassTwo(){
    return <p>初三(2)班:有50个人</p>
}
function ClassThree(){
    return <p>初三(3)班:有30个人</p>
}
class Dashboard extends React.Component {
    constructor(props){
        super(props)
    }
    render() {
        const match = this.props.match
        const rediectToLogin = <Redirect to='/login'></Redirect>
        const app = (
                <div>
                    <h2>我的名字是{this.props.users.user},年龄{this.props.users.age}岁</h2>
                    <h1>初三年段各个班有多少人</h1>
                    {this.props.users.isAuth? <button onClick={this.props.logout}>注销</button>:null}
                    <ul>
                        <li>
                            <Link to ={`${match.url}/`} >初三(1)班</Link>
                        </li>
                        <li>
                            <Link to ={`${match.url}/classTwo`}>初三(2)班</Link>
                        </li>
                        <li>
                            <Link to ={`${match.url}/classThree`}>初三(3)班</Link>
                        </li>
                    </ul>
                    <Route path={`${match.url}/`} exact component={ClassOne} ></Route>
                    <Route path={`${match.url}/classTwo`} component={ClassTwo}></Route>
                    <Route path={`${match.url}/classThree`}  component={ClassThree}></Route>
                </div>
            )
        return this.props.users.isAuth ? app : rediectToLogin
    }
}
const mapStateToProps = (state) =>{
    return {users:state.auth}
}
Dashboard = connect(mapStateToProps,{logout})(Dashboard);
export default Dashboard;
auth.redux.js
const LOGIN = 'LOGIN'
const LOGOUT = 'LOGOUT'
const USER_DATA='USER_DATA'
const initState = {
    isAuth:false,
    user:'李云龙',
    age:20
}
export function auth(state=initState,action){
    // console.log(state,action)
    switch(action.type){
        case LOGIN:
            return {...state, isAuth:true}
        case LOGOUT:
            return {...state, isAuth:false}
        case USER_DATA:
            return {...state, user:action.payload.user,age:action.payload.age}
        default:
            return state
    }
}

export function login(){
    return {type:LOGIN}
}
export function logout(){
    return {type:LOGOUT}
}
reducer/index.js
/*合并所有reducer 并且返回
combineReducers 这个是整合所有的方法
*/
import { combineReducers } from 'redux'
import {counter} from './../index.redux';
import {auth} from './../auth.redux';

export default combineReducers({counter,auth})
五.参考
原文地址:https://blog.csdn.net/gao_xu_520/article/details/81133691