本文将对 RocketMQ-Exporter 的设计实现做一个简单的介绍,读者可以通过本文了解到 RocketMQ-Exporter 的实现过程,以及通过 RocketMQ-Exporter 来搭建自己的 RocketMQ 监控系统。该项目的 git 地址 https://github.com/apache/rocketmq-exporter
文章主要内容包含以下几个方面:
- RocketMQ 介绍
- Prometheus 简介
- RocketMQ-Exporter 的具体实现
- RocketMQ-Exporter 的监控指标和告警指标
- RocketMQ-Exporter 使用示例
RocketMQ 介绍
RocketMQ 是一个分布式消息和流数据平台,具有低延迟、高性能、高可靠性、万亿级容量和灵活的可扩展性。简单的来说,它由 Broker 服务器和客户端两部分组成,其中客户端一个是消息发布者客户端 (Producer),它负责向 Broker 服务器发送消息;另外一个是消息的消费者客户端 (Consumer),多个消费者可以组成一个消费组,来订阅和拉取消费 Broker 服务器上存储的消息。正由于它具有高性能、高可靠性和高实时性的特点,与其他协议组件在 MQTT 等各种消息场景中的结合也越来越多,应用越来越广泛。而对于这样一个强大的消息中间件平台,在实际使用的时候还缺少一个监控管理平台。而当前在开源界,使用最广泛监控解决方案的就是 Prometheus。与其它传统监控系统相比较,Prometheus 具有易于管理,监控服务的内部运行状态,强大的数据模型,强大的查询语言 PromQL,高效的数据处理,可扩展,易于集成,可视化,开放性等优点。并且借助于 Prometheus 可以很快速的构建出一个能够监控 RocketMQ 的监控平台。
Prometheus 简介
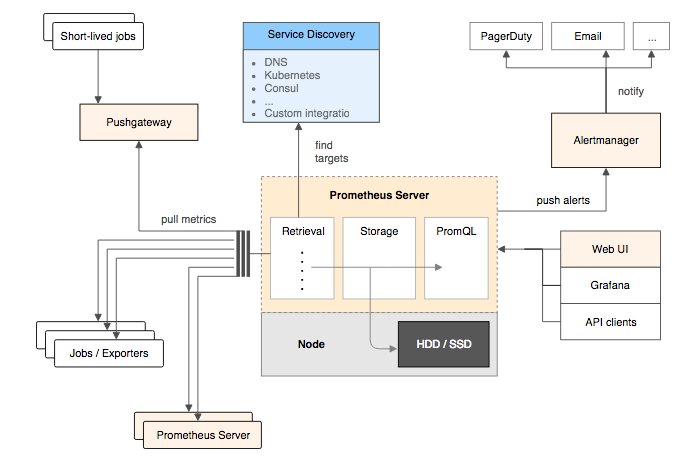
下图展示了 Prometheus 的基本架构:
Prometheus Server
Prometheus Server 是 Prometheus 组件中的核心部分,负责实现对监控数据的获取,存储以及查询。 Prometheus Server 可以通过静态配置管理监控目标,也可以配合使用 Service Discovery 的方式动态管理监控目标,并从这些监控目标中获取数据。其次 Prometheus Server 需要对采集到的监控数据进行存储,Prometheus Server 本身就是一个时序数据库,将采集到的监控数据按照时间序列的方式存储在本地磁盘当中。最后 Prometheus Server 对外提供了自定义的 PromQL 语言,实现对数据的查询以及分析。
Exporters
Exporter 将监控数据采集的端点通过 HTTP 服务的形式暴露给 Prometheus Server,Prometheus Server 通过访问该 Exporter 提供的 Endpoint 端点,即可获取到需要采集的监控数据。RocketMQ-Exporter 就是这样一个 Exporter,它首先从 RocketMQ 集群采集数据,然后借助 Prometheus 提供的第三方客户端库将采集的数据规范化成符合 Prometheus 系统要求的数据,Prometheus 定时去从 Exporter 拉取数据即可。当前 RocketMQ Exporter 已被 Prometheus 官方收录,其地址为 https://github.com/apache/rocketmq-exporter

RocketMQ-Exporter 的具体实现
当前在 Exporter 当中,实现原理如下图所示:
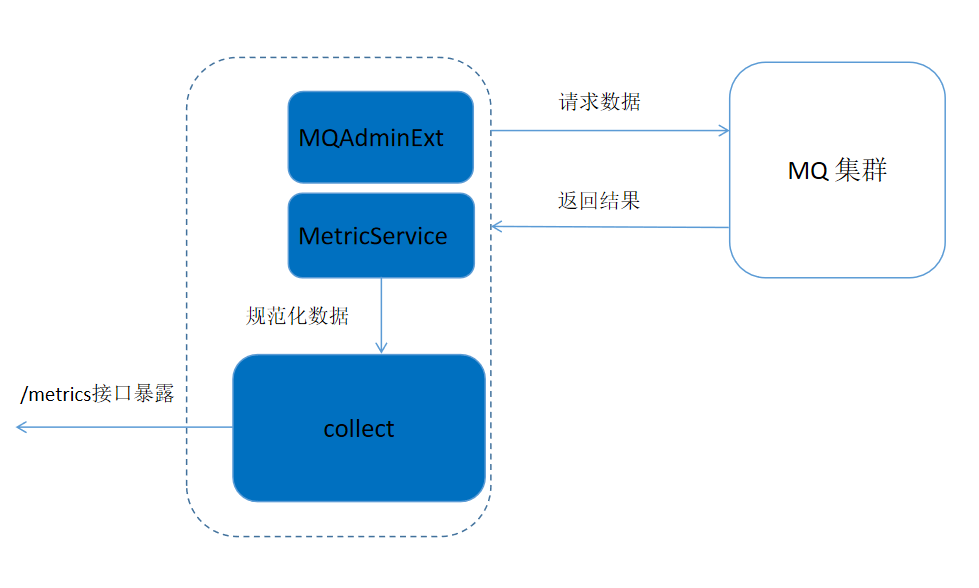
整个系统基于 spring boot 框架来实现。由于 MQ 内部本身提供了比较全面的数据统计信息,所以对于 Exporter 而言,只需要将 MQ 集群提供的统计信息取出然后进行加工而已。所以 RocketMQ-Exporter 的基本逻辑是内部启动多个定时任务周期性的从 MQ 集群拉取数据,然后将数据规范化后通过端点暴露给 Prometheus 即可。其中主要包含如下主要的三个功能部分:
- MQAdminExt 模块通过封装 MQ 系统客户端提供的接口来获取 MQ 集群内部的统计信息。
- MetricService 负责将 MQ 集群返回的结果数据进行加工,使其符合 Prometheus 要求的格式化数据。
- Collect 模块负责存储规范化后的数据,最后当 Prometheus 定时从 Exporter 拉取数据的时候,Exporter 就将 Collector 收集的数据通过 HTTP 的形式在 /metrics 端点进行暴露。
RocketMQ-Exporter 的监控指标和告警指标
RocketMQ-Exporter 主要是配合 Prometheus 来做监控,下面来看看当前在 Expoter 中定义了哪些监控指标和告警指标
- 监控指标
| 监控指标 | 含义 |
|---|---|
| rocketmq_broker_tps | broker 每秒生产消息数量 |
| rocketmq_broker_qps | broker 每秒消费消息数量 |
| rocketmq_producer_tps | 某个 topic 每秒生产的消息数量 |
| rocketmq_producer_put_size | 某个 topic 每秒生产的消息大小 (字节) |
| rocketmq_producer_offset | 某个 topic 的生产消息的进度 |
| rocketmq_consumer_tps | 某个消费组每秒消费的消息数量 |
| rocketmq_consumer_get_size | 某个消费组每秒消费的消息大小 (字节) |
| rocketmq_consumer_offset | 某个消费组的消费消息的进度 |
| rocketmq_group_get_latency_by_storetime | 某个消费组的消费延时时间 |
| rocketmq_message_accumulation(rocketmq_producer_offset-rocketmq_consumer_offset) | 消息堆积量(生产进度 - 消费进度) |
rocketmq_message_accumulation 是一个聚合指标,需要根据其它上报指标聚合生成。
- 告警指标
| 告警指标 | 含义 |
|---|---|
| sum(rocketmq_producer_tps) by (cluster) >= 10 | 集群发送 tps 太高 |
| sum(rocketmq_producer_tps) by (cluster) < 1 | 集群发送 tps 太低 |
| sum(rocketmq_consumer_tps) by (cluster) >= 10 | 集群消费 tps 太高 |
| sum(rocketmq_consumer_tps) by (cluster) < 1 | 集群消费 tps 太低 |
| rocketmq_group_get_latency_by_storetime > 1000 | 集群消费延时告警 |
| rocketmq_message_accumulation > value | 消费堆积告警 |
消费者堆积告警指标也是一个聚合指标,它根据消费堆积的聚合指标生成,value 这个阈值对每个消费者是不固定的,当前是根据过去 5 分钟生产者生产的消息数量来定,用户也可以根据实际情况自行设定该阈值。 告警指标设置的值只是个阈值只是象征性的值,用户可根据在实际使用 RocketMQ 的情况下自行设定。这里重点介绍一下消费者堆积告警指标,在以往的监控系统中,由于没有像 Prometheus 那样有强大的 PromQL 语言,在处理消费者告警问题时势必需要为每个消费者设置告警,那这样就需要 RocketMQ 系统的维护人员为每个消费者添加,要么在系统后台检测到有新的消费者创建时自动添加。在 Prometheus 中,这可以通过一条如下的语句来实现:
(sum(rocketmq_producer_offset) by (topic) - on(topic)  group_right  sum(rocketmq_consumer_offset) by (group,topic))
- ignoring(group) group_left sum (avg_over_time(rocketmq_producer_tps[5m])) by (topic)*5*60 > 0
借助 PromQL 这一条语句不仅可以实现为任意一个消费者创建消费告警堆积告警,而且还可以使消费堆积的阈值取一个跟生产者发送速度相关的阈值。这样大大增加了消费堆积告警的准确性。
RocketMQ-Exporter 使用示例
1 启动 NameServer 和 Broker
要验证 RocketMQ 的 Spring-Boot 客户端,首先要确保 RocketMQ 服务正确的下载并启动。可以参考 RocketMQ 主站的快速开始来进行操作。确保启动 NameServer 和 Broker 已经正确启动。
2 编译 RocketMQ-Exporter
用户当前使用,需要自行下载 git 源码编译
git clone https://github.com/apache/rocketmq-exporter
cd rocketmq-exporter
mvn clean install
3 配置和运行
RocketMQ-Exporter 有如下的运行选项
| 选项 | 默认值 | 含义 |
|---|---|---|
| rocketmq.config.namesrvAddr | 127.0.0.1:9876 | MQ 集群的 nameSrv 地址 |
| rocketmq.config.webTelemetryPath | /metrics | 指标搜集路径 |
| server.port | 5557 | HTTP 服务暴露端口 |
以上的运行选项既可以在下载代码后在配置文件中更改,也可以通过命令行来设置。
编译出来的 jar 包就叫 rocketmq-exporter-0.0.1-SNAPSHOT.jar,可以通过如下的方式来运行。
java -jar rocketmq-exporter-0.0.1-SNAPSHOT.jar [--rocketmq.config.namesrvAddr="127.0.0.1:9876" ...]
4 安装 Prometheus
首先到 Prometheus 官方下载地址 https://prometheus.io/download/ 去下载 Prometheus 安装包,当前以 linux 系统安装为例,选择的安装包为 prometheus-2.7.0-rc.1.linux-amd64.tar.gz,经过如下的操作步骤就可以启动 prometheus 进程。
tar -xzf prometheus-2.7.0-rc.1.linux-amd64.tar.gz
cd prometheus-2.7.0-rc.1.linux-amd64/
./prometheus --config.file=prometheus.yml --web.listen-address=:5555
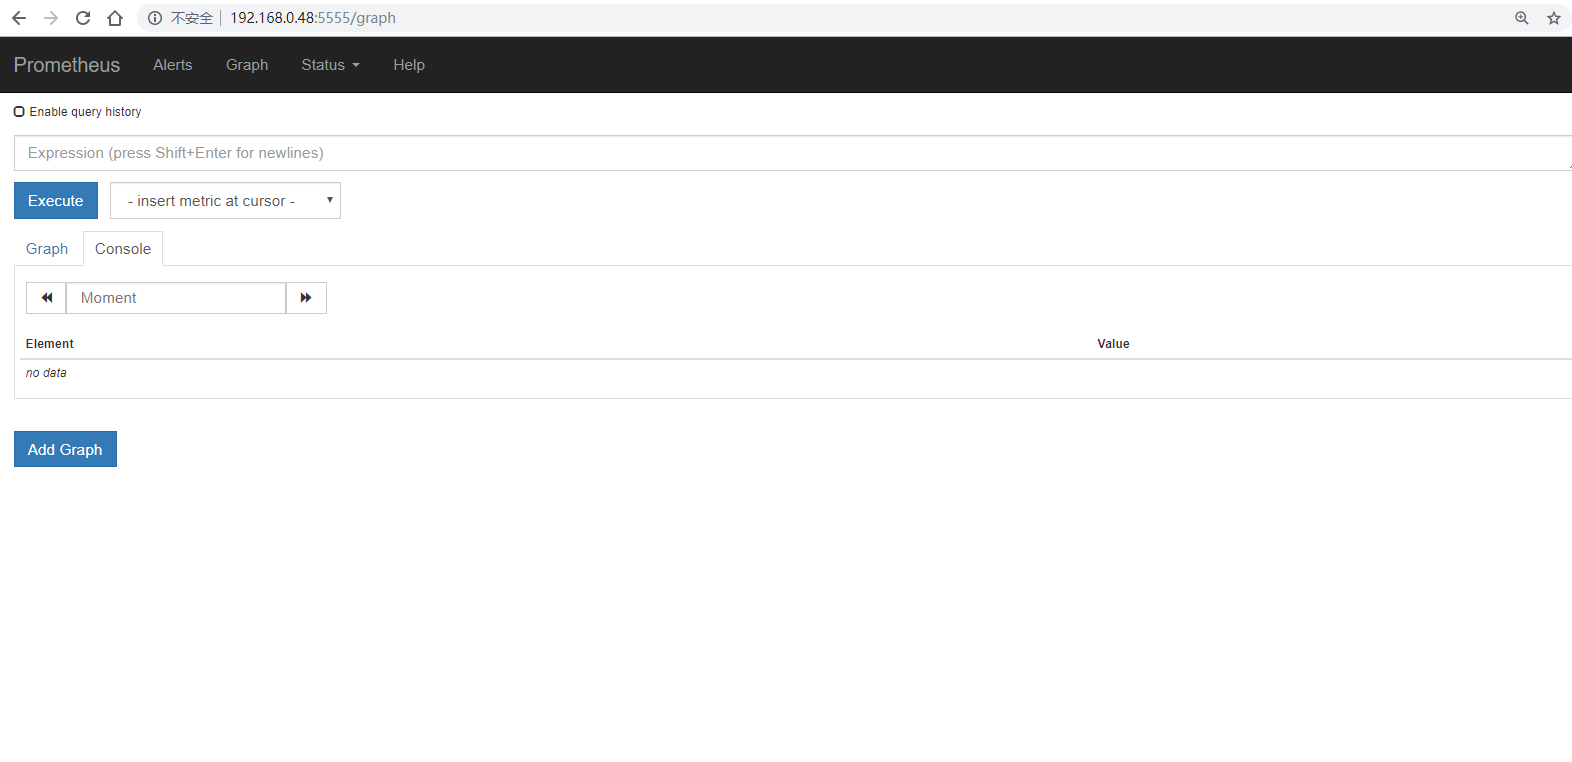
Prometheus 默认监听端口号为 9090,为了不与系统上的其它进程监听端口冲突,我们在启动参数里面重新设置了监听端口号为 5555。然后通过浏览器访问 http://< 服务器 IP 地址 >:5555, 就可以验证 Prometheus 是否已成功安装,显示界面如下
由于 RocketMQ-Exporter 进程已启动,这个时候可以通过 Prometheus 来抓取 RocketMQ-Exporter 的数据,这个时候只需要更改 Prometheus 启动的配置文件即可
整体配置文件如下:
# my global config
global:
   scrape_interval:     15s # Set the scrape interval to every 15 seconds. Default is every 1 minute.
   evaluation_interval: 15s # Evaluate rules every 15 seconds. The default is every 1 minute.
   # scrape_timeout is set to the global default (10s).


 # Load rules once and periodically evaluate them according to the global 'evaluation_interval'.
 rule_files:
   # - "first_rules.yml"
   # - "second_rules.yml"


 scrape_configs:
   - job_name: 'prometheus'
     static_configs:
     - targets: ['localhost:5555']


   - job_name: 'exporter'
     static_configs:
     - targets: ['localhost:5557']
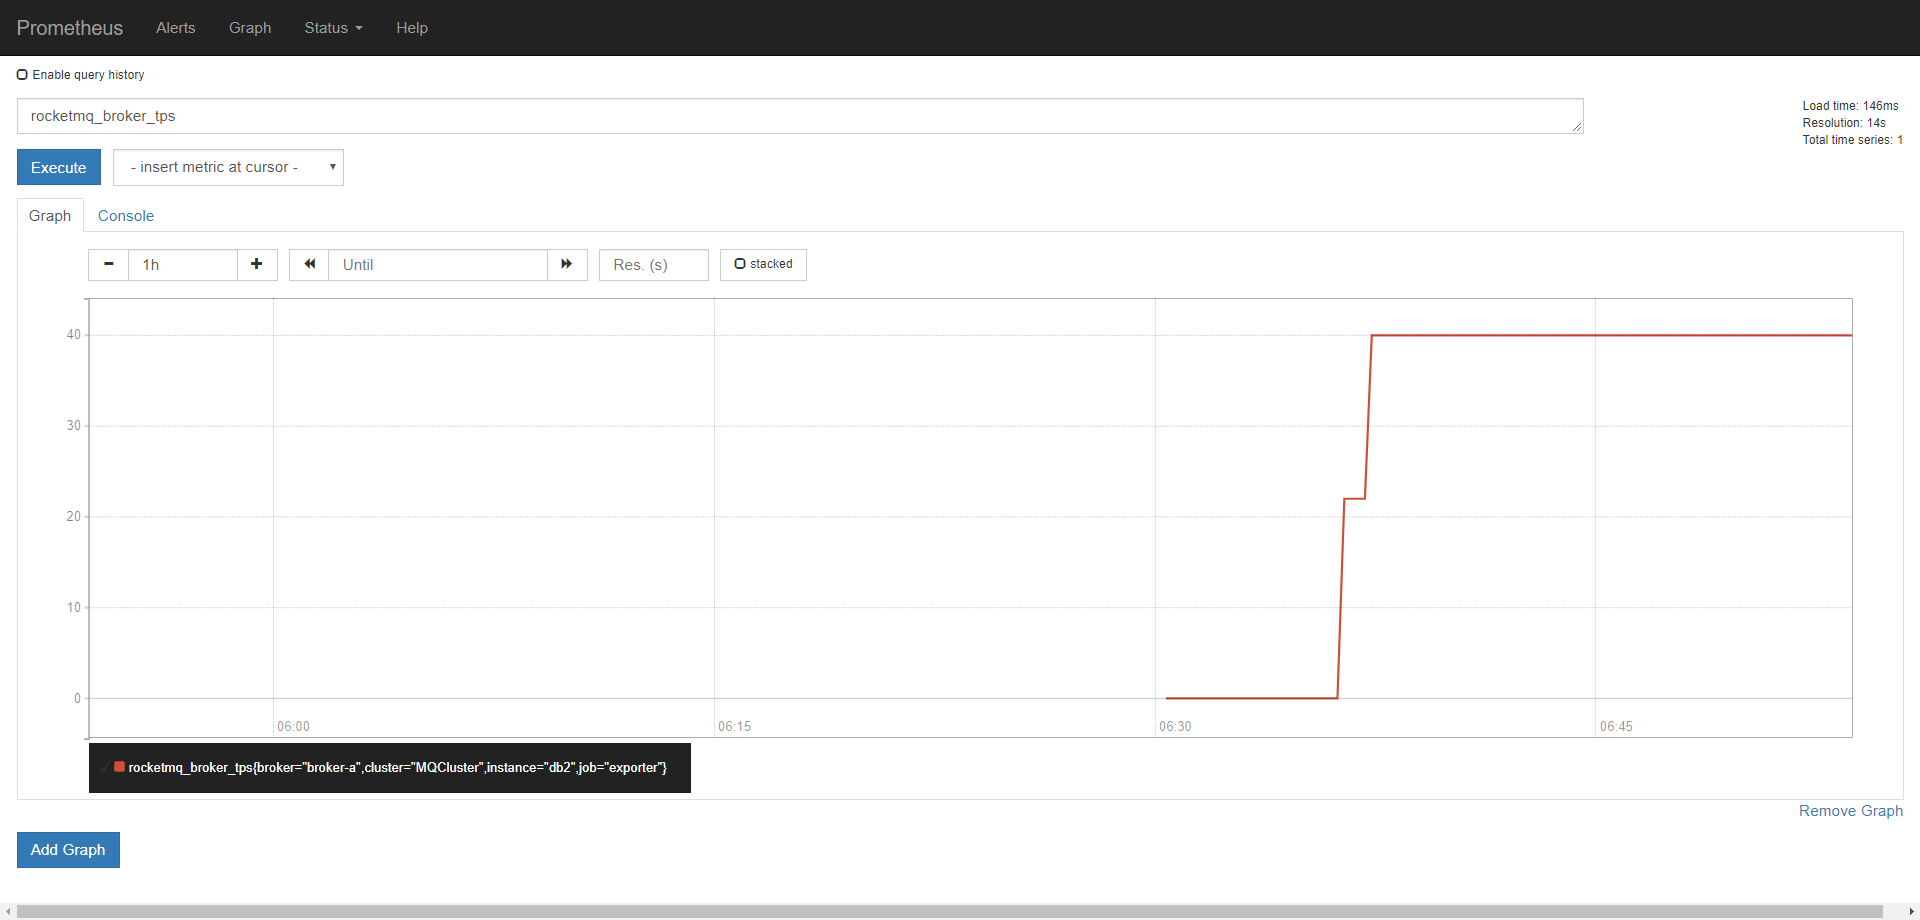
更改配置文件后,重启服务即可。重启后就可以在 Prometheus 界面查询 RocketMQ-Exporter 上报的指标,例如查询 rocketmq_broker_tps 指标,其结果如下
5 告警规则添加
在 Prometheus 可以展示 RocketMQ-Exporter 的指标后,就可以在 Prometheus 中配置 RocketMQ 的告警指标了。在 Prometheus 的配置文件中添加如下的告警配置项,*.rules 表示可以匹配多个后缀为 rules 的文件。
rule_files:
  # - "first_rules.yml"
  # - "second_rules.yml"
  - /home/prometheus/prometheus-2.7.0-rc.1.linux-amd64/rules/*.rules
当前设置的告警配置文件为 warn.rules,其文件具体内容如下所示。其中的阈值只起一个示例的作用,具体的阈值还需用户根据实际使用情况来自行设定。
###
# Sample prometheus rules/alerts for rocketmq.
#
###
# Galera Alerts

groups:
- name: GaleraAlerts
  rules:
  - alert: RocketMQClusterProduceHigh
    expr: sum(rocketmq_producer_tps) by (cluster) >= 10
    for: 3m
    labels:
      severity: warning
    annotations:
      description: '{{$labels.cluster}} Sending tps too high.'
      summary: cluster send tps too high
  - alert: RocketMQClusterProduceLow
    expr: sum(rocketmq_producer_tps) by (cluster) < 1
    for: 3m
    labels:
      severity: warning
    annotations:
      description: '{{$labels.cluster}} Sending tps too low.'
      summary: cluster send tps too low
  - alert: RocketMQClusterConsumeHigh
    expr: sum(rocketmq_consumer_tps) by (cluster) >= 10
    for: 3m
    labels:
      severity: warning
    annotations:
      description: '{{$labels.cluster}} consuming tps too high.'
      summary: cluster consume tps too high
  - alert: RocketMQClusterConsumeLow
    expr: sum(rocketmq_consumer_tps) by (cluster) < 1
    for: 3m
    labels:
      severity: warning
    annotations:
      description: '{{$labels.cluster}} consuming tps too low.'
      summary: cluster consume tps too low
  - alert: ConsumerFallingBehind
    expr: (sum(rocketmq_producer_offset) by (topic) - on(topic)  group_right  sum(rocketmq_consumer_offset) by (group,topic)) - ignoring(group) group_left sum (avg_over_time(rocketmq_producer_tps[5m])) by (topic)*5*60 > 0
    for: 3m
    labels:
      severity: warning
    annotations:
      description: 'consumer {{$labels.group}} on {{$labels.topic}} lag behind
        and is falling behind (behind value {{$value}}).'
      summary: consumer lag behind
  - alert: GroupGetLatencyByStoretime
    expr: rocketmq_group_get_latency_by_storetime > 1000
    for: 3m
    labels:
      severity: warning
    annotations:
      description: 'consumer {{$labels.group}} on {{$labels.broker}}, {{$labels.topic}} consume time lag behind message store time
        and (behind value is {{$value}}).'
      summary: message consumes time lag behind message store time too much
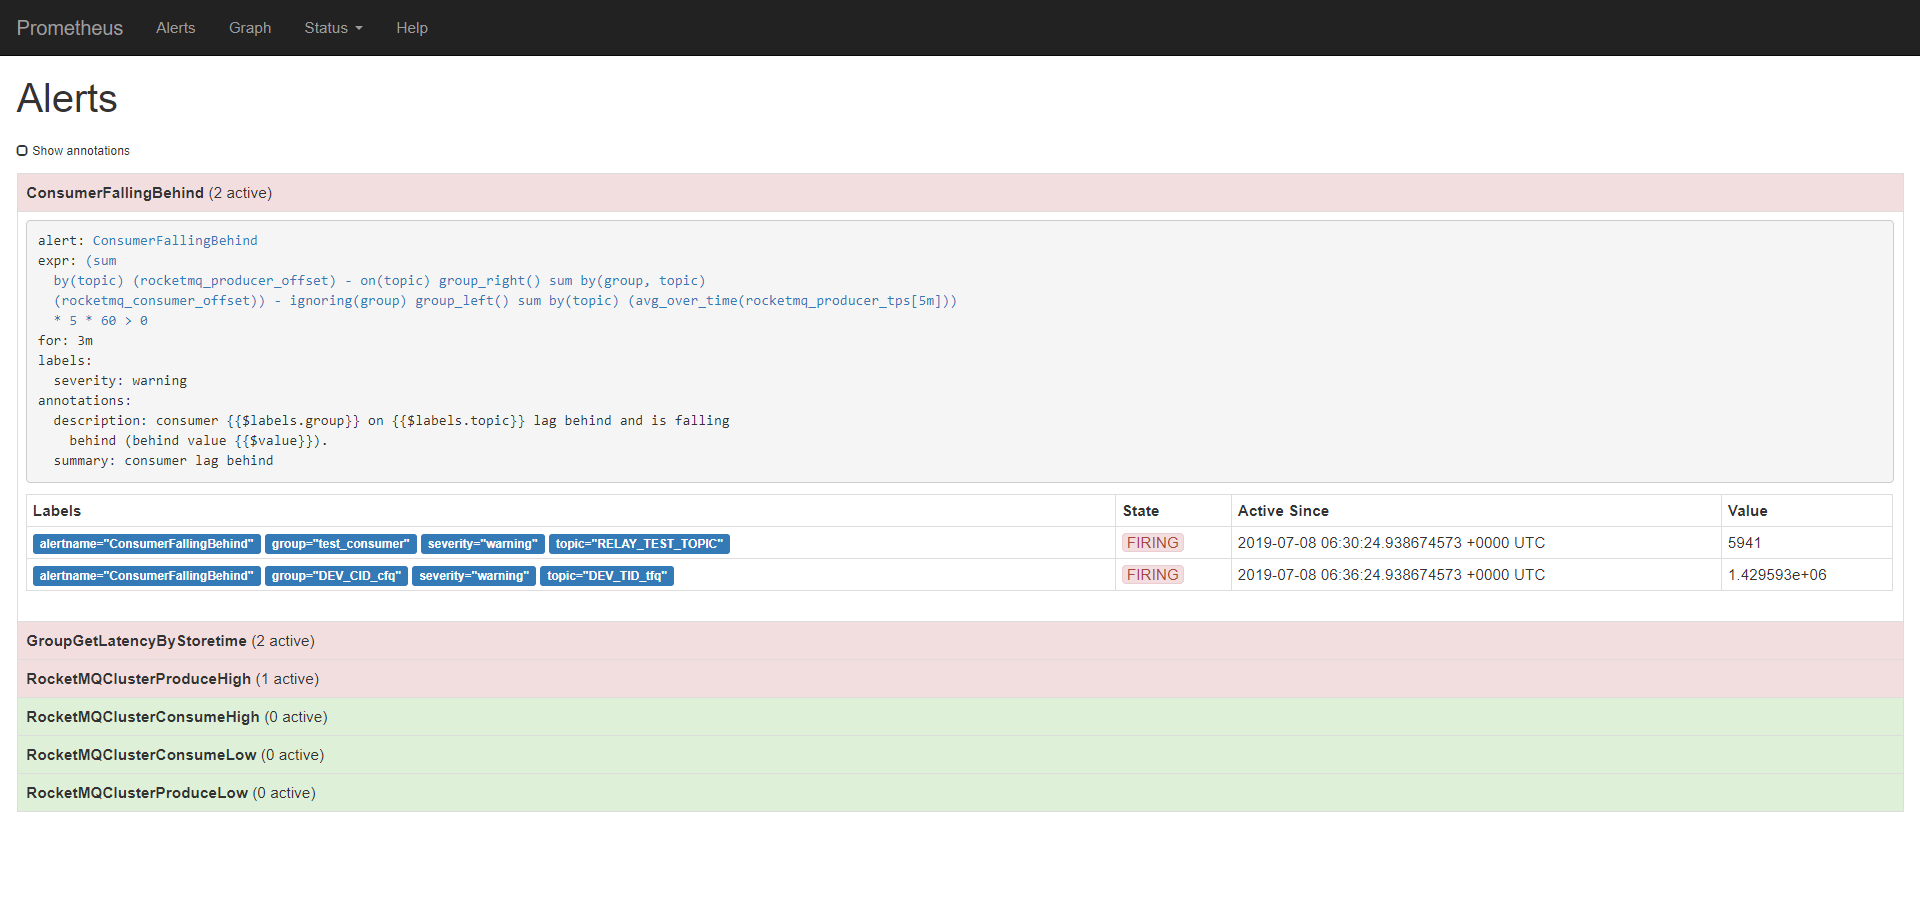
最终,可以在 Prometheus 的看一下告警展示效果,红色表示当前处于告警状态的项,绿色表示正常状态。
6 Grafana dashboard for RocketMQ
Prometheus 自身的指标展示平台没有当前流行的展示平台 Grafana 好, 为了更好的展示 RocketMQ 的指标,可以使用 Grafana 来展示 Prometheus 获取的指标。首先到官网去下载 https://grafana.com/grafana/download , 这里仍以二进制文件安装为例进行介绍。
wget https://dl.grafana.com/oss/release/grafana-6.2.5.linux-amd64.tar.gz
tar -zxvf grafana-6.2.5.linux-amd64.tar.gz
cd grafana-5.4.3/
同样为了不与其它进程的使用端口冲突,可以修改 conf 目录下的 defaults.ini 文件的监听端口,当前将 grafana 的监听端口改为 55555,然后使用如下的命令启动即可
./bin/grafana-server web
然后通过浏览器访问 http://< 服务器 IP 地址 >:55555, 就可以验证 grafana 是否已成功安装。系统默认用户名和密码为 admin/admin,第一次登陆系统会要求修改密码,修改密码后登陆,界面显示如下:
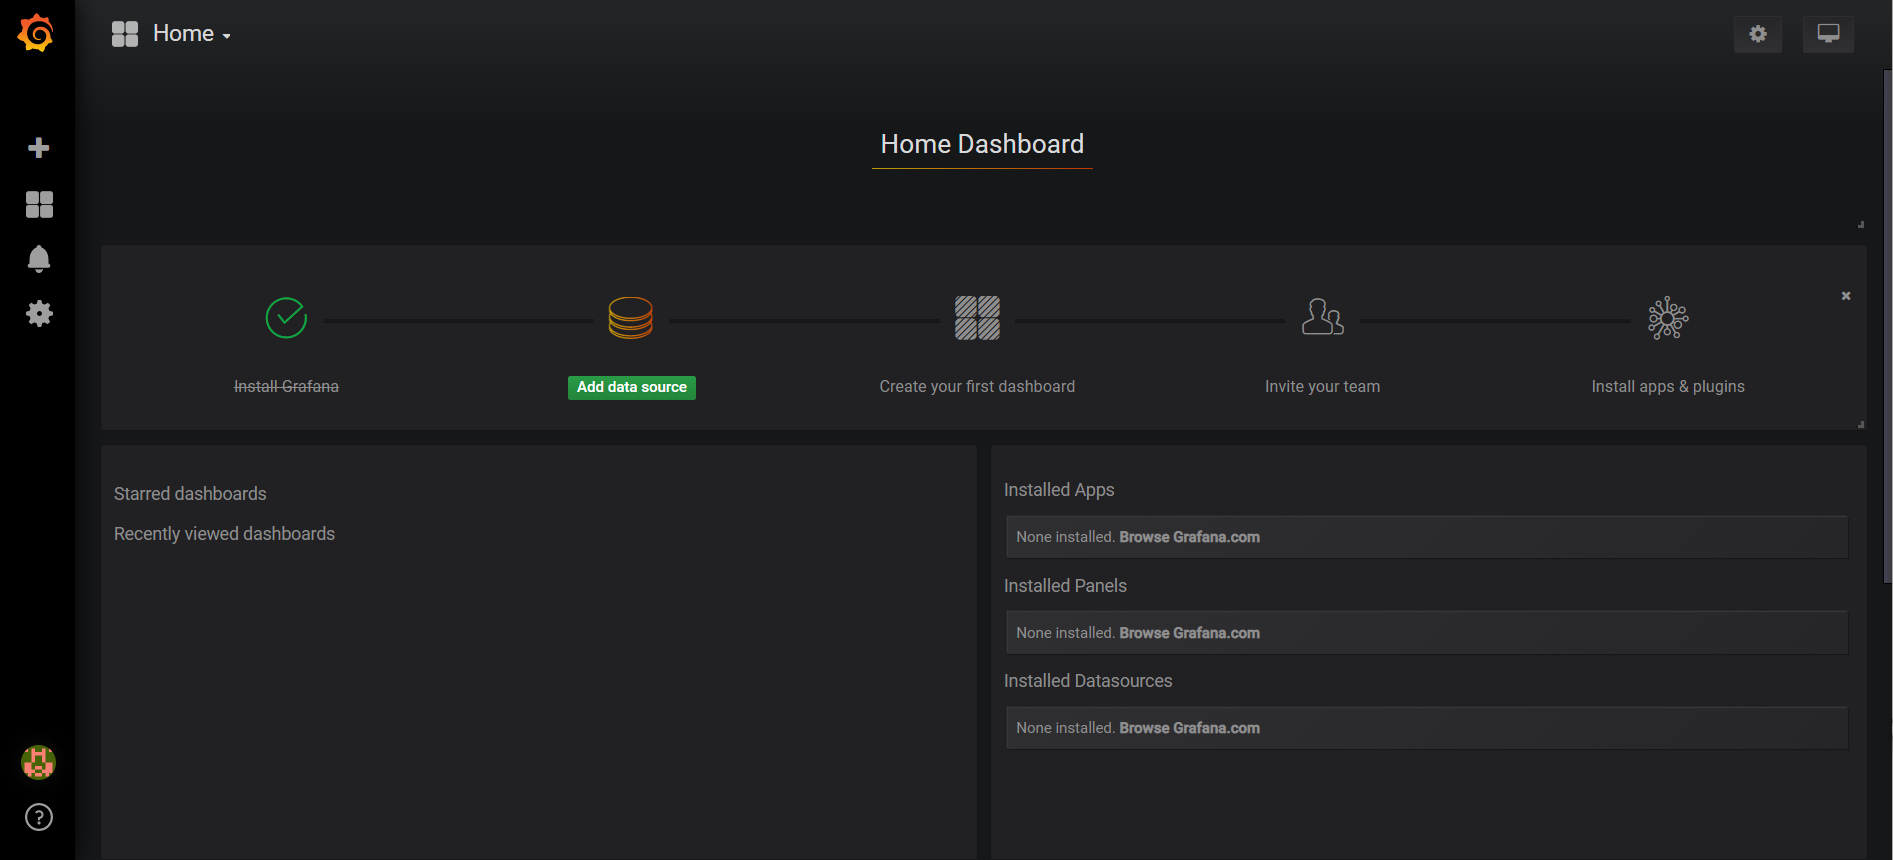
点击 Add data source 按钮,会要求选择数据源。
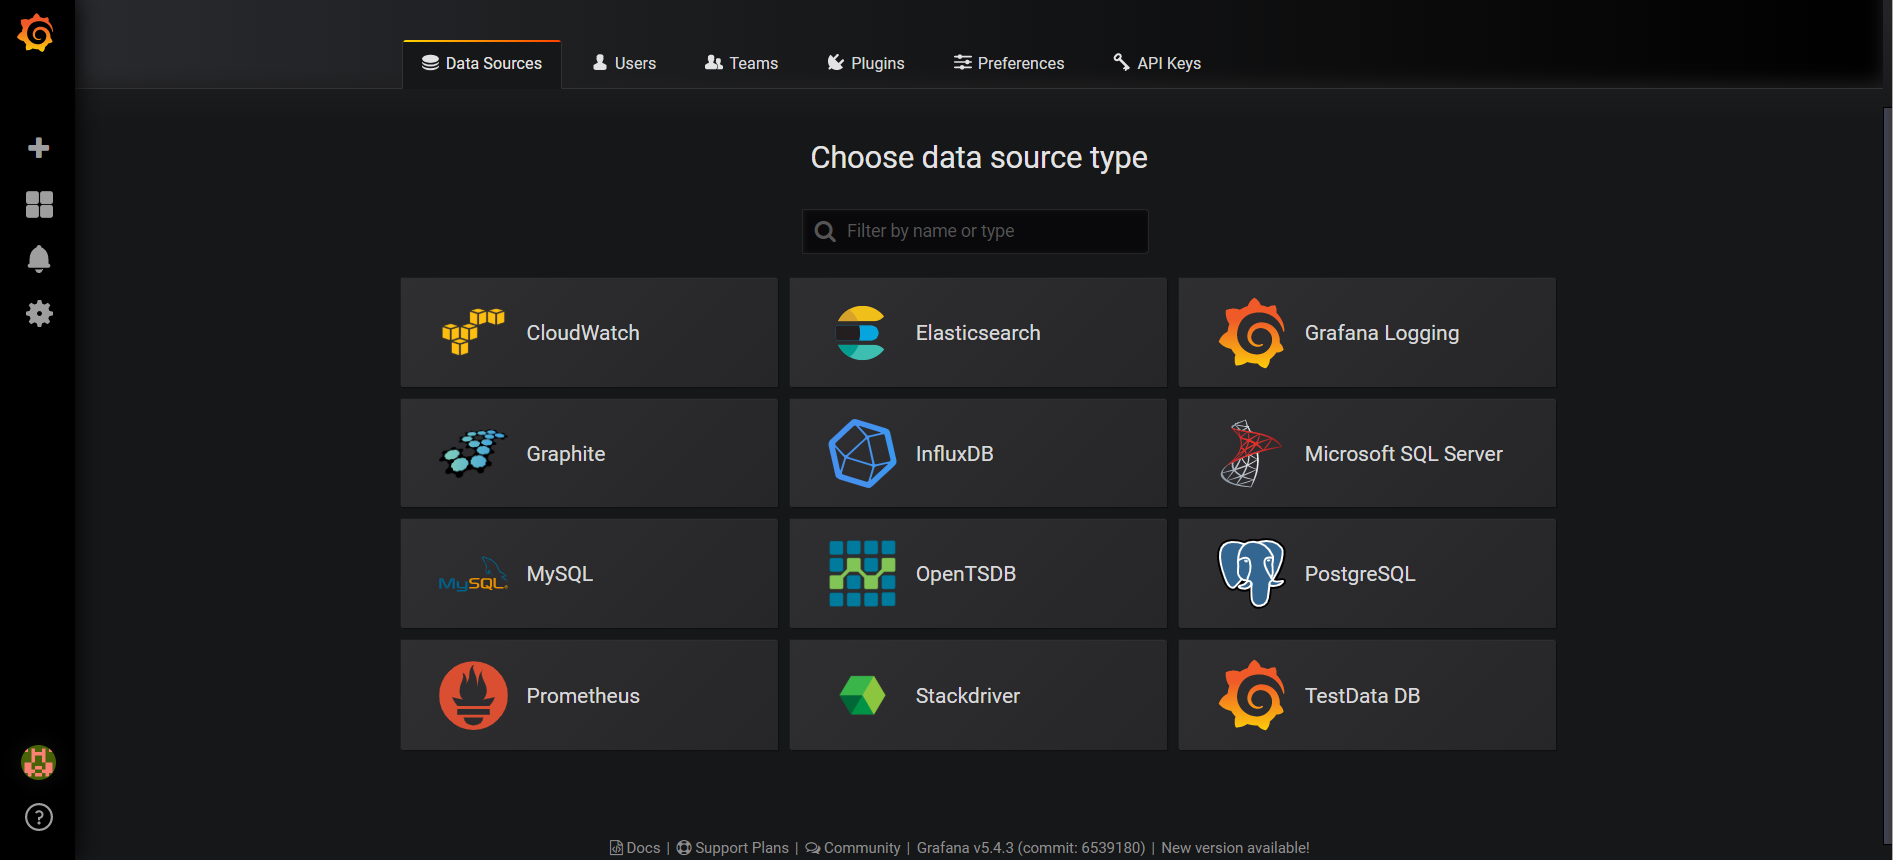
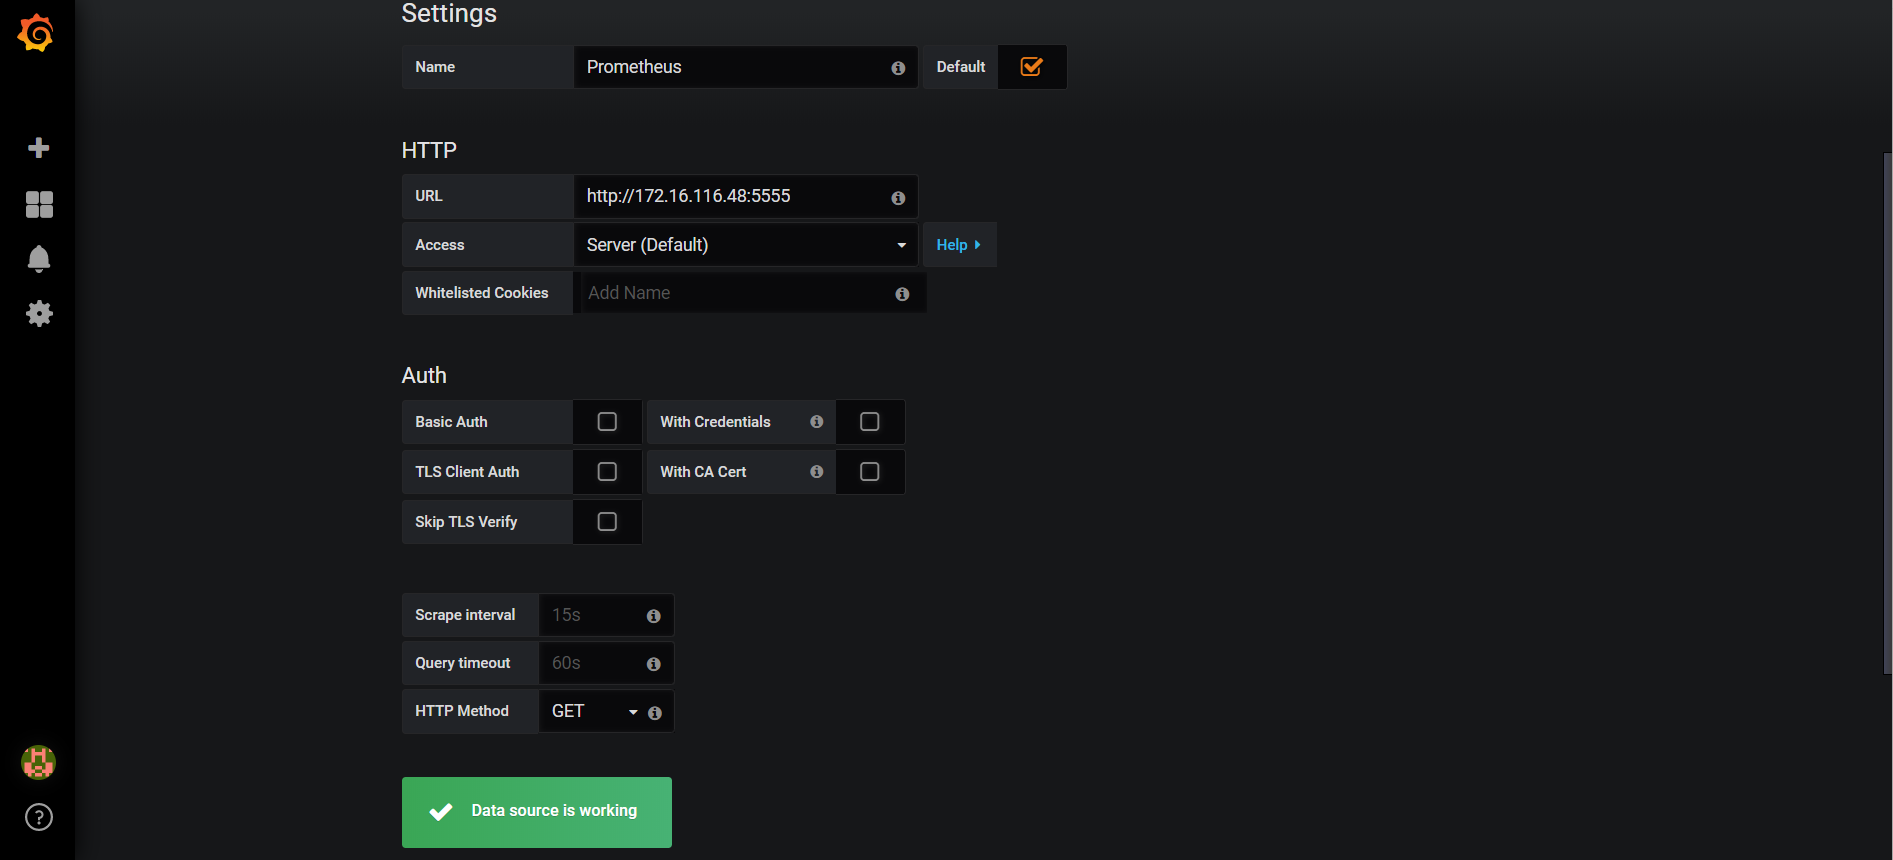
选择数据源为 Prometheus,设置数据源的地址为前面步骤启动的 Prometheus 的地址
回到主界面会要求创建新的 Dashboard
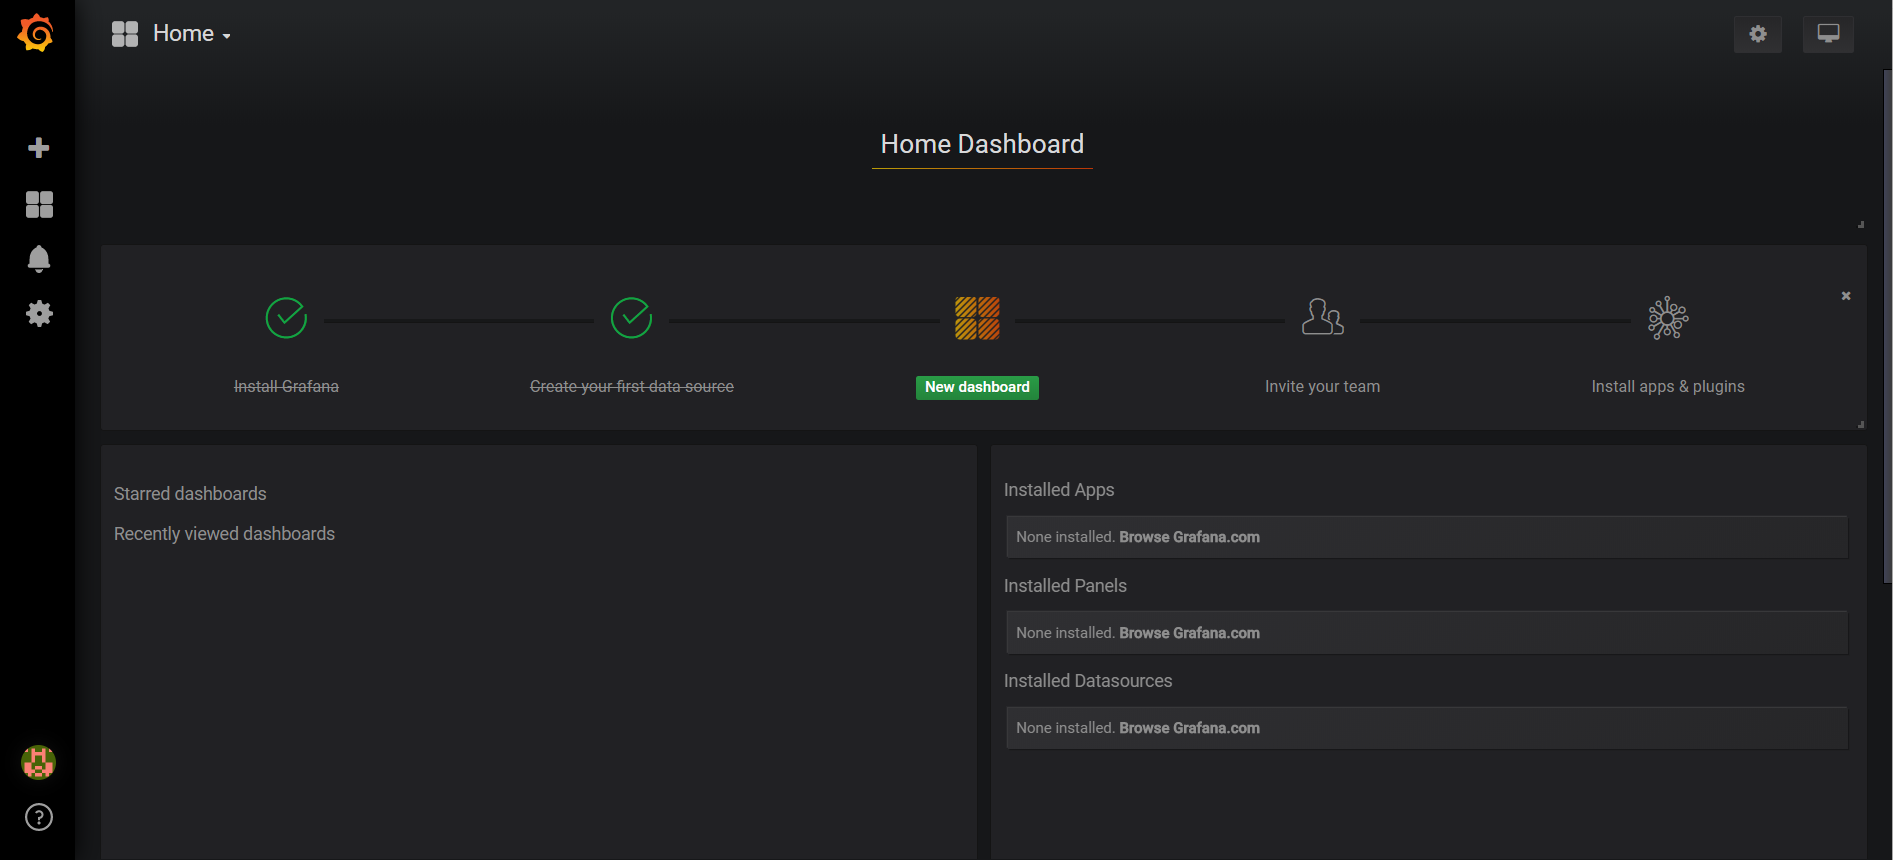
点击创建 dashboard,创建 dashboard 可以自己手动创建,也可以以配置文件导入的方式创建,当前已将 RocketMQ 的 dashboard 配置文件上传到 Grafana 的官网,这里以配置文件导入的方式进行创建。
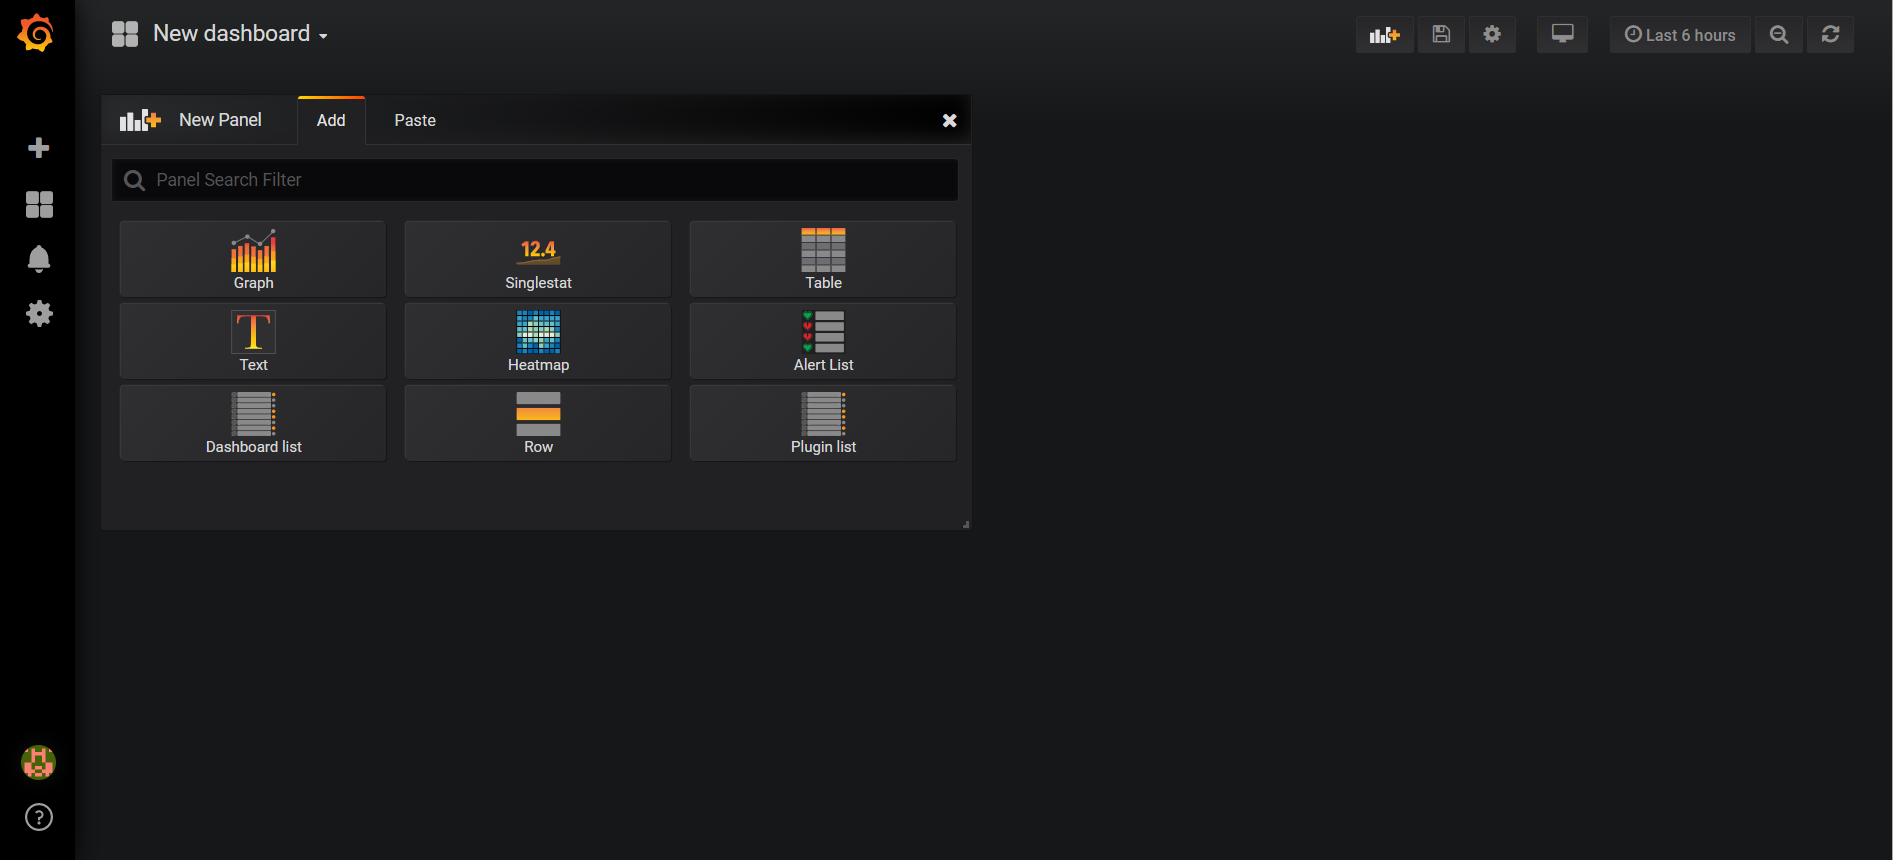
点击 New dashboard 下拉按钮
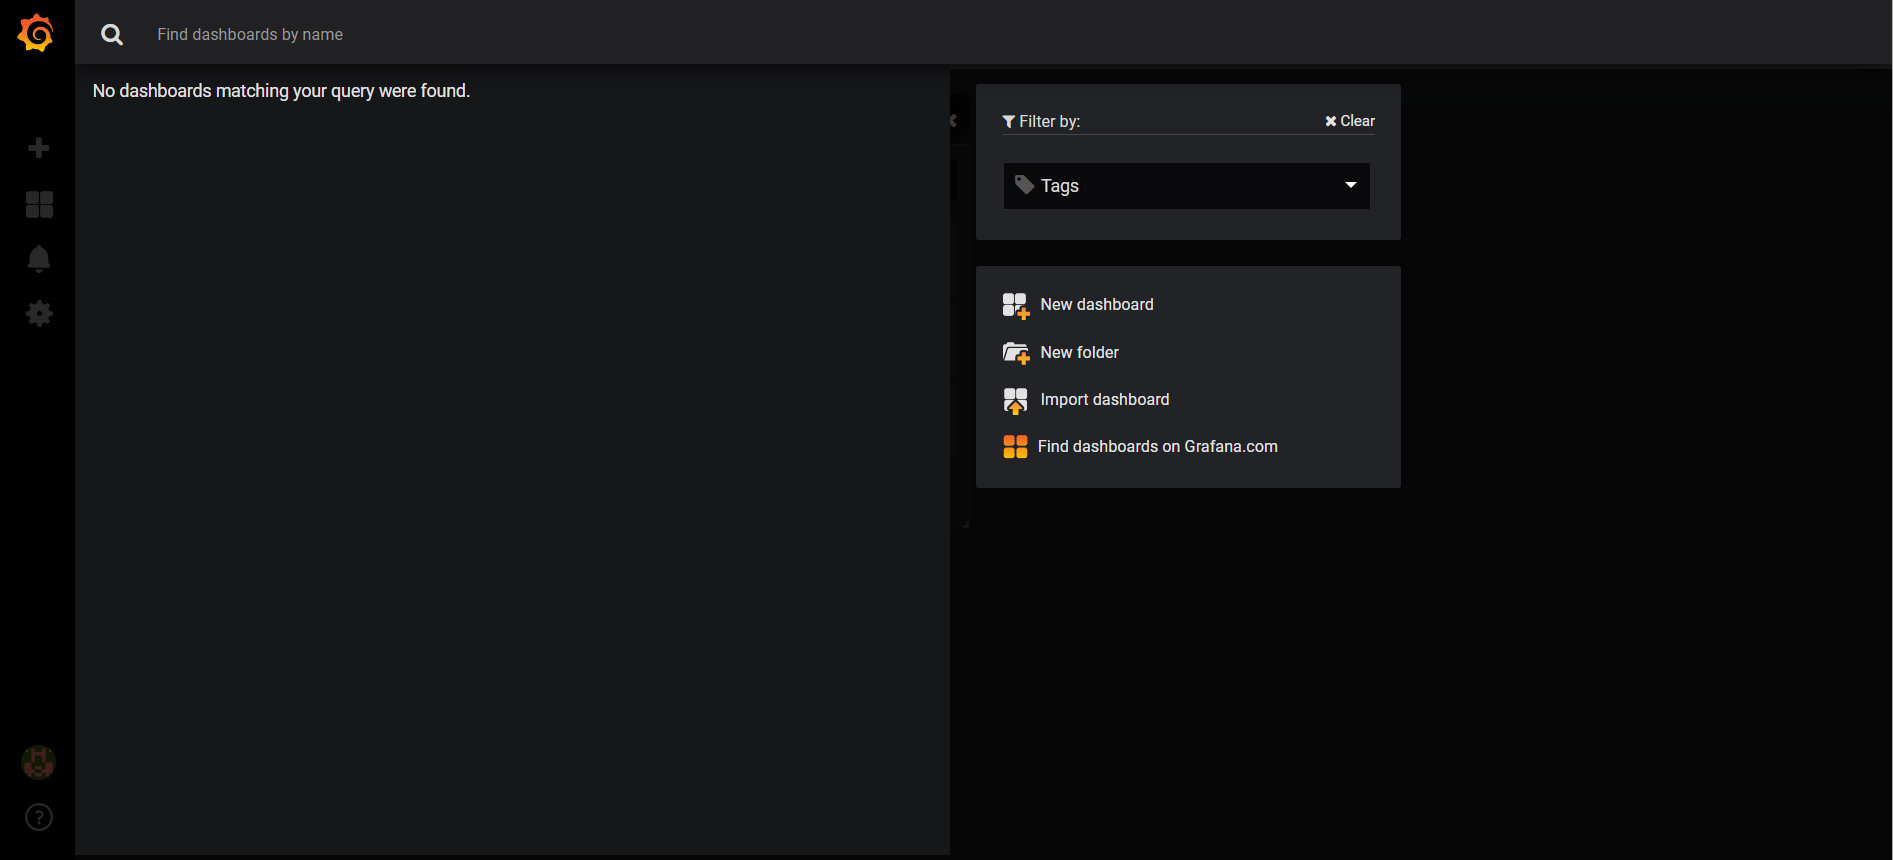
选择 import dashboard
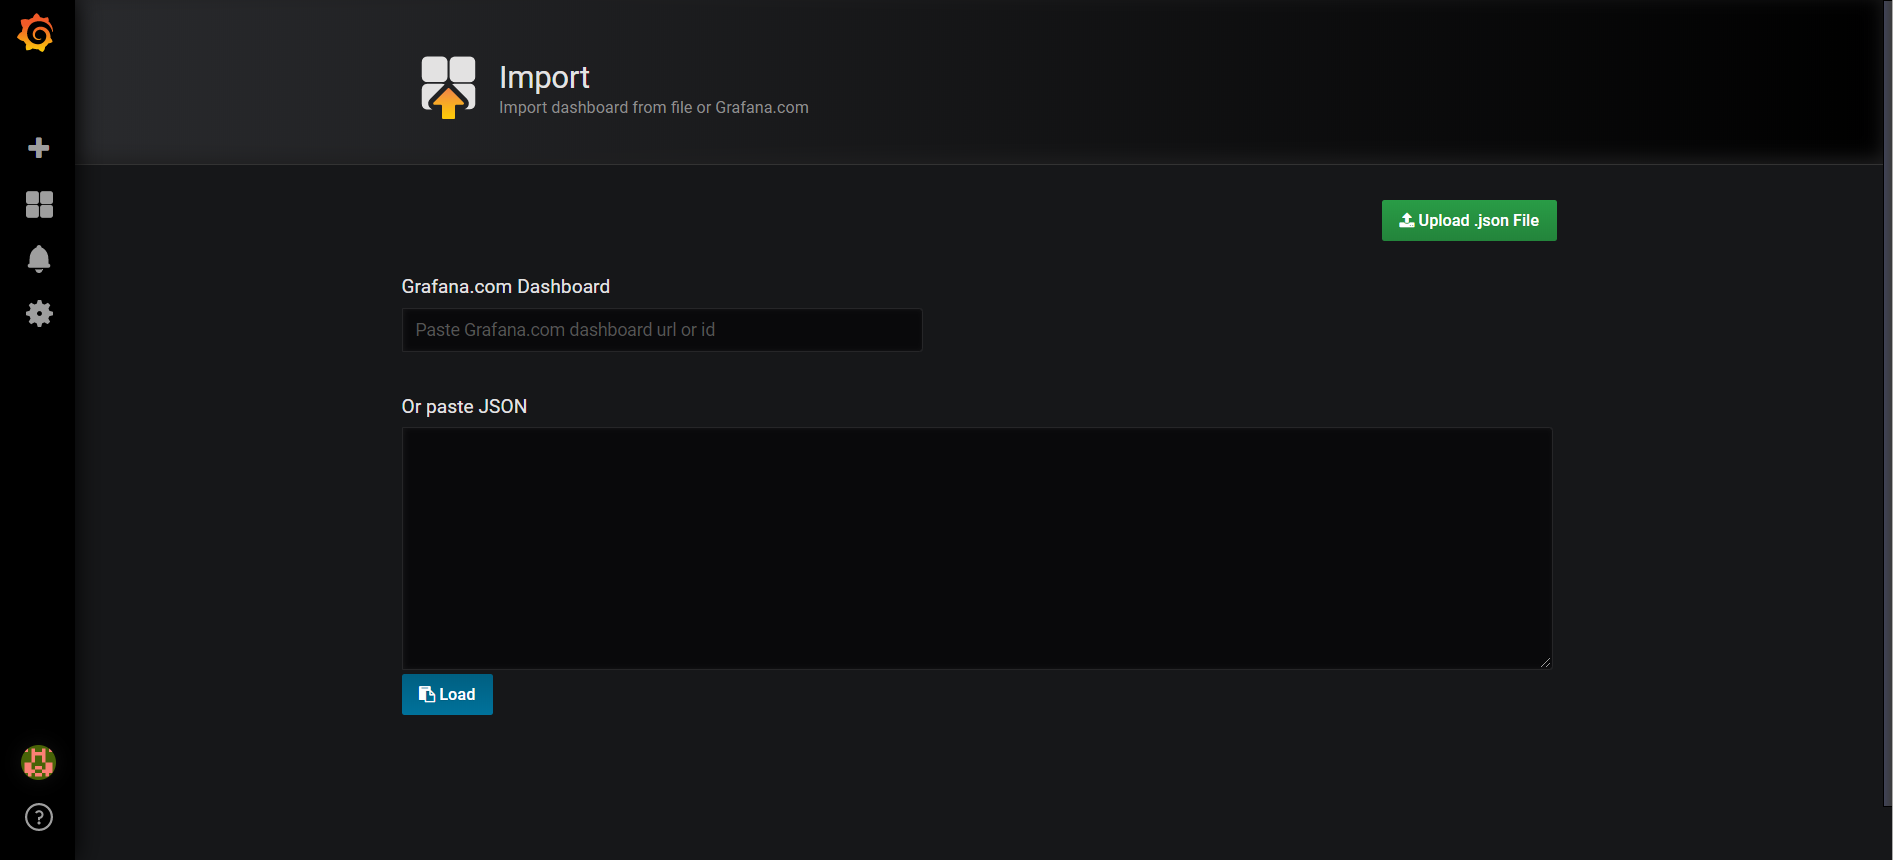
这个时候可以到 Grafana 官网去下载当前已为 RocketMQ 创建好的配置文件,地址为 https://grafana.com/dashboards/10477/revisions ,如下图所示
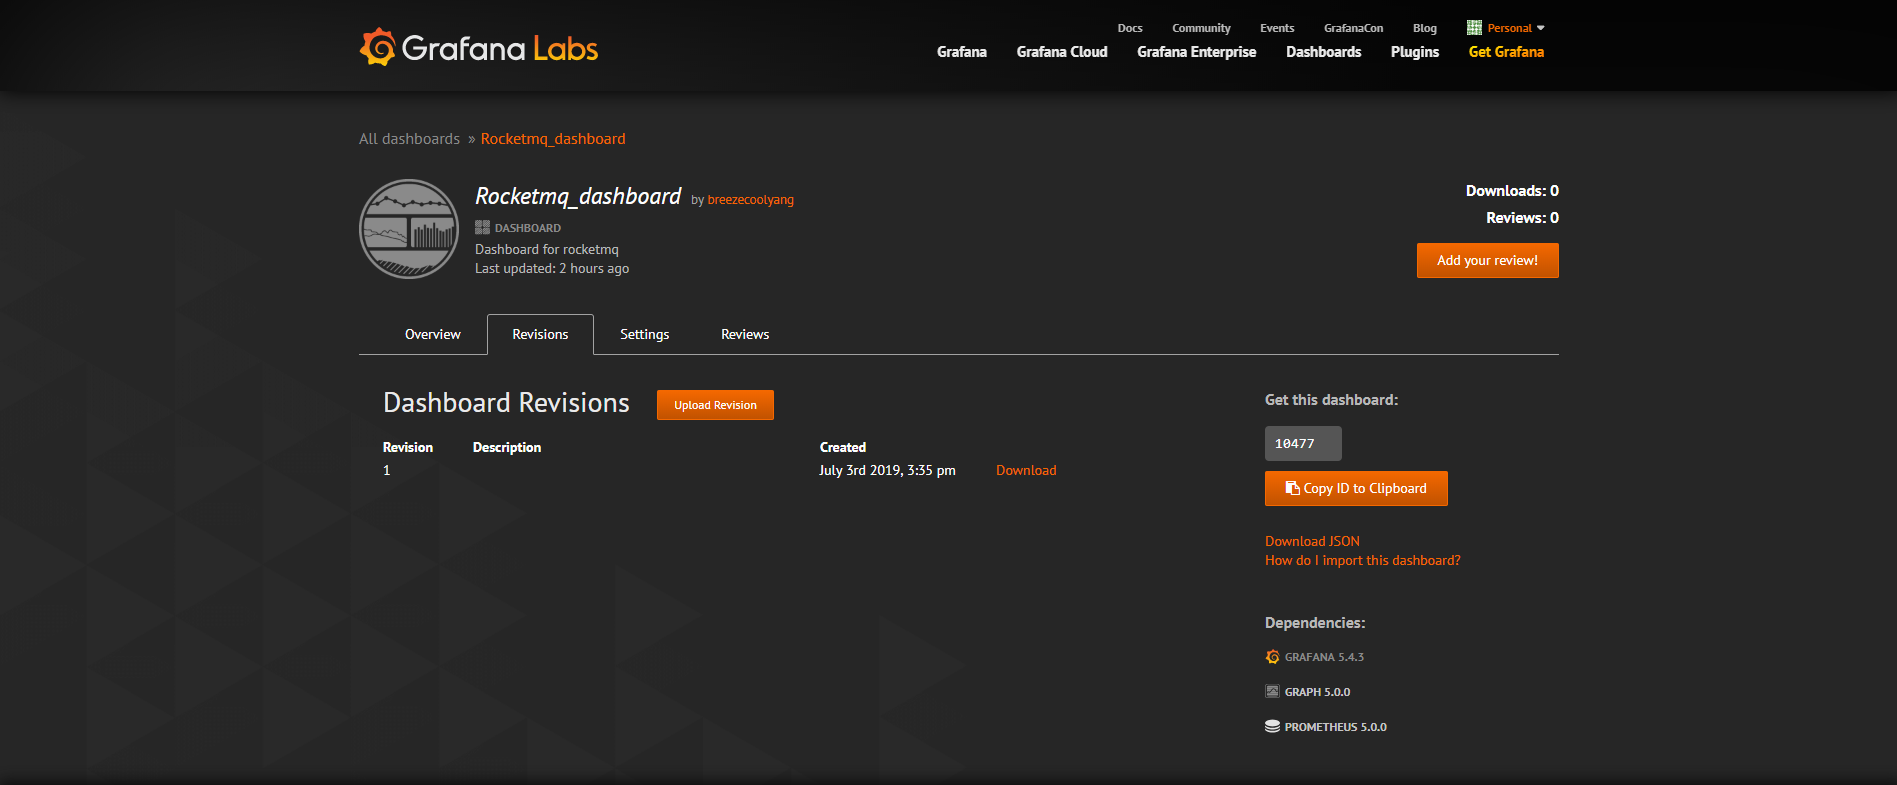
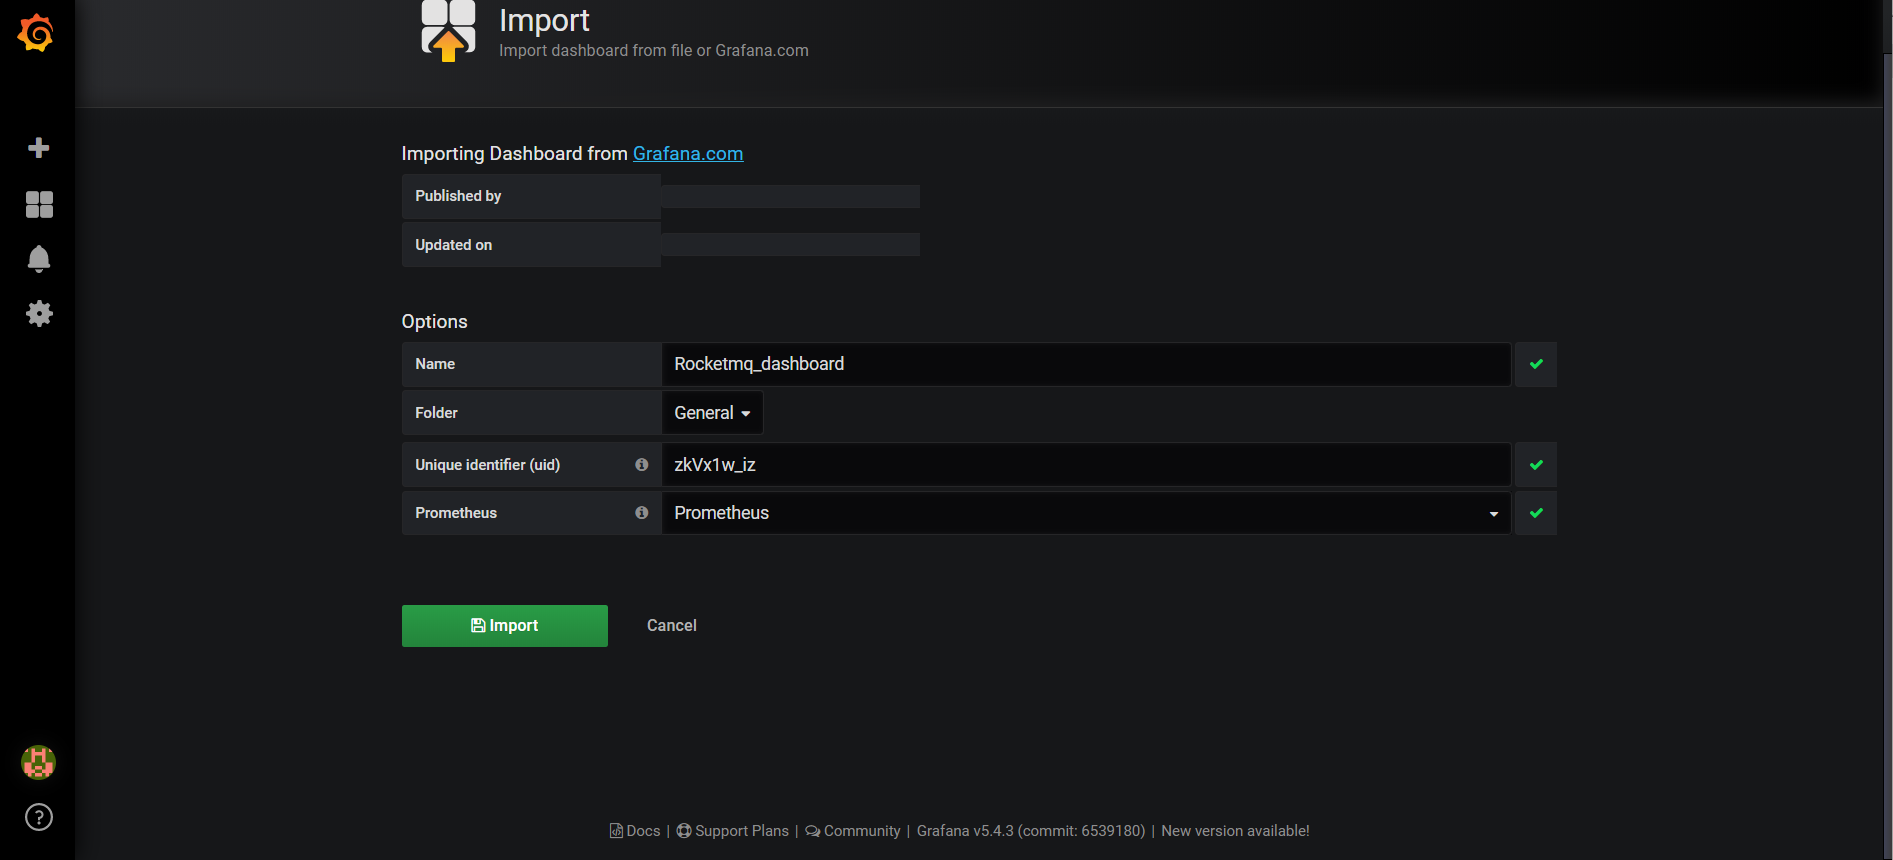
,点击 download 就可以下载配置文件,下载配置文件然后,复制配置文件中的内容粘贴到上图的粘贴内容处。
最后按上述方式就将配置文件导入到 Grafana 了。
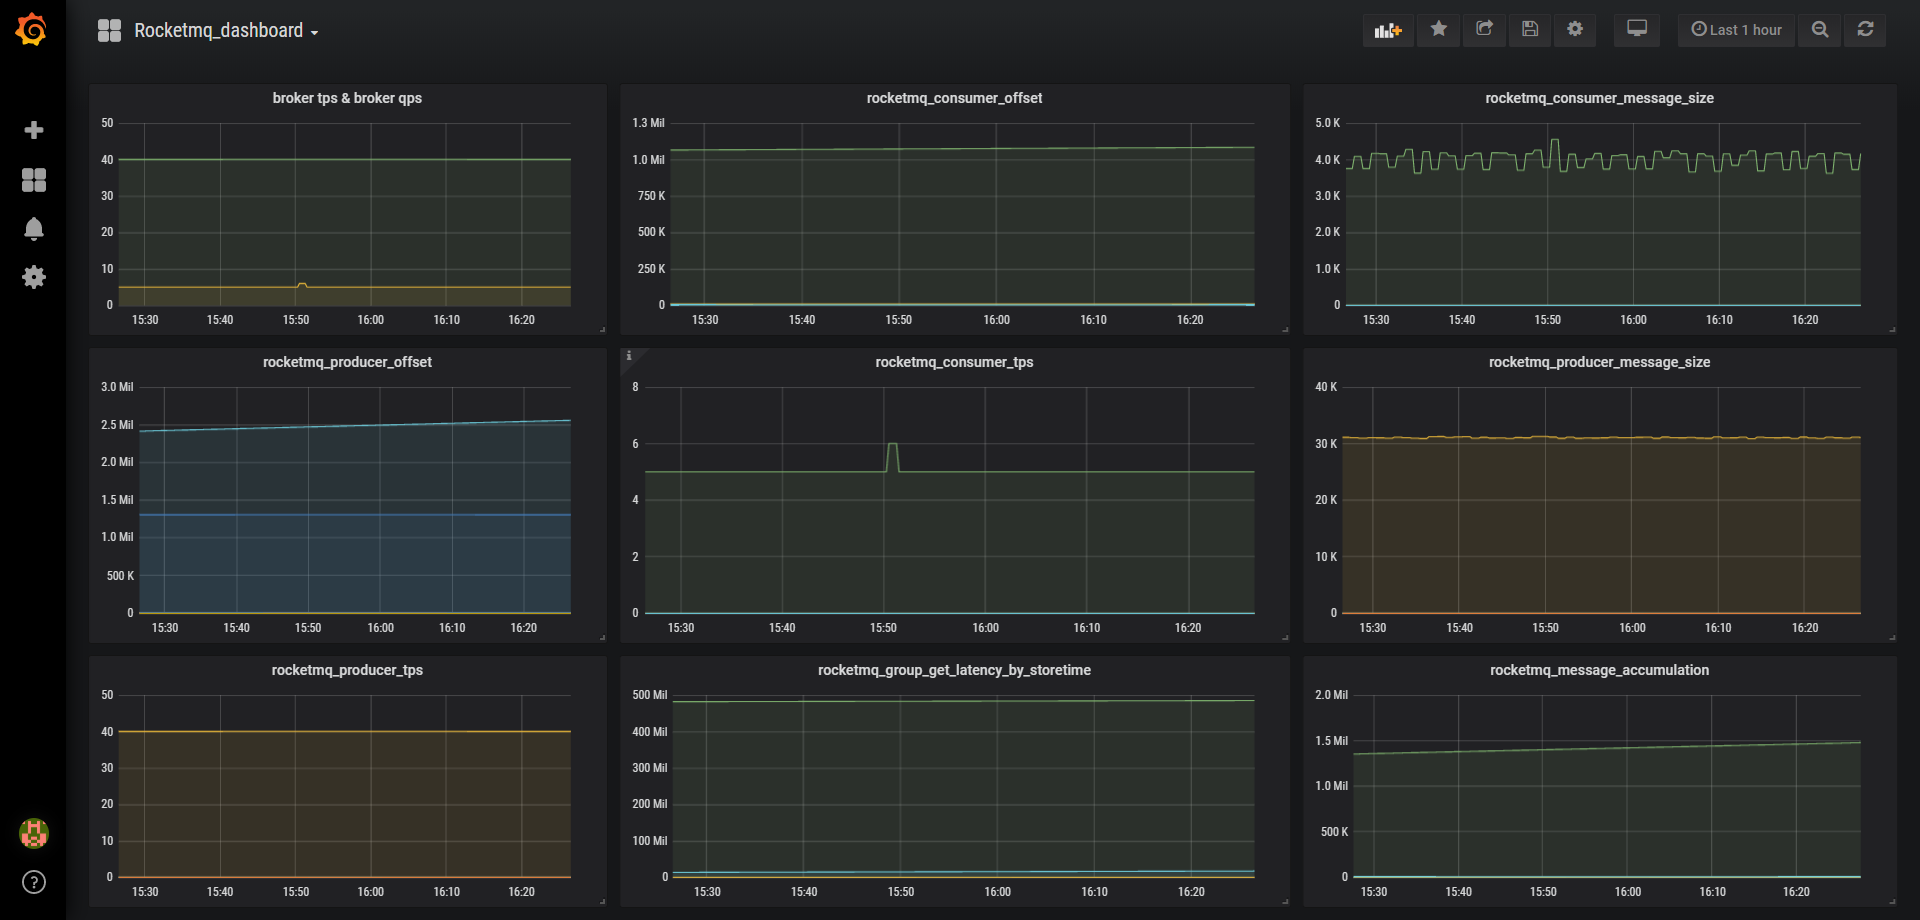
最终的效果如下所示
source: https://www.infoq.cn/article/NcSYj_2PQhBlqveuD1Kw