1、Nginx官网下载安装程序,http://nginx.org/
2、启动命令
启动:start nginx.exe
停止:nginx -s stop
重新加载: nginx -s reload
3、配置文件
路径 Nginx/conf/nginx.conf,配置文件内容,简单的实现一个负责均衡效果

#user  nobody;
worker_processes  2;

#error_log  logs/error.log;
#error_log  logs/error.log  notice;
#error_log  logs/error.log  info;

#pid        logs/nginx.pid;


events {
    worker_connections  1024;
}


http {
    include       mime.types;
    default_type  application/octet-stream;

    #log_format  main  '$remote_addr - $remote_user [$time_local] "$request" '
    #                  '$status $body_bytes_sent "$http_referer" '
    #                  '"$http_user_agent" "$http_x_forwarded_for"';

    #access_log  logs/access.log  main;

    sendfile        on;
    #tcp_nopush     on;

    #keepalive_timeout  0;
    keepalive_timeout  65;

    #gzip  on;

 #服务器的集群
    upstream  wei.com{  #服务器集群名字

    server    127.0.0.1:81;#服务器配置   weight是权重的意思,权重越大,分配的概率越大。
    server    127.0.0.1:82;
     #ip_hash;
    }

    server {
        listen       8080;
        server_name  localhost wei.com;

        #charset koi8-r;

        #access_log  logs/host.access.log  main;

        #location / {
         #   root   html;
          #  index  index.html index.htm;
       # }
  location / {
            proxy_pass http://wei.com;
            proxy_redirect default;
            index index.aspx;
       #root C:Websitedemo1
        }

        #error_page  404              /404.html;

        # redirect server error pages to the static page /50x.html
        #
        error_page   500 502 503 504  /50x.html;
        location = /50x.html {
            root   html;
        }

        # proxy the PHP scripts to Apache listening on 127.0.0.1:80
        #
        #location ~ .php$ {
        #    proxy_pass   http://127.0.0.1;
        #}

        # pass the PHP scripts to FastCGI server listening on 127.0.0.1:9000
        #
        #location ~ .php$ {
        #    root           html;
        #    fastcgi_pass   127.0.0.1:9000;
        #    fastcgi_index  index.php;
        #    fastcgi_param  SCRIPT_FILENAME  /scripts$fastcgi_script_name;
        #    include        fastcgi_params;
        #}

        # deny access to .htaccess files, if Apache's document root
        # concurs with nginx's one
        #
        #location ~ /.ht {
        #    deny  all;
        #}
    }


    # another virtual host using mix of IP-, name-, and port-based configuration
    #
    #server {
    #    listen       8000;
    #    listen       somename:8080;
    #    server_name  somename  alias  another.alias;

    #    location / {
    #        root   html;
    #        index  index.html index.htm;
    #    }
    #}


    # HTTPS server
    #
    #server {
    #    listen       443 ssl;
    #    server_name  localhost;

    #    ssl_certificate      cert.pem;
    #    ssl_certificate_key  cert.key;

    #    ssl_session_cache    shared:SSL:1m;
    #    ssl_session_timeout  5m;

    #    ssl_ciphers  HIGH:!aNULL:!MD5;
    #    ssl_prefer_server_ciphers  on;

    #    location / {
    #        root   html;
    #        index  index.html index.htm;
    #    }
    #}

}
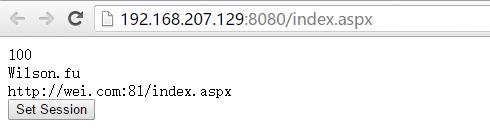
index.aspx 后台源码
<%@ Page Language="C#" AutoEventWireup="true" CodeBehind="Index.aspx.cs" Inherits="OpenLayerDemo.Index" %>

<!DOCTYPE html>

<html xmlns="http://www.w3.org/1999/xhtml">
<head runat="server">
<meta http-equiv="Content-Type" content="text/html; charset=utf-8"/>
    <title></title>
</head>
<body>
    <form id="form1" runat="server">
    <div>
    <asp:Button ID="btnSet" runat="server" OnClick="btnSet_Click" Text="Set Session" />
    </div>
    </form>
</body>
</html>
using System;
using System.Collections.Generic;
using System.Web;
using System.Web.UI;
using System.Web.UI.WebControls;

namespace OpenLayerDemo
{
    public partial class Index : System.Web.UI.Page
    {
        protected void Page_Load(object sender, EventArgs e)
        {
            Response.Write(System.Configuration.ConfigurationManager.AppSettings["val"] + "<br/>");

            if (Session["a"] != null)
            {
                Response.Write(Session["a"]);
            }
            else
            {
                Response.Write("session empty");
            }
            Response.Write("<br/>" + Request.Url.ToString());
        }

        protected void btnSet_Click(object sender, EventArgs e)
        {
            Session["a"] = "Wilson.fu";
        }
    }
}
关于配置参数:


nginx的upstream目前支持的5种方式的分配


1、轮询(默认)
每个请求按时间顺序逐一分配到不同的后端服务器,如果后端服务器down掉,能自动剔除。
upstream backserver {
server 192.168.0.14;
server 192.168.0.15;
}

2、指定权重
指定轮询几率,weight和访问比率成正比,用于后端服务器性能不均的情况。
upstream backserver {
server 192.168.0.14 weight=10;
server 192.168.0.15 weight=10;
}

3、IP绑定 ip_hash
每个请求按访问ip的hash结果分配,这样每个访客固定访问一个后端服务器,可以解决session的问题。
upstream backserver {
ip_hash;
server 192.168.0.14:88;
server 192.168.0.15:80;
}

4、fair(第三方)
按后端服务器的响应时间来分配请求,响应时间短的优先分配。
upstream backserver {
server server1;
server server2;
fair;
}

5、url_hash(第三方)
按访问url的hash结果来分配请求,使每个url定向到同一个后端服务器,后端服务器为缓存时比较有效。
upstream backserver {
server squid1:3128;
server squid2:3128;
hash $request_uri;
hash_method crc32;
}

在需要使用负载均衡的server中增加

proxy_pass http://backserver/;
upstream backserver{

ip_hash;
server 127.0.0.1:9090 down; (down 表示单前的server暂时不参与负载)
server 127.0.0.1:8080 weight=2; (weight 默认为1.weight越大,负载的权重就越大)
server 127.0.0.1:6060;
server 127.0.0.1:7070 backup; (其它所有的非backup机器down或者忙的时候,请求backup机器)
}

max_fails :允许请求失败的次数默认为1.当超过最大次数时,返回proxy_next_upstream 模块定义的错误


fail_timeout:max_fails次失败后,暂停的时间
按照MSDN的标准说法:“对密钥进行配置,以便将其用于对 Forms 身份验证 Cookie 数据和视图状态数据进行加密和解密,并将其用于对进程外会话状态标识进行验证。”也就是说Asp.Net的很多加密,都是依赖于machineKey里面的值,例如Forms 身份验证 Cookie、ViewState的加密。默认情况下,Asp.Net的配置是自己动态生成,如果单台服务器当然没问题,但是如果多台服务器负载均衡,machineKey还采用动态生成的方式,每台服务器上的machinekey值不一致,就导致加密出来的结果也不一致,不能共享验证和ViewState,所以对于多台服务器负载均衡的情况,一定要在每台站点配置相同的machineKey。

machineKey生成的算法:

validationKey = CreateKey(20);

decryptionKey = CreateKey(24);

protected string CreateKey(int len)

{

byte[] bytes = new byte[len];

new RNGCryptoServiceProvider().GetBytes(bytes);

StringBuilder sb = new StringBuilder();

for(int i = 0; i < bytes.Length; i++)

{

sb.Append(string.Format("{0:X2}",bytes[i]));

}

return sb.ToString();

}

附参考的matchineKey配置:

<?xml version="1.0"?>

<configuration>

<system.web>

<machineKey validationKey="3FF1E929BC0534950B0920A7B59FA698BD02DFE8" decryptionKey="280450BB36319B474C996B506A95AEDF9B51211B1D2B7A77" decryption="3DES" validation="SHA1"/>

</system.web>

</configuration>
基于redis的思路
http://www.2cto.com/kf/201402/279548.html
Nginx以windows服务方式运行见
https://github.com/daptiv/NginxService
中文帮助: