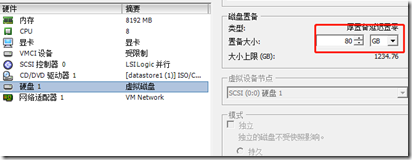
1、首先对虚拟机进行编辑设置
硬盘大小进行修改到80G;
2、在Linux系统中查看磁盘大小
此时并没有什么变化;
3、
上面没有变化的原因,是因为需要重新扫描存储设备的scsi总线;
找到scsi磁盘编号,进行rescan:
[root@slave1 ~]# ls /sys/class/scsi_disk/
0:0:0:0

[root@slave1 ~]# echo 1 >/sys/class/scsi_disk/0:0:0:0/device/rescan    #此处用转意:
4、此时再次查看磁盘大小,
就增加到了我们需要的大小;
5、划分磁盘空间
此时硬盘增加到了我们需要的大小,我们要是用的话,还需要格式化出一个分区并挂载;
[root@slave1 ~]# fdisk /dev/sda
欢迎使用 fdisk (util-linux 2.23.2)。

更改将停留在内存中,直到您决定将更改写入磁盘。
使用写入命令前请三思。


命令(输入 m 获取帮助):n
Partition type:
   p   primary (2 primary, 0 extended, 2 free)
   e   extended
Select (default p): p
分区号 (3,4,默认 3):
起始 扇区 (83886080-167772159,默认为 83886080):
将使用默认值 83886080
Last 扇区, +扇区 or +size{K,M,G} (83886080-167772159,默认为 167772159):
将使用默认值 167772159
分区 3 已设置为 Linux 类型,大小设为 40 GiB

命令(输入 m 获取帮助):w
The partition table has been altered!

Calling ioctl() to re-read partition table.

WARNING: Re-reading the partition table failed with error 16: 设备或资源忙.
The kernel still uses the old table. The new table will be used at
the next reboot or after you run partprobe(8) or kpartx(8)
正在同步磁盘。
6、内核重新载入三块磁盘的分区表
[root@slave1 ~]# kpartx -a /dev/sda
device-mapper: reload ioctl on sda1  failed: Device or resource busy
create/reload failed on sda1
device-mapper: reload ioctl on sda2  failed: Device or resource busy
create/reload failed on sda2
device-mapper: reload ioctl on sda3  failed: Device or resource busy
create/reload failed on sda3

[root@slave1 ~]# partprobe
Warning: 无法以读写方式打开 /dev/sr0 (只读文件系统)。/dev/sr0 已按照只读方式打开。
7、格式化并挂载
##格式化
[root@slave1 ~]# mkfs -t ext3 /dev/sda3
mke2fs 1.42.9 (28-Dec-2013)
文件系统标签=
OS type: Linux
块大小=4096 (log=2)
分块大小=4096 (log=2)
Stride=0 blocks, Stripe width=0 blocks
2621440 inodes, 10485760 blocks
524288 blocks (5.00%) reserved for the super user
第一个数据块=0
Maximum filesystem blocks=4294967296
320 block groups
32768 blocks per group, 32768 fragments per group
8192 inodes per group
Superblock backups stored on blocks:
    32768, 98304, 163840, 229376, 294912, 819200, 884736, 1605632, 2654208,
    4096000, 7962624

Allocating group tables: 完成
正在写入inode表: 完成
Creating journal (32768 blocks): 完成
Writing superblocks and filesystem accounting information: 完成


##挂载
[root@slave1 ~]# mkdir /home/new_disk    #创建一个挂载目录

[root@slave1 ~]# mount /dev/sda3 /home/new_disk/    #挂载


##永久挂载
[root@slave1 ~]# vim /etc/fstab    #在文件最后写入下面这一行
/dev/sda3    /home/new_disk    ext3    defaults    0 0

