环境准备:
搭建php5.4.39+apache2.2+mysq5.5.28l环境
(可参考http://www.cnblogs.com/yangxia-test/p/4414161.html)
(注意:testlink1.9.13要求php5.4以上.)
一、Testlink环境搭建
下载你需要用的TestLink版本,本文的TestLink的版本是1.9.13,下载地址:https://sourceforge.net/projects/testlink/files
下载之后,在windows下,发现该文档的打包方式是Linux下的方式Testlink1.9.13.tar.gz,用Winzip工具解压就可以看到Testlink1.9.13.tar.gz--->Testlink1.9.13.tar--->TestLink1.9.13,将最后一层重命名为testlink
1、 将”testlink”文件夹复制到”D:php”(php的安装目录)目录下;
注意: 将后面的版本号去掉,TestLink1.9.13变成testlink
2、打开IE浏览器,输入:http://IP地址:端口号/testlink(如:http://localhost/testlink);
3、打开页面后,点击“New installation”


4、进入安装页面,这个页面要检查一些相关配置环境。只管read/write permissions栏是否有failed。在页面中点击“new installation”;

注意:此步骤如如果报Checking if /var/testlink/logs/ directory exists [S] </B<< td> Failed!
Checking if /var/testlink/upload_area/ directory exists [S] </B<< td> Failed!
修改D:php estlink config.inc.php文件:
//$tlCfg->log_path = '/var/testlink/logs/'; /* unix example 注释掉该句,
添加如下内容
$tlCfg->log_path = 'testlinkDir/logs/';
//$g_repositoryPath = '/var/testlink/upload_area/'; /* unix example 注释掉该句,
添加如下内容
$g_repositoryPath = 'testlinkDir/upload_area/';
注意:testlinkDir 表示安装目录路径
5、再刷新,如果通过后,就可以进行安装了
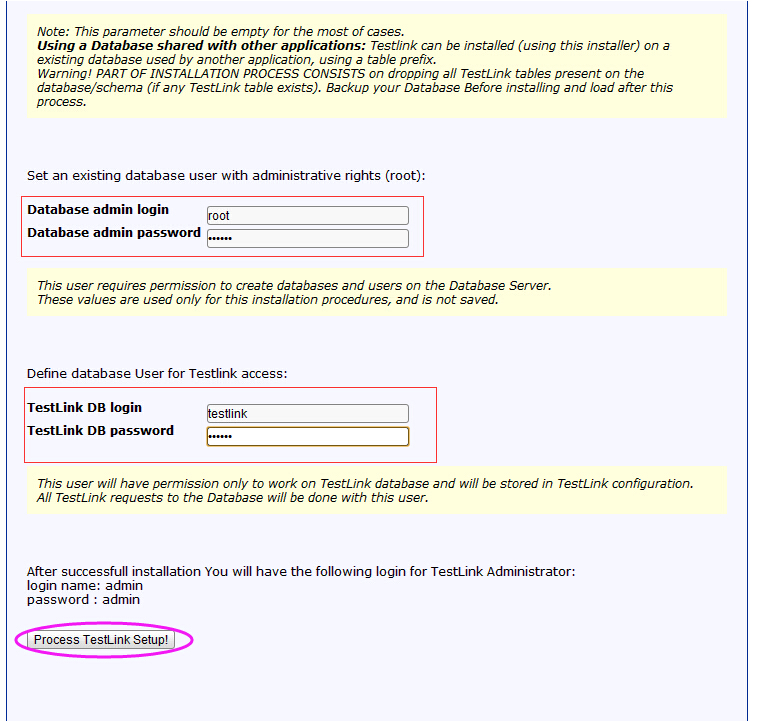
database type选择MYSQL、database host填写localhost。database name 填写testlink .
填写MYSQL数据库用户名和密码
Database login: root
Database password: *******
填写testlink数据库的登录帐号和密码
testlink DB login: testlink
testlink DB password: ******


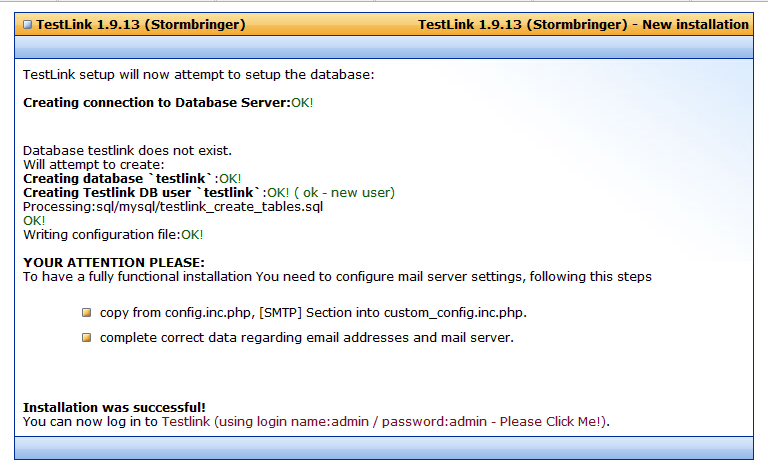
上述参数配置好后,点击页面中【Process Tesklink Setup】按钮;当出现以下页面提示时,表示配置成功;

二、登录使用
1、登录
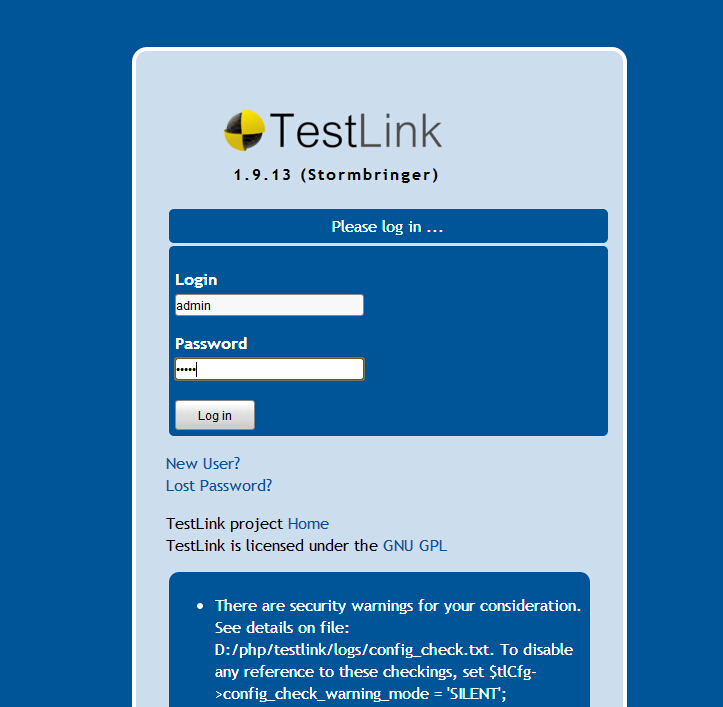
安装好之后,在http://localhost/testlink/login.php登录页面使用的登录名和密码,默认是admin/admin

2、汉化
解决方案:
1)htdocs estlink目录下修改文件config.inc.php
将$tlCfg->default_language = 'en_GB';
改为
/* [LOCALIZATION] */
$tlCfg->default_language = 'zh_CN';
2)登录TestLink,点击My SettingS,可以查看personal data,其中的locale选择Chinese Simplified,点击save.此时页面为中文的.
3、当用户登录后(使用admin/admin登录)页面上面为会安全提示,如下:
There are security warnings for your consideration. See details on file: D:Program filesVertrigoServ
www estlinklogsconfig_check.txt.
To disable any reference to these checkings,
set $tlCfg->config_check_warning_mode = 'SILENT';
解决办法:
在....VertrigoServwww estlink 根目录下找到config.inc.php 文件打开,
将$tlCfg->config_check_warning_mode = 'FILE';
改为
/* [LOGGING] */
$tlCfg->config_check_warning_mode = 'SILENT';
4、禁止用户注册
打开config.inc.php,找到$tlCfg->user_self_signup ,将其后true改为false,在登录界面便取消了New User链接。
环境已经基本搭建好了,局域网的其它机器也可以正常访问,接下来就是学习如何使用它了,加油!
转载自:https://www.cnblogs.com/yangxia-test/p/4414840.html