本文介绍通过 render函数创建DOM的基本过程(仅仅核心部分),更多的细节也可以参考 Vue 框架源码自行探索 。
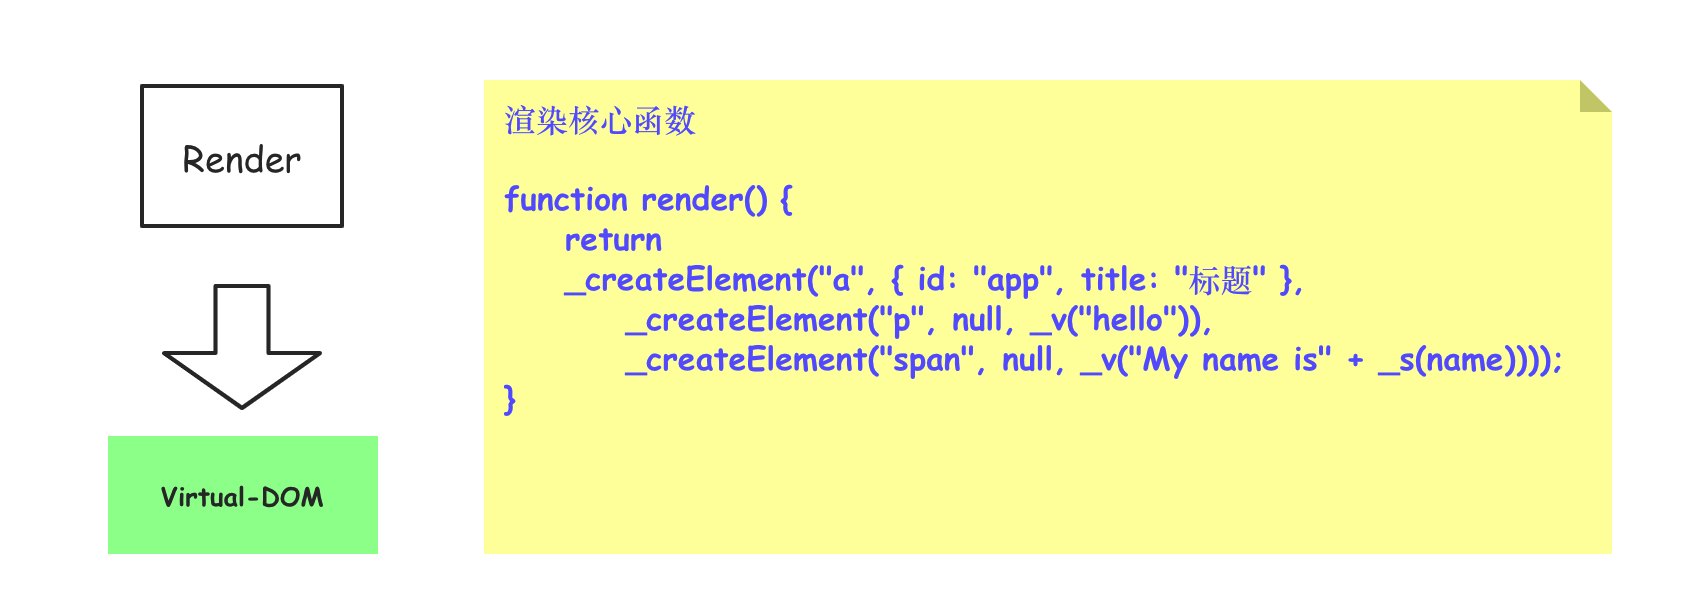
Render => Virtual-DOM
/* 模拟数据 */
function render() {
    let name = "刘毅";
    return _c("a", { id: "app", title: "标题" } , _c("p", null, _v("hello")),
        _c("span", null, _v("My name is" + _s(name))));
}

function _c() {
    return createElement(...arguments);
}

function _v(text) {
    return createTextNode(text);
}

/* 关键:用于处理插值模板 */
function _s(val) {
    return val == null ?'': (typeof val === 'object'?JSON.stringify(val):val);
}

/* 创建节点函数 */
function createElement(tag, data = {}, ...children) {
    return v_node(tag, data, null, children, null);
}

/* 创建文本内容 */
function createTextNode(text) {
    return v_node(null, null, null, null, text);
}

/* 创建虚拟 DOM 方法:把数据组织成对象返回 */
function v_node(tag, data, key, children, text) {
    return { tag, data, key, children, text }
}

let vNode = render();
console.log('vNode', vNode);

/* 打印输出 */
// vNode
// { tag: 'a',
//   data: { id: 'app', title: '标题' },
//   key: null,
//   text: null,
//   children:
//    [ { tag: 'p', data: null, key: null, children: [Array], text: null },
//      { tag: 'span', data: null,key: null,children: [Array],text: null }
//    ]
//   }
给出上面代码生成的虚拟 DOM对应的对象结构图。

Vue 框架源码核心
在 Vue 框架中,我们主要三种方式来渲染标签。
1、实例化 Vue 的过程中,通过 el 来选择实例挂载的标签。
2、实例化 Vue 的过程中,通过 template 标签字符串模板来渲染标签。
3、实例化 Vue 的过程中,直接通过 render 函数的方式来渲染标签,这也是底层的方法。
我们给出对应的 Vue 渲染标签(组件)的对应代码。
   <script src="./node_modules/vue/dist/vue.js"></script>
    <div id="app1">1111</div>
    <div id="app2">2222</div>
    <div id="app3">3333</div>
    <script>
        /* 第一种方式: 通过 配置项中的 el 参数来挂载 */
        let vm1 = new Vue({
            el: "#app1"
        });

        /* 第二种方式:通过template 模板 */
        let vm2 = new Vue({
            template: `<div class="box">我是模板内容</div>`
        });
        vm2.$mount("#app2");

        /* 第三种方式:通过 render 函数渲染 */
        let vm3 = new Vue({
            render(c) {
                return c('div', {
                    attrs: {
                        title: "标题",
                        idx: 1
                    },
                    class: {
                        'is-red': true,
                    }
                }, [
                  c('a', '我是a'),
                  c('span', {class: "span-class"}, '我是span'),
                  ])
            }
        });

        vm3.$mount("#app3");

        /* 测试数据 */
        console.log(vm1.$el);
        console.log(vm2.$el);
        console.log(vm3.$el);
    </script>
在上面的代码中,我们通过三种方式来进行渲染,它们将生成下面的标签结构。
<div id="app1">1111</div>
<div class="box">我是模板内容</div>
<div title="标题" idx="1" class="is-red"><span class="span-class">我是span</span><a>我是a</a></div>
在三种渲染的方式中,其中el 把挂载渲染的标签到页面,template 会直接执行替换操作,render函数同 template 一致。我们知道,无论使用什么样的方式来渲染 Vue框架的内部最终都是使用 render函数来进行处理的。
接下来,我这里通过代码简单模拟 render 函数渲染生成标签和虚拟 DOM 的过程。为了保持基本一致,我这里改造下上文的代码,并提供 Vue 这个构造函数(Class),并把涉及到的诸多方法都写到Vue原型对象上面以供实例化对象调用。
/* 第一部分代码:主要处理模板编译 */
/* 形如:abc-123 */
const nc_name = `[a-zA-Z_][\\-\\.0-9_a-zA-Z]*`;
/* 形如:<aaa:bbb> */
const q_nameCapture = `((?:${nc_name}\\:)?${nc_name})`;
/* 形如:<div   匹配开始标签的左半部分 */
const startTagOpen = new RegExp(`^<${q_nameCapture}`);
/* 匹配开始标签的右半部分(>) 形如`>`或者`  >`前面允许存在 N(N>=0)个空格 */
const startTagClose = /^\s*(\/?)>/;
/* 匹配闭合标签:形如 </div> */
const endTag = new RegExp(`^<\\/${q_nameCapture}[^>]*>`);
/* 匹配属性节点:形如 id="app" 或者 id='app' 或者 id=app 等形式的字符串 */
const att=/^\s*([^\s"'<>\/=]+)(?:\s*(=)\s*(?:"([^"]*)"+|'([^']*)'+|([^\s"'=<div>`]+)))?/
/* 匹配插值语法:形如 {{msg}} */
const defaultTagRE = /\{\{((?:.|\r?\n)+?)\}\}/g;
/* 标记节点类型(文本节点) */
let NODE_TYPE_TEXT = 3;
/* 标记节点类型(元素节点) */
let NODE_TYPE_ELEMENT = 1;

function compiler(html) {
    let stack = []; /* 数组模拟栈结构 */
    let currentParent;
    let root = null;

    /* 推进函数:每处理完一部分模板就向前推进删除一段 */
    function advance(n) {
        html = html.substring(n);
    }

    function start(tag, attrs) {
        let element = createASTElement(tag, attrs);
        if (!root) {
            root = element;
        }
        currentParent = element;
        stack.push(element);
    }

    function end(tagName) {
        let element = stack.pop();
        currentParent = stack[stack.length - 1];
        if (currentParent) {
            element.parent = currentParent;
            currentParent.children.push(element);
        }
    }

    /* 文本处理函数:<span>  hello <span> => text的值为 " hello "*/
    function chars(text) {
        /* 1.先处理文本字符串中所有的空格,全部替换为空 */
        // text = text.replace(/\s/g, '');

        /* 2.把数据组织成{text:"hello",type:3}的形式保存为当前父节点的子元素 */
        if (text) {
            currentParent.children.push({
                text,
                nodeType: NODE_TYPE_TEXT
            })
        }
    }

    function createASTElement(tag, attrs) {
        return {
            tag,
            attrs,
            children: [],
            parent: null,
            nodeType: NODE_TYPE_ELEMENT
        }
    }

    /* 解析开始标签部分:主要提取标签名和属性节点 */
    function parser_start_html() {

        /* 00-正则匹配 <div id="app" title="标题">模板结构*/
        let start = html.match(startTagOpen);
        if (start) {

            /* 01-提取标签名称 形如 div */
            const tagInfo = {
                tag: start[1],
                attrs: []
            };

            /* 删除<div部分 */
            advance(start[0].length);

            /* 02-提取属性节点部分 形如:id="app" title="标题"*/
            let attr, end;
            while (!(end = html.match(startTagClose)) && (attr = html.match(att))) {
                tagInfo.attrs.push({
                    name: attr[1],
                    value: attr[3] || attr[4] || attr[5]
                });
                advance(attr[0].length);
            }

            /* 03-处理开始标签 形如 >*/
            if (end) {
                advance(end[0].length);
                return tagInfo;
            }
        }
    }

    while (html) {
        let textTag = html.indexOf('<');

        /* 如果以<开头 */
        if (textTag == 0) {
            /* (1) 可能是开始标签 形如:<div id="app"> */
            let startTagMatch = parser_start_html();
            if (startTagMatch) {
                start(startTagMatch.tag, startTagMatch.attrs);
                continue;
            }

            /* (2) 可能是结束标签 形如:</div>*/
            let endTagMatch = html.match(endTag);
            if (endTagMatch) {
                advance(endTagMatch[0].length);
                end(endTagMatch[1]);
                continue;
            }
        }

        /* 文本内容的处理 */
        let text;
        if (textTag >= 0) {
            text = html.substring(0, textTag);
        }
        if (text) {
            advance(text.length);
            chars(text);
        }
    }

    return root;
}

/* ****************** */
function generateAttrs(attrs) {
    /* 1.初始化空字符 */
    let str = '';
    /* 2.遍历属性节点数组,并按既定格式拼接 */
    attrs.forEach((attr, idx) => {
        /* 2.1 如果属性节点名称为 style那么则对 value进行中间处理 */
        if (attr.name === 'style') {
            let obj = {};
            attr.value.split(';').forEach(item => {
                let [key, value] = item.split(':');
                obj[key] = value
            });
            attr.value = obj;
        }
        str += `${attr.name}:${JSON.stringify(attr.value)},`
    }); /* 循环后:str === id:"app",title:"标题", */

    /* 3.拼接上外层的{},并去掉{}中最后一个逗号(,)*/
    str = `{ ${str.slice(0, -1)} }`;
    return str;
}

function generateChildren(el) {
    let children = el.children;
    return (children && children.length > 0) ? `${children.map(c => generate(c)).join(',')}` : false;
}

function generate(node) {
    return node.nodeType == 1 ? generateRenderString(node) : generateText(node);
}

function generateText(node) {
    let tokens = [];
    let match, index;

    /* 获取文本内容 */
    let text = node.text;
    // console.log('node', node);

    /*如果是全局匹配 那么每次匹配的时候都需要将 lastIndex 调整到0*/
    let lastIndex = defaultTagRE.lastIndex = 0;

    /* 正则匹配(匹配插值语法部分的内容) */
    while (match = defaultTagRE.exec(text)) {
        index = match.index;
        if (index > lastIndex) {
            tokens.push(JSON.stringify(text.slice(lastIndex, index)));
        }
        tokens.push(`_s(${match[1].trim()})`);
        lastIndex = index + match[0].length;
    }
    if (lastIndex < text.length) {
        tokens.push(JSON.stringify(text.slice(lastIndex)))
    }
    return `_v(${tokens.join(' + ')})`;
}

/* 核心函数:完成每个部分字符串(标签名 && 属性节点 && 子节点)的拼接 */
function generateRenderString(el) {

    let children = generateChildren(el);
    return `_c("${el.tag}",${el.attrs.length ? generateAttrs(el.attrs) : 'null'}${ children ? `,${children}` : ''})`;
}

function compilerToFunction(template) {

    /* Html->AST */
    let root = compiler(template);

    /* AST->RenderString */
    let renderString = generateRenderString(root);

    /* RenderString->RenderFunction */
    return new Function(`with(this){ return ${renderString}}`);
}
/* 第二部分代码:主要处理虚拟 DOM 的生成 */
class Vue {
    constructor(options) {
        this.$options = options;

        /* 如果传入了 el | el + template  */
        if (this.$options.el) this.$mount(this.$options.el);
    }
    $mount(el) {
        let v_node;
        /* 挂载函数 */
        el = document.querySelector(el);

        /* 考虑:el + template + render函数的优先级关系 */
        if (!this.$options.render) {
            // 对模板进行编译
            let template = this.$options.template; // 取出模板

            /* 如果没有仅仅是传入 el的情况那么就获取outerHTML */
            if (!template && el) {
                template = el.outerHTML;
            }

            /* 无论传入的是 el || template  */
            /* 最终根据 template 标签字符串创建 render 函数 */
            this.$options.render = compilerToFunction(template).bind(this);
            v_node = this.$options.render();
        } else {

            /* 如何创建? */
            this.render = this.$options.render;
            v_node = this.render(this._c.bind(this));
        }
        console.log('v_node', v_node);

    }
    _c() {
        /* 创建标签节点 */
        return this.createElement(...arguments);
    }
    _v(text) {
        /* 创建文本节点 */
        return this.createTextNode(text);
    }
    _s(val) {
        /* 编译插值 */
     return val == null ? '':(typeof val === 'object'?JSON.stringify(val):val)
    }
    createElement(tag, data = {}, ...children) {
        /* 创建标签节点的实现函数 */
        return this.v_node(tag, data, null, children, null);
    }
    createTextNode(text) {
        /* 创建文本内容的实现函数 */
        return this.v_node(null, null, null, null, text);
    }
    v_node(tag, data, key, children, text) {
        /* 创建虚拟 DOM :把所有的数据都组织成对象返回 */
        return { tag, data, key, children, text }
    }
}
/* 第三部分:测试代码 */
/* 第一种方式 */
new Vue({
    el: "#app"
});

/* 第二种方式 */
new Vue({
    el: "#app",
    template: `<a id="app" title="标题">
                <p>hello</p>
                <span>My name is {{name}} </span>
               </a>`
});

/* 第三种方式 */
let vm3 = new Vue({
    render(c) {
        return c('div', {
            id: "testID"
        }, c('a', '我是a'))
    }
});

vm3.$mount("#app");
在上面的代码中,第一部分代码大部分来自于 ast && render 这篇博客,略有修改,把三种(挂载)渲染方式的情况下生成的虚拟 DOM 对象打印出来(参考下图)。
