注意:系统环境为Ubuntu18
一、docker安装
0:如果之前有安装过docker使用以下命令卸载:
sudo apt-get remove docker docker-engine docker.io containerd runc
docker安装官网参考:
https://docs.docker.com/install/linux/docker-ce/ubuntu/
1:首先更新apt
sudo apt-get update
2:添加证书安装包以允许apt通过HTTPS:
sudo apt-get install
    apt-transport-https
    ca-certificates
    curl
    gnupg-agent
    software-properties-common
3:添加docker官方密钥
curl -fsSL https://download.docker.com/linux/ubuntu/gpg | sudo apt-key add -
4:添加仓库
sudo add-apt-repository
   "deb [arch=amd64] https://download.docker.com/linux/ubuntu
   $(lsb_release -cs)
   stable"
5:安装docker ce
sudo apt-get install docker-ce docker-ce-cli containerd.io
6:测试
sudo docker run hello-world
7:添加当前系统用户到docker用户组
sudo usermod -aG docker 用户名
docker 拓展命令:
docker images :查看所有启动成功的镜像
docker ps -a :查看所有
docker logs 容器id :查看容器日志
docker 如果启动容器失败,就先删除容器,删除目录,再次执行安装。
二、使用docker安装Elasticsearch
1:获取镜像
docker image pull delron/elasticsearch-ik:2.4.6-1.0
如果pull拉取很慢可以从我的百度云中下载,然后传到Linux系统中然后使用docker命令导入
链接:https://pan.baidu.com/s/1zXBR_uHSFxK5xNxklGV1pQ
提取码:96iw
docker load -i elasticsearch-ik-2.4.6_docker.tar
查看本地仓库是否有这个镜像
docker images
或
docker image ls
将下载的elasticsearch.zip上传到Linux系统中的家目录,然后解压。在目录中的elasticsearch/config/elasticsearch.yml第54行更改IP地址为0.0.0.0,端口改为8002,默认为9002
解压命令:
unzip elasticsearch.zip
2:创建docker容器并运行
根据拉取到本地的镜像创建容器,需要将elasticsearch/config配置文件所在目录修改为你自己的路径
docker run -dti --network=host --name=elasticsearch -v /home/上面上传后解压出来的文件路径地址/elasticsearch/config:/usr/share/eleaticsearh/config delron/elasticsearch-ik:2.4.6-1.0
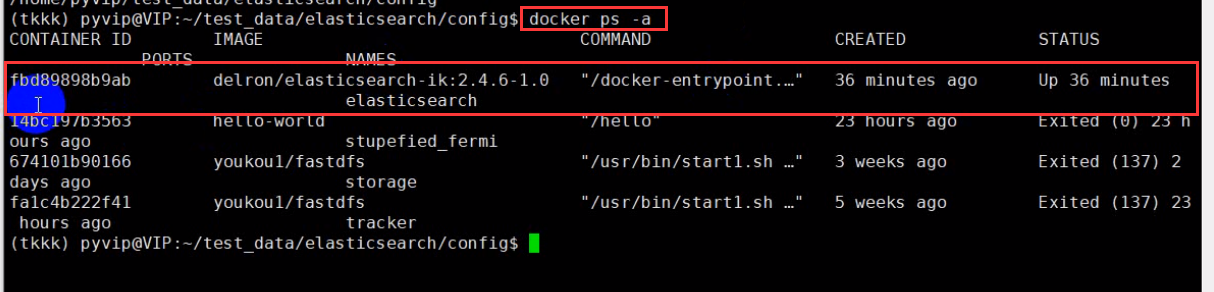
查看是否创建成功,如果STATUS为Up则创建成功
docker container ls -a 或 docker ps -a
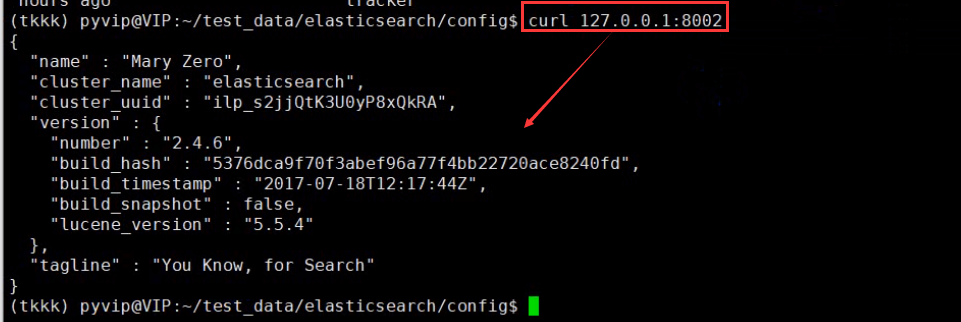
测试 curl 127.0.0.1:8002
3:进入项目的虚拟环境中,安装以下包
pip install django-haystack
pip install elasticsearch==2.4.1
4:在django项目配置,在settings.py文件中加入下面配置。
4-1:在INSTALLED_APPS节点中注册haystack
INSTALLED_APPS = [
    ...
    'haystack',
    ...
]
4-2:加入配置
# 建立连接
ELASTICSEARCH_DSL = {
  'default':{
    'host':'127.0.0.1:8002'
  },
}
# 配置Haystack
HAYSTACK_CONNECTIONS = {
    'default': {
        'ENGINE': 'haystack.backends.elasticsearch_backend.ElasticsearchSearchEngine',
        'URL': 'http://127.0.0.1:8002/',  # 此处为elasticsearch运行的服务器ip地址,端口号固定为9200
        'INDEX_NAME': 'mysite',  # 指定elasticsearch建立的索引库的名称
    },
}

# 当添加、修改、删除数据时,自动生成索引,当数据库改变时候,会自动更新索引
HAYSTACK_SIGNAL_PROCESSOR = 'haystack.signals.RealtimeSignalProcessor'
# 每页显示多少条数据
HAYSTACK_SEARCH_RESULTS_PER_PAGE = 20
5:建立索引
在需要创建索引的实体中创建search_indexes.py(文件名固定写法)

5-1:search_indexes.py文件内容如下:
from haystack import indexes
from .models import News  # 导入模型类


# 建索引类
# 模型名称+Index(固定的)
class NewsIndex(indexes.SearchIndex, indexes.Indexable):
    '''
    News索引数据库模型
    '''
    # 这个主要是使用5-2来建立索引
    text = indexes.CharField(document=True, use_template=True)
    # 以下是为了在使用时 news.id 如果没有写就需要news.object.id
    id = indexes.IntegerField(model_attr='id')
    title = indexes.CharField(model_attr='title')
    digest = indexes.CharField(model_attr='digest')
    content = indexes.CharField(model_attr='content')
    image_url = indexes.CharField(model_attr='image_url')

    def get_model(self):
        '''
        返回建立索引模型
        '''
        return News

    def index_queryset(self, using=None):
        '''
        返回要建立索引的数据查询集
        :param using:
        :return:
        '''

        return set.get_model().objects.filter(is_delete=False, tag_id=1)
        # return set.get_model().objects.filter(is_delete=False,tag_id=[1,2,3,4,5])
5-2:创建模板
# 需要在templates文件夹中创建一个search/indexes/app名称/模型名称小写_text.txt文件(固定结构)

news_text.txt内容为:需要建立的索引

6:生成索引
通过xshell进入项目进入虚拟环境执行
python manage.py rebuild_index

7: 分页搜索接口/方法
7-1
from haystack.views import SearchView as _SearchView
from .models import News  # 导入模型类
from .models import HotNews
from mysite import setttings
from django.core.paginator import Paginator, EmptyPage, PageNotAnInteger
from django.shortcuts import render
from django.views import View


class SearchView(_SearchView):
    # 模板文件
    template = 'news/search.html'

    # 重写响应方式,如果请求参数为空,返回模型News的热门新闻数据,否则根据参数q搜索相关数据
    def create_response(self):
        kw = self.request.GET.get('q', '')
        if not kw:
            show_all = True
            hot_news = HotNews.objects.select_related(
                'News'
            ).only(
                'news__title',
                'news__image_url',
                'news__id'
            ).filter(
                is_delete=False
            ).order_by(
                'priority',
                '-news__clicks'
            )
            paginator = Paginator(hot_news, setttings.HAYSTACK_SEARCH_RESULTS_PER_PAGE)
            try:
                page = paginator.page(int(self.request.GET.get('page', 1)))
            except PageNotAnInteger:
                # 如果参数page的数据类型不是整数,则返回第一页数据
                page = paginator.page(1)
            except EmptyPage:
                # 用户访问的页数大于实际的页数,则返回最后一页的数据
                page = paginator.page(paginator.num_pages)
            return render(self.request, self.template, locals())
        else:
            show_all = False
            qs = super(SearchView, self).create_response()
            return qs
7-2:在app中的urls中设置url
path('search/',view.SearchView(),name='search')
7-3:前端部分代码
         <div class="content">
                    <!-- search-list start -->
                    {% if not show_all %}
                        <div class="search-result-list">
                            <h2 class="search-result-title">
                                搜索结果 <span style="font-weight: 700;color: #ff6620;">{{ paginator.num_pages }}</span>页
                            </h2>
                            <ul class="news-list">
                                {% for one_news in page.object_list %}
                                    <li class="news-item clearfix">
                                        <a href="{% url 'news:detail' one_news.id %}" class="news-thumbnail"
                                           target="_blank">
                                            <img src="{{ one_news.object.image_url }}">
                                        </a>
                                        <div class="news-content">
                                            <h4 class="news-title">
                                                <a href="{% url 'news:detail' one_news.id %}">
                                                    {% highlight one_news.title with query %}
                                                </a>
                                            </h4>
                                            <p class="news-details">{% highlight one_news.digest with query %}</p>
                                            <div class="news-other">
                                                <span class="news-type">{{ one_news.object.tag.name }}</span>
                                                <span class="news-time">{{ one_news.object.update_time }}</span>
                                                <span
                                                        class="news-author">{% highlight one_news.object.author.username with query %}

                                      </span>
                                            </div>
                                        </div>
                                    </li>
                                {% endfor %}


                            </ul>
                        </div>

                    {% else %}

                        <div class="news-contain">
                            <div class="hot-recommend-list">
                                <h2 class="hot-recommend-title">热门推荐</h2>
                                <ul class="news-list">

                                    {% for one_hotnews in page.object_list %}

                                        <li class="news-item clearfix">
                                            <a href="#" class="news-thumbnail">
                                                <img src="{{ one_hotnews.news.image_url }}">
                                            </a>
                                            <div class="news-content">
                                                <h4 class="news-title">
                                                    <a href="{% url 'news:detail' one_hotnews.news.id %}">{{ one_hotnews.news.title }}</a>
                                                </h4>
                                                <p class="news-details">{{ one_hotnews.news.digest }}</p>
                                                <div class="news-other">
                                                    <span class="news-type">{{ one_hotnews.news.tag.name }}</span>
                                                    <span class="news-time">{{ one_hotnews.update_time }}</span>
                                                    <span class="news-author">{{ one_hotnews.news.author.username }}</span>
                                                </div>
                                            </div>
                                        </li>

                                    {% endfor %}

                                </ul>
                            </div>
                        </div>

                    {% endif %}

                    <!-- search-list end -->
                    <!-- news-contain start -->

                    {# 分页导航 #}
                    <div class="page-box" id="pages">
                        <div class="pagebar" id="pageBar">
                            <a class="a1">{{ page.paginator.count }}条</a>
                            {# 上一页的URL地址 #}
                            {% if page.has_previous %}
                                {% if query %}
                                    <a href="{% url 'news:search' %}?q={{ query }}&page={{ page.previous_page_number }}"
                                       class="prev">上一页</a>
                                {% else %}
                                    <a href="{% url 'news:search' %}?page={{ page.previous_page_number }}" class="prev">上一页</a>
                                {% endif %}
                            {% endif %}
                            {# 列出所有的URL地址 #}
                            {% for num in page.paginator.page_range|slice:":10" %}
                                {% if num == page.number %}
                                    <span class="sel">{{ page.number }}</span>
                                {% else %}
                                    {% if query %}
                                        <a href="{% url 'news:search' %}?q={{ query }}&page={{ num }}"
                                           target="_self">{{ num }}</a>
                                    {% else %}
                                        <a href="{% url 'news:search' %}?page={{ num }}" target="_self">{{ num }}</a>
                                    {% endif %}
                                {% endif %}
                            {% endfor %}

                            {# 如果页数大于10,则打两点 #}
                            {% if page.paginator.num_pages > 10 %}
                                ..

                                {% if query %}
                                    <a href="{% url 'news:search' %}?q={{ query }}&page={{ page.paginator.num_pages }}"
                                       target="_self">{{ page.paginator.num_pages }}</a>
                                {% else %}
                                    <a href="{% url 'news:search' %}?page={{ page.paginator.num_pages }}"
                                       target="_self">{{ page.paginator.num_pages }}</a>
                                {% endif %}

                            {% endif %}

                            {# 下一页的URL地址 #}
                            {% if page.has_next %}
                                {% if query %}
                                    <a href="{% url 'news:search' %}?q={{ query }}&page={{ page.next_page_number }}"
                                       class="next">下一页</a>
                                {% else %}
                                    <a href="{% url 'news:search' %}?page={{ page.next_page_number }}"
                                       class="next">下一页</a>
                                {% endif %}
                            {% endif %}
                        </div>
                    </div>

                    <!-- news-contain end -->
                </div>
7-4:高亮及分页样式
/* === current index start === */
#pages {
	padding: 32px 0 10px;
}

.page-box {
	text-align: center;
    /*font-size: 14px;*/
}

#pages a.prev, a.next {
	 56px;
	padding: 0
}

#pages a {
	display: inline-block;
	height: 26px;
	line-height: 26px;
	background: #fff;
	border: 1px solid #e3e3e3;
	text-align: center;
	color: #333;
	padding: 0 10px
}

#pages .sel {
	display: inline-block;
	height: 26px;
	line-height: 26px;
	background: #0093E9;
	border: 1px solid #0093E9;
	color: #fff;
	text-align: center;
	padding: 0 10px
}

.highlighted{
    color:coral;
    mso-ansi-font-weight: bold;
}
/* === current index end === */
8:效果图
