模版基本介绍
模板是一个文本,用于分离文档的表现形式和内容。 模板定义了占位符以及各种用于规范文档该如何显示的各部分基本逻辑(模板标签)。 模板通常用于产生HTML,但是Django的模板也能产生任何基于文本格式的文档。
来一个项目说明
1,建立MyDjangoSite项目具体不多说,参考前面。
2,在MyDjangoSite(包含四个文件的)文件夹目录下新建templates文件夹存放模版。
3,在刚建立的模版下建模版文件user_info.html
<html>
    <meta http-equiv="Content-type" content="text/html; charset=utf-8">
    <title>用户信息</title>
    <head></head>
    <body>
        <h3>用户信息:</h3>
        <p>姓名:{{name}}</p>
        <p>年龄:{{age}}</p>
    </body>
</html>
说明:{{ name }}叫做模版变量;{% if xx %} ,{% for x in list %}模版标签。
4,修改settings.py 中的TEMPLATE_DIRS
- 导入import os.path
- 添加 os.path.join(os.path.dirname(__file__), 'templates').replace('\','/'),
TEMPLATE_DIRS = (
    # Put strings here, like "/home/html/django_templates" or "C:/www/django/templates".
    # Always use forward slashes, even on Windows.
    # Don't forget to use absolute paths, not relative paths.

    #"E:/workspace/pythonworkspace/MyDjangoSite/MyDjangoSite/templates",
    os.path.join(os.path.dirname(__file__), 'templates').replace('\','/'),
)
说明:指定模版加载路径。其中os.path.dirname(__file__)为当前settings.py的文件路径,再连接上templates路径。
5,新建视图文件views.py
#vim: set fileencoding=utf-8:

#from django.template.loader import get_template
#from django.template import Context
#from django.http import HttpResponse
from django.shortcuts import render_to_response

def user_info(request):
    name = 'zbw'
    age = 24
    #t = get_template('user_info.html')
    #html = t.render(Context(locals()))
    #return HttpResponse(html)
    return render_to_response('user_info.html',locals())
说明:Django模板系统的基本规则: 写模板,创建 Template 对象,创建 Context , 调用 render() 方法。
可以看到上面代码中注释部分
   #t = get_template('user_info.html')
    #html = t.render(Context(locals()))
    #return HttpResponse(html)
get_template('user_info.html'),使用了函数 django.template.loader.get_template() ,而不是手动从文件系统加载模板。 该 get_template() 函数以模板名称为参数,在文件系统中找出模块的位置,打开文件并返回一个编译好的 Template 对象。
render(Context(locals()))方法接收传入一套变量context。它将返回一个基于模板的展现字符串,模板中的变量和标签会被context值替换。其中Context(locals())等价于Context({'name':'zbw','age':24}) ,locals()它返回的字典对所有局部变量的名称与值进行映射。
render_to_response Django为此提供了一个捷径,让你一次性地载入某个模板文件,渲染它,然后将此作为 HttpResponse返回。
6,修改urls.py
from django.conf.urls import patterns, include, url
from MyDjangoSite.views import user_info

# Uncomment the next two lines to enable the admin:
# from django.contrib import admin
# admin.autodiscover()

urlpatterns = patterns('',
    # Examples:
    # url(r'^$', 'MyDjangoSite.views.home', name='home'),
    # url(r'^MyDjangoSite/', include('MyDjangoSite.foo.urls')),

    # Uncomment the admin/doc line below to enable admin documentation:
    # url(r'^admin/doc/', include('django.contrib.admindocs.urls')),

    # Uncomment the next line to enable the admin:
    # url(r'^admin/', include(admin.site.urls)),

    url(r'^u/$',user_info),

)
7,启动开发服务器
基本一个简单的模版应用就完成,启动服务看效果!
效果如图:

模版的继承
减少重复编写相同代码,以及降低维护成本。直接看应用。
1,新建/templates/base.html
<html>
    <meta http-equiv="Content-type" content="text/html; charset=utf-8">
    <title>{% block title %}{% endblock %}</title>
    <head></head>
    <body>
        <h3>{% block headTitle %}{% endblock %}</h3>
        {% block content %} {% endblock %}

        {% block footer %}
            <h3>嘿,这是继承了模版</h3>
        {% endblock%}
    </body>
</html>
2,修改/template/user_info.html,以及新建product_info.html
urser_info.html
{% extends "base.html" %}

{% block title %}用户信息{% endblock %}


<h3>{% block headTitle %}用户信息:{% endblock %}</h3>

{% block content %}
<p>姓名:{{name}}</p>
<p>年龄:{{age}}</p>
{% endblock %}
product_info.html
{% extends "base.html" %}

{% block title %}产品信息{% endblock %}


<h3>{% block headTitle %}产品信息:{% endblock %}</h3>

{% block content %}
    {{productName}}
{% endblock %}
3,编写视图逻辑,修改views.py
#vim: set fileencoding=utf-8:

#from django.template.loader import get_template
#from django.template import Context
#from django.http import HttpResponse
from django.shortcuts import render_to_response

def user_info(request):
    name = 'zbw'
    age = 24
    #t = get_template('user_info.html')
    #html = t.render(Context(locals()))
    #return HttpResponse(html)
    return render_to_response('user_info.html',locals())

def product_info(request):
    productName = '阿莫西林胶囊'
    return render_to_response('product_info.html',{'productName':productName})
4,修改urls.py
from django.conf.urls import patterns, include, url
from MyDjangoSite.views import user_info,product_info

# Uncomment the next two lines to enable the admin:
# from django.contrib import admin
# admin.autodiscover()

urlpatterns = patterns('',
    # Examples:
    # url(r'^$', 'MyDjangoSite.views.home', name='home'),
    # url(r'^MyDjangoSite/', include('MyDjangoSite.foo.urls')),

    # Uncomment the admin/doc line below to enable admin documentation:
    # url(r'^admin/doc/', include('django.contrib.admindocs.urls')),

    # Uncomment the next line to enable the admin:
    # url(r'^admin/', include(admin.site.urls)),

    url(r'^u/$',user_info),
    url(r'^p/$',product_info),
)
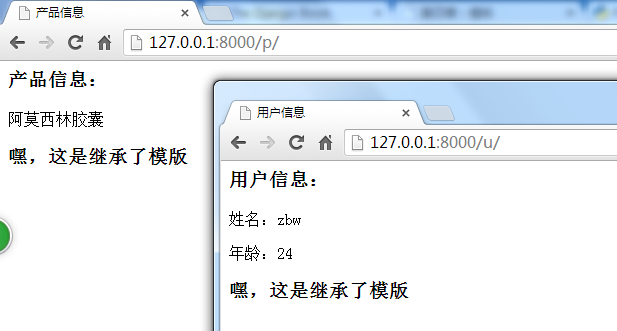
5,启动服务效果如下:
