1. Service存在的意义
防止Pod失联(服务发现)
定义一组Pod的访问策略(负载均衡)
负载均衡器类型:
- 四层,传输层,基于IP和端口
- 七层,应用层,基于应用协议转发啊,例如http协议
这里说的几层是指OSI七层模型。
user -> lb –> web
创建一个deploy
[root@k8s-m1 chp4]# kubectl create deployment web-nginx-0811 --image=nginx
deployment.apps/web-nginx-0811 created
扩展
[root@k8s-m1 chp4]# kubectl scale deployment web-nginx-0811 --replicas=3
获取创建的pod信息
[root@k8s-m1 chp4]# kubectl get pod -o wide |grep 0811
web-nginx-0811-55cf896fbc-6fm7p   1/1     Running   0          62s     10.244.111.225   k8s-n2   <none>           <none>
web-nginx-0811-55cf896fbc-9z47s   1/1     Running   0          41s     10.244.111.227   k8s-n2   <none>           <none>
web-nginx-0811-55cf896fbc-qfmb9   1/1     Running   0          41s     10.244.111.226   k8s-n2   <none>           <none>

标签查看
[root@k8s-m1 chp4]# kubectl get pods -l app=web-nginx-0811
NAME                              READY   STATUS    RESTARTS   AGE
web-nginx-0811-55cf896fbc-6fm7p   1/1     Running   0          2m57s
web-nginx-0811-55cf896fbc-9z47s   1/1     Running   0          2m36s
web-nginx-0811-55cf896fbc-qfmb9   1/1     Running   0          2m36s
创建服务方法1
命令行的形式暴露deploy创建接口
[root@k8s-m1 chp4]# kubectl expose deployment web-nginx-0811 --port=80
暴露的形式是 clusterIP
[root@k8s-m1 chp4]# kubectl get svc|grep 0811
NAME             TYPE        CLUSTER-IP       EXTERNAL-IP   PORT(S)        AGE
web-nginx-0811   ClusterIP   10.108.232.47    <none>        80/TCP         55s

查看endpoint 节点信息
[root@k8s-m1 chp6]# kubectl get ep|egrep '0811|N'
NAME             ENDPOINTS                                                                AGE
web-nginx-0811   10.244.111.225:80,10.244.111.226:80,10.244.111.227:80                    8m8s

[root@k8s-m1 chp6]# kubectl get pods -o wide |grep 0811
web-nginx-0811-55cf896fbc-6fm7p   1/1     Running   0          15m     10.244.111.225   k8s-n2   <none>           <none>
web-nginx-0811-55cf896fbc-9z47s   1/1     Running   0          14m     10.244.111.227   k8s-n2   <none>           <none>
web-nginx-0811-55cf896fbc-qfmb9   1/1     Running   0          14m     10.244.111.226   k8s-n2   <none>           <none>
[root@k8s-m1 chp6]# kubectl expose deployment web-nginx-0811 --port=80 --target-port=80 --type=NodePort -o yaml --dry-run=client>service.yaml
[root@k8s-m1 chp6]# cat service.yaml
apiVersion: v1
kind: Service
metadata:
  labels:
    app: web-nginx-0811
  name: web-nginx-0811
spec:
  ports:
  - port: 80
    protocol: TCP
    targetPort: 80
  selector:
    app: web-nginx-0811
  type: NodePort

[root@k8s-m1 chp6]# kubectl apply -f service.yaml
Warning: kubectl apply should be used on resource created by either kubectl create --save-config or kubectl apply
service/web-nginx-0811 configured
svc的形式已经变为NodePort 模式
[root@k8s-m1 chp6]# kubectl get svc|grep 0811
web-nginx-0811   NodePort    10.108.232.47    <none>        80:32597/TCP   11m

固定service 暴露的端口
[root@k8s-m1 chp6]# cat service.yaml
apiVersion: v1
kind: Service
metadata:
  labels:
    app: web-nginx-0811
  name: web-nginx-0811
spec:
  ports:
  - port: 80
    protocol: TCP
    targetPort: 80
    nodePort: 31024
  selector:
    app: web-nginx-0811
  type: NodePort
[root@k8s-m1 chp6]# kubectl apply -f service.yaml
service/web-nginx-0811 configured
[root@k8s-m1 chp6]# kubectl get svc|grep 0811
web-nginx-0811   NodePort    10.108.232.47    <none>        80:31024/TCP   14m
2.Pod与 Service的关系
通过 label- selector相关联
通过 Service实现Pod的负载均衡(TCP/DP4层)

3. Service三种类型
◆ ClusterIN:集群内部使用
◆ Node Port:对外暴露应用
◆ Load Balancer:对外暴露应用,适用公有云
ClusterIP:默认,分配一个稳定的P地址,即 VIP,只能在集群内部访问(同 Namespace内的Pod)

Nodeport:在每个节点上启用一个端口来暴露服务,可以在集群外部访问。也会分配一个稳定内部集群 IP 地址
访问地址:< NodelP>:< NodePort>

LoadBalancer:与 Nodeport类似,在每个节点上启用一个端口来暴露服务。 除此之外, Kubernetes 会请求底层云平台上的负载均衡器,将每个Node ( 【NodelP】:【NodePort】)作为后端添加进去。

4. Service代理模式

用户 -> 域名 -> 负载均衡器(公网IP) -> NodePort(所有节点) -> Pod
每部署一个应用,那么都要在负载均衡器配置,这样比较麻烦?
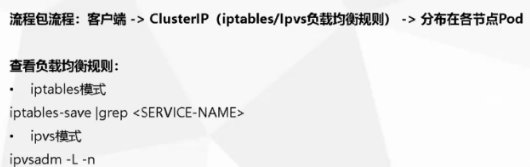
iptables -vnL
第一步:接受流量
NodePort访问入口规则:
-A KUBE-NODEPORTS -p tcp -m comment --comment "default/web:" -m tcp --dport 30012 -j KUBE-SVC-BIJGBSD4RZCCZX5R
ClusterIP 访问入口规则:
-A KUBE-SERVICES -d 10.100.158.44/32 -p tcp -m comment --comment "default/web: cluster IP" -m tcp --dport 80 -j KUBE-SVC-BIJGBSD4RZCCZX5R
iptables 用作于负载均衡器


[root@k8s-m1 ~]# iptables-save |grep web-nginx-0811
-A KUBE-NODEPORTS -p tcp -m comment --comment "default/web-nginx-0811:" -m tcp --dport 31024 -j KUBE-MARK-MASQ
-A KUBE-NODEPORTS -p tcp -m comment --comment "default/web-nginx-0811:" -m tcp --dport 31024 -j KUBE-SVC-R7TX7W65X4MU5SZ3
-A KUBE-SEP-N4MDZZ7SXQJUJITR -s 10.244.111.227/32 -m comment --comment "default/web-nginx-0811:" -j KUBE-MARK-MASQ
-A KUBE-SEP-N4MDZZ7SXQJUJITR -p tcp -m comment --comment "default/web-nginx-0811:" -m tcp -j DNAT --to-destination 10.244.111.227:80
-A KUBE-SEP-ODVS6KZQDDIOI3QQ -s 10.244.111.225/32 -m comment --comment "default/web-nginx-0811:" -j KUBE-MARK-MASQ
-A KUBE-SEP-ODVS6KZQDDIOI3QQ -p tcp -m comment --comment "default/web-nginx-0811:" -m tcp -j DNAT --to-destination 10.244.111.225:80
-A KUBE-SEP-XIZSVMKGA7NM5PF3 -s 10.244.111.226/32 -m comment --comment "default/web-nginx-0811:" -j KUBE-MARK-MASQ
-A KUBE-SEP-XIZSVMKGA7NM5PF3 -p tcp -m comment --comment "default/web-nginx-0811:" -m tcp -j DNAT --to-destination 10.244.111.226:80
-A KUBE-SERVICES ! -s 10.244.0.0/16 -d 10.108.232.47/32 -p tcp -m comment --comment "default/web-nginx-0811: cluster IP" -m tcp --dport 80 -j KUBE-MARK-MASQ
-A KUBE-SERVICES -d 10.108.232.47/32 -p tcp -m comment --comment "default/web-nginx-0811: cluster IP" -m tcp --dport 80 -j KUBE-SVC-R7TX7W65X4MU5SZ3
-A KUBE-SVC-R7TX7W65X4MU5SZ3 -m comment --comment "default/web-nginx-0811:" -m statistic --mode random --probability 0.33333333349 -j KUBE-SEP-ODVS6KZQDDIOI3QQ
-A KUBE-SVC-R7TX7W65X4MU5SZ3 -m comment --comment "default/web-nginx-0811:" -m statistic --mode random --probability 0.50000000000 -j KUBE-SEP-XIZSVMKGA7NM5PF3
-A KUBE-SVC-R7TX7W65X4MU5SZ3 -m comment --comment "default/web-nginx-0811:" -j KUBE-SEP-N4MDZZ7SXQJUJITR
[root@k8s-m1 ~]# iptables-save |grep web-nginx-0811|egrep '80|31024'
-A KUBE-NODEPORTS -p tcp -m comment --comment "default/web-nginx-0811:" -m tcp --dport 31024 -j KUBE-MARK-MASQ
-A KUBE-NODEPORTS -p tcp -m comment --comment "default/web-nginx-0811:" -m tcp --dport 31024 -j KUBE-SVC-R7TX7W65X4MU5SZ3
-A KUBE-SEP-N4MDZZ7SXQJUJITR -p tcp -m comment --comment "default/web-nginx-0811:" -m tcp -j DNAT --to-destination 10.244.111.227:80
-A KUBE-SEP-ODVS6KZQDDIOI3QQ -p tcp -m comment --comment "default/web-nginx-0811:" -m tcp -j DNAT --to-destination 10.244.111.225:80
-A KUBE-SEP-XIZSVMKGA7NM5PF3 -p tcp -m comment --comment "default/web-nginx-0811:" -m tcp -j DNAT --to-destination 10.244.111.226:80
-A KUBE-SERVICES ! -s 10.244.0.0/16 -d 10.108.232.47/32 -p tcp -m comment --comment "default/web-nginx-0811: cluster IP" -m tcp --dport 80 -j KUBE-MARK-MASQ
-A KUBE-SERVICES -d 10.108.232.47/32 -p tcp -m comment --comment "default/web-nginx-0811: cluster IP" -m tcp --dport 80 -j KUBE-SVC-R7TX7W65X4MU5SZ3

[root@k8s-m1 ~]# iptables-save |grep web-nginx-0811|egrep '31024'
-A KUBE-NODEPORTS -p tcp -m comment --comment "default/web-nginx-0811:" -m tcp --dport 31024 -j KUBE-MARK-MASQ
-A KUBE-NODEPORTS -p tcp -m comment --comment "default/web-nginx-0811:" -m tcp --dport 31024 -j KUBE-SVC-R7TX7W65X4MU5SZ3

[root@k8s-m1 ~]# iptables-save |grep KUBE-SVC-R7TX7W65X4MU5SZ3
:KUBE-SVC-R7TX7W65X4MU5SZ3 - [0:0]
-A KUBE-NODEPORTS -p tcp -m comment --comment "default/web-nginx-0811:" -m tcp --dport 31024 -j KUBE-SVC-R7TX7W65X4MU5SZ3
-A KUBE-SERVICES -d 10.108.232.47/32 -p tcp -m comment --comment "default/web-nginx-0811: cluster IP" -m tcp --dport 80 -j KUBE-SVC-R7TX7W65X4MU5SZ3
-A KUBE-SVC-R7TX7W65X4MU5SZ3 -m comment --comment "default/web-nginx-0811:" -m statistic --mode random --probability 0.33333333349 -j KUBE-SEP-ODVS6KZQDDIOI3QQ
-A KUBE-SVC-R7TX7W65X4MU5SZ3 -m comment --comment "default/web-nginx-0811:" -m statistic --mode random --probability 0.50000000000 -j KUBE-SEP-XIZSVMKGA7NM5PF3
-A KUBE-SVC-R7TX7W65X4MU5SZ3 -m comment --comment "default/web-nginx-0811:" -j KUBE-SEP-N4MDZZ7SXQJUJITR


[root@k8s-m1 ~]# iptables-save |grep KUBE-SEP-XIZSVMKGA7NM5PF3
:KUBE-SEP-XIZSVMKGA7NM5PF3 - [0:0]
-A KUBE-SEP-XIZSVMKGA7NM5PF3 -s 10.244.111.226/32 -m comment --comment "default/web-nginx-0811:" -j KUBE-MARK-MASQ
-A KUBE-SEP-XIZSVMKGA7NM5PF3 -p tcp -m comment --comment "default/web-nginx-0811:" -m tcp -j DNAT --to-destination 10.244.111.226:80
service是由哪个组件实现?
kube-proxy
[root@k8s-m1 ~]# kubectl get configmaps -n kube-system NAME DATA AGE calico-config 4 19d coredns 1 19d extension-apiserver-authentication 6 19d kube-proxy 2 19d kubeadm-config 2 19d kubelet-config-1.18 1 19d
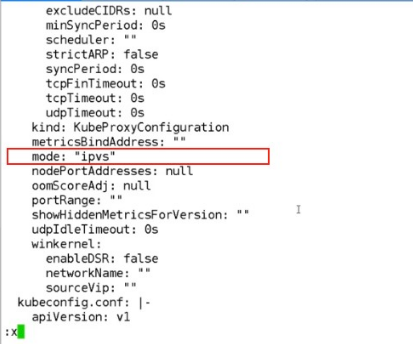
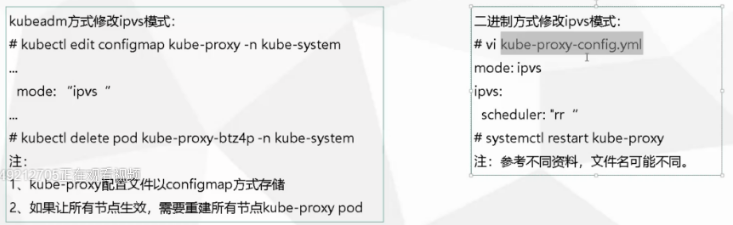
#编辑 kube-proxy 的模式为ipvs [root@k8s-m1 ~]# kubectl edit configmaps kube-proxy -n kube-system configmap/kube-proxy edited
查看 kube-proxy 分布位置,并删掉一个,看新生成的 kube-proxy 的负载均衡模式
[root@k8s-m1 ~]# kubectl get pods -n kube-system
NAME                                       READY   STATUS    RESTARTS   AGE
calico-kube-controllers-578894d4cd-kwvfj   1/1     Running   2          12d
calico-node-588zq                          1/1     Running   3          19d
calico-node-62gxk                          1/1     Running   3          19d
calico-node-ph6fd                          1/1     Running   2          19d
coredns-7ff77c879f-wmcb8                   1/1     Running   2          12d
coredns-7ff77c879f-z7wxq                   1/1     Running   2          12d
etcd-k8s-m1                                1/1     Running   2          19d
kube-apiserver-k8s-m1                      1/1     Running   2          19d
kube-controller-manager-k8s-m1             1/1     Running   3          19d
kube-proxy-kfrqf                           1/1     Running   0          5s
kube-proxy-nnzdv                           1/1     Running   2          19d
kube-proxy-t2xst                           1/1     Running   3          19d
kube-scheduler-k8s-m1                      1/1     Running   2          19d
metrics-server-7875f8bf59-n2lr2            1/1     Running   2          12d
[root@k8s-m1 ~]# kubectl delete pod kube-proxy-t2xst  -n kube-system
pod "kube-proxy-t2xst" deleted


[root@k8s-m1 ~]# kubectl logs kube-proxy-nnzdv -n kube-system
W0805 12:03:22.156816       1 server_others.go:559] Unknown proxy mode "", assuming iptables proxy
I0805 12:03:22.163733       1 node.go:136] Successfully retrieved node IP: 10.0.0.23
I0805 12:03:22.163755       1 server_others.go:186] Using iptables Proxier.
I0805 12:03:22.164056       1 server.go:583] Version: v1.18.0
I0805 12:03:22.165226       1 conntrack.go:100] Set sysctl 'net/netfilter/nf_conntrack_max' to 131072
I0805 12:03:22.165258       1 conntrack.go:52] Setting nf_conntrack_max to 131072
I0805 12:03:22.165467       1 conntrack.go:83] Setting conntrack hashsize to 32768
I0805 12:03:22.169343       1 conntrack.go:100] Set sysctl 'net/netfilter/nf_conntrack_tcp_timeout_established' to 86400
I0805 12:03:22.169372       1 conntrack.go:100] Set sysctl 'net/netfilter/nf_conntrack_tcp_timeout_close_wait' to 3600
I0805 12:03:22.174342       1 config.go:133] Starting endpoints config controller
I0805 12:03:22.174399       1 shared_informer.go:223] Waiting for caches to sync for endpoints config
I0805 12:03:22.174437       1 config.go:315] Starting service config controller
I0805 12:03:22.174441       1 shared_informer.go:223] Waiting for caches to sync for service config
I0805 12:03:22.274994       1 shared_informer.go:230] Caches are synced for endpoints config
I0805 12:03:22.274994       1 shared_informer.go:230] Caches are synced for service config
发现还是iptables
这里要启用ipvs 模式,需要启用 ipvs 内核版本需要升级到3.10 以后,重启主机,才能生效。具体的内核升级,见资料文档
master 和 node 都需要升级
[root@k8s-m1 ~]# lsmod |grep vs
ip_vs_sh               12688  0
ip_vs_wrr              12697  0
ip_vs_rr               12600  0
ip_vs                 145497  6 ip_vs_rr,ip_vs_sh,ip_vs_wrr
nf_conntrack          133095  9 ip_vs,nf_nat,nf_nat_ipv4,nf_nat_ipv6,xt_conntrack,nf_nat_masquerade_ipv4,nf_conntrack_netlink,nf_conntrack_ipv4,nf_conntrack_ipv6
vmw_vsock_vmci_transport    30577  1
vsock                  36526  2 vmw_vsock_vmci_transport
vmw_vmci               67127  1 vmw_vsock_vmci_transport
libcrc32c              12644  4 xfs,ip_vs,nf_nat,nf_conntrack

[root@k8s-m1 ~]# modprobe ip_vs
完成内核升级后,再次删除pod,查看启动模式是什么
# 查看所有的pod
[root@k8s-m1 ~]#  kubectl get pods -n kube-system -o wide
NAME                                       READY   STATUS    RESTARTS   AGE   IP              NODE     NOMINATED NODE   READINESS GATES
calico-kube-controllers-578894d4cd-kwvfj   1/1     Running   3          12d   10.244.42.148   k8s-m1   <none>           <none>
calico-node-588zq                          1/1     Running   4          19d   10.0.0.25       k8s-n2   <none>           <none>
calico-node-62gxk                          1/1     Running   4          19d   10.0.0.24       k8s-n1   <none>           <none>
calico-node-ph6fd                          1/1     Running   3          19d   10.0.0.23       k8s-m1   <none>           <none>
coredns-7ff77c879f-wmcb8                   1/1     Running   3          12d   10.244.42.150   k8s-m1   <none>           <none>
coredns-7ff77c879f-z7wxq                   1/1     Running   3          12d   10.244.42.149   k8s-m1   <none>           <none>
etcd-k8s-m1                                1/1     Running   3          19d   10.0.0.23       k8s-m1   <none>           <none>
kube-apiserver-k8s-m1                      1/1     Running   3          19d   10.0.0.23       k8s-m1   <none>           <none>
kube-controller-manager-k8s-m1             1/1     Running   4          19d   10.0.0.23       k8s-m1   <none>           <none>
kube-proxy-5h8v7                           1/1     Running   2          16m   10.0.0.24       k8s-n1   <none>           <none>
kube-proxy-kfrqf                           1/1     Running   2          17m   10.0.0.25       k8s-n2   <none>           <none>
kube-proxy-nnzdv                           1/1     Running   4          19d   10.0.0.23       k8s-m1   <none>           <none>
kube-scheduler-k8s-m1                      1/1     Running   3          19d   10.0.0.23       k8s-m1   <none>           <none>
metrics-server-7875f8bf59-n2lr2            1/1     Running   4          12d   10.244.215.93   k8s-n1   <none>           <none>


[root@k8s-m1 ~]# kubectl delete pods kube-proxy-5h8v7 -n kube-system
pod "kube-proxy-5h8v7" deleted
[root@k8s-m1 ~]#  kubectl get pods -n kube-system -o wide
NAME                                       READY   STATUS    RESTARTS   AGE   IP              NODE     NOMINATED NODE   READINESS GATES
calico-kube-controllers-578894d4cd-kwvfj   1/1     Running   3          12d   10.244.42.148   k8s-m1   <none>           <none>
calico-node-588zq                          1/1     Running   4          19d   10.0.0.25       k8s-n2   <none>           <none>
calico-node-62gxk                          1/1     Running   4          19d   10.0.0.24       k8s-n1   <none>           <none>
calico-node-ph6fd                          1/1     Running   3          19d   10.0.0.23       k8s-m1   <none>           <none>
coredns-7ff77c879f-wmcb8                   1/1     Running   3          12d   10.244.42.150   k8s-m1   <none>           <none>
coredns-7ff77c879f-z7wxq                   1/1     Running   3          12d   10.244.42.149   k8s-m1   <none>           <none>
etcd-k8s-m1                                1/1     Running   3          19d   10.0.0.23       k8s-m1   <none>           <none>
kube-apiserver-k8s-m1                      1/1     Running   3          19d   10.0.0.23       k8s-m1   <none>           <none>
kube-controller-manager-k8s-m1             1/1     Running   4          19d   10.0.0.23       k8s-m1   <none>           <none>
kube-proxy-kfrqf                           1/1     Running   2          17m   10.0.0.25       k8s-n2   <none>           <none>
kube-proxy-nnzdv                           1/1     Running   4          19d   10.0.0.23       k8s-m1   <none>           <none>
kube-proxy-xjqgt                           1/1     Running   0          4s    10.0.0.24       k8s-n1   <none>           <none>
kube-scheduler-k8s-m1                      1/1     Running   3          19d   10.0.0.23       k8s-m1   <none>           <none>
metrics-server-7875f8bf59-n2lr2            1/1     Running   4          12d   10.244.215.93   k8s-n1   <none>           <none>
[root@k8s-m1 ~]# kubectl logs kube-proxy-xjqgt -n kube-system
I0812 00:56:09.349197       1 node.go:136] Successfully retrieved node IP: 10.0.0.24
I0812 00:56:09.349267       1 server_others.go:259] Using ipvs Proxier.
W0812 00:56:09.349548       1 proxier.go:429] IPVS scheduler not specified, use rr by default
I0812 00:56:09.349675       1 server.go:583] Version: v1.18.0
I0812 00:56:09.349959       1 conntrack.go:52] Setting nf_conntrack_max to 131072
I0812 00:56:09.350711       1 config.go:133] Starting endpoints config controller
I0812 00:56:09.350724       1 shared_informer.go:223] Waiting for caches to sync for endpoints config
I0812 00:56:09.350735       1 config.go:315] Starting service config controller
I0812 00:56:09.350737       1 shared_informer.go:223] Waiting for caches to sync for service config
I0812 00:56:09.450985       1 shared_informer.go:230] Caches are synced for endpoints config
I0812 00:56:09.450985       1 shared_informer.go:230] Caches are synced for service config
这里用ipvsadm 工具,查看负载均衡策略
[root@k8s-n1 ~]# ipvsadm -L -n
IP Virtual Server version 1.2.1 (size=4096)
Prot LocalAddress:Port Scheduler Flags
  -> RemoteAddress:Port           Forward Weight ActiveConn InActConn
TCP  127.0.0.1:30000 rr
  -> 10.244.42.147:8443           Masq    1      0          0
TCP  172.16.1.24:30000 rr
  -> 10.244.42.147:8443           Masq    1      0          0
TCP  172.16.1.24:31024 rr
  -> 10.244.111.231:80            Masq    1      0          0
  -> 10.244.111.234:80            Masq    1      0          0
  -> 10.244.111.235:80            Masq    1      0          0
TCP  172.16.1.24:31359 rr
  -> 10.244.42.145:8080           Masq    1      0          0
  -> 10.244.111.229:8080          Masq    1      0          0
  -> 10.244.111.232:8080          Masq    1      0          0
  -> 10.244.215.88:8080           Masq    1      0          0
  -> 10.244.215.90:8080           Masq    1      0          0
  -> 10.244.215.92:8080           Masq    1      0          0
TCP  172.16.1.24:31473 rr
  -> 10.244.215.94:80             Masq    1      0          0
TCP  172.16.1.24:32116 rr
  -> 10.244.111.233:8080          Masq    1      0          0
  -> 10.244.215.89:8080           Masq    1      0          0
  -> 10.244.215.91:8080           Masq    1      0          0
TCP  172.17.0.1:30000 rr
  -> 10.244.42.147:8443           Masq    1      0          0
TCP  172.17.0.1:31024 rr
  -> 10.244.111.231:80            Masq    1      0          0
  -> 10.244.111.234:80            Masq    1      0          0
  -> 10.244.111.235:80            Masq    1      0          0
TCP  172.17.0.1:31473 rr
  -> 10.244.215.94:80             Masq    1      0          0
TCP  10.0.0.24:30000 rr
  -> 10.244.42.147:8443           Masq    1      0          0
TCP  10.0.0.24:31024 rr
  -> 10.244.111.231:80            Masq    1      0          0
  -> 10.244.111.234:80            Masq    1      0          0
  -> 10.244.111.235:80            Masq    1      0          0
修改代理模式的方法
Iptables VS IPVS
Iptables:
·灵活,功能强大
·规则遍历匹配和更新,呈线性时延
IPVS:
·工作在内核态,有更好的性能
·调度算法丰富:rr,wrr,lc,wlc, ip hash...
5. Service dns:名称
DNS 服务监视 Kubernetes api ,为每一个 Service 创建DNS记录用于域名解析。
ClusterIP A记录格式:<service-name>.< namespace-name>.svc.cluster.local
示例:my-svc.my-namespace.svc.cluster.local
https://github.com/kubernetes/kubernetes/tree/master/cluster/addons/dns/coredns
[root@k8s-m1 ~]# kubectl run dns-client -it --rm --image=busybox:1.28.4 sh
If you don't see a command prompt, try pressing enter.
/ # nslookup web-nginx-0811
Server:    10.96.0.10
Address 1: 10.96.0.10 kube-dns.kube-system.svc.cluster.local

Name:      web-nginx-0811
Address 1: 10.108.232.47 web-nginx-0811.default.svc.cluster.local
/ #
/ # nslookup web.kube-system
Server:    10.96.0.10
Address 1: 10.96.0.10 kube-dns.kube-system.svc.cluster.local

nslookup: can't resolve 'web.kube-system'
1.采用 NodePort对外暴露应用,前面加一个LB实现统一访问入口
2.优先使用 IPVS 代理模式
3.集群内应用采用DNS名称访问
6. Ingress为弥补 NodePort不足而生
NodePort 存在的不足:
一个端口只能一个服务使用,端口需提前规划
只支持4层负载均衡
7.Pod与 Ingress的关系
通过 Service相关联
通过 Ingress Controller 实现Pod的负载均衡
支持TCP/UDP 4层和HTTP 7层

8. Ingress Controller
1.部署 Ingress Controller


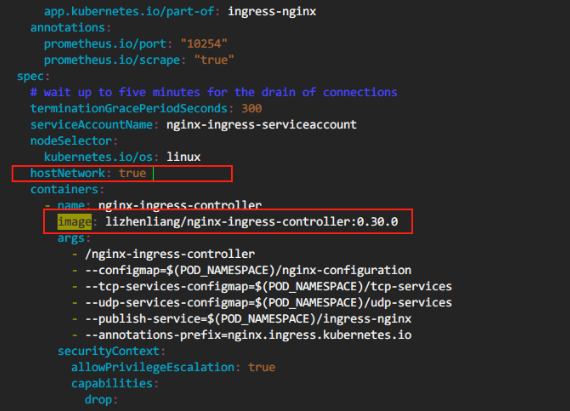
创建 ingress-control
[root@k8s-m1 chp6]# vim mandatory.yaml
[root@k8s-m1 chp6]# kubectl apply -f mandatory.yaml
namespace/ingress-nginx created
configmap/nginx-configuration created
configmap/tcp-services created
configmap/udp-services created
serviceaccount/nginx-ingress-serviceaccount created
clusterrole.rbac.authorization.k8s.io/nginx-ingress-clusterrole created
role.rbac.authorization.k8s.io/nginx-ingress-role created
rolebinding.rbac.authorization.k8s.io/nginx-ingress-role-nisa-binding created
clusterrolebinding.rbac.authorization.k8s.io/nginx-ingress-clusterrole-nisa-binding created
deployment.apps/nginx-ingress-controller created
limitrange/ingress-nginx created


查看 ingress-control 所在的pod
[root@k8s-m1 chp6]# kubectl get pods -n ingress-nginx -o wide
NAME                                       READY   STATUS    RESTARTS   AGE   IP          NODE     NOMINATED NODE   READINESS GATES
nginx-ingress-controller-766fb9f77-jjxxj   1/1     Running   0          42m   10.0.0.25   k8s-n2   <none>           <none>

在node2 节点查看监听的端口
[root@k8s-n2 ~]# ss -antp|egrep '80|443'|grep nginx
LISTEN     0      4096         *:443                      *:*                   users:(("nginx",pid=116113,fd=33),("nginx",pid=116100,fd=33))
LISTEN     0      4096         *:443                      *:*                   users:(("nginx",pid=116112,fd=25),("nginx",pid=116100,fd=25))
LISTEN     0      4096         *:80                       *:*                   users:(("nginx",pid=116113,fd=31),("nginx",pid=116100,fd=31))
LISTEN     0      4096         *:80                       *:*                   users:(("nginx",pid=116112,fd=23),("nginx",pid=116100,fd=23))
9. Ingress
创建一个服务实例-用 ingress 负载均衡
[root@k8s-m1 chp6]#  kubectl create deploy java-demo-0812 --image=lizhenliang/java-demo
deployment.apps/java-demo-0812 created
[root@k8s-m1 chp6]# kubectl expose deploy java-demo-0812 --port=80 --target-port=8080
service/java-demo-0812 exposed
[root@k8s-m1 chp6]# kubectl get svc
NAME             TYPE        CLUSTER-IP       EXTERNAL-IP   PORT(S)        AGE
java-demo-0812   ClusterIP   10.96.15.234     <none>        80/TCP         1s
[root@k8s-m1 chp6]# kubectl get  ep
NAME             ENDPOINTS                                                                 AGE
java-demo-0812   10.244.111.249:8080                                                       23s

[root@k8s-m1 chp6]# kubectl scale deployment java-demo-0812 --replicas=2
deployment.apps/java-demo-0812 scaled
[root@k8s-m1 chp6]# kubectl get pod -o wide
NAME                              READY   STATUS    RESTARTS   AGE     IP               NODE     NOMINATED NODE   READINESS GATES
java-demo-0812-744df89f5-crn7n    1/1     Running   0          32s     10.244.111.250   k8s-n2   <none>           <none>
java-demo-0812-744df89f5-l6xgz    1/1     Running   0          3m19s   10.244.111.249   k8s-n2   <none>           <none>

[root@k8s-m1 chp6]# kubectl get  ep
NAME             ENDPOINTS                                                                 AGE
java-demo-0812   10.244.111.249:8080,10.244.111.250:8080                                   3m43s
[root@k8s-m1 chp6]# vim ingress.yml
[root@k8s-m1 chp6]# kubectl apply -f ingress.yml
ingress.networking.k8s.io/virtual-host-ingress created
[root@k8s-m1 chp6]# cat ingress.yml
apiVersion: networking.k8s.io/v1beta1
kind: Ingress
metadata:
  name: virtual-host-ingress
spec:
  rules:
  - host: foo.bar.com
    http:
      paths:
      - backend:
          serviceName: java-demo-0812
          servicePort: 80

查看 ingress 的负载均衡策略
[root@k8s-m1 chp6]# kubectl exec -it nginx-ingress-controller-766fb9f77-jjxxj sh -n ingress-nginx
kubectl exec [POD] [COMMAND] is DEPRECATED and will be removed in a future version. Use kubectl kubectl exec [POD] -- [COMMAND] instead.

/etc/nginx $ cat /etc/nginx/nginx.conf|grep -C 10 foo.bar.com|grep -v "#"

            deny all;

            access_log off;
            stub_status on;
        }

    }

    server {
        server_name foo.bar.com ;

        listen 80  ;
        listen [::]:80  ;
        listen 443  ssl http2 ;
        listen [::]:443  ssl http2 ;

        set $proxy_upstream_name "-";

        ssl_certificate_by_lua_block {
            certificate.call()
--
            proxy_next_upstream_timeout             0;
            proxy_next_upstream_tries               3;

            proxy_pass http://upstream_balancer;

            proxy_redirect                          off;

        }

    }

    server {
        listen 8181 default_server reuseport backlog=4096;
        listen [::]:8181 default_server reuseport backlog=4096;
        set $proxy_upstream_name "internal";

        access_log off;

        location / {
基于nginx的分发
内部是基于lua维护的列表
2.创建 Ingress https 规则

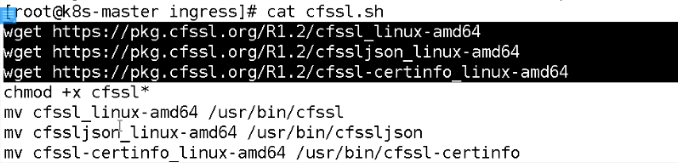
[root@k8s-m1 ingress]# tar xf cfssl.tar.gz
[root@k8s-m1 ingress]# ls
ca-config.json  certs.sh  cfssl-certinfo  cfssl.sh      foo.bar.com-csr.json     ingress.yaml
ca-csr.json     cfssl     cfssljson       cfssl.tar.gz  ingress-controller.yaml
[root@k8s-m1 ingress]# mv cfssl cfssljson cfssl-certinfo /usr/bin/
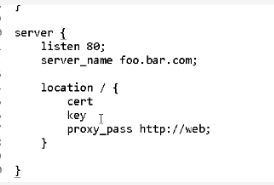
编辑修改cert.sh文件
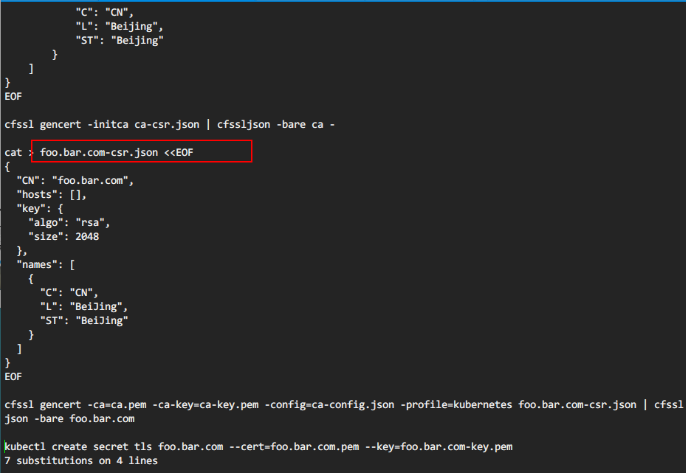
生成证书
[root@k8s-m1 ingress]# bash certs.sh
2020/08/17 19:55:46 [INFO] generating a new CA key and certificate from CSR
2020/08/17 19:55:46 [INFO] generate received request
2020/08/17 19:55:46 [INFO] received CSR
2020/08/17 19:55:46 [INFO] generating key: rsa-2048
2020/08/17 19:55:47 [INFO] encoded CSR
2020/08/17 19:55:47 [INFO] signed certificate with serial number 651695061435089474260733688775545827114603389380
2020/08/17 19:55:47 [INFO] generate received request
2020/08/17 19:55:47 [INFO] received CSR
2020/08/17 19:55:47 [INFO] generating key: rsa-2048
2020/08/17 19:55:47 [INFO] encoded CSR
2020/08/17 19:55:47 [INFO] signed certificate with serial number 209459435568000678384024388454887297024732237390
2020/08/17 19:55:47 [WARNING] This certificate lacks a "hosts" field. This makes it unsuitable for
websites. For more information see the Baseline Requirements for the Issuance and Management
of Publicly-Trusted Certificates, v.1.1.6, from the CA/Browser Forum (https://cabforum.org);
specifically, section 10.2.3 ("Information Requirements").
secret/foo.bar.com created
[root@k8s-m1 ingress]# tail -1 certs.sh
kubectl create secret tls foo.bar.com --cert=foo.bar.com.pem --key=foo.bar.com-key.pem

[root@k8s-m1 ingress]# kubectl get secrets
NAME                  TYPE                                  DATA   AGE
default-token-dvcjp   kubernetes.io/service-account-token   3      24d
foo.bar.com           kubernetes.io/tls                     2      116s
[root@k8s-m1 chp6]# kubectl apply -f ingress-https.yml
ingress.networking.k8s.io/tls-example-ingress created
[root@k8s-m1 chp6]# cat ingress-https.yml
apiVersion: networking.k8s.io/v1beta1
kind: Ingress
metadata:
  name: tls-example-ingress
spec:
  tls:
  - hosts:
    - foo.bar.com
    secretName: foo.bar.com
  rules:
  - host: foo.bar.com
    http:
      paths:
      - path: /
        backend:
          serviceName: java-demo-0812
          servicePort: 80

[root@k8s-m1 chp6]# kubectl get ingress
NAME                   CLASS    HOSTS         ADDRESS   PORTS     AGE
tls-example-ingress    <none>   foo.bar.com             80, 443   105s
virtual-host-ingress   <none>   foo.bar.com             80        3d20h

删除之前的 ingress 虚拟主机
[root@k8s-m1 chp6]# kubectl delete -f ingress.yml
ingress.networking.k8s.io "virtual-host-ingress" deleted
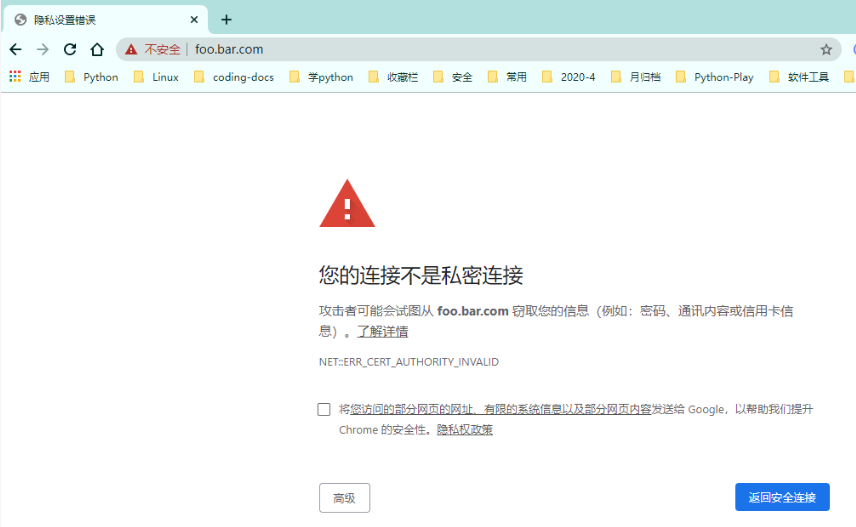
访问基于https 网址

查看证书
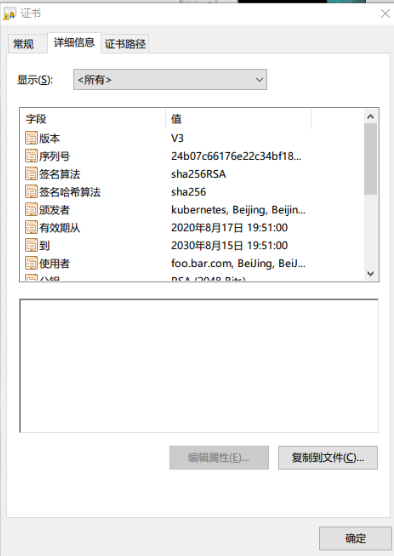
证书和路径保持对应的关系