首先看一下这个java web文件的总览,这是一个大体的步骤,下面进行分步骤介绍:
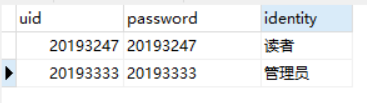
1.在navicat中建表(我的库名为test01,标名为diff_login,)
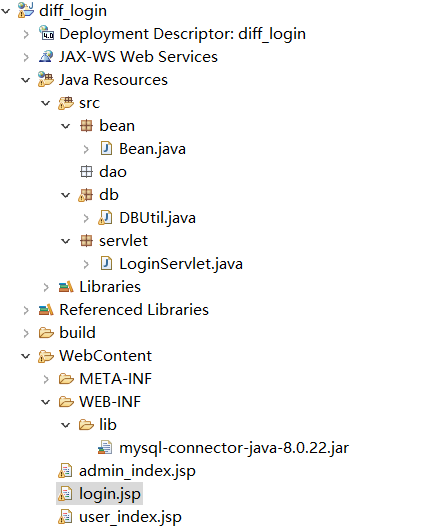
2.接下来建立一个web文件,命名如第一张图所示。
3.建立bean层,创建Bea类,代码如下:
package bean;
public class Bean {
public int uid;
public String password;
public String identity;
public int getUid() {
return uid;
}
public void setUid(int uid) {
this.uid = uid;
}
public String getPassword() {
return password;
}
public void setPassword(String password) {
this.password = password;
}
public String getIdentity() {
return identity;
}
public void setIdentity(String identity) {
this.identity = identity;
}
public Bean(int uid,String password,String identity) {
this.uid = uid;
this.password = password;
this.identity = identity;
}
@Override
public String toString() {
return "Bean [uid=" + uid + ", password=" + password + ", identity=" + identity + "]";
}
}
3.建立db层,建立DBUtil类,代码如下:
package db;
import java.sql.Connection;
import java.sql.DriverManager;
import java.sql.PreparedStatement;
import java.sql.ResultSet;
import java.sql.SQLException;
import java.sql.Statement;
public class DBUtil {
private static String url = "jdbc:mysql://localhost:3306/test01?&useSSL=false&serverTimezone=UTC";
private static String user = "root";
private static String password = "3wcnasdqaz";
private static String jdbcName="com.mysql.cj.jdbc.Driver";
private Connection con=null;
public static Connection getConnection() {
Connection con=null;
try {
Class.forName(jdbcName);
con=DriverManager.getConnection(url, user, password);
//System.out.println("数据库连接成功");
} catch (Exception e) {
// TODO Auto-generated catch block
//System.out.println("数据库连接失败");
e.printStackTrace();
}
try {
con = DriverManager.getConnection(url,user,password);
System.out.println("数据库连接成功");
} catch (SQLException e) {
// TODO: handle exception
e.printStackTrace();
}
return con;
}
public static void main(String[] args)throws SQLException {
Connection conn = getConnection();
PreparedStatement pstmt = null;
ResultSet rs = null;
String sql ="select * from diff_login";
pstmt = conn.prepareStatement(sql);
rs = pstmt.executeQuery();
System.out.println(getConnection());
while(rs.next()){
System.out.println("数据表连接成功");
}
}
public static void close(Connection con) {
if(con!=null)
try {
con.close();
} catch (SQLException e) {
// TODO Auto-generated catch block
e.printStackTrace();
}
}
public static void close(Statement state, Connection conn) {
if(state!=null) {
try {
state.close();
} catch (SQLException e) {
e.printStackTrace();
}
}
if(conn!=null) {
try {
conn.close();
} catch (SQLException e) {
e.printStackTrace();
}
}
}
public static void close(ResultSet rs, Statement state, Connection conn) {
if(rs!=null) {
try {
rs.close();
} catch (SQLException e) {
e.printStackTrace();
}
}
if(state!=null) {
try {
state.close();
} catch (SQLException e) {
e.printStackTrace();
}
}
if(conn!=null) {
try {
conn.close();
} catch (SQLException e) {
e.printStackTrace();
}
}
}
}
4.建立servlet层,建立LoginServlet类,代码如下:
package servlet;
import java.io.IOException;
import java.sql.Connection;
import java.sql.DriverManager;
import java.sql.PreparedStatement;
import java.sql.ResultSet;
import java.text.SimpleDateFormat;
import java.util.Date;
import javax.servlet.ServletException;
import javax.servlet.annotation.WebServlet;
import javax.servlet.http.HttpServlet;
import javax.servlet.http.HttpServletRequest;
import javax.servlet.http.HttpServletResponse;
/**
* Servlet implementation class LoginServlet
*/
@WebServlet("/LoginServlet")
public class LoginServlet extends HttpServlet {
private static final long serialVersionUID = 1L;
/**
* @see HttpServlet#HttpServlet()
*/
public LoginServlet() {
super();
// TODO Auto-generated constructor stub
}
/**
* @see HttpServlet#doGet(HttpServletRequest request, HttpServletResponse response)
*/
protected void doGet(HttpServletRequest request, HttpServletResponse response) throws ServletException, IOException {
// TODO Auto-generated method stub
response.getWriter().append("Served at: ").append(request.getContextPath());
}
/**
* @see HttpServlet#doPost(HttpServletRequest request, HttpServletResponse response)
*/
protected void doPost(HttpServletRequest request, HttpServletResponse response) throws ServletException, IOException {
request.setCharacterEncoding("UTF-8");
response.setCharacterEncoding("UTF-8");
int uid=Integer.parseInt(request.getParameter("uid"));
String pass=String.valueOf(request.getParameter("password"));
String identity=String.valueOf(request.getParameter("identity"));//后台输出时间,可有可无
SimpleDateFormat sdf = new SimpleDateFormat("yyyy-MM-dd HH:mm:ss");//后台输出时间,可有可无
String date=sdf.format(new Date());//
try {
Class.forName("com.mysql.cj.jdbc.Driver");
String url="jdbc:mysql://localhost:3306/test01?&useSSL=false&serverTimezone=UTC";
String username="root";
String password="3wcnasdqaz";
Connection conn=DriverManager.getConnection(url,username,password);
String sql="select * from diff_login where uid='"+uid+"'and password='"+pass+"'and identity='"+identity+"'";
PreparedStatement ps=conn.prepareStatement(sql);
ResultSet rs=ps.executeQuery();
if(rs.next()) {
System.out.println(date+" "+uid+" "+"login"+""+identity);
System.out.println();
request.setAttribute("uid", uid);
if(identity.equals("读者")){
request.getRequestDispatcher("user_index.jsp").forward(request,response);
}
if(identity.equals("管理员")){
request.getRequestDispatcher("admin_index.jsp").forward(request,response);
}
}else{
request.setAttribute("message", "用户名或密码错误");
request.getRequestDispatcher("login.jsp").forward(request,response);
}
}catch(Exception e) {
e.printStackTrace();
}finally{
}
}
}
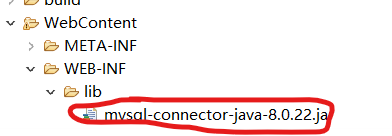
6.导入jar包到本web的lib文件夹下
7.创建login.jsp文件,代码如下
<%@ page language="java" contentType="text/html; charset=UTF-8"
pageEncoding="UTF-8"%>
<!DOCTYPE html>
<html>
<head>
<meta charset="UTF-8">
<title>登录</title>
</head>
<body>
<%
Object message = request.getAttribute("message");
if (message != null && !"".equals(message)) {
%>
<script type="text/javascript">
alert("<%=request.getAttribute("message")%>"); //弹出对话框
</script>
<%
}
%>
<form name="user" action="LoginServlet" method="post" onsubmit="return check()">
<table id="addTable" class="table table-bordered" align="center">
<tr class="text-center row">
<td class="col-sm-2">
学号/工号
</td>
<td class="col-sm-4">
<input type="number" class="form-control" name="uid" id="uid" >
</td>
</tr>
<tr class="text-center row">
<td class="col-sm-2">
密码
</td>
<td class="col-sm-4">
<input type="password" class="form-control" name="password" id="password">
</td>
</tr>
<tr class="text-center row">
<td>
登陆身份
</td>
<td colspan="3">
<select class="form-control" id="identity" name="identity">
<option value="读者">读者</option>
<option value="管理员">管理员</option>
</select>
</td>
</tr>
<tr class="text-center row" align="center">
<td colspan="3">
<input type="submit" value="登录" >
</td>
</tr>
</table>
</form>
<script type="text/javascript">
function check(){
if(user.uid.value==""||user.uid.value==null){
alert("学号/工号为空!");
return false;
}
if(user.password.value==""||user.password.value==null){
alert("密码为空!");
return false;
}
}
</script>
</body>
</html>
以上7步就完成了简单的分角色登陆的过程,而文件中的user_index与admin_index是两个跳转的页面,及分角色登陆完毕后跳转到不同的页面(读者跳转到到user_index,管理员跳转到admin_index)
还有就是现在用户的信息只能是自己输入到数据库中,然后在进行登录,如果想要实现注册功能,只需要添加一个简单的增加功能即可,下一次我们将要给出详细的注册功能的实现。