转载:https://www.cnblogs.com/yplong/articles/4676093.html
原文:https://docs.microsoft.com/en-us/aspnet/mvc/overview/older-versions/getting-started-with-ef-5-using-mvc-4/creating-an-entity-framework-data-model-for-an-asp-net-mvc-application
Contoso 大学 Web 示例应用演示了如何使用 EF5 技术创建 ASP.NET MVC 应用。这个例子是Contoso大学的官网。应用包括了类似学生注册、课程创建以及教师分配等功能。这个系列教程展示了创建 Contoso 大学应用的步骤。你可以下载完整的例子 。
编码优先原则
EF( Entity Framework)提供3种方式来处理数据:数据库优先(Database First),模型优先( Model First)和编码优先(Code First).这些课程采用的是编码优先原则。关于这三者的区别,工作流程以及如何选择其中的一种作为你的方案,请浏览Entity Framework Development Workflows.
MVC
应用程序 采用 ASP.NET MVC设计方式。如果你更喜欢 ASP.NET Web Forms 模式,请浏览Model Binding and Web Forms 系列课程和Model Binding and Web Forms文章。
Contoso 大学网站应用程序
在这个教程中你将创建的应用是一个简单的大学网站。


由于教程主要关注于如何使用 EF ,所以界面的风格与内置模板的风格保持一致。
EF 开发方法
下图所示,存在三种方式来使用 EF:数据库优先,模型优先和代码优先。

数据库优先
如果你已经创建了数据库,EF 可以自动生成创建数据模型,包含关联到数据库中表和字段的类和属性。关于数据库结构的信息(存储架构)、数据模型(概念模型)、它们之间的映射被存储在扩 展名为 .edmx 的 XML 文件中。Visual Studio 提供了 EF 设计器,这是一个图形化的设计器,可以用来显示和编辑 .edmx 文件。Getting Started With the Entity Framework 和 Continuing With the Entity Framework 介绍了使用数据库优先的开发。
模型优先
如果你还没有数据库,你可以在 Visual Stdio 中使用 EF 的设计器通过创建模型来开始。当模型创建之后,设计器可以生成 DDL 语句来创建相应的数据库。这个方法也使用 .edmx 文件来存储模型以及映射信息。 What's New in the Entity Framework 4 介绍了模型优先的开发。
代码优先
不管你是否已经有数据库,你仍然可以编写自己的类和数据关联到数据表和字段,使用 EF 而不需要 .edmx 文件。所有有时候这种方法又被称为 Code Onle。当然经典的名称为 Code First。在数据库的存储架构到概念模型之间的映射通过约定以及特定的映射 API 完成。如果你还没有数据库,EF 可以自动为你创建它,在模型改变的时候,先删除掉然后重新创建,这个教程使用代码优先的方式进行开发。
使用代码优先的方式进行数据库访问的 API 基于 DbContext 类。这也同样可以用于数据库优先或者模型优先的开发流程。 更多详细的内容,可以看 When is Code First not code first?
POCO (简单的老的 CLR 对象)
默认情况下,当你使用数据库优先或者模型优先开发方法的时候,你的数据模型对象需要派生自 EntityObject 类,通过它提供 EF 功能。这意味着这些类不能是 持久性无感知(persistence ignorant ) 的,所以不能符合领域驱动开发的要求。所有的 EF 开发方法都支持使用 POCO 类,由于不需要派生自 EntityObject ,所以,这样的类是持久性无感知的。在这个教程中,我们将会使用 POCO 类。
创建一个WebMvc应用程序:


设置站点的风格:
通过一些简单的修改来设置站点的菜单,布局和主页。
打开 ViewsShare\_Layout.cshtml 文件,替换现相关的内容如下高亮的代码:
<!DOCTYPE html>
<html lang="en">
    <head>
        <meta charset="utf-8" />
        <title>@ViewBag.Title - Contoso University</title>
        <link href="~/favicon.ico" rel="shortcut icon" type="image/x-icon" />
        <meta name="viewport" content="width=device-width" />
        @Styles.Render("~/Content/css")
        @Scripts.Render("~/bundles/modernizr")
    </head>
    <body>
        <header>
            <div class="content-wrapper">
                <div class="float-left">
                    <p class="site-title">@Html.ActionLink("Contoso University", "Index", "Home")</p>
                </div>
                <div class="float-right">
                    <section id="login">
                        @Html.Partial("_LoginPartial")
                    </section>
                    <nav>
                        <ul id="menu">
                            <li>@Html.ActionLink("Home", "Index", "Home")</li>
                            <li>@Html.ActionLink("About", "About", "Home")</li>
                            <li>@Html.ActionLink("Students", "Index", "Student")</li>
                            <li>@Html.ActionLink("Courses", "Index", "Course")</li>
                            <li>@Html.ActionLink("Instructors", "Index", "Instructor")</li>
                            <li>@Html.ActionLink("Departments", "Index", "Department")</li>
                        </ul>
                    </nav>
                </div>
            </div>
        </header>
        <div id="body">
            @RenderSection("featured", required: false)
            <section class="content-wrapper main-content clear-fix">
                @RenderBody()
            </section>
        </div>
        <footer>
            <div class="content-wrapper">
                <div class="float-left">
                    <p>© @DateTime.Now.Year - Contoso University</p>
                </div>
            </div>
        </footer>

        @Scripts.Render("~/bundles/jquery")
        @RenderSection("scripts", required: false)
    </body>
</html>
代码变化如下:
- 用"Contoso University"替换 "My ASP.NET MVC Application" 和"your logo here"。
- 增加了一些后面要用到的响应连接。
在ViewsHomeIndex.cshtml页面中把内容替换为下面的内容:
@{
    ViewBag.Title = "Home Page";
}
@section featured {
    <section class="featured">
        <div class="content-wrapper">
            <hgroup class="title">
                <h1>@ViewBag.Title.</h1>
                <h2>@ViewBag.Message</h2>
            </hgroup>
        </div>
    </section>
}
在ControllersHomeController.cs文件中,将 "欢迎使用 ASP.NET MVC!" 替换为 "欢迎来到 Contoso University!"
public ActionResult Index()
{
    ViewBag.Message = "Welcome to Contoso University";

    return View();
}
按下ctrl+F5 运行网站你可以看到主页和主菜单如下:

创建数据模型
下一步,需要创建 Contoso 大学应用的第一组实体类,从下面的三个实体开始。

在学生 (Student) 实体和 注册 (Enrollment) 实体之间存在一对多的关联, 在课程 (Course) 和 注册 (Enrollment) 之间也存在一对多的关联。或者说,一个学生可以注册许多课程,一个课程可以被许多学生注册。
下面的时间,你需要为每个实体创建相应的类。
注意:如果你在创建完成所有这些类的时候编译程序,将会看到编译错误。
学生实体

在Models文件夹下面创建一个Student.cs的文件并且把文件内容替换为下面的代码:
using System;
using System.Collections.Generic;

namespace ContosoUniversity.Models
{
    public class Student
    {
        public int StudentID { get; set; }
        public string LastName { get; set; }
        public string FirstMidName { get; set; }
        public DateTime EnrollmentDate { get; set; }

        public virtual ICollection<Enrollment> Enrollments { get; set; }
    }
}
StudentID 属性将会映射到数据库中关联到这个类的表的主键,默认情况下,EF 将属性名为 ID 或者 “类名ID” 的属性作为主键。
Enrollments 属性是导航属性,导航属性用来导航到这个实体关联的其他实体。Student 类的 Enrollments 属性用来持有这个学生关联的所有注册实体。或者说,如果在数据库中,一个学生行有两个关联的注册行(通过 StudentId 这个外键关联到学生表),学生实体的注册属性将会包含包含两个注册实体。
导航属性典型地被定义为虚拟的 virtual,以便通过 EF 名为延迟加载的功能来获得好处,(延迟加载将在后面进行说明),如果导航属性可以持有多个实体,(在多对多情况下,或者一对多情况下),类型必须为 ICollection。
注册实体

在Models文件夹下面创建一个Enrollment.cs的文件并且把文件内容替换为下面的代码:
namespace ContosoUniversity.Models
{
    public enum Grade
    {
        A, B, C, D, F
    }

    public class Enrollment
    {
        public int EnrollmentID { get; set; }
        public int CourseID { get; set; }
        public int StudentID { get; set; }
        public Grade? Grade { get; set; }

        public virtual Course Course { get; set; }
        public virtual Student Student { get; set; }
    }
}
Grade 是一个枚举。在Grade类型后面加一个?问号表示Grade属性值可以为空。空和0是不一样的,空表示没成绩,0表示成绩是0。
StudentID属性是一个外键,关联的导航属性是Student类。一个 Enrollment 关联一个 Student,所以这个属性只能持有一个 Student 实体 (不像 Student.Enrollments 导航属性)。CourseID 属性也是外键,关联的导航属性为 Course,一个 Enrollment 关联一个 Course 实体。
课程实体

在 Models 文件夹中,创建 Course.cs 代码文件,使用下面的代码替换原有的代码。
using System.Collections.Generic;
using System.ComponentModel.DataAnnotations.Schema;

namespace ContosoUniversity.Models
{
    public class Course
    {
        [DatabaseGenerated(DatabaseGeneratedOption.None)]
        public int CourseID { get; set; }
        public string Title { get; set; }
        public int Credits { get; set; }

        public virtual ICollection<Enrollment> Enrollments { get; set; }
    }
}
Enrollments属性是一个导航属性,一个课程实体可以关联多个Enrollments实体。
下节课我们会更多的来讲解[DatabaseGenerated(DatabaseGeneratedOption.None)]。属性的作用就是课程表的主键是要主动输入的而不是用数据库自动生成,即不是自增。
创建数据库上下文
在 EF 中,主要的协调数据访问功能的类是数据库上下文类。你创建的这个类必须继承自 System.Data.Entity.DbContext类。在你的代码中指定数据模型中包含的实体。你可以定制某些 EF 的行为。在这个项目中,这个类的名字为 SchoolContext。
创建一个DAL文件夹(做数据访问层),在这个文件夹中创建一个新的类SchoolContext.cs,替换文件内容如下:
using ContosoUniversity.Models;
using System.Data.Entity;
using System.Data.Entity.ModelConfiguration.Conventions;

namespace ContosoUniversity.DAL
{
    public class SchoolContext : DbContext
    {
        public DbSet<Student> Students { get; set; }
        public DbSet<Enrollment> Enrollments { get; set; }
        public DbSet<Course> Courses { get; set; }

        protected override void OnModelCreating(DbModelBuilder modelBuilder)
        {
            modelBuilder.Conventions.Remove<PluralizingTableNameConvention>();
        }
    }
}
为每一个实体创建一个 DbSet 属性,在 EF 术语中,一个实体集典型地关联到一个数据库中的表,一个实体关联到表中的一行。在 OnModelCreating 方法中的代码防止数据库中的表名被多元化。如果没有这样处理的话,生成的表将会被命名为 Students,Courses 和 Enrollments。现在,表名将会被命名为 Student,Course 和 Enrollment。开发者可以决定表名是否被多元化。这个教程使用单数模式,但是重要的是你可以这行代码来选择喜欢的模式。
(这个类位于 Models 命名空间,有些时候 EF 假定实体类和上下文类在相同的命名空间中)
设置连接字符串
你还没有创建数据库连接串,如果你不去创建它,EF 将会自动为你创建一个 SQL Server Express 的数据库。这个教程中,你将要使用 SQL Server Compact,所以,需要你来创建一个数据库连接串。
打开项目的 web.config 文件,在 connectionStrings 配置中增加一个新的数据库连接串,如下所示,(确信是项目根目录中的 web.config ,注意在 Views 中还有一个,你不需要更新它)
<add name="SchoolContext" connectionString="Data Source=(LocalDb)v11.0;Initial Catalog=ContosoUniversity;Integrated Security=SSPI;AttachDBFilename=|DataDirectory|ContosoUniversity.mdf" providerName="System.Data.SqlClient" />
默认情况下,EF 查找与数据库上下文类同名的数据库连接串。你现在添加的链接串将会导致在 App_Data 文件夹中创建名为 School.sdf 的 SQL Server Compact 数据库文件。
实际上你不需要创建连接字符串,如果你不指定字符串,EF会自动给你创建一个。因此数据库就不再app项目下的App_data folder文件中。想知道数据库是创建在那里的请阅读 Code First to a New Database. connectionStrings集合包含一个默认的连接字符串DefaultConnection作为关联数据库的串。本例子中不需要用成员数据库,两个连串的区别仅仅是字符串的name和name对应的值。
设置执行Code First Migration
当我们开始开发应用程序的时候,需要频繁的更新data model中的实体,每一次的更新,模型中的字段就和数据库中的字段不一致了,所以我们需要配置,让程序自动的删除和重新创建数据库。前期开发中我们用的都是测试数据,这样做不会存在什么问题,当产品发布,部署以后,你只是希望更新数据库,而不是删除重建。Migrations 特点就是确保代码优先来更新数据库而不是删除重建。起初的开发环境中,当模型改变的时候,你需要使用 DropCreateDatabaseIfModelChanges 来删除,重建和补充数据库。当你觉得部署程序后,你就可以转换成migrations方法。更多详情请参见:Code First Migrations 和Migrations Screencast Series.
开启Enable Code First Migrations
从Tools 菜单, 点击Library Package Manager 然后双击打开 Package Manager Console.

在PM> prompt enter the following command:
输入
enable-migrations -contexttypename SchoolContext

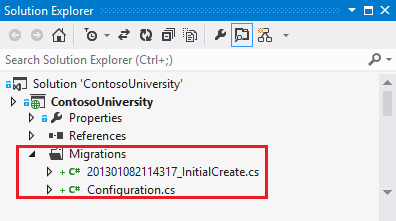
这个命令就会在ContosoUniversity项目中创建一个Migrations文件夹,并且增加一个Configuration.cs 文件。

Configuration这个类中包含一个Seed方法,每次当模型变动或者创建数据库的时候就会被调用。
internal sealed class Configuration : DbMigrationsConfiguration<ContosoUniversity.Models.SchoolContext>
{
    public Configuration()
    {
        AutomaticMigrationsEnabled = false;
    }

    protected override void Seed(ContosoUniversity.Models.SchoolContext context)
    {
        //  This method will be called after migrating to the latest version.

        //  You can use the DbSet<T>.AddOrUpdate() helper extension method
        //  to avoid creating duplicate seed data. E.g.
        //
        //    context.People.AddOrUpdate(
        //      p => p.FullName,
        //      new Person { FullName = "Andrew Peters" },
        //      new Person { FullName = "Brice Lambson" },
        //      new Person { FullName = "Rowan Miller" }
        //    );
        //
    }
}
Seed的目的就是 Code First创建或者更新的时候插入测试数据。
设置 Seed 方法
当 Code First Migrations创建或者更新数据库的时候,seed会运行,目的就是确保在你从数据库读取数据之前插入测试数据。
Code First早期版本中,Migrations 还没发布之前,Seed被用来插入测试数据。因为当模型改变的时候,数据库会被完全删除重建。有了Code First Migrations,数据库改变,测试数据会被保留。所有Seed方法中没必要包含测试数据了。
事实上如果你使用Migrations来部署产品的数据库,你不希望seed来插入测试数据,因为seed方法会在产品中运行。除非你希望seed方法来向数据库中插入一些你期望插入的数据,比如默认数据。比如,你想在数据库中的部门表里面插入真实的有用的部门名称。
本教材中使用migrations来部署,但是你的seed方法中还需要插入测试数据来使你的程序看起来更清晰。
1、替换Configuration.cs文件中的代码如下:
namespace ContosoUniversity.Migrations
{
   using System;
   using System.Collections.Generic;
   using System.Data.Entity.Migrations;
   using System.Linq;
   using ContosoUniversity.Models;

   internal sealed class Configuration : DbMigrationsConfiguration<ContosoUniversity.DAL.SchoolContext>
   {
      public Configuration()
      {
         AutomaticMigrationsEnabled = false;
      }

      protected override void Seed(ContosoUniversity.DAL.SchoolContext context)
      {
         var students = new List<Student>
            {
                new Student { FirstMidName = "Carson",   LastName = "Alexander",
                    EnrollmentDate = DateTime.Parse("2010-09-01") },
                new Student { FirstMidName = "Meredith", LastName = "Alonso",
                    EnrollmentDate = DateTime.Parse("2012-09-01") },
                new Student { FirstMidName = "Arturo",   LastName = "Anand",
                    EnrollmentDate = DateTime.Parse("2013-09-01") },
                new Student { FirstMidName = "Gytis",    LastName = "Barzdukas",
                    EnrollmentDate = DateTime.Parse("2012-09-01") },
                new Student { FirstMidName = "Yan",      LastName = "Li",
                    EnrollmentDate = DateTime.Parse("2012-09-01") },
                new Student { FirstMidName = "Peggy",    LastName = "Justice",
                    EnrollmentDate = DateTime.Parse("2011-09-01") },
                new Student { FirstMidName = "Laura",    LastName = "Norman",
                    EnrollmentDate = DateTime.Parse("2013-09-01") },
                new Student { FirstMidName = "Nino",     LastName = "Olivetto",
                    EnrollmentDate = DateTime.Parse("2005-08-11") }
            };
         students.ForEach(s => context.Students.AddOrUpdate(p => p.LastName, s));
         context.SaveChanges();

         var courses = new List<Course>
            {
                new Course {CourseID = 1050, Title = "Chemistry",      Credits = 3, },
                new Course {CourseID = 4022, Title = "Microeconomics", Credits = 3, },
                new Course {CourseID = 4041, Title = "Macroeconomics", Credits = 3, },
                new Course {CourseID = 1045, Title = "Calculus",       Credits = 4, },
                new Course {CourseID = 3141, Title = "Trigonometry",   Credits = 4, },
                new Course {CourseID = 2021, Title = "Composition",    Credits = 3, },
                new Course {CourseID = 2042, Title = "Literature",     Credits = 4, }
            };
         courses.ForEach(s => context.Courses.AddOrUpdate(p => p.Title, s));
         context.SaveChanges();

         var enrollments = new List<Enrollment>
            {
                new Enrollment {
                    StudentID = students.Single(s => s.LastName == "Alexander").StudentID,
                    CourseID = courses.Single(c => c.Title == "Chemistry" ).CourseID,
                    Grade = Grade.A
                },
                 new Enrollment {
                    StudentID = students.Single(s => s.LastName == "Alexander").StudentID,
                    CourseID = courses.Single(c => c.Title == "Microeconomics" ).CourseID,
                    Grade = Grade.C
                 },
                 new Enrollment {
                    StudentID = students.Single(s => s.LastName == "Alexander").StudentID,
                    CourseID = courses.Single(c => c.Title == "Macroeconomics" ).CourseID,
                    Grade = Grade.B
                 },
                 new Enrollment {
                     StudentID = students.Single(s => s.LastName == "Alonso").StudentID,
                    CourseID = courses.Single(c => c.Title == "Calculus" ).CourseID,
                    Grade = Grade.B
                 },
                 new Enrollment {
                     StudentID = students.Single(s => s.LastName == "Alonso").StudentID,
                    CourseID = courses.Single(c => c.Title == "Trigonometry" ).CourseID,
                    Grade = Grade.B
                 },
                 new Enrollment {
                    StudentID = students.Single(s => s.LastName == "Alonso").StudentID,
                    CourseID = courses.Single(c => c.Title == "Composition" ).CourseID,
                    Grade = Grade.B
                 },
                 new Enrollment {
                    StudentID = students.Single(s => s.LastName == "Anand").StudentID,
                    CourseID = courses.Single(c => c.Title == "Chemistry" ).CourseID
                 },
                 new Enrollment {
                    StudentID = students.Single(s => s.LastName == "Anand").StudentID,
                    CourseID = courses.Single(c => c.Title == "Microeconomics").CourseID,
                    Grade = Grade.B
                 },
                new Enrollment {
                    StudentID = students.Single(s => s.LastName == "Barzdukas").StudentID,
                    CourseID = courses.Single(c => c.Title == "Chemistry").CourseID,
                    Grade = Grade.B
                 },
                 new Enrollment {
                    StudentID = students.Single(s => s.LastName == "Li").StudentID,
                    CourseID = courses.Single(c => c.Title == "Composition").CourseID,
                    Grade = Grade.B
                 },
                 new Enrollment {
                    StudentID = students.Single(s => s.LastName == "Justice").StudentID,
                    CourseID = courses.Single(c => c.Title == "Literature").CourseID,
                    Grade = Grade.B
                 }
            };

         foreach (Enrollment e in enrollments)
         {
            var enrollmentInDataBase = context.Enrollments.Where(
                s =>
                     s.Student.StudentID == e.StudentID &&
                     s.Course.CourseID == e.CourseID).SingleOrDefault();
            if (enrollmentInDataBase == null)
            {
               context.Enrollments.Add(e);
            }
         }
         context.SaveChanges();
      }
   }
}
Seed 方法把数据库context对象转换为输入参数,在这个方法中通过这个对象把实体插入数据库中。对于每一个实体类型,代码都会创建一个新的实体集合,然后把他们添加到对应的DbSet属性中。然后保存到数据库中。并不是每一个实体都需要调用SaveChanges方法,这里这么做,主要是来定位错误。
有些地方声明使用 AddOrUpdate 方法来插入数据,表示更新。
因为Seed在每一次 migration的时候都会执行,你不仅仅是执行插入数据,因为有些数据在你第一次migration创建数据库的时候就已经插入了,"upsert"操作就阻止了当你执行插入数据使该数据已经存在所抛出的错误,但是它重写了很多改变方法,你可能需要做一些测试。
测试数据的时候你可能不想看到这样的事情发生:在某些情况下当你改变数据在测试数据库后,您希望您的更改保持更新。在这种情况下你想做一个有条件的插入操作:如果数据不存在,才插入。Seed方法包含了这两种方式。
AddOrUpdate的第一个参数表示指定你需要判断数据是否存在的字段。在你做的测试student表的数据中,LastName属性就是来作为第一个参数的,来判断这个值是不是已经存在。因为LastName是唯一的不可重复的。
context.Students.AddOrUpdate(p => p.LastName, s)
这行代码表示LastName是唯一的。如果你手动插入一条重复的LastName的学生信息,下一次你migration的时候就会看到下面的错误:
Sequence contains more than one element
关于AddOrUpdate方法的更多信息,请参考: Take care with EF 4.3 AddOrUpdate Method。
代码中Enrollment实体没有使用AddOrUpdate方法。它判断了该实体是否已经存在,不存在则插入。foreach方法循环判断Enrollment表,如果enrollment不存在,则插入到数据库中。第一次更新的时候这些信息就会被添加到数据库中。
foreach (Enrollment e in enrollments)
{
    var enrollmentInDataBase = context.Enrollments.Where(
        s => s.Student.StudentID == e.Student.StudentID &&
             s.Course.CourseID == e.Course.CourseID).SingleOrDefault();
    if (enrollmentInDataBase == null)
    {
        context.Enrollments.Add(e);
    }
}
如何调试Seed方式参考: Seeding and Debugging Entity Framework (EF) DBs。
生成项目:
创建执行第一次Migration
在Package Manager Console窗口中输入以下命令:
add-migration InitialCreate
update-database
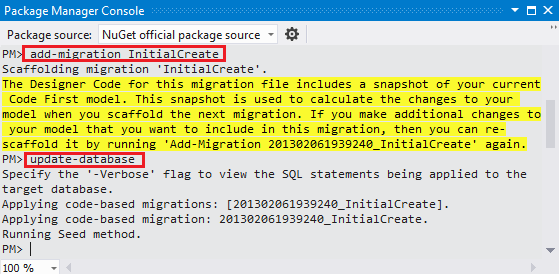
add-migration命令会在Migrations文件夹中增加一个InitialCreate.cs文件,文件包含了创建数据库的代码。命令中第一个参数 (InitialCreate)可以自己随意指定。
InitialCreate类中的 Up 方法,用来创建数据库来和模型中的实体集保持一致。Down方法用来删除操作。Migrations 调用up方法去执行数据模型的改变,调用 Down方法来回滚更新。
InitialCreate file:
namespace ContosoUniversity.Migrations
{
    using System;
    using System.Data.Entity.Migrations;

    public partial class InitialCreate : DbMigration
    {
        public override void Up()
        {
            CreateTable(
                "dbo.Student",
                c => new
                    {
                        StudentID = c.Int(nullable: false, identity: true),
                        LastName = c.String(),
                        FirstMidName = c.String(),
                        EnrollmentDate = c.DateTime(nullable: false),
                    })
                .PrimaryKey(t => t.StudentID);

            CreateTable(
                "dbo.Enrollment",
                c => new
                    {
                        EnrollmentID = c.Int(nullable: false, identity: true),
                        CourseID = c.Int(nullable: false),
                        StudentID = c.Int(nullable: false),
                        Grade = c.Int(),
                    })
                .PrimaryKey(t => t.EnrollmentID)
                .ForeignKey("dbo.Course", t => t.CourseID, cascadeDelete: true)
                .ForeignKey("dbo.Student", t => t.StudentID, cascadeDelete: true)
                .Index(t => t.CourseID)
                .Index(t => t.StudentID);

            CreateTable(
                "dbo.Course",
                c => new
                    {
                        CourseID = c.Int(nullable: false),
                        Title = c.String(),
                        Credits = c.Int(nullable: false),
                    })
                .PrimaryKey(t => t.CourseID);

        }

        public override void Down()
        {
            DropIndex("dbo.Enrollment", new[] { "StudentID" });
            DropIndex("dbo.Enrollment", new[] { "CourseID" });
            DropForeignKey("dbo.Enrollment", "StudentID", "dbo.Student");
            DropForeignKey("dbo.Enrollment", "CourseID", "dbo.Course");
            DropTable("dbo.Course");
            DropTable("dbo.Enrollment");
            DropTable("dbo.Student");
        }
    }
}
update-database命令来调用Up方法来创建数据库,然后调用seed方法来构建(初始化)数据库。
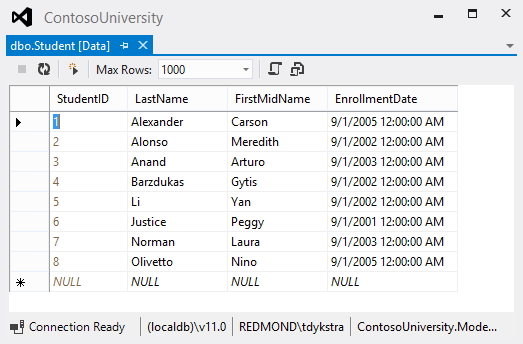
此时sqlserver中已经创建了和模型一致的数据库,数据库名字是:ContosoUniversity。 .mdf文件在你的项目中 App_Data文件夹下,因为这些都是你在连接字符串中指定的。
在Visual Studio中你可以使用 Server Explorer或者Explorer (SSOX)来查看数据库。在In Visual Studio Express 2012中,Server Explorer 被叫做 Database Explorer.
-
点击 View 按钮, 打开Server Explorer.
-
点击 Add Connection 图标.

3.如果弹出选择数据库对话框,选择Microsoft SQL Server 点击continue。

4.在Add Connection 对话框, 输入(localdb)v11.0 作为 Server Name. 在Select or enter a database name, 选择ContosoUniversity.

5点击OK。
6.展开  SchoolContext 展开 Tables.


7.右击 Student 表 点击 Show Table Data  就可以看到表的里面的数据。


1、创建一个Student控制器和视图
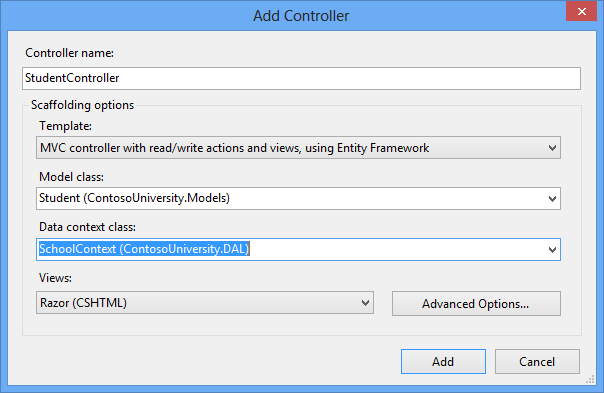
To create a Student controller, right-click the Controllers folder in Solution Explorer, select Add, and then click Controller. In the Add Controller dialog box, make the following selections and then click Add:
-
Controller name: StudentController.
-
Template: MVC controller with read/write actions and views, using Entity Framework.
-
Model class: Student (ContosoUniversity.Models). (If you don't see this option in the drop-down list, build the project and try again.)
-
Data context class: SchoolContext (ContosoUniversity.Models).
-
Views: Razor (CSHTML). (The default.)
2、Visual Studio opens the ControllersStudentController.cs file. You see a class variable has been created that instantiates a database context object:

实例化数据库上下文:
private SchoolContext db = new SchoolContext();
获取Student实例化数据:
The Index action method gets a list of students from the Students entity set by reading the Students property of the database context instance:
public ViewResult Index()
{
    return View(db.Students.ToList());
}
修改StudentIndex.cshtml视图:
<table>
    <tr>
        <th>
            @Html.DisplayNameFor(model => model.LastName)
        </th>
        <th>
            @Html.DisplayNameFor(model => model.FirstMidName)
        </th>
        <th>
            @Html.DisplayNameFor(model => model.EnrollmentDate)
        </th>
        <th></th>
    </tr>

@foreach (var item in Model) {
    <tr>
        <td>
            @Html.DisplayFor(modelItem => item.LastName)
        </td>
        <td>
            @Html.DisplayFor(modelItem => item.FirstMidName)
        </td>
        <td>
            @Html.DisplayFor(modelItem => item.EnrollmentDate)
        </td>
        <td>
            @Html.ActionLink("Edit", "Edit", new { id=item.StudentID }) |
            @Html.ActionLink("Details", "Details", new { id=item.StudentID }) |
            @Html.ActionLink("Delete", "Delete", new { id=item.StudentID })
        </td>
    </tr>
}
按快捷键CTRL+F5运行项目:

Conventions约定
The amount of code you had to write in order for the Entity Framework to be able to create a complete database for you is minimal because of the use of conventions, or assumptions that the Entity Framework makes. Some of them have already been noted:
- The pluralized forms of entity class names are used as table names.
- Entity property names are used for column names.
- Entity properties that are named
IDor classnameIDare recognized as primary key properties.
You've seen that conventions can be overridden (for example, you specified that table names shouldn't be pluralized), and you'll learn more about conventions and how to override them in the Creating a More Complex Data Model tutorial later in this series. For more information, see Code First Conventions.
Summary
You've now created a simple application that uses the Entity Framework and SQL Server Express to store and display data. In the following tutorial you'll learn how to perform basic CRUD (create, read, update, delete) operations. You can leave feedback at the bottom of this page. Please let us know how you liked this portion of the tutorial and how we could improve it.
Links to other Entity Framework resources can be found in the ASP.NET Data Access Content Map.
Recommended content
-
Tutorial: Implement CRUD Functionality with the Entity Framework in ASP.NET MVC
Review and customize the create, read, update, delete (CRUD) code that the MVC scaffolding automatically creates in controllers and views.
-
ASP.NET MVC 4 Entity Framework Scaffolding and Migrations
If you are familiar with ASP.NET MVC 4 controller methods, or have completed the "Helpers, Forms and Validation" Hands-On lab, you should be aware...
-
Tutorial: Get Started with Entity Framework 6 Code First using MVC 5
In this series of tutorials, you learn how to build an ASP.NET MVC 5 application that uses Entity Framework 6 for data access.
-
Tutorial: Get started with EF Database First using MVC 5
This tutorial shows how to start with an existing database and quickly create a web application that enables users to interact with the data.