通过制作一个登录小案例来搭建MVC简单三层

在View --Shared下创建一个母版页:


<!DOCTYPE html>
<html>
<head>
<meta name="viewport" content="width=device-width" />
<script src="~/Scripts/jquery-1.10.2.min.js"></script>
<script src="~/Scripts/jquery.validate.min.js"></script>
<script src="~/Scripts/jquery.validate.unobtrusive.min.js"></script>
<link href="~/Content/LogIn.css" rel="stylesheet" />
<style type="text/css">
* {
margin: 0;
padding: 0;
}
.nav {
border: 2px solid border-right:none;
overflow: hidden;
float: center;
}
.nav ul li {
float: left;
130px;
height: 20px;
}
.nav ul li a {
150px;
height: 30px;
text-align: center;
line-height: 28px;
display: block;
border-right: 2px solid #FFFFFF;
color: #FFF;
150px;
font-weight: bold;
}
.nav ul li a:hover {
font-weight: bold;
color: #FFFFFF;
}
.nav ul li ul {
position: absolute;
display: none;
}
.nav ul li ul li {
float: none;
}
.nav ul li ul li a {
150px;
height: 40px;
border-right: none;
border-top: 1px dotted #FFFFFF;
background: #cc6698;
}
.nav ul li:hover ul {
display: block;
}
.barStyle {
color: #FFFFFF;
font-weight: bold;
}
.style1 {
text-align: center;
font-family: "Meiryo UI";
font-size: x-large;
}
</style>
<title>@ViewBag.Title</title>
</head>
<body>
<div id="header" style="background: #a6154c; 100%; height: 80px">
<p style="color: #ffffff; padding: 23px" class="style1">
<strong>User Management System</strong>
</p>
</div>
@if (Request.IsAuthenticated) <span style="color:#ff6600;"> //如果登陆成功</span>
{
<center>
<div class="nav" style="background: #a6154c; 100%; height: 30px">
<ul>
<li>@Html.ActionLink("Home", "Index", "Home")</li> //主页
<li>@Html.ActionLink("Log Out", "LogOut", "Account")</li> //导航栏添加一个 log Out 选项
</ul>
</div>
<div><span>Current ID: @Context.User.Identity.Name</span> </div> <span style="color:#ff6600;">//获取当前登录用户</span>
</center>
}
else <span style="color:#ff6600;">// 未登录状态</span>
{
<center>
<div class="nav" style="background: #a6154c; 100%; height: 30px">
<ul>
<li>@Html.ActionLink("Home", "Index", "Home")</li> //主页
<li>@Html.ActionLink("Log In", "login", "Account")</li> //登陆选项
</ul>
</div>
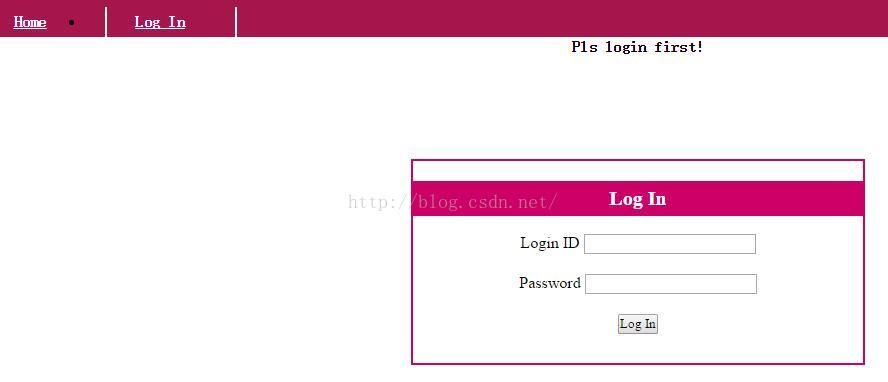
<b>Pls login first!</b> //提示需要先登录
</center>
}
<div>
@RenderBody()
</div>
</body>
</html>
注意:需要使用Request.IsAuthenticated身份验证,记得在Web.config下添加如下代码
<authentication mode="Forms">
      <forms loginUrl="~/Account/Login" protection="All" timeout="60" path="/" />
</authentication>
接下来是控制器:AccountController.cs
public class AccountController : Controller
    {
        // GET: Account
        public ActionResult Index()
        {
            return View();
        }

        public ActionResult Login()
        {
            return View();
        }

        [HttpPost]
        public ActionResult Login(AccountEntity account)
        {
            if (new Bll.AccountManageBll().LoginCheck(account))
            {
                FormsAuthentication.SetAuthCookie(account.LogID, true);
                return RedirectToAction("Index", "Home");
            }
            else
            {
                ViewBag.msg = "LogID or Password error.";
                return View();
            }
        }

        public ActionResult LogOut()
        {
            FormsAuthentication.SignOut();
            return RedirectToAction("Index","Home");
        }
    }
视图:View--Account--Login.cshtml
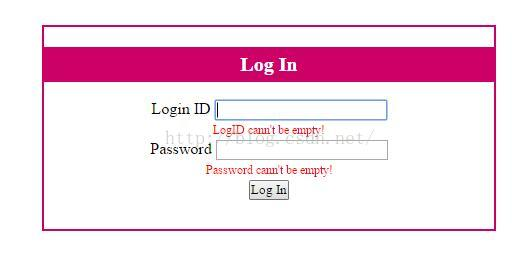
@using Model
@model AccountEntity
@{
    ViewBag.Title = "Login";
    Layout = "~/Views/Shared/_LoginPartial.cshtml";
}

<br />
<br />
<br />
@using (Html.BeginForm("Login", "Account", FormMethod.Post))
{
    <div class="full">
        <div class="box">
            <div class="title">
                <span class="titlespan"><b>Log In</b></span>
            </div>
            <br />
            <div class="ID">
                <div><span>Login ID  </span> @Html.TextBoxFor(u => u.LogID)</div>
                <div>@Html.ValidationMessageFor(u => u.LogID, "", new { style = "color:#F00;font-size:10px" })</div>
            </div>
            <div class="password">
                <div><span>Password  </span>@Html.PasswordFor(u => u.Password)</div>
                <div>@Html.ValidationMessageFor(u => u.Password, "", new { style = "color:#F00;font-size:10px" })</div> <span style="color:#ff6600;"> //校验不能为空</span>
            </div>
            <div class="btnLogin">
                <input type="Submit" name="Submit" value="Log In">
            </div>
        </div>
    </div>
        <div class="full">
            <br />
            <span style="color:#F00;font-size:12px;font-weight:bold">@ViewBag.msg</span><br />
        </div>
}
Model层新建一个AccountEntity实体模型
public class AccountEntity
{
    [Required(ErrorMessage ="LogID cann't be empty!")] //Required 验证
    public string LogID { get; set; }

    [Required(ErrorMessage = "Password cann't be empty!")]   //Required 验证
    public string Password { get; set; }

    public AccountEntity() { } //无参构造函数
    public AccountEntity(string ID,string Pwd)  //有参构造函数 为了测试数据
    {
        LogID = ID;
        Password = Pwd;
    }
}
【DAL】数据访问层AccountServiceDal.cs
【使用数据库才需要使用,本实例测试数据在BLL层】
/// <summary>
/// 获取用户信息
/// </summary>
/// <returns></returns>
public List<AccountEntity> GetAccountInfo()
{
    string sqlStr = @"ProcSelAccount";  //存储过程名
    List<AccountEntity> accountList = new List<AccountEntity>();

    using (SqlDataReader reader = SqlHelper.ExecReader(sqlStr))   //SqlHelper: SQL帮助类
    {
        while (reader.Read())
        {
            AccountEntity account = BuildSubject(reader);
            accountList.Add(account);
        }
    }
    return accountList;
}

public AccountEntity BuildSubject(SqlDataReader reader)
{
    AccountEntity account = new AccountEntity();
    account.LogID = reader.GetString(0);
    account.Password = reader.GetString(1);
【BLL业务逻辑层】AccountManagerBLL.cs
public bool LoginCheck(AccountEntity account)
{
    bool flag = false;
    // List<AccountEntity> accountList = new AccountServiceDal().GetAccountInfo();   //校验数据库中用户数据,需使用此代码

    <span style="color:#ff0000;">//Test Account Data</span>
    List<AccountEntity> accountList = new List<AccountEntity>()  //增加两条用户数据
    {
        new AccountEntity("Jarvis","ABC123"),
        new AccountEntity("Admin","admin123")
    };

    foreach (AccountEntity accountInfo in accountList)
    {
        if(accountInfo.LogID == account.LogID && accountInfo.Password == account.Password)
        {
            flag = true;
        }
    }
    return flag;
}
登录状态:
验证:
正确登录:

登录成功:
