使用代理工厂实现增强
步骤一:
public class IdoSomeServiceimpl {

    public void Some() {
        System.out.println("真实业务代码");
    }
}
步骤二:
public class Qianzeng implements MethodBeforeAdvice {
    @Override
    public void before(Method method, Object[] objects, Object o) throws Throwable {
        System.out.println("前增强");
    }
}
步骤三:
<?xml version="1.0" encoding="UTF-8"?>
<beans xmlns="http://www.springframework.org/schema/beans"
       xmlns:xsi="http://www.w3.org/2001/XMLSchema-instance"
       xsi:schemaLocation="http://www.springframework.org/schema/beans
       http://www.springframework.org/schema/beans/spring-beans.xsd">


    <!--注入业务-->
    <bean id="idoSomeServiceimpl" class="com.SpringMckz02.proxyFactory.IdoSomeServiceimpl"></bean>
    <!--切面-->
    <bean id="qianzeng" class="com.SpringMckz02.proxyFactory.Qianzeng"></bean>
    <!--使用代理工厂实现增强-->
    <bean id="proxyFactory" class="org.springframework.aop.framework.ProxyFactoryBean">
        <!--将增强和业务织入到一起-->
        <property name="target" ref="idoSomeServiceimpl"></property>
        <!--拦截器-->
        <property name="interceptorNames" value="qianzeng"></property>
    </bean>
</beans>
步骤四:
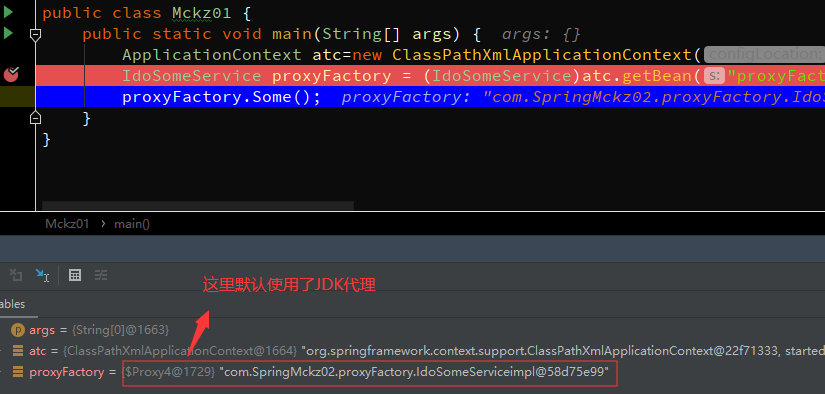
public static void main(String[] args) {
        ApplicationContext atc=new ClassPathXmlApplicationContext("applicationContext.xml");
        IdoSomeService proxyFactory = (IdoSomeService)atc.getBean("proxyFactory");
        proxyFactory.Some();
    }

注意:这里显示默认使用了JDK代理
接下来我们更改他的代理
创建一个接口
public interface IdoSomeService {
    public void Some();
}
让业务类继承这个接口
public class IdoSomeServiceimpl implements IdoSomeService {
    @Override
    public void Some() {
        System.out.println("真实业务代码");
    }
}
修改大配置文件
<?xml version="1.0" encoding="UTF-8"?>
<beans xmlns="http://www.springframework.org/schema/beans"
       xmlns:xsi="http://www.w3.org/2001/XMLSchema-instance"
       xsi:schemaLocation="http://www.springframework.org/schema/beans
       http://www.springframework.org/schema/beans/spring-beans.xsd">


    <!--注入业务-->
    <bean id="idoSomeServiceimpl" class="com.SpringMckz02.proxyFactory.IdoSomeServiceimpl"></bean>
    <!--切面-->
    <bean id="qianzeng" class="com.SpringMckz02.proxyFactory.Qianzeng"></bean>
    <!--使用代理工厂实现增强-->
    <bean id="proxyFactory" class="org.springframework.aop.framework.ProxyFactoryBean">
        <!--将增强和业务织入到一起-->
        <property name="target" ref="idoSomeServiceimpl"></property>
        <!--拦截器-->
        <property name="interceptorNames" value="qianzeng"></property>
        <!--设置动态代理-->
        <property name="proxyTargetClass" value="true"></property>
    </bean>
</beans>

环绕增强
步骤一:
public interface IdoSomeService {
    public void Some();
}
步骤二:
public class IdoSomeServiceimpl implements IdoSomeService {
    @Override
    public void Some() {
        System.out.println("真实业务代码");
    }
}
步骤三:
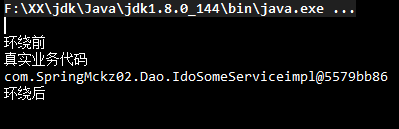
public class MyAroundAdvice implements MethodInterceptor {
    @Override
    public Object invoke(MethodInvocation invocation) throws Throwable {
        System.out.println("环绕前");
        Object proceed = invocation.proceed();
        Object aThis = invocation.getThis();
        System.out.println(aThis);
        System.out.println("环绕后");
        return proceed;
    }
}
步骤四:
<?xml version="1.0" encoding="UTF-8"?>
<beans xmlns="http://www.springframework.org/schema/beans"
       xmlns:xsi="http://www.w3.org/2001/XMLSchema-instance"
       xsi:schemaLocation="http://www.springframework.org/schema/beans
       http://www.springframework.org/schema/beans/spring-beans.xsd">

<!--环绕增强-->
    <!--注入业务-->
    <bean id="idoSomeService" class="com.SpringMckz02.Dao.IdoSomeServiceimpl"></bean>
    <!--切面-->
    <bean id="myAroundAdvice" class="com.SpringMckz02.Dao.MyAroundAdvice"></bean>
    <!--使用代理工厂实现增强-->
    <bean id="proxyFactoryBean" class="org.springframework.aop.framework.ProxyFactoryBean">
        <!--将增强和业务织入到一起-->
        <property name="target" ref="idoSomeService"></property>
        <!--拦截器-->
        <property name="interceptorNames" value="myAroundAdvice"></property>
    </bean>
</beans>
步骤五:
@Test
    public void proxy(){
        ApplicationContext atc=new ClassPathXmlApplicationContext("applicationContext.xml");
        IdoSomeService proxyFactory = (IdoSomeService)atc.getBean("proxyFactoryBean");
        proxyFactory.Some();
    }
异常抛出增强
步骤一:
public interface IdoSomeYichang {
    public void Some();
}
步骤二:(这里写了个异常)
public class IdoSomeYichangimpl implements IdoSomeYichang{
    @Override
    public void Some() {
        int sum=5/0;
        System.out.println("真实业务代码");

    }
}
步骤三:
public class Yichangimpl implements ThrowsAdvice {
    public void afterThrowing(Exception e){
        System.out.println("发生了异常,执行增强操作");
    }
}
步骤四:
<?xml version="1.0" encoding="UTF-8"?>
<beans xmlns="http://www.springframework.org/schema/beans"
       xmlns:xsi="http://www.w3.org/2001/XMLSchema-instance"
       xsi:schemaLocation="http://www.springframework.org/schema/beans
       http://www.springframework.org/schema/beans/spring-beans.xsd">
<!--异常增强-->
    <!--注入业务-->
    <bean id="idoSomeService" class="com.SpringMckz02.Yichangzengqiang.IdoSomeYichangimpl"></bean>
    <!--切面-->
    <bean id="yichangimpl" class="com.SpringMckz02.Yichangzengqiang.Yichangimpl"></bean>
    <!--使用代理工厂实现增强-->
    <bean id="proxyFactoryBean" class="org.springframework.aop.framework.ProxyFactoryBean">
        <!--将增强和业务织入到一起-->
        <property name="target" ref="idoSomeService"></property>
        <!--拦截器-->
        <property name="interceptorNames" value="yichangimpl"></property>
    </bean>
</beans>
第五步:
@Test
    public void proxys(){
        ApplicationContext atc=new ClassPathXmlApplicationContext("applicationContext.xml");
        IdoSomeYichang proxyFactory = (IdoSomeYichang)atc.getBean("proxyFactoryBean");
        proxyFactory.Some();
    }
