Spring是一个基于IOC和AOP的结构J2EE系统的框架
IOC 反转控制 是Spring的基础,Inversion Of Control
简单说就是创建对象由以前的程序员自己new 构造方法来调用,变成了交由Spring创建对象
DI 依赖注入 Dependency Inject. 简单地说就是拿到的对象的属性,已经被注入好相关值了,直接使用即可。
1.XML配置:
约束文档
PS xsd文件在jar包中,不必担心断网而无法使用的问题
<?xml version="1.0" encoding="UTF-8"?>
<beans xmlns="http://www.springframework.org/schema/beans"
    xmlns:xsi="http://www.w3.org/2001/XMLSchema-instance"
    xmlns:aop="http://www.springframework.org/schema/aop"
    xmlns:tx="http://www.springframework.org/schema/tx"
    xmlns:context="http://www.springframework.org/schema/context"
    xsi:schemaLocation="
   http://www.springframework.org/schema/beans
   http://www.springframework.org/schema/beans/spring-beans-3.0.xsd
   http://www.springframework.org/schema/aop
   http://www.springframework.org/schema/aop/spring-aop-3.0.xsd
   http://www.springframework.org/schema/tx
   http://www.springframework.org/schema/tx/spring-tx-3.0.xsd
   http://www.springframework.org/schema/context
   http://www.springframework.org/schema/context/spring-context-3.0.xsd">
</beans>
2.实体类注入:
(1)set方式:
<!-- scope="singleton" 单例模式 -->
    <bean name="c" class="pojo.Category" scope="singleton">
    <!-- set方式注入 -->
    <!-- 注入属性 name:成员变量名 value:值 -->
        <property name="name" value="categoryFirst" />
    </bean>
    <bean name="p" class="pojo.Product">
        <property name="name" value="product 1" />
        <!-- 属性值为对象时 注入一个对象  -->
        <property name="category"  ref="c" />
    </bean>
(2)构造器方式:
 <bean name="car" class="pojo.Car">
    <!-- 构造器注入 name:属性名 value:值 index:参数下标 type:数值类型 -->
    <constructor-arg name="name" value="奔驰" index="0"></constructor-arg>
    <constructor-arg name="color" value="银色" index="1"></constructor-arg>
    <constructor-arg name="wheels" value="4" index="2" type="java.lang.Integer"></constructor-arg>
 </bean>
(3)复杂类型注入:
    <!-- 复杂类型注入 -->
    <bean name="demo" class="pojo.Demo">
        <property name="arr">
            <array>
                <value>1</value>
                <ref bean="car"/>
            </array>
        </property>
        <property name="list">
            <list>
                <value>2</value>
                <ref bean="c"/>
            </list>
        </property>
        <property name="map">
            <map>
                <entry key="一号" value="1"></entry>
                <entry key="二号" value-ref="car"></entry>
                <entry key-ref="car" value-ref="car"></entry>
            </map>
        </property>
        <property name="pro">
            <props>
                <prop key="driver">com.mysql.jdbc.Driver</prop>
                <prop key="user">root</prop>
                <prop key="pwd">123456</prop>
            </props>
        </property>
    </bean>
3.注解方式:
(1)注解方式注入对象:
添加:<context:annotation-config/>,表示告诉Spring要用注解的方式进行配置
原来的<property name="category" ref="c" />去掉
<context:annotation-config/>
<bean name="c" class="pojo.Category" scope="singleton">
       <property name="name" value="categoryFirst" />
</bean>
<bean name="p" class="pojo.Product">
       <property name="name" value="product 1" />
</bean>
两种方式:Autowired/Resource,任选其一
Autowired可在set方法上进行注解,如果有多个对象,则@Qualifier(value = "plane")指定对象名
@Resource(name="")可以指定对象名
@Autowired
@Resource(name="c")
private Category category;
(2)注解为bean类:
XML内只添加
<context:component-scan base-package="pojo"/>
<?xml version="1.0" encoding="UTF-8"?>
<beans xmlns="http://www.springframework.org/schema/beans"
    xmlns:xsi="http://www.w3.org/2001/XMLSchema-instance" xmlns:aop="http://www.springframework.org/schema/aop"
    xmlns:tx="http://www.springframework.org/schema/tx" xmlns:context="http://www.springframework.org/schema/context"
    xsi:schemaLocation="
   http://www.springframework.org/schema/beans
   http://www.springframework.org/schema/beans/spring-beans-3.0.xsd
   http://www.springframework.org/schema/aop
   http://www.springframework.org/schema/aop/spring-aop-3.0.xsd
   http://www.springframework.org/schema/tx
   http://www.springframework.org/schema/tx/spring-tx-3.0.xsd
   http://www.springframework.org/schema/context
   http://www.springframework.org/schema/context/spring-context-3.0.xsd">

    <context:component-scan base-package="pojo"/>

</beans>
其作用是告诉Spring,bean都放在pojo这个包下
为Product类加上@Component注解,即表明此类是bean
为Category 类加上@Component注解,即表明此类是bean
@Repository 用于对DAO实现类进行标注(dao层)
@Service 用于对Service实现类进行标注(service层)
@Controller 用于对Controller实现类进行标注(web层)
public class Car {
    private String name;
    private String color;
    private Integer wheels;
    public Car() {
        super();
    }
    public Car(String name, String color, Integer wheels) {
        super();
        this.name = name;
        this.color = color;
        this.wheels = wheels;
    }
    public String getName() {
        return name;
    }
    @Value("奔驰")
    public void setName(String name) {
        this.name = name;
    }
    public String getColor() {
        return color;
    }
    @Value("银色")
    public void setColor(String color) {
        this.color = color;
    }
    public Integer getWheels() {
        return wheels;
    }
    @Value("4")
    public void setWheels(Integer wheels) {
        this.wheels = wheels;
    }
}
4.获取实体类
public class TestSpring {
    public static void main(String[] args) {
        ApplicationContext context = new ClassPathXmlApplicationContext("applicationContext.xml");
        Category c = (Category) context.getBean("c");
        System.out.println(c.getName());
        Product p = (Product)context.getBean("p");
        System.out.println(p.getName());
        System.out.println(p.getCategory().getName());

    }
}
5.AOP
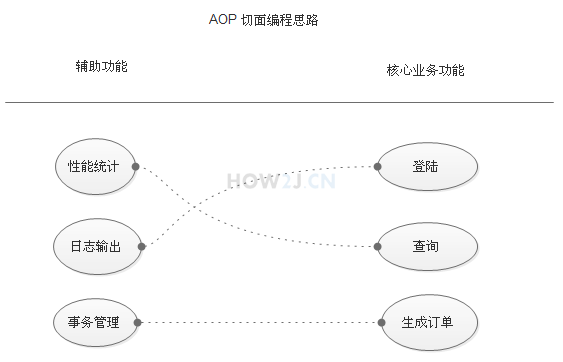
AOP 即 Aspect Oriented Program 面向切面编程
首先,在面向切面编程的思想里面,把功能分为核心业务功能,和周边功能。
(1)所谓的核心业务,比如登陆,增加数据,删除数据都叫核心业务
(2)所谓的周边功能,比如性能统计,日志,事务管理等等
周边功能在Spring的面向切面编程AOP思想里,即被定义为切面
在面向切面编程AOP的思想里面,核心业务功能和切面功能分别独立进行开发
然后把切面功能和核心业务功能 "编织" 在一起,这就叫AOP
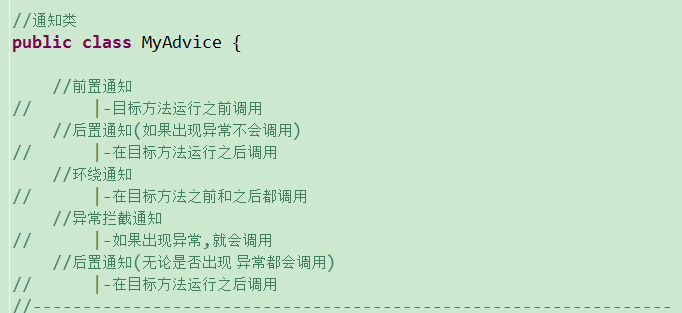
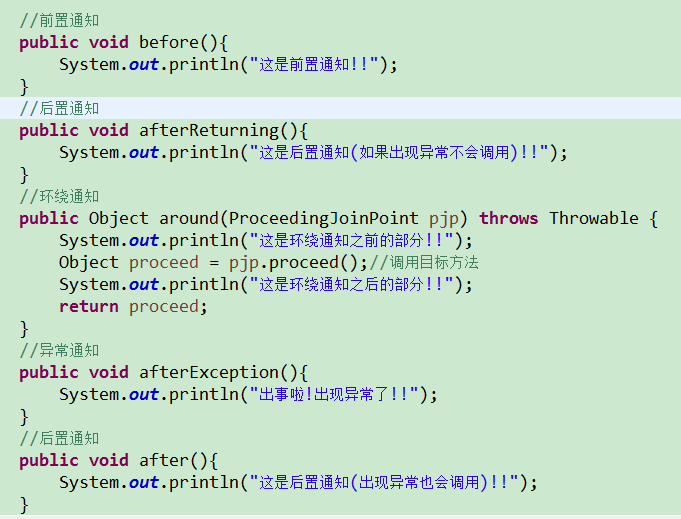
(1)日志辅助功能(日志切面)
public class LoggerAspect {public Object log(ProceedingJoinPoint joinPoint) throws Throwable{//ProceedingJoinPoint 环绕通知
        System.out.println("start log:"+joinPoint.getSignature().getName());
        Object object = joinPoint.proceed();
        System.out.println("end log:"+joinPoint.getSignature().getName());
        return object;
    }
}
除环绕通知外,还有前置通知、后置通知、异常通知
(2)业务类
public class ProductService {
    public void doSomeService() {
        System.out.println("doSomeService");
    }
}
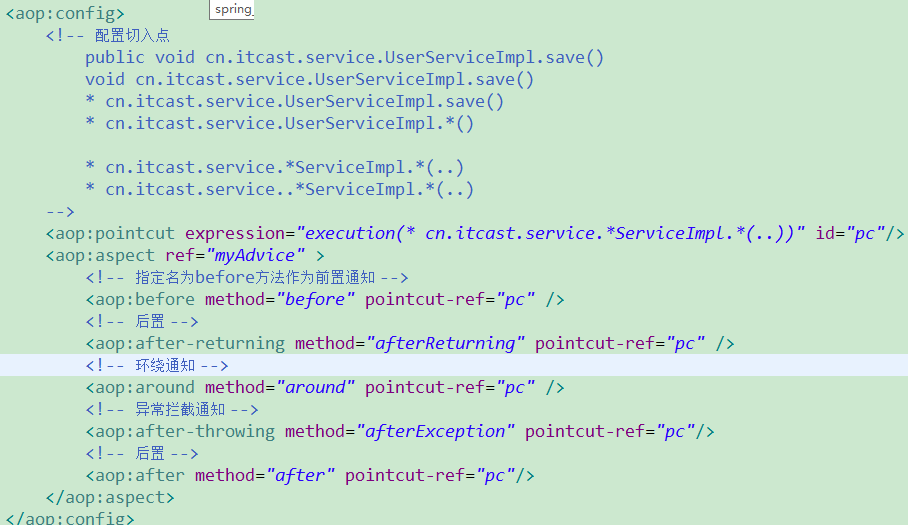
(3)XML配置
    <!--业务对象-->
    <bean name="s" class="service.ProductService"></bean>
    <!--日志切面对象-->
    <bean id="loggerAspect" class="service.LoggerAspect"/>
    <aop:config>
        <!--指定核心业务功能-->
        <aop:pointcut id="loggerCutpoint"
           <!--这表示对满足如下条件的方法调用,进行切面操作:
           * 返回任意类型
           service.ProductService.* 包名以 service.ProductService 开头的类的任意方法
           (..) 参数是任意数量和类型-->
            expression=
            "execution(* service.ProductService.*(..)) "/>
         <!--指定辅助功能-->
        <aop:aspect id="logAspect" ref="loggerAspect">
            <!--将两个功能编制在一起-->
            <aop:around pointcut-ref="loggerCutpoint" method="log"/>
        </aop:aspect>
    </aop:config>