使用SpringBoot提供的@Repository接口,可以完成曾经需要大量代码编写和配置文件定制工作。这些以前让新手程序员头疼,让有经验的程序员引以为傲的配置,由于框架的不断完善,变得不那么重要,同时,也提升了程序员的工作效率。
本文介绍的是如何通过springboot操作MongoDB。
一.先配置pom.xml
<parent>
        <groupId>org.springframework.boot</groupId>
        <artifactId>spring-boot-starter-parent</artifactId>
        <version>1.4.1.RELEASE</version>
        <relativePath /> <!-- lookup parent from repository -->
</parent>

    <dependencies>
        <dependency>
            <groupId>org.springframework.boot</groupId>
            <artifactId>spring-boot-starter-web</artifactId>
        </dependency>
        <dependency>
            <groupId>org.springframework.boot</groupId>
            <artifactId>spring-boot-starter-tomcat</artifactId>
        </dependency>
        <dependency>
            <groupId>org.springframework.boot</groupId>
            <artifactId>spring-boot-starter-data-mongodb</artifactId>
        </dependency>
    </dependencies>
二.在application.properties中配置MongoDB配置
spring.data.mongodb.uri=mongodb://root:root@localhost:27017/test
三.声明entity和repository
@Document(collection = "t_app")
@Data
public class App
{
    @Id
    private ObjectId id;
    @Field("api_key")
    private String apiKey;
    private String appname;
    private List<Object> activities;
}
@Repository
public interface AppRepository extends MongoRepository<App, ObjectId>
{
    App findOneByApiKey(String apiKey);
}
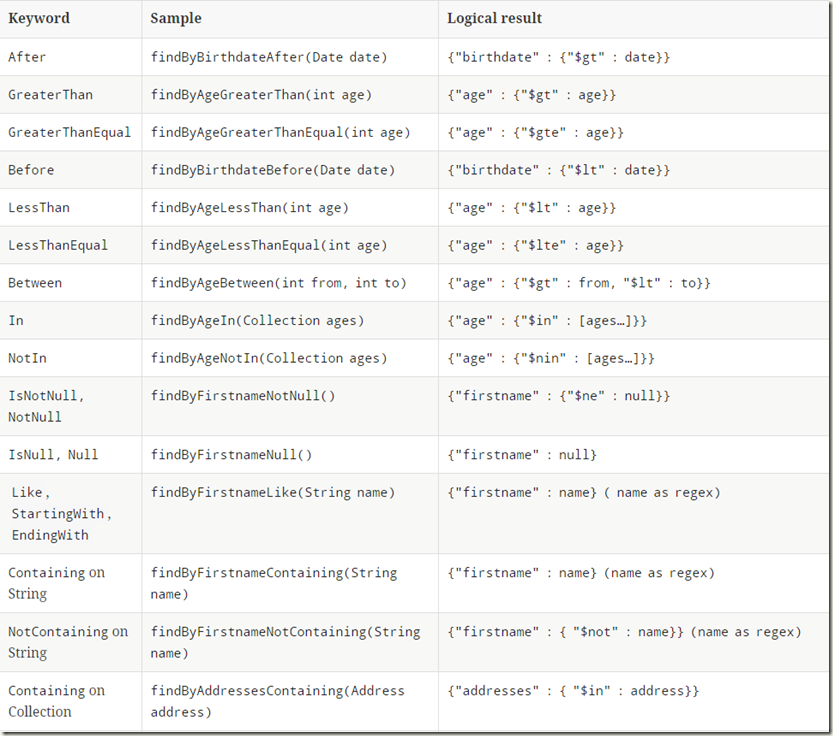
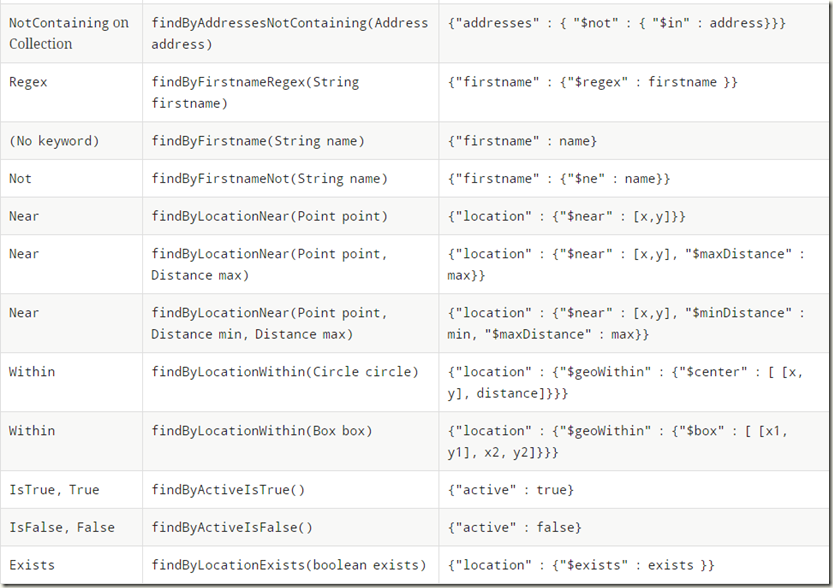
四.支持的Repository
ps:KeyWord可以用and方法连起来。
如:
List<DiscountCode> findFirst5ByActivityIdInAndEndTimeAfterAndStatus(List<ObjectId> activityIds, Date endTime,String status);
五.Repository声明和使用
@Autowired
private AppRepository appRepository;


