Django REST framework is a powerful and flexible toolkit for building Web APIs.
一, Some reasons you might want to use REST framework:
- The Web browsable API is a huge usability win for your developers.
- Authentication policies including packages for OAuth1a and OAuth2.
- Serialization that supports both ORM and non-ORM data sources.
- Customizable all the way down - just use regular function-based views if you don't need the more powerful features.
- Extensive documentation, and great community support.
- Used and trusted by internationally recognised companies including Mozilla, Red Hat, Heroku, and Eventbrite.
二, REST framework requires the following:
- Python (2.7, 3.2, 3.3, 3.4, 3.5, 3.6)
- Django (1.10, 1.11, 2.0 alpha)
三, Installation
3.1 使用 pip 安装
pip install djangorestframework
pip install markdown       # Markdown support for the browsable API.
pip install django-filter  # Filtering support
3.2 或者 clone the project from github.
git clone git@github.com:encode/django-rest-framework.git
3.3 And add 'rest_framework' to your INSTALLED_APPS setting.
# settings.py
INSTALLED_APPS = [
    'django.contrib.admin',
    'django.contrib.auth',
    'django.contrib.contenttypes',
    'django.contrib.sessions',
    'django.contrib.messages',
    'django.contrib.staticfiles',
    ........

    'rest_framework',

]
3.4 If you're intending to use the browsable API you'll probably also want to add REST framework's login and logout views. Add the following to your root urls.py file. (如果您打算使用可浏览的API,您可能还需要添加REST框架的登录和注销视图。 将以下内容添加到您的根urls.py文件中。)
urlpatterns = [
    ...
    url(r'^api-auth/', include('rest_framework.urls', namespace='rest_framework'))
]
3.5 Note that the URL path can be whatever you want, but you must include 'rest_framework.urls' with the 'rest_framework' namespace. You may leave out the namespace in Django 1.9+, and REST framework will set it for you. (请注意,URL路径可以是任何您想要的,但是您必须在“rest_framework”命名空间中包含“rest_framework.urls”。 您可以在Django 1.9+中省略命名空间,REST框架将为您设置。)
四, Example
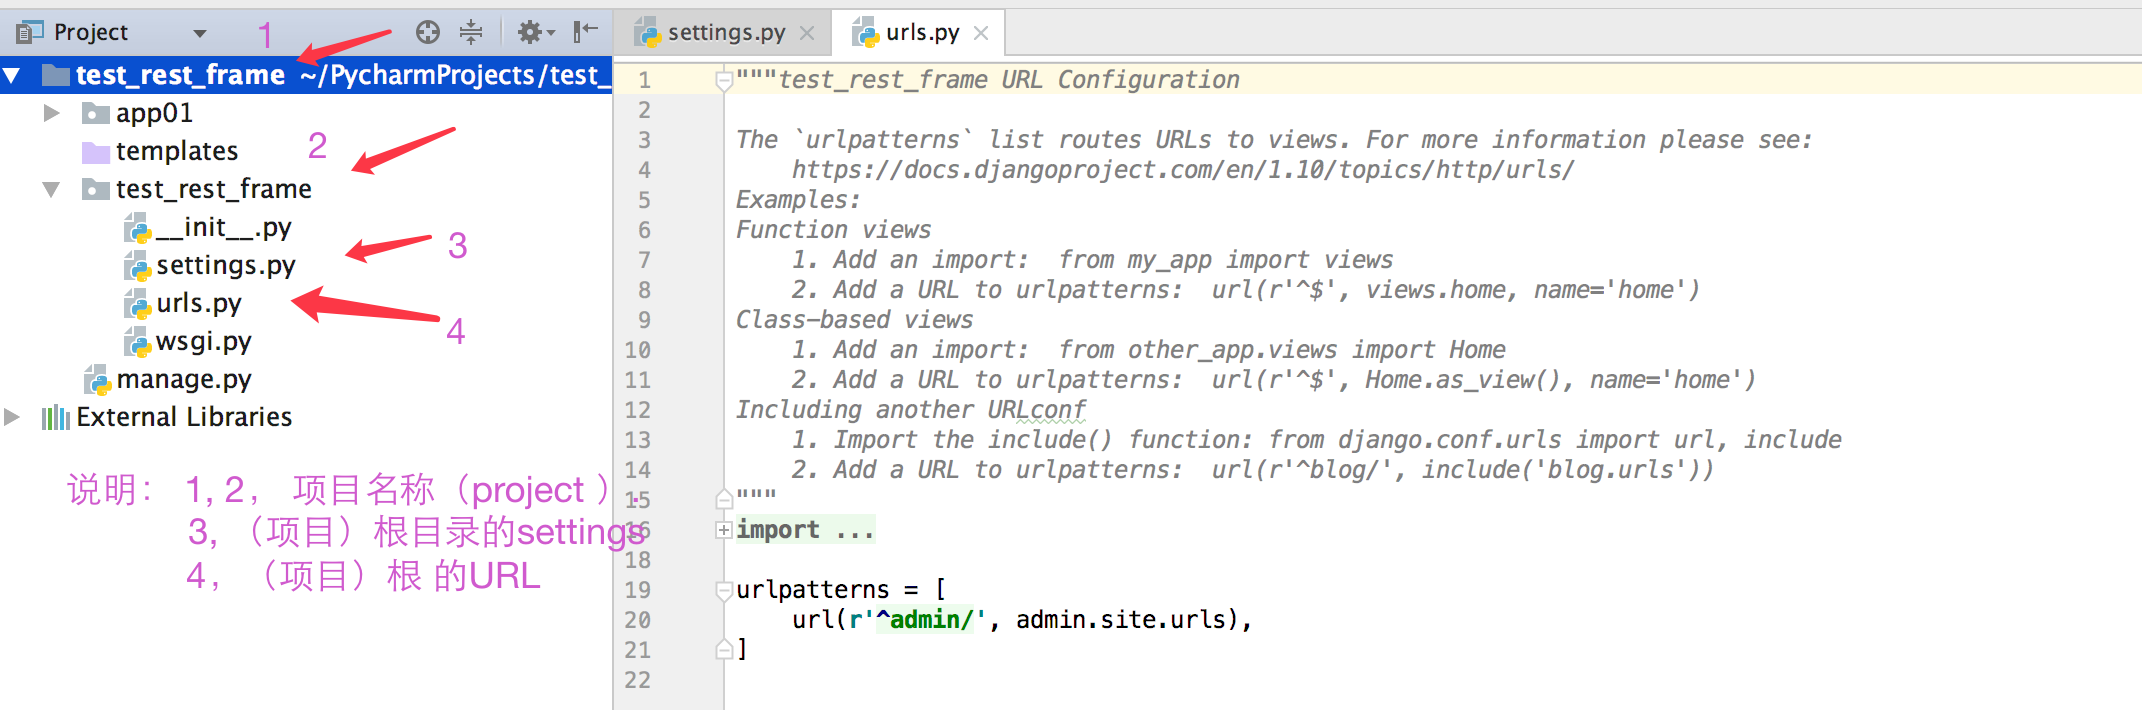
4.1 建立一个新的 Django项目 test_rest_frame
Any global settings for a REST framework API are kept in a single configuration dictionary named REST_FRAMEWORK. Start off by adding the following to your settings.py module:(REST框架API的任何全局设置都保存在名为REST_FRAMEWORK的单个配置字典中。 首先将以下内容添加到settings.py模块中:)
REST_FRAMEWORK = {
    # Use Django's standard `django.contrib.auth` permissions, 权限验证 ,
    # or allow read-only access for unauthenticated users.    对没有权限验证的用户做只读处理
    'DEFAULT_PERMISSION_CLASSES': [
        'rest_framework.permissions.DjangoModelPermissionsOrAnonReadOnly'
    ]
}
注意 !!!! 不过不要忘记下面这个
INSTALLED_APPS = (
    ...
    'rest_framework',
)
4.2 哈哈, 这样是不是就更清晰了

test_rest/settings.py
# Application definition

#  这里添加rest_framework   到  INSTALLED_APPS

INSTALLED_APPS = [
    'django.contrib.admin',
    'django.contrib.auth',
    'django.contrib.contenttypes',
    'django.contrib.sessions',
    'django.contrib.messages',
    'django.contrib.staticfiles',
    'app01.apps.App01Config',   # 这个地方怎么变了, 哈哈, 如果用Django1.9 以下的版本就改为  app01
    "rest_framework",
]
#   这里添加  REST_FRAMEWORK  字典
REST_FRAMEWORK = {
    # Use Django's standard `django.contrib.auth` permissions,
    # or allow read-only access for unauthenticated users.
    'DEFAULT_PERMISSION_CLASSES': [
        'rest_framework.permissions.DjangoModelPermissionsOrAnonReadOnly'
    ]
}
4.3 接下来 就是在URL 中添加内容了
test_rest_frame/url.py
from django.conf.urls import url, include
from django.contrib.auth.models import User
from rest_framework import routers, serializers, viewsets

# Serializers define the API representation.
class UserSerializer(serializers.HyperlinkedModelSerializer):
    class Meta:
        model = User
        fields = ('url', 'username', 'email', 'is_staff')

# ViewSets define the view behavior.
class UserViewSet(viewsets.ModelViewSet):
    queryset = User.objects.all()
    serializer_class = UserSerializer

# Routers provide an easy way of automatically determining the URL conf.
router = routers.DefaultRouter()
router.register(r'users', UserViewSet)

# Wire up our API using automatic URL routing.
# Additionally, we include login URLs for the browsable API.
urlpatterns = [
    url(r'^', include(router.urls)),
    url(r'^api-auth/', include('rest_framework.urls', namespace='rest_framework'))
]
You can now open the API in your browser at http://127.0.0.1:8000/, and view your new 'users' API. If you use the login control in the top right corner you'll also be able to add, create and delete users from the system.(您现在可以在浏览器中打开API, http://127.0.0.1:8000/并查看新的“用户”API。 如果您使用右上角的登录控件,您还可以从系统添加,创建和删除用户。)
4.4 , Creating a model to work with
from django.db import models
# from pygments.lexers import get_all_lexers
# from pygments.styles import get_all_styles

# LEXERS = [item for item in get_all_lexers() if item[1]]
# LANGUAGE_CHOICES = sorted([(item[1][0], item[0]) for item in LEXERS])
# STYLE_CHOICES = sorted((item, item) for item in get_all_styles())
class Article(models.Model):
    """
    文章的简要说明
    """
    title = models.CharField(max_length=100, blank=True, default='', verbose_name="文章标题")
    content = models.TextField(verbose_name="文章内容")
    language_choice = ((0, '中文'), (1, '英文'))
    linenos = models.BooleanField(default=False)
    language = models.CharField(choices=language_choice, default='python', max_length=100, verbose_name="语言")
    style_choice = ((0, '散文'), (1, '诗歌'), (1, '技术博文'))
    style = models.CharField(choices=style_choice, default='friendly', max_length=100)
    created = models.DateTimeField(auto_now_add=True, verbose_name="发表日期")

    class Meta:
        ordering = ('created',)
4.5 , Creating a Serializer class
The first thing we need to get started on our Web API is to provide a way of serializing and deserializing the snippet instances into representations such as json. We can do this by declaring serializers that work very similar to Django's forms. Create a file in the app01 directory named serializers.py and add the following.
下面就是我们自己创建的序列化类
from rest_framework import serializers
from snippets.models import Snippet, LANGUAGE_CHOICES, STYLE_CHOICES


class ArticleSerializer(serializers.Serializer):
    id = serializers.IntegerField(read_only=True)
    title = serializers.CharField(required=False, allow_blank=True, max_length=100)
    content = serializers.CharField(style={'base_template': 'textarea.html'})
    linenos = serializers.BooleanField(required=False)
    language = serializers.ChoiceField(choices=LANGUAGE_CHOICES, default='python')
    style = serializers.ChoiceField(choices=STYLE_CHOICES, default='friendly')

    def create(self, validated_data):
        """
        Create and return a new `Snippet` instance, given the validated data.
        """
        return Snippet.objects.create(**validated_data)

    def update(self, instance, validated_data):
        """
        Update and return an existing `Snippet` instance, given the validated data.
        """
        instance.title = validated_data.get('title', instance.title)
        instance.code = validated_data.get('code', instance.code)
        instance.linenos = validated_data.get('linenos', instance.linenos)
        instance.language = validated_data.get('language', instance.language)
        instance.style = validated_data.get('style', instance.style)
        instance.save()
        return instance
1, The first part of the serializer class defines the fields that get serialized/deserialized. The create() and update() methods define how fully fledged instances are created or modified when calling serializer.save()
2, A serializer class is very similar to a Django Form class, and includes similar validation flags on the various fields, such as required, max_length and default.
3, The field flags can also control how the serializer should be displayed in certain circumstances, such as when rendering to HTML. The {'base_template': 'textarea.html'} flag above is equivalent to using widget=widgets.Textarea on a Django Form class. This is particularly useful for controlling how the browsable API should be displayed, as we'll see later in the tutorial.
4, We can actually also save ourselves some time by using the ModelSerializer class, as we'll see later, but for now we'll keep our serializer definition explicit.
4.6 Working with Serializers
Before we go any further we'll familiarize ourselves with using our new Serializer class. Let's drop into the Django shell.
python manage.py shell
Okay, once we've got a few imports out of the way, let's create a couple of code snippets to work with.
from snippets.models import Snippet
from snippets.serializers import SnippetSerializer
from rest_framework.renderers import JSONRenderer
from rest_framework.parsers import JSONParser

snippet = Snippet(code='foo = "bar"
')
snippet.save()

snippet = Snippet(code='print "hello, world"
')
snippet.save()
We've now got a few snippet instances to play with. Let's take a look at serializing one of those instances.
serializer = SnippetSerializer(snippet)
serializer.data
# {'id': 2, 'title': u'', 'code': u'print "hello, world"
', 'linenos': False, 'language': u'python', 'style': u'friendly'}
At this point we've translated the model instance into Python native datatypes.
 To finalize the serialization process we render the data into json.
content = JSONRenderer().render(serializer.data)
content
# '{"id": 2, "title": "", "code": "print \"hello, world\"\n", "linenos": false, "language": "python", "style": "friendly"}'
Deserialization is similar. First we parse a stream into Python native datatypes...
from django.utils.six import BytesIO

stream = BytesIO(content)
data = JSONParser().parse(stream)
...then we restore those native datatypes into a fully populated object instance.
serializer = SnippetSerializer(data=data)
serializer.is_valid()
# True
serializer.validated_data
# OrderedDict([('title', ''), ('code', 'print "hello, world"
'), ('linenos', False), ('language', 'python'),
 ('style', 'friendly')])
serializer.save()
# <Snippet: Snippet object>
Notice how similar the API is to working with forms. The similarity should become even more apparent
when we start writing views that use our serializer.

We can also serialize querysets instead of model instances. To do so we simply add a many=True flag to the serializer arguments.
serializer = SnippetSerializer(Snippet.objects.all(), many=True)
serializer.data
# [OrderedDict([('id', 1), ('title', u''), ('code', u'foo = "bar"
'), ('linenos', False), ('language', 'python'),
('style', 'friendly')]), OrderedDict([('id', 2), ('title', u''), ('code', u'print "hello, world"
'),
 ('linenos', False), ('language', 'python'), ('style', 'friendly')]), OrderedDict([('id', 3), ('title', u''),
('code', u'print "hello, world"'), ('linenos', False), ('language', 'python'), ('style', 'friendly')])]
接下来就用到了我们刚刚创建的序列化的类
4.7 Using ModelSerializers
Our ArticleSerializer class is replicating a lot of information that's also contained in the Article model. It would be nice if we could keep our code a bit more concise.
In the same way that Django provides both Form classes and ModelForm classes, REST framework includes both Serializer classes, and ModelSerializer classes.
Let's look at refactoring our serializer using the ModelSerializer class. Open the file app01/serializers.py again, and replace the ArticleSerializer class with the following.
class SnippetSerializer(serializers.ModelSerializer):
    class Meta:
        model = Snippet
        fields = ('id', 'title', 'code', 'linenos', 'language', 'style')
One nice property that serializers have is that you can inspect all the fields in a serializer instance, by printing its representation. Open the Django shell with python manage.py shell, then try the following:
from snippets.serializers import SnippetSerializer
serializer = SnippetSerializer()
print(repr(serializer))
# SnippetSerializer():
#    id = IntegerField(label='ID', read_only=True)
#    title = CharField(allow_blank=True, max_length=100, required=False)
#    code = CharField(style={'base_template': 'textarea.html'})
#    linenos = BooleanField(required=False)
#    language = ChoiceField(choices=[('Clipper', 'FoxPro'), ('Cucumber', 'Gherkin'), ('RobotFramework', 'RobotFramework'),
                       ('abap', 'ABAP'), ('ada', 'Ada')
#    style = ChoiceField(choices=[('autumn', 'autumn'), ('borland', 'borland'), ('bw', 'bw'), ('colorful', 'colorful')...
It's important to remember that ModelSerializer classes don't do anything particularly magical, they are simply a shortcut for creating serializer classes:
- An automatically determined set of fields.
- Simple default implementations for the
create()andupdate()methods.
4.8 Writing regular Django views using our Serializer
Let's see how we can write some API views using our new Serializer class. For the moment we won't use any of REST framework's other features, we'll just write the views as regular Django views.
Edit the app01/views.py file, and add the following.
from django.http import HttpResponse, JsonResponse
from django.views.decorators.csrf import csrf_exempt
from rest_framework.renderers import JSONRenderer
from rest_framework.parsers import JSONParser
from snippets.models import Snippet
from snippets.serializers import SnippetSerializer
The root of our API is going to be a view that supports listing all the existing snippets, or creating a new snippet.
@csrf_exempt
def snippet_list(request):
    """
    List all code snippets, or create a new snippet.
    """
    if request.method == 'GET':
        snippets = Snippet.objects.all()
        serializer = SnippetSerializer(snippets, many=True)
        return JsonResponse(serializer.data, safe=False)

    elif request.method == 'POST':
        data = JSONParser().parse(request)
        serializer = SnippetSerializer(data=data)
        if serializer.is_valid():
            serializer.save()
            return JsonResponse(serializer.data, status=201)
        return JsonResponse(serializer.errors, status=400)
    Note that because we want to be able to POST to this view from clients that won't have a CSRF token
we need to mark the view as csrf_exempt. This isn't something that you'd normally want to do,
and REST framework views actually use more sensible behavior than this, but it'll do for our purposes right now.

We'll also need a view which corresponds to an individual snippet, and can be used to retrieve, update or delete the snippet.
@csrf_exempt
def snippet_detail(request, pk):
    """
    Retrieve, update or delete a code snippet.
    """
    try:
        snippet = Snippet.objects.get(pk=pk)
    except Snippet.DoesNotExist:
        return HttpResponse(status=404)

    if request.method == 'GET':
        serializer = SnippetSerializer(snippet)
        return JsonResponse(serializer.data)

    elif request.method == 'PUT':
        data = JSONParser().parse(request)
        serializer = SnippetSerializer(snippet, data=data)
        if serializer.is_valid():
            serializer.save()
            return JsonResponse(serializer.data)
        return JsonResponse(serializer.errors, status=400)

    elif request.method == 'DELETE':
        snippet.delete()
        return HttpResponse(status=204)
4.9 Finally we need to wire these views up. Create the app01/urls.py file:
from django.conf.urls import url
from snippets import views

urlpatterns = [
    url(r'^snippets/$', views.snippet_list),
    url(r'^snippets/(?P<pk>[0-9]+)/$', views.snippet_detail),
]
We also need to wire up the root urlconf, in the test_rest_frame/urls.py file, to include our snippet app's URLs.
from django.conf.urls import url, include

urlpatterns = [
    url(r'^', include('snippets.urls')),
]
更多的关于rest_framework的用法相关 http://www.django-rest-framework.org/