一、jQuery基础
jQuery是一个类库,类似于python中的模块,其封装了JavaScript对dom的操作,我们使用jQuery可以用更少的代码完成复杂的场景,而jQuery的内部本质上也是dom的操作。jQuery类库有3个系列,可以去jQuery的官网进行下载,然后使用<script src="jQuery的路径"></script>导入到我们的项目中,就可以使用了jQuery了。jquery的中文手册地址是:http://jquery.cuishifeng.cn/
1、jQuery对象和document对象的转换
jQuery[0] =====> Dom对象
Dom对象 ======>$(Dom对象) 调用jQuery类库时使用$符或jQuery。
2、元素查找
jQuery中常见的元素查找有:id,class,标签查找,组合查找,层级查找,基本查找,属性查找,表单查找,表单对象查找等,基本使用如下;


 1 <!DOCTYPE html>
 2 <html lang="en">
 3 <head>
 4     <meta charset="UTF-8">
 5     <title>Title</title>
 6 </head>
 7 <body>
 8     <div id="id">hello jquery
 9         <div class="c1">
10             <a></a>
11         </div>
12         <a></a>
13         <label>123</label>
14         <a id="a11">456</a>
15     </div>
16     <a id="a1">hello</a>
17     <a age></a>
18     <a age="18"></a>
19
20     <form id="f1">
21         <input type="text"/>
22         <input type="password"/>
23         <input type="checkbox"/>
24         <input type="button"value="按钮">
25     </form>
26 <script src="jquery-3.3.1.js">
27
28 </script>
29 <script>
30     $('#id');//id查找
31     $('.c1');//class查找
32     $('div');//标签查找
33     $('#id,.c1,a');//组合查找
34     //----层级查找
35     $('#id a');//查找子子孙孙
36     $('#id>a');//查找儿子
37     //---基本查找
38     $('#id>a:first');
39     $('#id>a:last');
40     $('#id>a:eq(1)');
41     //----属性查找
42     $('[age]');
43     $('[age="18"]');
44     //表单查找
45     $(':text');
46     $(':password');
47     $(':checkbox');
48     $(':button');
49     //表单对象属性查找
50     $(':checked'); //查找所有被选中的checkbox
51 </script>
52 </body>
53 </html>
jQuery实现多选,反选,取消操作实例。
 1 <!DOCTYPE html>
 2 <html lang="en">
 3 <head>
 4     <meta charset="UTF-8">
 5     <title>Title</title>
 6 </head>
 7 <body>
 8     <table id="tb" border="1" cellspacing="0" style=" 300px">
 9         <thead>
10             <th>操作</th>
11             <th>IP</th>
12             <th>PORT</th>
13         </thead>
14         <tbody>
15             <tr>
16                 <td><input type="checkbox"/></td>
17                 <td>1.1.1.1</td>
18                 <td>8080</td>
19             </tr>
20             <tr>
21                 <td><input type="checkbox"/></td>
22                 <td>1.1.1.1</td>
23                 <td>8080</td>
24             </tr>
25             <tr>
26                 <td><input type="checkbox"/></td>
27                 <td>1.1.1.1</td>
28                 <td>8080</td>
29             </tr>
30             <tr>
31                 <td><input type="checkbox"/></td>
32                 <td>1.1.1.1</td>
33                 <td>8080</td>
34             </tr>
35         </tbody>
36     </table>
37     <input id="all_id" type="button" value="全选"/>
38     <input id="rev_id" type="button" value="反选"/>
39     <input id="canel_id" type="button" value="取消"/>
40
41 <script src="jquery-3.3.1.js"></script>
42 <script>
43     $('#all_id')[0].onclick = function(){
44         $('#tb :checkbox').prop('checked',true);
45     }
46
47     $('#canel_id')[0].onclick = function () {
48         $('#tb :checkbox').prop('checked',false);
49     }
50
51     $('#rev_id')[0].onclick = function () {
52         $('#tb :checkbox').each(function () {
53             $(this).prop('checked',!$(this).prop('checked'));
54             // this.checked = !this.checked;
55         })
56     }
57 </script>
58 </body>
59 </html>
其中prpo是专门用于checkbox,radio属性设置,each方法是jQuery内置循环。$('#tb :checkbox').each(function(k){ //k当前索引 //this当前循环的元素})。
3、筛选(next(), nextAll(), nextUntil(), prev(), prevAll(), prevUntil(), parent(), parents(), parentsUntil(), children(), siblings(), find(), $('#id').eq(index), $('#id:eq(index)'), first(), last())
 1 <!DOCTYPE html>
 2 <html lang="en">
 3 <head>
 4     <meta charset="UTF-8">
 5     <title>Title</title>
 6 </head>
 7 <body>
 8     <div>
 9         <a id="i2"></a>
10         <a>asdf</a>
11         <a>asdf</a>
12         <a id='i1' class="c1">asdf</a>
13         <a>asdf</a>
14         <a id='ii1'>asdf</a>
15         <a>asdf</a>
16     </div>
17
18 <script src="jquery-3.3.1.js">
19
20 </script>
21 <script>
22     $('#i1').next();//下一个元素
23     $('#i1').nextAll(); //下面所有元素
24     $('#i1').nextUntil('#ii1');//直到#ii1,不包含#ii1
25     $('#i1').prev(); //前一个元素
26     $('#i1').prevAll(); //前面所有元素
27     $('#i1').prevUntil("#i2"); //前面的元素 直到i2
28     $('#i1').parent();//父标签
29     $('#i1').parents(); //所有父标签
30     $('#i1').parentsUntil('#id'); //查找所有父标签直到id
31     $('#i1').children(); //查找所有孩子
32     $('#i1').siblings();  //查询所有兄弟
33     $('#i1').find(); //查询子子孙孙
34     $('#i1:eq(1)'); //查找第一个元素
35     $('#i1').eq(1); //查找第一个元素
36     $('#i1').first();  //查找第一个元素
37     $('#i1').hasClass('c1'); //查找是否有某个类
38 </script>
39 </body>
40 </html>
4、文本操作(text(),html(),val())
 1 <!DOCTYPE html>
 2 <html lang="en">
 3 <head>
 4     <meta charset="UTF-8">
 5     <title>Title</title>
 6 </head>
 7 <body>
 8 <a id="id">12345</a>
 9 <input type="text" value="1234"/>
10
11 <script src="jquery-3.3.1.js">
12
13 </script>
14 <script>
15     $('#id').text();  //获取值
16     $('#id').text('sdds'); //设置值
17     $(':text').val();//获取值
18     $(':text').val('sfsf');//设置值
19     $('#id').html('<a>1</a>'); //设置html
20     $('#id').html();  //获取html
21 </script>
22 </body>
23 </html>
5、类操作(addClass(),removeClass(),toggleClass())
 1 <!DOCTYPE html>
 2 <html lang="en">
 3 <head>
 4     <meta charset="UTF-8">
 5     <title>Title</title>
 6     <style>
 7         .hide{
 8             display: none;
 9         }
10     </style>
11 </head>
12 <body>
13 <a id="id">12345</a>
14 <script src="jquery-3.3.1.js">
15
16 </script>
17 <script>
18     $('#id').addClass('hide');//添加类
19     $('#id').removeClass('hide');//删除类
20     $('#id').toggleClass('hide');//如果有就删除 如果没有就添加
21 </script>
22 </body>
23 </html>
实例展示,tab菜单
 1 <!DOCTYPE html>
 2 <html lang="en">
 3 <head>
 4     <meta charset="UTF-8">
 5     <title>Title</title>
 6     <style>
 7
 8         .content_active{
 9             background: #7dddff;
10         }
11         .active{
12             background: #3f49e1;
13         }
14         .menu{
15             height: 48px;
16             background: #dddddd;
17             line-height: 48px;
18         }
19         .menu .item{
20             float: left;
21             margin-left: 80px;
22             padding-left: 40px;
23             padding-right: 40px;
24             cursor: pointer;
25
26             width: 50px;
27             /*background: #cadd66;*/
28         }
29         .hide{
30             display: none;
31         }
32         .content {
33             height: 300px;
34             width: 698px;
35             border: 1px solid darkgray;
36         }
37     </style>
38 </head>
39 <body>
40 <div style=" 700px;margin: 0 auto">
41     <div class="menu">
42         <div target='1' class="item active">菜单一</div>
43         <div target='2' class="item">菜单二</div>
44         <div target='3' class="item">菜单三</div>
45     </div>
46     <div>
47         <div name='1' class="content">内容fdfdfdfdfdfds一</div>
48         <div name='2' class="content hide"><input type="button" value="点我"/></div>
49         <div name='3' class="content hide">内容sdffffff三</div>
50     </div>
51 </div>
52
53 <script src="jquery-3.3.1.js"></script>
54
55 <script>
56     $('.item').click(function(){
57         $(this).addClass('active').siblings().removeClass('active');
58         // var attr = $(this).attr('target');
59         // var temp = ".content[name="+attr+"]";
60         // $(temp).removeClass('hide');
61         // $(temp).siblings().addClass('hide');
62         //利用索引完成
63         $('.content').eq($(this).index()).removeClass('hide').siblings().addClass('hide');
64     })
65 </script>
66 </body>
67 </html>
6、属性操作(attr(),removeAttr(),prpo())
 1 <!DOCTYPE html>
 2 <html lang="en">
 3 <head>
 4     <meta charset="UTF-8">
 5     <title>Title</title>
 6     <style>
 7         .hide{
 8             display: none;
 9         }
10     </style>
11 </head>
12 <body>
13 <a id="id">12345</a>
14 <input type="radio" value="k"/>
15 <script src="jquery-3.3.1.js">
16
17 </script>
18 <script>
19     //专门用于自定义属性
20     $('#id').attr('class'); //获取属性值
21     $('#id').attr('class','hide'); //设置属性,可以是自定义属性
22     $('#id').removeAttr('class'); //删除属性
23     //专门用于checbox,radio一类
24     $(':radio').prop('checked');  //获取属性值
25     $(':radio').prop('checked',true); //设置
26 </script>
27 </body>
28 </html>
7、文档处理(append(), prepend(), after(), before(), empty())
 1 <!DOCTYPE html>
 2 <html lang="en">
 3 <head>
 4     <meta charset="UTF-8">
 5     <title>Title</title>
 6     <style>
 7         .hide{
 8             display: none;
 9         }
10     </style>
11 </head>
12 <body>
13 <div id="i1">1233</div>
14 <script src="jquery-3.3.1.js">
15
16 </script>
17 <script>
18     $('#i1').append('<div>123</div>'); //在儿子节点最后插入一个子元素
19     $('#i1').prepend('<div>456</div>>'); //在儿子节点最前面插入一个子元素
20     $('#i1').after('<div>1111</div>'); //在该元素后面插入一个子元素
21     $('#i1').before('<div>4444</div>'); //在该元素前面插入一个老师
22     $('#i1').empty();//清空元素的内容
23 </script>
24 </body>
25 </html>
8、css处理 $('#i1').css({'height':'200px','width':'100px','background':'blue'})
点赞实例演示。
 1 <!DOCTYPE html>
 2 <html lang="en">
 3 <head>
 4     <meta charset="UTF-8">
 5     <title>Title</title>
 6     <style>
 7         .container{
 8             padding: 50px;
 9             border: 1px solid darkgray;
10         }
11         .container .item{
12             height: 40px;
13             width: 40px;
14             line-height: 40px;
15             text-align: center;
16             position: relative;
17             cursor: pointer;
18             /*border: 1px solid red;*/
19         }
20     </style>
21 </head>
22 <body>
23     <div class="container">
24         <div  class="item">
25             <span>赞</span>
26         </div>
27     </div>
28
29 <script src="jquery-3.3.1.js"></script>
30
31 <script>
32     $('.item').click(function () {
33         var span = document.createElement("span");
34         var fontSize = 15;
35         var right = 0;
36         var top = 0;
37         var opacity = 1;
38         $(span).text("+1");
39         $(span).css('position','absolute');
40         $(span).css('right',right);
41         $(span).css('top',top);
42         $(span).css('fontSize',fontSize+"px");
43         $(span).css('color',"green");
44         $(span).css('opacity',opacity);
45         $(this).append(span);
46         var obj = setInterval(function() {
47             fontSize = fontSize+5;
48             right = right-10;
49             top = top -10;
50             opacity = opacity - 0.1;
51             $(span).css('right',right);
52             $(span).css('top',top);
53             $(span).css('fontSize',fontSize+"px");
54             $(span).css('color',"green");
55             $(span).css('opacity',opacity);
56             if(opacity<0) {
57                 clearInterval(obj);
58                 $(span).remove();
59             }
60         },100);
61     });
62 </script>
63 </body>
64 </html>
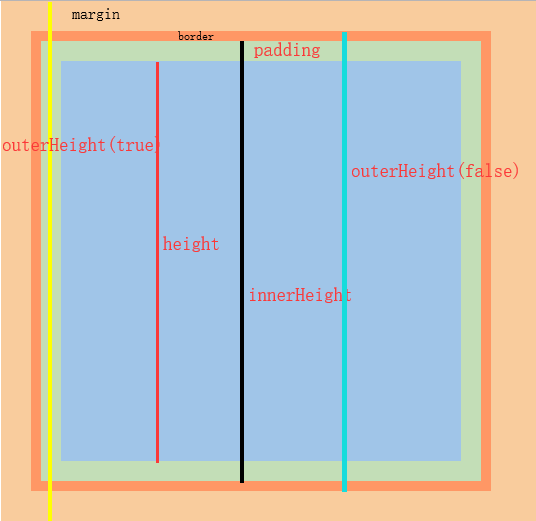
9、位置($(window).scrollTop() offset().left offset().top, position().top, position().left $('#id').height(), $('#id').innerHeight(), $('#id').outerHeight())
 1 <!DOCTYPE html>
 2 <html lang="en">
 3 <head>
 4     <meta charset="UTF-8">
 5     <title>Title</title>
 6     <style>
 7         #i1{
 8             height: 100px;
 9             width: 100px;
10             overflow: auto;
11             position: relative;
12         }
13         #i2{
14             position: absolute;
15             height: 50px;
16             width: 50px;
17             background: #ff6600;
18             left: 10px;
19
20         }
21     </style>
22 </head>
23 <body style="height: 5000px">
24 <div id="i1">
25     <div id="i2">2121</div>
26     <p>ddsdds</p>
27     <p>ddsdds</p>
28     <p>ddsdds</p>
29     <p>ddsdds</p>
30     <p>ddsdds</p>
31 </div>
32 <script src="jquery-3.3.1.js">
33
34 </script>
35 <script>
36     $(window).scrollTop(); //获取滚动条的位置
37     $(window).scrollTop(10);//设置滚动条的位置
38     $('#i1').scrollTop(); //获取div滚动条的位置
39     $('#i1').scrollTop(10);  //设置div滚动条的位置
40     $('#i1').offset();  //div坐标位置
41     $('#i2').position();  //div的position位置
42 </script>
43 </body>
44 </html>
下面我们通过一个图来理解height(),innerHeight(),outerHeight(false),outerHeight(true)。
控件拖拽实例演示。
 1 <!DOCTYPE html>
 2 <html lang="en">
 3 <head>
 4     <meta charset="UTF-8">
 5     <title>Title</title>
 6     <style>
 7
 8         #moveBar{
 9             position: absolute;
10         }
11         #banner{
12
13             height: 48px;
14             width: 300px;
15             background: #ff6600;
16             line-height: 48px;
17             text-align: center;
18             cursor: move;
19             user-select:none;/*用户无法选择文本*/
20
21         }
22         #content{
23             position: absolute;
24             top: 48px;
25             height: 200px;
26             width: 298px;
27             border: 1px solid darkgray;
28         }
29     </style>
30 </head>
31 <body>
32     <div id="moveBar">
33         <div id="banner">标题</div>
34         <!--<div id="d1" style="z-index: 2">标题</div>-->
35         <div id="content"><textarea style=" 292px;height: 194px;">编辑</textarea> </div>
36     </div>
37
38 <script src="jquery-3.3.1.js"></script>
39
40 <script>
41     $(function () {
42         $('#banner').mousedown(function(e) {
43            var isMove = true;
44            var div_x = e.pageX - $('#moveBar').offset().left;
45            var div_y = e.pageY - $('#moveBar').offset().top;
46            $(document).mousemove(function(e) {
47                if(isMove){
48                    var tem_x =  e.pageX - div_x;
49                    var tem_y = e.pageY - div_y;
50                    $('#moveBar').css('left',tem_x);
51                    $('#moveBar').css('top',tem_y);
52                }
53            }).mouseup(function () {
54                isMove= false;
55            })
56         });
57
58     });
59
60 </script>
61 </body>
62 </html>
10、jQuery事件绑定(click(), [bind()--unbind()], [on()--off()], [delegate()---undelegate()托管])
 1 <!DOCTYPE html>
 2 <html lang="en">
 3 <head>
 4     <meta charset="UTF-8">
 5     <title>Title</title>
 6     <style>
 7         #i1{
 8             height: 100px;
 9             width: 100px;
10             background: #ff6600;
11         }
12
13     </style>
14 </head>
15 <body>
16 <div id="i1">
17     事件绑定
18 </div>
19
20 <input type="button" value="+"/>
21 <script src="jquery-3.3.1.js">
22
23 </script>
24 <script>
25     $('div').click(function(e) {
26         console.log(this);
27         alert('hi');
28     });
29
30     $('div').bind('click',function(e) {
31         console.log(this);
32         alert('bind');
33     });
34
35     $('div').on('click',function (e) {
36         alert('on');
37     });
38     //托管----该绑定事件的方式不同于其他三种的原因是:其在事件触发的时候才会绑定事件,看下面的列子
39     $(document).delegate('div','click',function () {
40         alert('delegate');
41     });
42
43     //---------以下实例展示了托管不同于其他事件绑定的方法
44
45     $(':button').click(function (e) {
46         $('body').append('<div>新增的div</div>');
47     })
48     //点击+按钮生成新的div,此时点击新的div 只有delegate绑定的事件能响应
49 </script>
50 </body>
51 </html>
最后需要提醒的是,我们希望在页面框架加载完成之后就能够自动执行jQuery代码,此时,我们一般会将代码放在
$(function()){
$(....) //我们的jQuery代码
}
11、阻止事件发生
我们知道,对于一个<a href='http://www.baidu.com'></a>标签而言,其默认有一个鼠标点击跳转时间,那么,如果我们给这个a标签绑定一个click时间,会肿么样呢?一起看下面的例子。
 1 <!DOCTYPE html>
 2 <html lang="en">
 3 <head>
 4     <meta charset="UTF-8">
 5     <title>Title</title>
 6
 7 </head>
 8 <body>
 9 <a href="http://www.baidu.com">百度一下</a>
10
11
12 <script src="jquery-3.3.1.js">
13
14 </script>
15 <script>
16     $('a').click(function () {
17         alert(1);
18         return true; //false时不会跳转 为true时会跳转
19     });
20 </script>
21 </body>
22 </html>
通过上面的例子,我们发现如果我们自己绑定的事件return false时,标签自己默认的事件就失效,反之,如果我们返回true,则在响应完我们自己的事件之后,再去响应默认的事件。这种机制,使我们想起在表单提交的时候可以做一些必要的校验。辣么,我们就看一下表单提交的代码演示。
 1 <!DOCTYPE html>
 2 <html lang="en">
 3 <head>
 4     <meta charset="UTF-8">
 5     <title>Title</title>
 6     <style>
 7         .error{
 8             color: red;
 9         }
10     </style>
11 </head>
12 <body>
13     <form action="5.html" method="post">
14         <div><input type="text"/></div>
15         <div><input type="text"/></div>
16         <div><input type="text"/></div>
17         <div><input type="password"/></div>
18         <input type="submit" value="提交"/>
19     </form>
20     <div style="height: 600px; 600px;border: 1px solid darkgray">
21         <img  height="600px" width="600px" src="http://img.ivsky.com/img/tupian/pre/201803/15/fangsuo_shudian-022.jpg"/>
22     </div>
23 <script src="jquery-3.3.1.js" ></script>
24
25 <script>
26     $(function () { //当页面框架加载完成后,自动执行
27         $(':submit').bind('click',function () {
28         var flag = true;
29         $('.error').remove();
30         $(':text,:password').each(function () {
31            var val = $(this).val();
32            if(val.trim().length<=0){
33                flag = false;
34                if($(this).parent().find('span').length<=0){
35                    var tag = document.createElement('span');
36                    $(tag).text('*必填');
37                    $(tag).addClass('error');
38                    $(this).after(tag);
39                }
40            }
41         });
42         return flag;
43     });
44     });
45 </script>
46 </body>
47 </html>