WCF想要对外提供服务,那么需要一个宿主来容纳这些服务。
宿主环境
• Self-hosting
– 控制台应用程序,Windows应用程序,Windows服务
– HTTP, TCP, named pipes, Microsoft® Message Queuing (MSMQ)
• IIS/Microsoft® ASP.NET
– HTTP
• Windows Activation Service (windows2008/IIS7的新东西)
– HTTP, TCP, named pipes, MSMQ
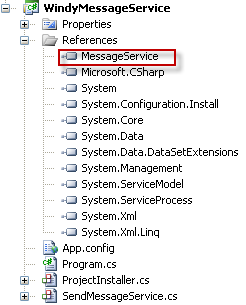
1 下面把昨天的 WCF Service 放到 Windows Services中, 在这个Windows Service 项目中我直接引用了上次写的 WCF 服务的 dll。(MessageService)

(图 1)
2 SendMessageService.cs 代码:MessageService.MessageService 为 namespace名称.classname。
1 public partial class SendMessageService : ServiceBase
2 {
3 private ServiceHost _serviceHost;
4 public SendMessageService()
5 {
6 InitializeComponent();
7 }
8
9 protected override void OnStart(string[] args)
10 {
11 if (this._serviceHost != null)
12 {
13 this._serviceHost.Close();
14 }
15 this._serviceHost = new ServiceHost(typeof(MessageService.MessageService));
16 this._serviceHost.Open();
17 }
18
19 protected override void OnStop()
20 {
21 if (this._serviceHost != null)
22 {
23 this._serviceHost.Close();
24 }
25 }
26 }
(图 2)
3 添加 App.config文件
1 <?xml version="1.0" encoding="utf-8" ?>
2 <configuration>
3 <system.serviceModel>
4 <services>
5 <service name="MessageService.MessageService">
6 <endpoint address="net.tcp://localhost:8899/SendMessage" binding="netTcpBinding"
7 bindingConfiguration="" name="tcpBing" contract="MessageService.ISendMessageService" />
8 </service>
9 </services>
10 </system.serviceModel>
11 </configuration>
(图 3)
4 这样一个标准的 Windows Service就写好了。然后安装这个服务。在 SendMessageService.cs 的设计界面 右键 选择 “Add Installer”.这时Visual Studio 会为我们自动生成一个安装类ProjectInstaller.cs,
如(图 1)所示。
编译这个项目后会在 Debug或 Release 下找到相应的 .exe文件。
5 修改client段的App.config
1 <client>
2 <endpoint address="net.tcp://tj-windy:8899/SendMessage"
3 binding="netTcpBinding" bindingConfiguration="TcpBinding"
4 contract="ServiceReference.SendMessageService" name="TcpBinding">
5 <identity>
6 <dns value="localhost" />
7 </identity>
8 </endpoint>
9 </client>
2 <endpoint address="net.tcp://tj-windy:8899/SendMessage"
3 binding="netTcpBinding" bindingConfiguration="TcpBinding"
4 contract="ServiceReference.SendMessageService" name="TcpBinding">
5 <identity>
6 <dns value="localhost" />
7 </identity>
8 </endpoint>
9 </client>
启动安装好的 Windows Service,再运行客户端就好了!