样式模块分为两大块,精确获取样式值与设置样式,精确是用于修饰符获取的。由于样式分布为外部样式,内部样式与行内样式,再加个impotant对选择器的权重的干扰,我们实际很难看到元素是应用了那块的样式。因此,样式模块,80%的比重在于获取这一块,像offset,滚动条也纳入这一块。
大体上,我们在标准浏览器是使用getComputedStyle,ie6-8使用currentStyle来获取元素的精确样式。不过,getComputedStyle并不挂在元素上,而是window的一个API,它返回一个对象,可以选择使用getPropertyValue方法传入连字符风格的样式名取得其值 ,或者属性法+驼峰风格的样式名去取值。但考虑到currentStyle也是使用属性法+驼峰风格,我们就统一使用后者。

    var getStyle = function (el, name) {
        if (el.style) {
            name = name.replace(/-(w)/g,function(all,letter) {
                return letter.toUpperCase();
            });
            if (window.getComputedStyle) {
                //getComputedStyle的第二个伪类是用于对付伪类的,如滚动条,placeholder,
                //但ie9不支持,因为我们只管元素节点,上面的el.style过滤掉了
                return el.ownerDocument.getComputedStyle(el, null)[name]
            } else {
                return el.currentStyle[ name ]
            }
        }
    }
设置样式则更是没有难度,直接el.style[name]=value搞定。
但框架要考虑的东西更多,如兼容性,易用性,扩展性
1.样式名要同时支持连字符风格(css的标准风格),与驼峰风格(DOM的标准风格)
2.样式名要进行必要的处理,如float样式与css3带私有前缀的样式
3.如果框架是仿jQuery风格,要考虑set all get frist
4.设置样式时,对长度宽度可以考虑直接处理数值,比如由框架智能补上px单位。
5.设置样式时,对于长宽度可以考虑传入相对值,如"-=20"
6.对于个别的样式特殊处理,如IE下的z-index,opacity,user-select,background-position,top,left
7.基于setStyle,getStyle的扩展,height,width,offset等方法。
在学习过程中,对css模块与css_fix模块进行展开。涵盖的内容相当于jQuery的css,offset,demensions模块,也相当于EXT4的Element.style Element.scroll, Element.position模块。
https://github.com/jiayi2/mass-Framework/blob/master/css.js
https://github.com/jiayi2/mass-Framework/blob/master/css_fix.js
其中,css_fix用于兼容旧版的IE,涉及的API有css,cssName,cssNumber,cssHooks,height,width,innerHeight,innerWidth,outerWidth,offset,position,scrollTop,scrollLeft,show,hide,toggle,offsetParent,scrollParent。
放在$上为静态方法,放在$.fn上的为原型方法。独立于这两者的为私有方法或对象。
一.样式名的修正
不是所有的样式名都是用正则简单的处理一下就行,这里存在三个陷阱,float对于的javascript属性存在兼容性问题。css3带来的私有前缀,ie的私有前缀不和流等问题。
私有前缀是css3的实现和标准滞后所带来的问题,其实私有前缀-ms-在ie8时代就存在了,-khtml-就更早了。现在私有前缀如下:
| 浏览器 | ie | firefox | chrome | safari | opera | Konqueror |
| 前缀 | -ms- | -moz- | -webkit- | -webkit- | -o- | -khtml- |
2013年,google嫌webkit内核态臃肿,决定自己单干,取名blink,并在chrome28起使用此内核,为了减轻用户负担,还是使用webkit做前缀,目前,2013年,google嫌webkit内核态臃肿,决定自己单干,取名blink,并在chrome28起使用此内核,为了减轻用户负担,还是使用webkit做前缀,目前,使用-webkit-前缀的有Opera,Safari,Chrome三家。
上述的这些前缀加上样式名再驼峰化就是真正可用的样式名,比如-ms-transform -> MsTransform, -webkit-transform ->WebKitTransform, -o-transform -> Otransform 。
但这些实验性的样式会迟早退出历史舞台,它们会卸载掉前缀从新亮相,比如ff17下就可以直接使用transfrom。但光是这样不够,还有第三个问题:IE下的-ms-trabsform的javascript属性名为msTransform,因此,搞定这个正则就特别复杂,我们要动用一个函数通过侦测手段获取它。在mass,它叫cssName,在jQuery,它叫vendorPropName。由于特征侦测是DOM操作,消耗很大,因此获取后就应该缓存起来,避免重复检测,这个对象在mass称为cssMap.
    var prefixes = ['', '-webkit-', '-moz-', '-ms-', '-o-'];
    var cssMap = {
        "float": $.support.cssFloat ? 'cssFloat' : 'styleFloat', background : "backgroundColor"
    };

    function cssName(name, host, camelCase) {
        if (cssMap[name]) {
            return cssMap[name];
        }
        host = host || document.documentElement
        for (var i = 0, n = prefixes.length; i < n; i++) {
            camelCase = $.String.camelCase(prefixes[i] + name);
            if (camelCase in host) {
                return (cssMap[name] = camelCase)
            }
        }
        return null;
    }
prefixes的顺序设置得相当有技巧,“”表示没有私有前缀, 此样式已经标准化,所有在最前。-webkit- , -o-依次排开。
通过上面的函数,我们只需传入一个参数,就可以得到真正可用的样式名了。
一:个别样式的特殊处理
让我们来展示cssHooks的价值所在,它是专门用于对付那些有兼容性的问题,不按常规出牌的奇葩样式。cssHooks为一个普通的对象。每个属性名都以xxx+":set"或xxx+":get"命名,值为处理函数。
1。opacity。
.opacity{opacity:.5}
opacity会让背景与内容变得透明,想内容不透明,就要用rgba与hsla。不过它们是一种值的格式,并不是样式。
ie依赖滤镜DXImageTransform.Microsoft.Alpha,不过IE提供了一个简短的
.opacity{
fliter:alpha(opacity=40)
}
在ie6 7需要注意,为了使得透明设置生效,元素必须是“有布局”。一个元素可以通过一些css属性来使其被布局,有如width和position.关于微软专有的hasLayout属性详情,以及如何触发它,可以看下面的链接。
http://www.blueidea.com/tech/site/2006/3698.asp
2.background-position
旧版ie中,ie只支持backgrounPositionX与backgroundPositionY,不支持backgroundPosition。实现很简单,分别提取backgrounPositionX与backgroundPositionY,然后拼合他们。
    adapter["backgroundPosition:get"] = function(node, name, value) {
        var style = node.currentStyle;
        return style.backgroundPositionX + " " + style.backgroundPositionY
    };
3.z-index
z-index是一个并不难理解的属性,但它因为错误的假设使一些开发人员陷入混乱。混乱发生的原因是因为z-index只能工作在被明确定义了absolute,fixed,relative这三个定位属性元素中,它会让元素沿着z轴进行排序(z轴的起点为父节点所在的层,终点为屏幕)。
z-index在下拉菜单,tooltip,灯箱效果中,相册与拖动中经常被使用。为了让目标控件排在最前,我们需要得知他们的z-index,然后有目的的改z-index,然后有目的的改z-index或重排元素(将目标元素移除dom树,再插入父元素最后的一个元素之后)。
想获取z-index,这里应对一个特殊情况,目标元素没有被定位,需要往上回溯到其祖先定位元素。如果找到,就返回祖先的z-index.如果最后也没找到,就返回0.
    adapter["zIndex:get"] = function (node) {
        while (node.nodeType !== 9) {
            //即使元素定为了,但如果z-index的值设置为 "aaa"这样的无效值。浏览器都会返回auto
            //如果没有指定z-index值,ie会返回0。其它返回auto
        var position = getter(node, "position") || "static";
        if (position !== "static") {
            // <div style="z-index:-10;" ><div style="z-index:0;"></div></div>
            var value = parseInt(getter(node, "zIndex"),10);
            if (!isNaN(value) && value !== 0) {
                return value;
            }
        }
        node = node.parentNode;
       }
       return 0
    }
4.元素的隐显
元素的隐藏与显示在页面上实现由很多办法,这里只说明下display。display为none时,它不再占有物理空间,附近的元素就顺势挪过去,比如手风琴效果,下拉效果都依赖于此。
    $.fn.show = function() {
        return this.each(function() {
            this.style.display = "";
        })
    }

    $.fn.hide = function() {
        return this.each(function() {
            this.style.display = "none";
        })
    }

    $.fn.toggle = function() {
        return this.each(function() {
            this.style.display = isHidden(this) ? "" : "none";
        })
    }

    $.fn.isHidden = function(node) {
        return node.sourceIndex === 0 ||
        getter(node, "display") === "none" ||
        !$.contains(node.ownerDocument, node);
    }
然后我们创建一个方法,把$.fn.show, $.fn.hide, $.fn.toggle功能全部交给它做。
    function toggleDisplay(nodes, show) {
        var elem, values = [],
            status = [],
            index = 0,
            length = nodes.length;
    //由于传入的元素们可能存在包含关系,因此分开两个循环来处理,度土匪循环用于取得当前值或默认值
    for (; index < length; index++) {
        elem = nodes[index];
        if (!elem.style) {
            continue;
        }

        values[index] = $._data(elem, "olddisplay");
        status[index] = $.isHidden(elem);
        if (!values[index]) {
            values[index] = status[index] ? $.parseDispaly(elem.nodeName) : getter(elem,"display");
            $._data(elem,"olddisplay",values[index]);
        }
    }
    //第二个循环用于样式设置,-1为toggle,1为show,0为hide
    for (index = 0, index < length; index++) {
        elem = nodes[index];
        if (elem.style) {
            continue;
        }

        show = show === -1 ? !status[index] : "none";
    }
    return nodes
    }
最后,我们只要稍微在外面一层就能实现与jQuery功能一样的show,hide,toggle,这样做还有一个好处,就是接口与实现分离,实现隐藏于内部。保持既有功能,不受太多制约,安心优化与升级。
    $.fn.show = function() {
        return toggleDisplay (this, 1);
    };

    $.fn.hide = function() {
        return toggleDisplay (this, 0);
    }
    //state为true时,强制全部显示,为false时,强制全部隐藏
    $.fn.toggle = function() {
        return toggleDisplay (this, typeof state === "boolean" ? state : -1)
    }
5.元素的坐标(基于getBoundingClientRect方法)
元素的坐标指其top与left值。node.style恰逢有这两个属性,但它只有被定位了才生效。否则在其他浏览器下都返回auto.它的offsetTop,offsetLeft也是有效的。它是相对offsetParent的距离。我们一级一级的向上累加,就能得到相对页面的坐标,亦有人称之为元素的绝对坐标。
    function offset (node) {
        var left = node.offsetLeft,
            top = node.offsetTop;
        do {
            left += node.offsetLeft;
            top += node.offsetTop;
        } while (node = node.offsetParent);
        return {
            left: left,
            top: top
        }
    }
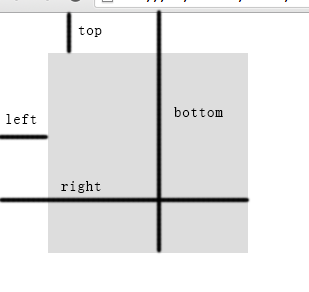
此外,相对于可视的坐标也很实用,比如让弹出窗口居中对齐。以前实现这个计算量非常巨大,自从IE的getBoundingClientRect方法被挖掘出来以后,简直是小菜一碟、现在列入w3c标准,无兼容性之忧。此方法能获取页面中某个元素的border-box的左、上、右、下的相对浏览器视窗的位置。
它返回一个Object对象,该对象肯定有4个属性,top,left,right,bottom,标准的浏览器还多出width和height这两个属性,这里的top,left和css的理解相似,width,height就是元素自身的高,但是right,bottom和css的理解有所不一样。如下:(-top - left,+bottom +right等自行测试)
https://msdn.microsoft.com/en-us/library/hh781509(v=vs.85).aspx
Measuring Element Dimension and Location with CSSOM in Windows Internet Explorer 9
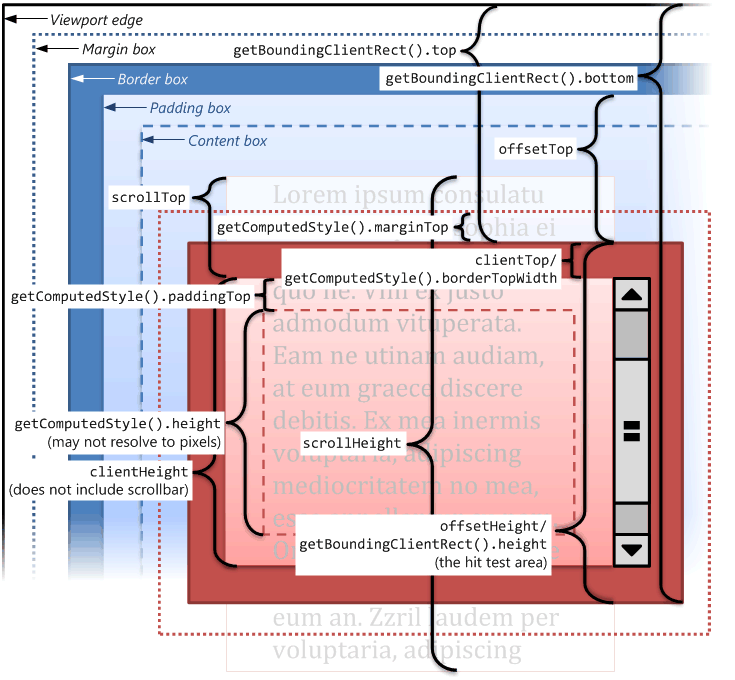
上面是微软MSDN的文章,用于演示CSSOM的各种属性.上面页面中拥有一个相对定位的红色元素。蓝色元素是红色元素的父节点,它用于演示各种盒子,如:content-box,padding-box,border-box,margin-box以及offset(这是属于蓝色元素的,换言之,它是蓝色元素的offsetParent) viewport是个黑色虚线框,为html标签。蓝色元素还有滚动条,方便我们观察clientTop与scrollTop, clientHeight与scrollHeight的差异。
getBoundingClientRect中的top与bottom也在此图中显示出来,掌握此图对我们构建此模块非常有用。
getBoundingClientRect目前市场主流浏览器都支持。
因此,我们可以利用它求出相对于页面的距离。将它相对于可视区域距离加上滚动条的距离即可!
   var left = this.getBoundingClientRect().left + document.documentElement.scrollLeft;
   var top = this.getBoundingClientRect().top + document.documentElement.scrollTop;
更多参考:https://developer.mozilla.org/en-US/docs/Web/API/Element
https://msdn.microsoft.com/en-us/library/ms536433.aspx
判定一个元素的,首先我们判定它是否在DOM树上,不在直接返回(0,0)。否则取得元素在可视区域的距离加上滚动条的距离然后减去浏览器的边框。因此在计算可视区距离与滚动距离时都已经包含浏览器边框。
    $.fn.offset = function(options) {
        if ( argunments.length ) {//设置匹配元素的offset
            return (!options || (isFinite(options.top) && !isFinite(options.left))) ? this :
            this.each(function(){
                setOffset(this, options);
            })
        }
        //取得第一个元素的相对页面的坐标
        var node = this[0], doc = node && node.ownerDocument, pos = {
            left:0,
            top:0
        };

        if (!doc) {
            return pos
        }

        //我们通过getBoundingClientRect计算元素相对于client的rect
        //https://msdn.microsoft.com/en-us/library/ms536433.aspx上面有更多api
        var box = node.getBoundingClientRect(), win = getWinow(doc),
        root = doc.document,
        clientTop = root.clentTop || 0,
        clientLeft = root.clentLeft || 0,
        scrollTop = win.pageYOffset || root.scrollTop,
        scrollLeft  = win.pageXOffset || root.scrollLeft;

        //将滚动距离加到left,top上面
        //ie一些版本会为HTML自动添加2px的border,需要去掉。https://msdn.microsoft.com/en-us/library/ms533564.aspx
        pos.top = box.top + scrollTop - clientTop,
        pos.left = box.left + scrollLeft - clientLeft;

        return pos;
    }
关于offsetParent,请自行参考jQ.
从盒子模型来看,相对于offsetParent的距离,是指此元素的margin-box左上角到offsetParent的content-box的左上角。由于offsetParent,getBoundClientRect首先提出来的,因此盒子都以border-box为计算单元。我们需要减去offsetParent的左边框与元素的左边界的宽。如图
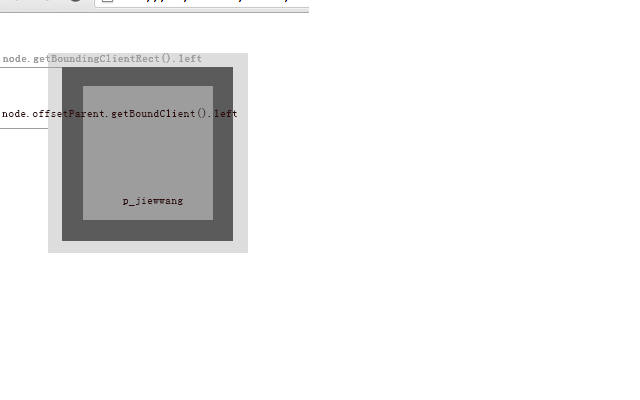
因此,x轴的距离计算公式如下:
X = node[clientLeft] - offsetParent[client_left] - offsetParent[boderLeftWidth] - node[marginLeftWidth]
整个实现方法如下:
    $.fn.position = function() { //取得元素相对于其offsetParent的坐标
        var offset, offsetParent, node = this[0],
               parentOffset = { //默认的offsetParent相对于视窗距离
                   top:0,
                   left:0
        }
        if (!node || node.nodeType !== 1) {
            return
        }
        //fixed元素是相对于window
        if (getter(node,"position") === "fixed") { //fixed
            offset = node.getBoundingClientRect();
        } else {
            offset = this.offset();//得到元素相对视窗距离。因为我们只有top和left
            offsetParent = this.offsetParent();

            if (offsetParent[0].tagName !== "HTML") {
                parentOffset = offsetParent.offset();//得到它的offsetParent相对视窗的距离
            }

            parentOffset.top += parseFloat(getter(offsetParent[0],"borderTopWidth")) || 0;
            parentOffset.left += parseFloat(getter(offsetParent[0],"boderLeftWidth")) || 0;
        }
            return {
                top: offset.top - parentOffset.top - (parseFloat(getter(node,"marginTop")) || 0),
                left :offset.left - parentOffset.left - (parseFloat(getter(node,"marginLeftWidth")) || 0)
        }
    }
我们再回头看看offset方法.offset也是一个set all get first的方法。想把一个元素挪到某个位置有很多实现方式,比如移动滚动条,修改margin,修改left,top。offset的写法就是最后一种。不过可能存在祖先定为,因此不借助框架。这个工作对一般人而言有点吃力,而正是框架的价值所在。
    function setOffset(node, options) {
        if (node && node.nodeType == 1) {
            var position = $.css(node, "position");
            //强制定位
            if (position === "static") {
                node.style.position = "relative";
            }
            var curElem = $(node),
                curOffset = curElem.offset(),
                curCSSTop = $.css(node, "top"),
                curCSSLeft = $.css(node, "left"),
                calculatePosition = (position === "absolute" || position === "fixed") && [curCSSTop, curCSSLeft].indexOf("auto") > -1,
                props = {}, curPosition = {}, curTop, curLeft;

            if (calculatePosition) {
                curPosition = curElem.position();
                curTop = curPosition.top;
                curLeft = curPosition.left;
            } else {
                //如果是相对定位,只要用当前top,left做基数
                curTop = parseFloat(curCSSTop) || 0;
                curCSSLeft = parseFloat(curCSSLeft) || 0;
            }

            if (options.top != null) {
                props.top = (options.top - curOffset.top) + curTop;
            }
            if (options.left != null) {
                props.left = (options.left - curOffset.left) + curLeft;
            }
            curElem.css(props)
        }
    }
offset方法完整了。
6.元素的滚动条坐标
元素的滚动条坐标这是浏览器一组非常重要的属性,因此,光浏览器本身就提供了多个方法来修改它们,比如挂在window下的scroll,scrollTop,scrollBy方法,挂在元素下的scrollLeft,scrollTop,scrollIntoView。
jQuery在css模块就提供了scrollLeft,scrollTop,来修改或读取元素或窗口的滚动坐标,在animation模块,更是允许他以平滑的方式来挪动它们。EXT更是用一整块的模块来满足用户对滚动的各种需求。
修改top, left挪动元素又一个坏处,就是可能遮在某些元素之上,而修改scrollTop,scrollLeft不会。
这里我们仿照jQuery那样,把这两个方法名取名为scrollTop、scrollLeft,对于一般元素节点,读写都没有什么困难(因为元素上就有这两个属性了。我们只需要集中精力对付外边的滚动条,也称为浏览器的滚动条。位于顶层的可视元素之上。)设置时,我们用到了window中的scrollTop方法,里面传入你想要滚动到的坐标。读取时,我们常说使用pageXOffset, pageYOffset这组属性,标准浏览器网景时代就支持了。IE则直接取html元素的scrollLeft,scrollTop属性。
    "scrollLeft_pageXOffset, scrollTop_pageYOffset".replace($.rmapper, function(_, method, prop) {
        $.fn[method] = function(val) {
            var node, win, top = method === "scrollTop";
            if (val === void 0) {
                node = this[0];
                if (!node) {
                    return null;
                }
                win = getWinow(node);//获取第一个元素的scrollTop/scrollLeft
                return win ? (prop in win) ? win[prop] : win.document.documentElement[method] : node[method];
            }

            return this.each(function(){//设置匹配元素的scrollTop/scrollLeft
                win = getWinow(this);
                if (win) {
                    win.scrollTo(!top ? val : $(win).scrollLeft(), top ? val : $(win).scrollTop());
                } else {
                    this[method] = val;
                }
            })
        }
    })