今天的内容是用heartbeat实现web服务器高可用
一、简介:
heartbeat的工作原理:heartbeat最核心的包括两个部分,心跳监测部分和资源接管部分,心跳监测可以通过网络链路和串口进行,而且支持冗余链路,它们之间相互发送报文来告诉对方自己当前的状态,如果在指定的时间内未收到对方发送的报文,那么就认为对方失效,这时需启动资源接管模块来接管运行在对方主机上的资源或者服务。
| 主机名 | ip | 系统 | 角色 |
| tiandong63 | 192.168.199.3 | rhel6.5 | NFS存储 |
| tiandong64 | 192.168.199.4 | rhel6.5 | heartbeat主节点 |
| tiandong66 | 192.168.199.6 | rhel7.4 | heartbeat从节点 |
heartbeat需要的几个包
Heartbeat-3-0-958e11be8686 # 心跳主程序包
resource-agents-3.9.6 #集群实验资源代理
Reusable-Cluster-Components-glue--0a7add1d9996 #可重复使用的群集组件
二、实战:使用heartbeat实现web服务高可用
1、拓扑图:
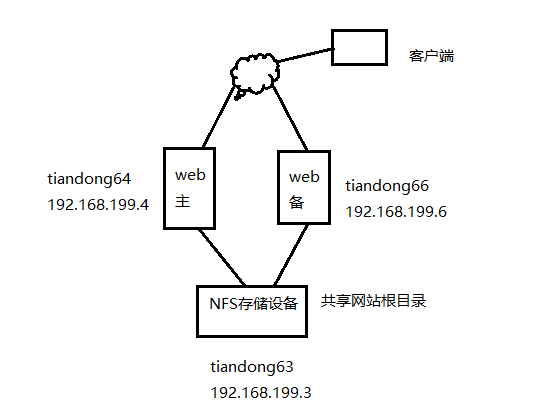
2、配置tiandong63位NFS服务器,提供存储资源:(https://www.cnblogs.com/winter1519/p/7396135.html 这里有详细的讲解,有需要的可以参考。)
[root@tiandong63 ~]# yum install nfs-utils -y
[root@tiandong63 ~]# mkdir /wwwdir
[root@tiandong63 ~]# echo 'heartbeat test' > /wwwdir/index.html
[root@tiandong63 ~]# chmod -R 777 /wwwdir/
[root@tiandong63 ~]# more /etc/exports
/wwwdir 192.168.199.0/24(rw)
[root@tiandong63 ~]# /etc/init.d/nfs start
[root@tiandong63 ~]# chkconfig nfs on
[root@tiandong64 ~]# showmount -e 192.168.199.3
Export list for 192.168.199.3:
/wwwdir 192.168.199.0/24
3、tiandong64,66测试nfs 存储挂载并安装httpd web服务器(基本操作是一致)
[root@tiandong64 ~]# showmount -e 192.168.199.3
Export list for 192.168.199.3:
/wwwdir 192.168.199.0/24
[root@tiandong64 ~]# yum install httpd -y
[root@tiandong64 ~]# mount.nfs 192.168.199.3:/wwwdir/ /var/www/html/
[root@tiandong64 ~]# df -h
Filesystem Size Used Avail Use% Mounted on
/dev/sda3 28G 2.3G 24G 9% /
tmpfs 491M 0 491M 0% /dev/shm
/dev/sda1 194M 29M 155M 16% /boot
192.168.199.3:/wwwdir/ 28G 5.5G 21G 22% /var/www/html
[root@tiandong64 ~]# /etc/init.d/httpd start
[root@tiandong64 ~]# curl 192.168.199.4
heartbeat test
卸载,关闭服务,后期这些资源通过heartbeat管理。
[root@tiandong64 ~]# umount /var/www/html/
[root@tiandong64 ~]# /etc/init.d/httpd stop
Stopping httpd: [ OK ]
[root@tiandong64 ~]# chkconfig httpd off
4、tiandong64安装heartbeat(tiandong66安装一样)
1)安装依赖包:
[root@tiandong64 ~]# yum install -y bzip2 bzip2-devel gcc gcc-c++ autoconf automake libtool e2fsprogs-devel glib2-devel libxml2 libxml2-devel libtool-ltdl-devel asciidoc libuuid-devel docbook
2)编译安装Reusable-Cluster-Components-glue--0a7add1d9996
[root@tiandong64 ~]#groupadd haclient 创建用户组
[root@tiandong64 ~]#useradd -g haclient hacluster 创建用户
[root@tiandong64 heartbeat]# cd Reusable-Cluster-Components-glue--0a7add1d9996/
[root@tiandong64 Reusable-Cluster-Components-glue--0a7add1d9996]# ./autogen.sh
[root@tiandong64 Reusable-Cluster-Components-glue--0a7add1d9996]#./configure --prefix=/usr/local/heartbeat/
[root@tiandong64 Reusable-Cluster-Components-glue--0a7add1d9996]#make && make install
3)编译安装resource-agents-3.9.6
[root@tiandong64 heartbeat]#cd resource-agents-3.9.6/
[root@tiandong64 resource-agents-3.9.6]#./autogen.sh
[root@tiandong64 resource-agents-3.9.6]#./configure --prefix=/usr/local/heartbeat --with-daemon-user=hacluster --with-daemon-group=haclient --enable-fatal-warnings=no LIBS='/lib64/libuuid.so.1'
[root@tiandong64 resource-agents-3.9.6]#make && make install
4)编译安装Heartbeat
[root@tiandong64 heartbeat]# cd Heartbeat-3-0-958e11be8686/
[root@tiandong64 Heartbeat-3-0-958e11be8686]# ./bootstrap
[root@tiandong64 Heartbeat-3-0-958e11be8686]#export CFLAGS="$CFLAGS -I/usr/local/heartbeat/include -L/usr/local/heartbeat/lib"
[root@tiandong64 Heartbeat-3-0-958e11be8686]#./configure --prefix=/usr/local/heartbeat --with-daemon-user=hacluster --with-daemon-group=haclient --enable-fatal-warnings=no LIBS='/lib64/libuuid.so.1'
[root@tiandong64 Heartbeat-3-0-958e11be8686]#make && make install
5)生成配置文件
[root@tiandong64 ~]# cd /usr/local/heartbeat/etc/ha.d/
[root@tiandong64 ha.d]# ls
harc rc.d README.config resource.d shellfuncs
[root@tiandong64 ha.d]# cp /root/heartbeat/Heartbeat-3-0-958e11be8686/doc/{authkeys,ha.cf,haresources} .
[root@tiandong64 ha.d]# ls
authkeys ha.cf harc haresources rc.d README.config resource.d shellfuncs
[root@tiandong64 ha.d]# chmod 600 authkeys
[root@tiandong64 ha.d]# mkdir -pv /usr/local/heartbeat/usr/lib/ocf/lib/heartbeat
mkdir: created directory `/usr/local/heartbeat/usr'
mkdir: created directory `/usr/local/heartbeat/usr/lib'
mkdir: created directory `/usr/local/heartbeat/usr/lib/ocf'
mkdir: created directory `/usr/local/heartbeat/usr/lib/ocf/lib'
mkdir: created directory `/usr/local/heartbeat/usr/lib/ocf/lib/heartbeat'
[root@tiandong64 ha.d]# cd !$
cd /usr/local/heartbeat/usr/lib/ocf/lib/heartbeat
[root@tiandong64 heartbeat]# pwd
/usr/local/heartbeat/usr/lib/ocf/lib/heartbeat
[root@tiandong64 heartbeat]# cp /usr/lib/ocf/lib/heartbeat/ocf-* .
[root@tiandong64 heartbeat]# ls
ocf-binaries ocf-directories ocf-rarun ocf-returncodes ocf-shellfuncs
[root@tiandong64 heartbeat]# ln -sv /usr/local/heartbeat/lib64/heartbeat/plugins/* /usr/local/heartbeat/lib/heartbeat/plugins/
`/usr/local/heartbeat/lib/heartbeat/plugins/HBauth' -> `/usr/local/heartbeat/lib64/heartbeat/plugins/HBauth'
`/usr/local/heartbeat/lib/heartbeat/plugins/HBcomm' -> `/usr/local/heartbeat/lib64/heartbeat/plugins/HBcomm'
`/usr/local/heartbeat/lib/heartbeat/plugins/quorum' -> `/usr/local/heartbeat/lib64/heartbeat/plugins/quorum'
`/usr/local/heartbeat/lib/heartbeat/plugins/tiebreaker' -> `/usr/local/heartbeat/lib64/heartbeat/plugins/tiebreaker'
[root@tiandong64 heartbeat]# chkconfig --add heartbeat
[root@tiandong64 heartbeat]# chkconfig heartbeat on
6)heartbeat配置
heartbeat的配置主要涉及到三个文件:
haresources 用来配置要让Heartbeat托管的服务
authkeys 是用来指定Heartbeat的认证方式。
ha.cf 主配置文件
(1)主配置文件
[root@tiandong64 ~]# cd /usr/local/heartbeat/etc/ha.d/
[root@tiandong64 ha.d]# grep -v '^#' ha.cf
debugfile /var/log/ha-debug #用于记录heartbeat的调试信息
logfile /var/log/ha-log #设置heartbeat的日志,这里用的是系统日志
logfacility local0 #设置heartbeat的日志,这里用的是系统日志
keepalive 2 #设定心跳(监测)时间时间为2秒
deadtime 30 #指定若备用节点在30秒内未收到主节点心跳信号,则接管主服务器资源
warntime 10 #指定心跳延迟的时间为10秒,10秒内备节点不能接收主节点心跳信号,
initdead 120 #系统启动或重启后预留的忽略时间段,取值至少为deadtime的两倍
udpport 694 #广播/单播通讯使用的Udp端口
ucast eth0 192.168.199.6 #采用网卡eth0的udp单播来组织心跳,后面跟的IP地址为双机对方IP地址
auto_failback on #定义当主节点恢复后,是否将服务自动切回(on是自动切回)
node tiandong64 #主节点名称
node tiandong66 #备用节点名称
ping 192.168.199.1 #通过ping网关检测心跳是否正常,仅用来测试网络
respawn hacluster /usr/local/heartbeat/libexec/heartbeat/ipfail #指定和heartbeat一起启动、关闭的进程
apiauth ipfail gid=haclient uid=hacluster #设置启动IPfail的用户和组
资源配置文件
(2)[root@tiandong64 ha.d]# grep -v '^#' haresources 配置资源文件
tiandong64 IPaddr::192.168.199.111/24/eth0 Filesystem::192.168.199.3:/wwwdir::/var/www/html::nfs httpd
tiandong64 主服务器主机名
IPaddr::192.168.199.111/24/eth0 #指定VIP以及绑定的网卡
Filesystem::192.168.199.3:/wwwdir::/var/www/html::nfs #指定挂载的存储
httpd #指定要启动的服务。这个服务必须是在/etc/init.d下或者/usr/local/heartbeat/etc/ha.d/resource.d目录下注:tiandong64是主服务器的主机名, tiandong66上不需要修改。这样资源默认会加一这个主机上。当tiandong64坏了,tiandong66会再接管。
(3)认证文件
[root@tiandong64 ha.d]# vim authkeys 认证文件
auth 3
#1 crc
#2 sha1 HI!
3 md5 Hello!
(4)编写httpd启动脚本
[root@tiandong64 resource.d]# pwd
/usr/local/heartbeat/etc/ha.d/resource.d
[root@tiandong64 resource.d]# vim httpd
#!/bin/bash
/etc/init.d/httpd $1
[root@tiandong64 resource.d]# chmod 755 httpd
[root@tiandong64 ~]# cd /usr/local/heartbeat/etc/ha.d/
[root@tiandong64 ha.d]# ls
authkeys ha.cf harc haresources rc.d README.config resource.d shellfuncs
(5)配置文件复制到备机上。
[root@tiandong64 ha.d]# scp authkeys ha.cf haresources 192.168.199.6:`pwd`
[root@tiandong64 resource.d]# scp httpd 192.168.199.6:`pwd`
三、测试
1、手动加载VIP:192.168.199.111到网卡eth0上面。
[root@tiandong64 resource.d]# ./IPaddr 192.168.199.111/24/eth0 start
INFO: Using calculated netmask for 192.168.199.111: 255.255.255.0
DEBUG: Using calculated broadcast for 192.168.199.111: 192.168.199.255
INFO: eval ifconfig eth0:0 192.168.199.111 netmask 255.255.255.0 broadcast 192.168.199.255
DEBUG: Sending Gratuitous Arp for 192.168.199.111 on eth0:0 [eth0]
ARPING 192.168.199.111 from 192.168.199.111 eth0
INFO: Success
INFO: Success
[root@tiandong64 resource.d]# ip a
1: lo: <LOOPBACK,UP,LOWER_UP> mtu 16436 qdisc noqueue state UNKNOWN
link/loopback 00:00:00:00:00:00 brd 00:00:00:00:00:00
inet 127.0.0.1/8 scope host lo
inet6 ::1/128 scope host
valid_lft forever preferred_lft forever
2: eth0: <BROADCAST,MULTICAST,UP,LOWER_UP> mtu 1500 qdisc pfifo_fast state UP qlen 1000
link/ether 00:0c:29:c7:20:71 brd ff:ff:ff:ff:ff:ff
inet 192.168.199.4/24 brd 192.168.199.255 scope global eth0
inet 192.168.199.111/24 brd 192.168.199.255 scope global secondary eth0:0
inet6 fe80::20c:29ff:fec7:2071/64 scope link
valid_lft forever preferred_lft forever
2、手动测试NFS挂载
[root@tiandong64 resource.d]# ./Filesystem 192.168.199.3:/wwwdir /var/www/html/ nfs start
INFO: Running start for 192.168.199.3:/wwwdir on /var/www/html
INFO: Success
INFO: Success
[root@tiandong64 resource.d]# df -h
Filesystem Size Used Avail Use% Mounted on
/dev/sda3 28G 2.3G 24G 9% /
tmpfs 491M 0 491M 0% /dev/shm
/dev/sda1 194M 29M 155M 16% /boot
192.168.199.3:/wwwdir 28G 5.5G 21G 22% /var/www/html
[root@tiandong64 resource.d]# /etc/init.d/httpd start 测试访问
[root@tiandong64 resource.d]# curl 192.168.199.4
heartbeat test
[root@tiandong64 resource.d]# ./IPaddr 192.168.199.111/24/eth0 stop
SIOCDELRT: No such process
INFO: ifconfig eth0:0 down
INFO: Success
INFO: Success
[root@tiandong64 resource.d]# ./Filesystem 192.168.199.3:/wwwdir /var/www/html/ nfs stop
INFO: Running stop for 192.168.199.3:/wwwdir on /var/www/html
INFO: Trying to unmount /var/www/html
INFO: unmounted /var/www/html successfully
INFO: Success
INFO: Success
[root@tiandong64 resource.d]# df -h
Filesystem Size Used Avail Use% Mounted on
/dev/sda3 28G 2.3G 24G 9% /
tmpfs 491M 0 491M 0% /dev/shm
/dev/sda1 194M 29M 155M 16% /boot
[root@tiandong64 resource.d]# /etc/init.d/httpd stop
[root@tiandong64 ~]# /etc/init.d/heartbeat start
Starting High-Availability services: INFO: Resource is stopped
[ OK ]
3、配置tiandong66(192.168.199.6)
[root@tiandong66 ~]# cd /usr/local/heartbeat/etc/ha.d/
[root@tiandong66 ha.d]# vim ha.cf
121 ucast ens33 192.168.199.4
[root@tiandong66 ha.d]# vim haresources
45 tiandong64 IPaddr::192.168.199.111/24/ens33 Filesystem::192.168.199.3:/wwwdir::/var/www/html::nfs httpd
[root@tiandong66 ha.d]# chmod 755 authkeys
4、两台机器启动heartbeat服务
[root@tiandong64 ~]# /etc/init.d/heartbeat start
[root@tiandong66 ~]# systemctl start heartbeat
5、查看集群
[root@tiandong64 ~]# ip a 查看VIP加载
1: lo: <LOOPBACK,UP,LOWER_UP> mtu 16436 qdisc noqueue state UNKNOWN
link/loopback 00:00:00:00:00:00 brd 00:00:00:00:00:00
inet 127.0.0.1/8 scope host lo
inet6 ::1/128 scope host
valid_lft forever preferred_lft forever
2: eth0: <BROADCAST,MULTICAST,UP,LOWER_UP> mtu 1500 qdisc pfifo_fast state UP qlen 1000
link/ether 00:0c:29:c7:20:71 brd ff:ff:ff:ff:ff:ff
inet 192.168.199.4/24 brd 192.168.199.255 scope global eth0
inet 192.168.199.111/24 brd 192.168.199.255 scope global secondary eth0:0
inet6 fe80::20c:29ff:fec7:2071/64 scope link
valid_lft forever preferred_lft forever
[root@tiandong64 ~]# df -h|tail -1 查看挂载
192.168.199.3:/wwwdir 28G 5.5G 21G 22% /var/www/html
[root@tiandong64 ~]# netstat -antup|grep httpd 查看web服务
tcp 0 0 :::80 :::* LISTEN 9286/httpd
在备机上没有这些资源。
6、故障模拟。
停止tiandong64上面的heartbeat服务
[root@tiandong64 ~]# /etc/init.d/heartbeat stop
[root@tiandong66 ~]# ip a |grep ens33
2: ens33: <BROADCAST,MULTICAST,UP,LOWER_UP> mtu 1500 qdisc pfifo_fast state UP qlen 1000
inet 192.168.199.6/24 brd 192.168.199.255 scope global ens33
inet 192.168.199.111/24 brd 192.168.199.255 scope global secondary ens33:0
[root@tiandong66 ~]# df -h|tail -1
192.168.199.3:/wwwdir 28G 5.5G 21G 22% /var/www/html
[root@tiandong66 ~]# netstat -antup|grep httpd
tcp6 0 0 :::80 :::* LISTEN 14670/httpd
恢复tiandong64上面的服务,资源有切回来了。
[root@tiandong64 ~]# /etc/init.d/heartbeat start
Starting High-Availability services: INFO: Resource is stopped
[ OK ]
[root@tiandong64 ~]# ip a
1: lo: <LOOPBACK,UP,LOWER_UP> mtu 16436 qdisc noqueue state UNKNOWN
link/loopback 00:00:00:00:00:00 brd 00:00:00:00:00:00
inet 127.0.0.1/8 scope host lo
inet6 ::1/128 scope host
valid_lft forever preferred_lft forever
2: eth0: <BROADCAST,MULTICAST,UP,LOWER_UP> mtu 1500 qdisc pfifo_fast state UP qlen 1000
link/ether 00:0c:29:c7:20:71 brd ff:ff:ff:ff:ff:ff
inet 192.168.199.4/24 brd 192.168.199.255 scope global eth0
inet 192.168.199.111/24 brd 192.168.199.255 scope global secondary eth0:1
inet6 fe80::20c:29ff:fec7:2071/64 scope link
valid_lft forever preferred_lft forever
[root@tiandong64 ~]# df -h|tail -1
192.168.199.3:/wwwdir 28G 5.5G 21G 22% /var/www/html
[root@tiandong64 ~]# netstat -antup|grep httpd
tcp 0 0 :::80 :::* LISTEN 10646/httpd
OK,heartbeat就到这里结束了,欢迎各位同学的指教。
QQ:1127000493
tiandong66配置:
[root@tiandong66 ~]# chkconfig --add heartbeat
[root@tiandong66 ~]# chkconfig heartbeat on
[root@tiandong66 ~]# cd /usr/local/heartbeat/etc/ha.d/
[root@tiandong66 ha.d]# cp /root/heartbeat/Heartbeat-3-0-958e11be8686/doc/{authkeys,ha.cf,haresources} .
[root@tiandong66 ha.d]# chmod 600 authkeys
[root@tiandong66 ha.d]# mkdir -pv /usr/local/heartbeat/usr/lib/ocf/lib/heartbeat
mkdir: 已创建目录 "/usr/local/heartbeat/usr"
mkdir: 已创建目录 "/usr/local/heartbeat/usr/lib"
mkdir: 已创建目录 "/usr/local/heartbeat/usr/lib/ocf"
mkdir: 已创建目录 "/usr/local/heartbeat/usr/lib/ocf/lib"
mkdir: 已创建目录 "/usr/local/heartbeat/usr/lib/ocf/lib/heartbeat"
[root@tiandong66 ha.d]# cd !$
cd /usr/local/heartbeat/usr/lib/ocf/lib/heartbeat
[root@tiandong66 heartbeat]# cp /usr/lib/ocf/lib/heartbeat/ocf-* .
[root@tiandong66 heartbeat]# ln -sv /usr/local/heartbeat/lib64/heartbeat/plugins/* /usr/local/heartbeat/lib/heartbeat/plugins/
"/usr/local/heartbeat/lib/heartbeat/plugins/HBauth" -> "/usr/local/heartbeat/lib64/heartbeat/plugins/HBauth"
"/usr/local/heartbeat/lib/heartbeat/plugins/HBcomm" -> "/usr/local/heartbeat/lib64/heartbeat/plugins/HBcomm"
"/usr/local/heartbeat/lib/heartbeat/plugins/quorum" -> "/usr/local/heartbeat/lib64/heartbeat/plugins/quorum"
"/usr/local/heartbeat/lib/heartbeat/plugins/tiebreaker" -> "/usr/local/heartbeat/lib64/heartbeat/plugins/tiebreaker"
[root@tiandong66 heartbeat]#
[root@tiandong66 heartbeat]# systemctl enable heartbeat