声明:本文转载自:https://blog.csdn.net/litianxiang_kaola/article/details/79481422
这里介绍两种整合SpringBoot和Mybatis的模式,分别是“全注解版” 和 “注解xml合并版”。
前期准备
开发环境
- 开发工具:IDEA
- JDK:1.8
- 技术:SpringBoot、Maven、Mybatis
创建项目
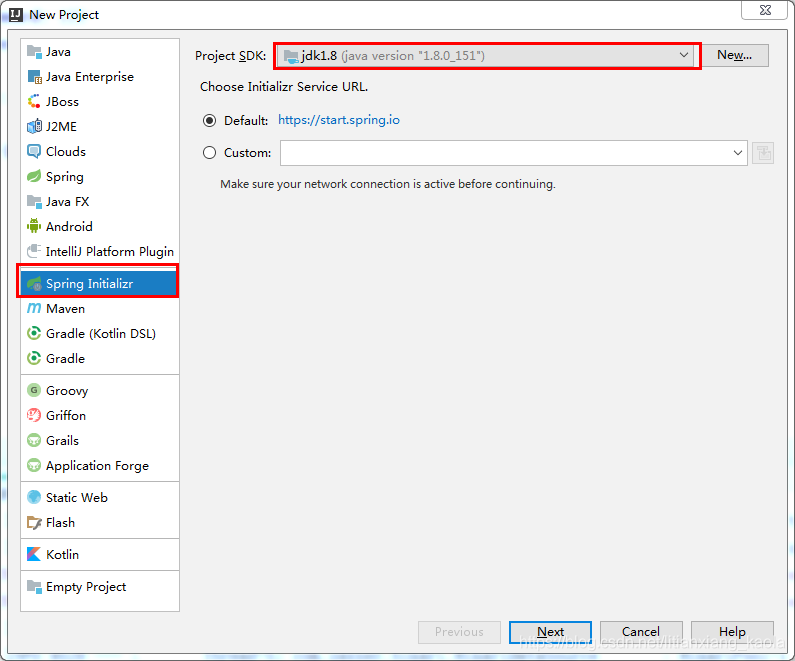
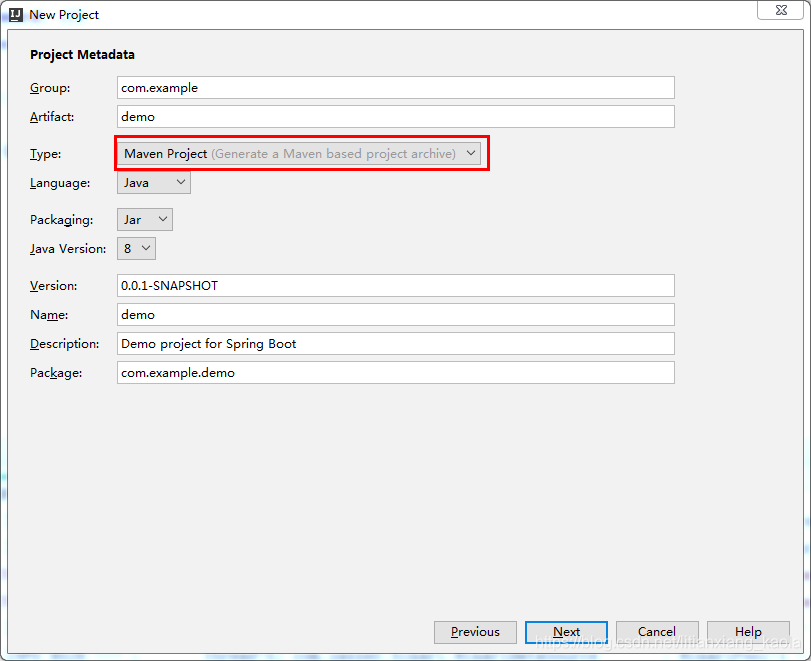
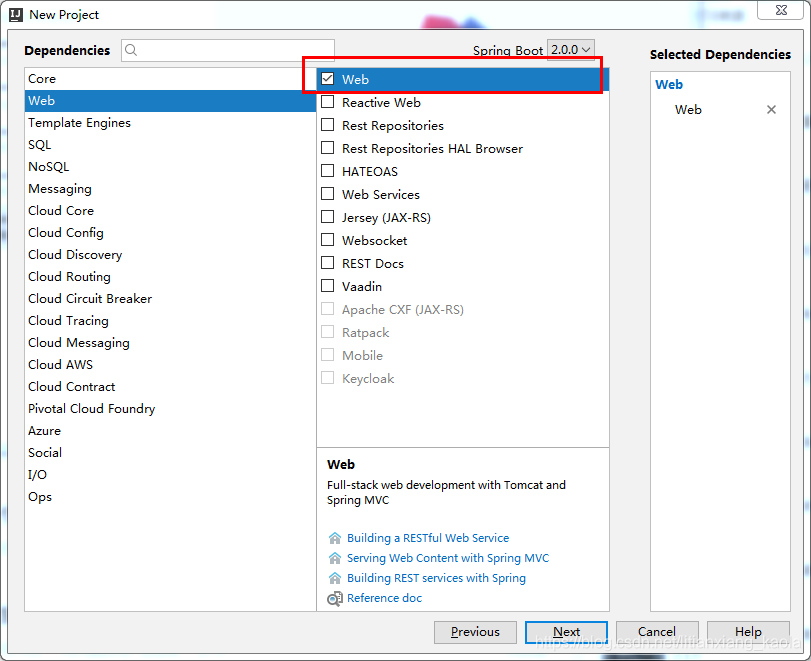
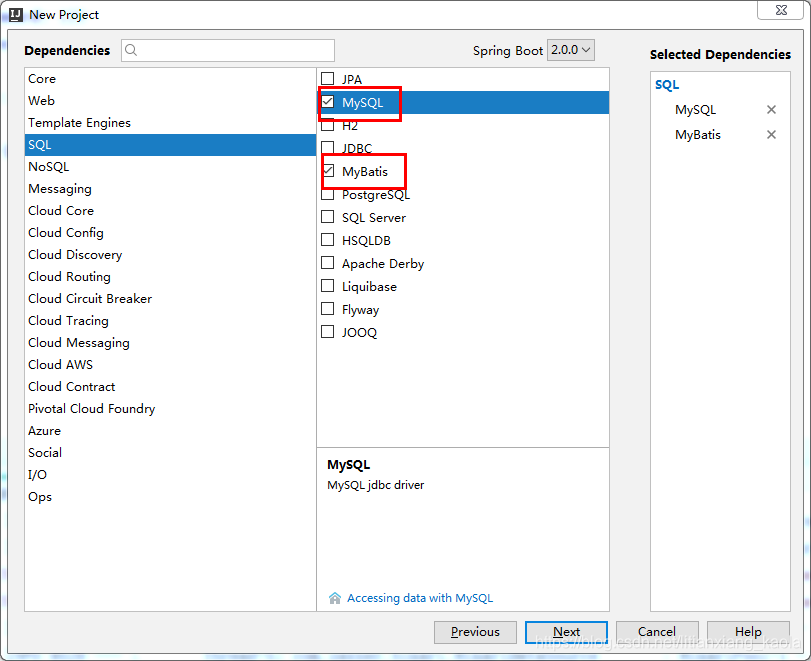

项目结构
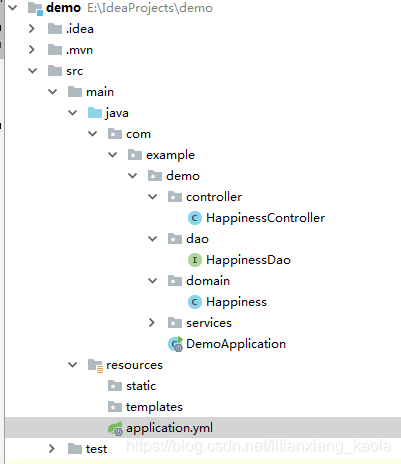
Maven依赖
<?xml version="1.0" encoding="UTF-8"?>
<project xmlns="http://maven.apache.org/POM/4.0.0" xmlns:xsi="http://www.w3.org/2001/XMLSchema-instance"
    xsi:schemaLocation="http://maven.apache.org/POM/4.0.0 http://maven.apache.org/xsd/maven-4.0.0.xsd">
    <modelVersion>4.0.0</modelVersion>

    <groupId>com.example</groupId>
    <artifactId>demo</artifactId>
    <version>0.0.1-SNAPSHOT</version>
    <packaging>jar</packaging>

    <name>demo</name>
    <description>Demo project for Spring Boot</description>

    <parent>
        <groupId>org.springframework.boot</groupId>
        <artifactId>spring-boot-starter-parent</artifactId>
        <version>2.0.0.RELEASE</version>
        <relativePath/> <!-- lookup parent from repository -->
    </parent>

    <properties>
        <project.build.sourceEncoding>UTF-8</project.build.sourceEncoding>
        <project.reporting.outputEncoding>UTF-8</project.reporting.outputEncoding>
        <java.version>1.8</java.version>
    </properties>

    <dependencies>
        <dependency>
            <groupId>org.springframework.boot</groupId>
            <artifactId>spring-boot-starter-web</artifactId>
        </dependency>
        <dependency>
            <groupId>org.mybatis.spring.boot</groupId>
            <artifactId>mybatis-spring-boot-starter</artifactId>
            <version>1.3.1</version>
        </dependency>

        <dependency>
            <groupId>mysql</groupId>
            <artifactId>mysql-connector-java</artifactId>
            <scope>runtime</scope>
        </dependency>
        <dependency>
            <groupId>org.springframework.boot</groupId>
            <artifactId>spring-boot-starter-test</artifactId>
            <scope>test</scope>
        </dependency>
    </dependencies>

    <build>
        <plugins>
            <plugin>
                <groupId>org.springframework.boot</groupId>
                <artifactId>spring-boot-maven-plugin</artifactId>
            </plugin>
        </plugins>
    </build>
</project>
全注解版
SpringBoot配置文件
这里使用yml格式的配置文件,将application.properties改名为application.yml。
#配置数据源
spring:
  datasource:
     url: jdbc:mysql://127.0.0.1:3306/dianping?useUnicode=true&characterEncoding=utf8
     username: root
     password: 123
     driver-class-name: com.mysql.jdbc.Driver
SpringBoot会自动加载application.yml相关配置,数据源就会自动注入到sqlSessionFactory中,sqlSessionFactory会自动注入到Mapper中。
实体类
public class Happiness {
    private Long id;
    private String city;
    private Integer num;

    //getters、setters、toString
}
映射类
@Mapper
public interface HappinessDao {
    @Select("SELECT * FROM happiness WHERE city = #{city}")
    Happiness findHappinessByCity(@Param("city") String city);

    @Insert("INSERT INTO happiness(city, num) VALUES(#{city}, #{num})")
    int insertHappiness(@Param("city") String city, @Param("num") Integer num);
}
Service类
事务管理只需要在方法上加个注解:@Transactional
@Service
public class HappinessService {
    @Autowired
    private HappinessDao happinessDao;

    public Happiness selectService(String city){
        return happinessDao.findHappinessByCity(city);
    }

    @Transactional
    public void insertService(){
        happinessDao.insertHappiness("西安", 9421);
        int a = 1 / 0; //模拟故障
        happinessDao.insertHappiness("长安", 1294);
    }
}
Controller类
@RestController
@RequestMapping("/demo")
public class HappinessController {
    @Autowired
    private HappinessService happinessService;

    @RequestMapping("/query")
    public Happiness testQuery(){
        return happinessService.selectService("北京");
    }

    @RequestMapping("/insert")
    public Happiness testInsert(){
        happinessService.insertService();
        return happinessService.selectService("西安");
    }
}
测试
http://localhost:8080/demo/query
http://localhost:8080/demo/insert
注解xml合并版
项目结构
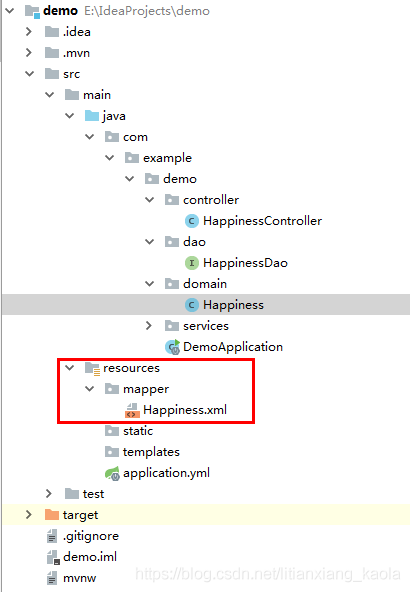
SpringBoot配置文件
#配置数据源
spring:
  datasource:
     url: jdbc:mysql://127.0.0.1:3306/dianping
     username: root
     password: 123
     driver-class-name: com.mysql.jdbc.Driver

#指定mybatis映射文件的地址
mybatis:
  mapper-locations: classpath:mapper/*.xml
映射类
@Mapper
public interface HappinessDao {
    Happiness findHappinessByCity(String city);
    int insertHappiness(HashMap<String, Object> map);
}
映射文件
<mapper namespace="com.example.demo.dao.HappinessDao">
    <select id="findHappinessByCity" parameterType="String" resultType="com.example.demo.domain.Happiness">
        SELECT * FROM happiness WHERE city = #{city}
    </select>

    <insert id="insertHappiness" parameterType="HashMap" useGeneratedKeys="true" keyProperty="id">
        INSERT INTO happiness(city, num) VALUES(#{city}, #{num})
    </insert>
</mapper>
Service类
事务管理只需要在方法上加个注解:@Transactional
@Service
public class HappinessService {
    @Autowired
    private HappinessDao happinessDao;

    public Happiness selectService(String city){
        return happinessDao.findHappinessByCity(city);
    }

    @Transactional
    public void insertService(){
        HashMap<String, Object> map = new HashMap<String, Object>();
        map.put("city", "西安");
        map.put("num", 9421);

        happinessDao.insertHappiness(map);
        int a = 1 / 0; //模拟故障
        happinessDao.insertHappiness(map);
    }
}
Controller类
@RestController
@RequestMapping("/demo")
public class HappinessController {
    @Autowired
    private HappinessService happinessService;

    @RequestMapping("/query")
    public Happiness testQuery(){
        return happinessService.selectService("北京");
    }

    @RequestMapping("/insert")
    public Happiness testInsert(){
        happinessService.insertService();
        return happinessService.selectService("西安");
    }
}
SpringBoot整合Mybatis打印sql语句
如果使用的是application.properties文件,加入如下配置
logging.level.com.example.demo.mapper=debug
logging.level,后面的路径指的是mybatis对应的方法接口所在的包。并不是mapper.xml所在的包。
如果使用的是application.yml文件,加入如下配置:
logging:
  level:
    com.example.demo.mapper: debug
在mybatis中@MapperScan和@Mapper的区别
在使用Mybatis时需要把映射类*.mapper注册到Bean工厂中,这时候我们有两种方式可以注入,一种是在每个*.mapper类上加上@Mapper注解,另一种就是在Application启动类上加@MapperScan注解来扫描类
(1)方式一:使用@Mapper注解
为了让DemoMapper能够让别的类进行引用,我们可以在DemMapper类上添加@Mapper注解:

直接在Mapper类上面添加注解@Mapper,这种方式要求每一个mapper类都需要添加此注解,比较麻烦。
(2)方式二:使用@MapperScan注解
通过使用@MapperScan可以指定要扫描的Mapper类的包的路径,比如:
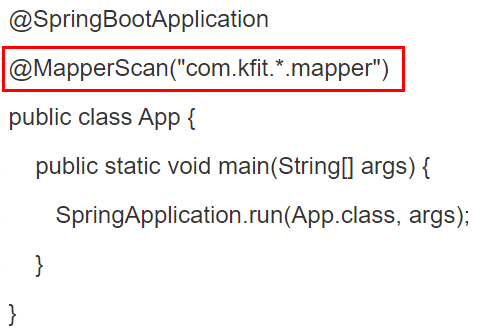
使用@MapperScan注解多个包
