一、Bean的配置
Spring可以看做是一个大型工厂,生产和管理Spring容器中的Bean。如何使用这个工厂生产和管理Bean,需要开发者将Bean配置在Spring配置文件中。Spring框架支持XML和Properties两种格式的配置文件,在实际开发中,常用XML格式的配置文件。
Spring IOC容器管理Bean时,需要了解Bean的类名、名称、依赖项、属性、生命周期及作用域等信息。为此,Spring IOC提供了一系列配置项,用于Bean在IOC容器中的定义。
① class
该配置项是强制项,用于指定创建Bean实例的Bean类的路径。
② name
该配置项是强制项,用于指定Bean唯一的标识符,在基于 XML 的配置项中,可以使用 id和或 name 属性来指定 Bean唯一 标识符。
③ scope
该配置项是可选项,用于设定创建Bean对象的作用域。
④ constructor-arg
该配置项是可选项,用于指定通过构造函数注入依赖数据到Bean。
⑤ properties
该配置项是可选项,用于指定通过set方法注入依赖数据到Bean。
⑥ autowiring mode
该配置项是可选项,用于指定通过自动依赖方法注入依赖数据到Bean。
⑦ lazy-initialization mode
该配置项是可选项,用于指定IOC容器延迟创建Bean,在用户请求时创建Bean,而不要在启动时就创建Bean。
⑧ initialization
该配置项是可选项,用于指定IOC容器完成Bean必要的创建后,调用Bean类提供的回调方法对Bean实例进一步处理。
⑨ destruction
该配置项是可选项,用于指定IOC容器在销毁Bean时,调用Bean类提供的回调方法。
<?xml version="1.0" encoding="UTF-8"?>
<beans xmlns="http://www.springframework.org/schema/beans"
    xmlns:xsi="http://www.w11.org/2001/XMLSchema-instance"
    xsi:schemaLocation="http://www.springframework.org/schema/beans
        http://www.springframework.org/schema/beans/spring-beans.xsd">
    <!-- 使用id属性定义myTestDIDao,其对应的实现类为dao.TestDIDaoImpl-->
    <bean id="myTestDIDao" class="dao.TestDIDaoImpl" />
    <!-- 使用构造方法注入 -->
    <bean id="testDIService" class="service.TestDIServiceImpl">
        <!--给构造方法传引用类型的参数值myTestDIDao-->
        <constructor-arg index="0" ref="myTestDIDao"/>
    </bean>
</beans>
二、Bean的实例化
Spring框架实例化Bean有三种方式:
1.构造方法实例化
2.静态工厂实例化
3.实例工厂实例化
其中最常用的实例方法是构造方法实例化
本次目录结构:
1.构造方法实例化
在Spring框架中,Spring容器可以调用Bean对应类中无参数构造方法来实例化Bean,这种方式称为构造方法实例化。
1.1创建Web项目ch3
1.2创建BeanClass类
在ch3目录下,创建instance包,并在该包中创建BeanClass类,代码如下:
BeanClass.java
package instance;

public class BeanClass {
    public String message;
    public BeanClass() {
        message = "构造方法实例化Bean";
    }
    public BeanClass(String s) {
        message = s;
    }
}
1.3创建配置文件
在ch3的src目录下,创建Spring的配置文件applicationContext.xml,在配置文件中定义一个id为constructorInstance的Bean,代码如下:
applicationContext.xml
<?xml version="1.0" encoding="UTF-8"?>
<beans xmlns="http://www.springframework.org/schema/beans"
       xmlns:xsi="http://www.w3.org/2001/XMLSchema-instance"
       xsi:schemaLocation="http://www.springframework.org/schema/beans

http://www.springframework.org/schema/beans/spring-beans.xsd">
    <!-- 构造方法实例化Bean 默认scope="singleleton"单例模式
              scope="prototype" 每次获取prototype定义的bean,都将创造新的Bean实例
    -->
    <bean id="constructorInstance" class="instance.BeanClass" />
</beans>
1.4创建测试类
在ch3的src目录下创建test包,并在该包下创建测试类TestInstance,代码如下:
TestInstance.java
package test;

import org.springframework.context.ApplicationContext;
import org.springframework.context.support.ClassPathXmlApplicationContext;

import instance.BeanClass;

public class TestInstance {

    public static void main(String[] args) {
        // 初始化Spring容器ApplicationContext,加载配置文件
        ApplicationContext appCon = new ClassPathXmlApplicationContext("applicationContext.xml");
        //测试构造方法实例化Bean
        BeanClass b1 = (BeanClass)appCon.getBean("constructorInstance");
        System.out.println(b1 + b1.message);
    }

}
运行结果

2.静态化工厂实例化
使用静态工厂实例化Bean时,要求开发者在工厂类中创建一个静态的方法来创建Bean的实例。配置Bean时,class属性指定静态工厂类,同时还需要使用factory-method属性指定工厂类中的静态方法。
2.1创建工厂类BeanStaticFactory
在instance包中,创建工厂类BeanStaticFactory,该类中有个静态方法来实例化对象,具体代码如下:
BeanStaticFactory.java
package instance;

public class BeanStaticFactory {
    private static BeanClass beanInstance = new BeanClass("调用静态工厂方法实例化Bean");
    public static BeanClass createInstance() {
        return beanInstance;
    }
}
2.2编辑配置文件
在配置文件applicationContext.xml中,添加如下配置代码:
<!-- 静态工厂方法实例化Bean,createInstance为静态工厂类BeanStaticFactory中的静态方法 -->
    <bean id="staticFactoryInstance"
          class="instance.BeanStaticFactory"
          factory-method="createInstance" />
applicationContext.xml
<?xml version="1.0" encoding="UTF-8"?>
<beans xmlns="http://www.springframework.org/schema/beans"
       xmlns:xsi="http://www.w3.org/2001/XMLSchema-instance"
       xsi:schemaLocation="http://www.springframework.org/schema/beans

http://www.springframework.org/schema/beans/spring-beans.xsd">
    <!-- 构造方法实例化Bean,默认scope="singleleton"单例模式
              scope="prototype" 每次获取prototype定义的bean,都将创造新的Bean实例
    -->
    <bean id="constructorInstance" class="instance.BeanClass" />
    <!-- 静态工厂方法实例化Bean,createInstance为静态工厂类BeanStaticFactory中的静态方法 -->
    <bean id="staticFactoryInstance"
          class="instance.BeanStaticFactory"
          factory-method="createInstance" />
</beans>
2.3添加测试代码
在测试类TestInstance中,添加如下代码:
BeanClass b2 = (BeanClass)appCon.getBean("staticFactoryInstance");
        System.out.println(b2 + b2.message);
package test;

import org.springframework.context.ApplicationContext;
import org.springframework.context.support.ClassPathXmlApplicationContext;

import instance.BeanClass;

public class TestInstance {

    public static void main(String[] args) {
        // 初始化Spring容器ApplicationContext,加载配置文件
        ApplicationContext appCon = new ClassPathXmlApplicationContext("applicationContext.xml");
        //测试构造方法实例化Bean
        BeanClass b1 = (BeanClass)appCon.getBean("constructorInstance");
        System.out.println(b1 + b1.message);

        BeanClass b2 = (BeanClass)appCon.getBean("staticFactoryInstance");
        System.out.println(b2 + b2.message);
    }

}
运行结果

3.实例工厂实例化
使用实例工厂实例化Bean时,要求开发者在工厂类中创建一个实例化方法来创建Bean的实例。配置Bean时,需要使用factory-bean属性指定配置的实例工厂,同时还需要factory-method属性指定实例工厂中的实例方法。
3.1创建工厂类BeanInstanceFactory
在instance包中,创建工厂类BeanInstanceFactory,该类中有个实例方法来实例化对象,具体代码如下:
BeanStaticFactory.java
package instance;

public class BeanStaticFactory {
    private static BeanClass beanInstance = new BeanClass("调用静态工厂方法实例化Bean");
    public static BeanClass createInstance() {
        return beanInstance;
    }
}
3.2编辑配置文件
在配置文件applicationContext.xml中,添加如下配置代码:
    <!-- 配置工厂 -->
    <bean id="myFactory" class="instance.BeanInstanceFactory" />
    <!-- 使用factory-bean属性指定配置工厂,使用Factory-method属性指定使用工厂中哪个方法实例化Bean -->
    <bean id="instanceFactoryInstance"
          factory-bean="myFactory"
          factory-method="createBeanClassInstance" />
applicationContext.xml
<?xml version="1.0" encoding="UTF-8"?>
<beans xmlns="http://www.springframework.org/schema/beans"
       xmlns:xsi="http://www.w3.org/2001/XMLSchema-instance"
       xsi:schemaLocation="http://www.springframework.org/schema/beans

http://www.springframework.org/schema/beans/spring-beans.xsd">
    <!-- 构造方法实例化Bean 默认scope="singleleton"单例模式
             scope="prototype" 每次获取prototype定义的bean,都将创造新的Bean实例
    -->
    <bean id="constructorInstance" class="instance.BeanClass" />
    <!-- 静态工厂方法实例化Bean,createInstance为静态工厂类BeanStaticFactory中的静态方法 -->
    <bean id="staticFactoryInstance"
          class="instance.BeanStaticFactory"
          factory-method="createInstance" />
    <!-- 配置工厂 -->
    <bean id="myFactory" class="instance.BeanInstanceFactory" />
    <!-- 使用factory-bean属性指定配置工厂,使用Factory-method属性指定使用工厂中哪个方法实例化Bean -->
    <bean id="instanceFactoryInstance"
          factory-bean="myFactory"
          factory-method="createBeanClassInstance" />
</beans>
3.3添加测试代码
在测试类TestInstance中,添加如下代码:
BeanClass b3 = (BeanClass)appCon.getBean("instanceFactoryInstance");
System.out.println(b3 + b3.message);
TestInstance.java
package test;

import org.springframework.context.ApplicationContext;
import org.springframework.context.support.ClassPathXmlApplicationContext;

import instance.BeanClass;

public class TestInstance {

    public static void main(String[] args) {
        // 初始化Spring容器ApplicationContext,加载配置文件
        ApplicationContext appCon = new ClassPathXmlApplicationContext("applicationContext.xml");
        //测试构造方法实例化Bean
        BeanClass b1 = (BeanClass)appCon.getBean("constructorInstance");
        System.out.println(b1 + b1.message);

        BeanClass b2 = (BeanClass)appCon.getBean("staticFactoryInstance");
        System.out.println(b2 + b2.message);

        BeanClass b3 = (BeanClass)appCon.getBean("instanceFactoryInstance");
        System.out.println(b3 + b3.message);
    }

}
运行结果

三、Bean的作用域

(1)当一个bean的作用域为Singleton,那么Spring IoC容器中只会存在一个共享的bean实例,并且所有对bean的请求,只要id与该bean定义相匹配,则只会返回bean的同一实例。Singleton是单例类型,就是在创建起容器时就同时自动创建了一个bean的对象,不管你是否使用,他都存在了,每次获取到的对象都是同一个对象。注意,Singleton作用域是Spring中的缺省作用域。要在XML中将bean定义成singleton,可以这样配置:
<bean id="ServiceImpl" class="cn.csdn.service.ServiceImpl" scope="singleton">
(2)当一个bean的作用域为Prototype,表示一个bean定义对应多个对象实例。Prototype作用域的bean会导致在每次对该bean请求(将其注入到另一个bean中,或者以程序的方式调用容器的getBean()方法)时都会创建一个新的bean实例。Prototype是原型类型,它在我们创建容器的时候并没有实例化,而是当我们获取bean的时候才会去创建一个对象,而且我们每次获取到的对象都不是同一个对象。根据经验,对有状态的bean应该使用prototype作用域,而对无状态的bean则应该使用singleton作用域。在XML中将bean定义成prototype,可以这样配置:
<bean id="account" class="com.foo.DefaultAccount" scope="prototype"/>
或者
<bean id="account" class="com.foo.DefaultAccount" singleton="false"/>
(3)当一个bean的作用域为Request,表示在一次HTTP请求中,一个bean定义对应一个实例;即每个HTTP请求都会有各自的bean实例,它们依据某个bean定义创建而成。该作用域仅在基于web的Spring ApplicationContext情形下有效。考虑下面bean定义:
<bean id="loginAction" class="cn".csdn.LoginAction" scope="request"/>
针对每次HTTP请求,Spring容器会根据loginAction bean的定义创建一个全新的LoginAction bean实例,且该loginAction bean实例仅在当前HTTP request内有效,因此可以根据需要放心的更改所建实例的内部状态,而其他请求中根据loginAction bean定义创建的实例,将不会看到这些特定于某个请求的状态变化。当处理请求结束,request作用域的bean实例将被销毁。
(4)当一个bean的作用域为Session,表示在一个HTTP Session中,一个bean定义对应一个实例。该作用域仅在基于web的Spring ApplicationContext情形下有效。考虑下面bean定义:
<bean id="userPreferences" class="com.foo.UserPreferences" scope="session"/>
针对某个HTTP Session,Spring容器会根据userPreferences bean定义创建一个全新的userPreferences bean实例,且该userPreferences bean仅在当前HTTP Session内有效。与request作用域一样,可以根据需要放心的更改所创建实例的内部状态,而别的HTTP Session中根据userPreferences创建的实例,将不会看到这些特定于某个HTTP Session的状态变化。当HTTP Session最终被废弃的时候,在该HTTP Session作用域内的bean也会被废弃掉。
(5)当一个bean的作用域为Global Session,表示在一个全局的HTTP Session中,一个bean定义对应一个实例。典型情况下,仅在使用portlet context的时候有效。该作用域仅在基于web的Spring ApplicationContext情形下有效。考虑下面bean定义:
<bean id="user" class="com.foo.Preferences "scope="globalSession"/>
global session作用域类似于标准的HTTP Session作用域,不过仅仅在基于portlet的web应用中才有意义。Portlet规范定义了全局Session的概念,它被所有构成某个portlet web应用的各种不同的portlet所共享。在global session作用域中定义的bean被限定于全局portlet Session的生命周期范围内。
四、Bean的生命周期
在传统的Java应用中,bean的生命周期很简单,使用Java关键字 new 进行Bean 的实例化,然后该Bean 就能够使用了。一旦bean不再被使用,则由Java自动进行垃圾回收。
相比之下,Spring管理Bean的生命周期就复杂多了,正确理解Bean 的生命周期非常重要,因为Spring对Bean的管理可扩展性非常强,下面展示了一个Bean的构造过程
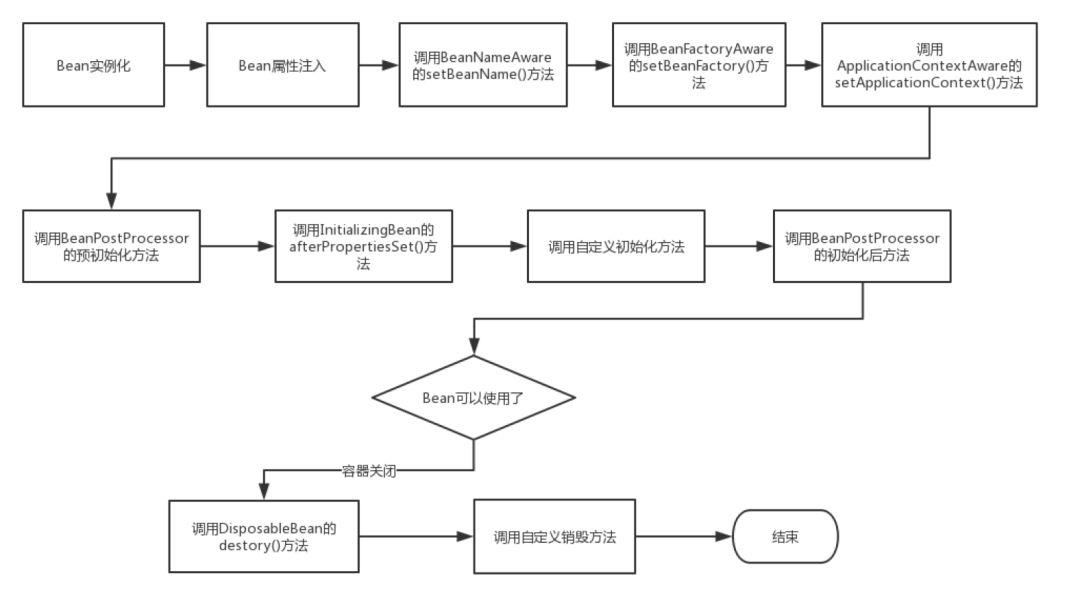
Bean 的生命周期
如上图所示,Bean 的生命周期还是比较复杂的,下面来对上图每一个步骤做文字描述:
1.Spring启动,查找并加载需要被Spring管理的bean,进行Bean的实例化
2.Bean实例化后对将Bean的引入和值注入到Bean的属性中
3.如果Bean实现了BeanNameAware接口的话,Spring将Bean的Id传递给setBeanName()方法
4.如果Bean实现了BeanFactoryAware接口的话,Spring将调用setBeanFactory()方法,将BeanFactory容器实例传入
5.如果Bean实现了ApplicationContextAware接口的话,Spring将调用Bean的setApplicationContext()方法,将bean所在应用上下文引用传入进来。
6.如果Bean实现了BeanPostProcessor接口,Spring就将调用他们的postProcessBeforeInitialization()方法。
7.如果Bean 实现了InitializingBean接口,Spring将调用他们的afterPropertiesSet()方法。类似的,如果bean使用init-method声明了初始化方法,该方法也会被调用
8.如果Bean 实现了BeanPostProcessor接口,Spring就将调用他们的postProcessAfterInitialization()方法。
9.此时,Bean已经准备就绪,可以被应用程序使用了。他们将一直驻留在应用上下文中,直到应用上下文被销毁。
10.如果bean实现了DisposableBean接口,Spring将调用它的destory()接口方法,同样,如果bean使用了destory-method 声明销毁方法,该方法也会被调用。
下面用实例演示Bean的生命周期
目录结构

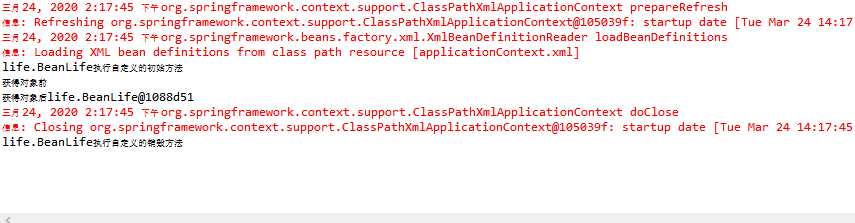
1.创建Bean的实现类
在ch3应用src目录中,创建life包,在life包下创建BeanLife。在类BeanLife中有两个方法,一个是演示初始化过程,一个演示销毁过程。具体代码如下:
BeanLife.java
package life;

public class BeanLife {
    public void initMyself() {
        System.out.println(this.getClass().getName() + "执行自定义的初始方法");
    }
    public void destroyMyself() {
        System.out.println(this.getClass().getName() + "执行自定义的销毁方法");
    }
}
2.配置Bean
在Spring配置文件中,使用实现类BeanLife配置一个id为beanLife的Bean。具体代码如下:
    <!-- 配置bean,使用init-method属性指定的初始化方法 ,使用destroy-method属性指定销毁方法-->
    <bean id="beanLife" class="life.BeanLife" init-method="initMyself" destroy-method="destroyMyself" />
3.测试生命周期
在ch3应用的test包中,创建测试类TestLife,具体代码如下:
TestLife.java
package test;

import org.springframework.context.ApplicationContext;
import org.springframework.context.support.ClassPathXmlApplicationContext;

import life.BeanLife;

public class TestLife {

    public static void main(String[] args) {
        // 初始化Spring容器,加载配置文件
        //为了方便演示销毁的执行,这里使用ClassPathXmlApplicationContext实现类声明容器
        ClassPathXmlApplicationContext ctx = new ClassPathXmlApplicationContext("applicationContext.xml");
        System.out.println("获得对象前");
        BeanLife blife = (BeanLife)ctx.getBean("beanLife");
        System.out.println("获得对象后" + blife);
        ctx.close();

    }

}
测试结果
五、Bean的装配方式
Bean的装配方式可以理解为将Bean依赖注入到Spring容器中,Bean的装配方式即Bean的依赖注入方式。Spring容器支持基于XML配置的装配、基于注解的装配以及自动装配等多种装配方式。本节将主要讲解基于XML配置的装配和基于注解的装配。
1.基于XML配置的装配
通过2.3节的学习之后,我们知道Spring提供了两种基于XML配置的装配方式:构造方法注入和属性setter方法注入。
目录结构
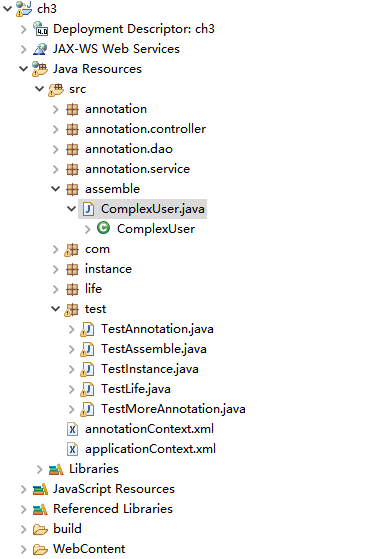
1.1创建Bean的实现类
在ch3应用src目录中,创建包assemble,在assemble包下创建类ComplexUser。在类ComplexUser中分别使用构造方法注入和setter注入
ComplexUser.java
package assemble;

import java.util.Arrays;
import java.util.List;
import java.util.Map;
import java.util.Set;

public class ComplexUser {
    private String uname;
    private List<String> hobbyList;
    private Map<String,String> residenceMap;
    private Set<String> aliasSet;
    private String[] array;

    public ComplexUser(String uname, List<String> hobbyList, Map<String, String> residenceMap, Set<String> aliasSet,
            String[] array) {
        super();
        this.uname = uname;
        this.hobbyList = hobbyList;
        this.residenceMap = residenceMap;
        this.aliasSet = aliasSet;
        this.array = array;
    }

    public ComplexUser() {
        super();
        // TODO Auto-generated constructor stub
    }

    public String getUname() {
        return uname;
    }

    public void setUname(String uname) {
        this.uname = uname;
    }

    public List<String> getHobbyList() {
        return hobbyList;
    }

    public void setHobbyList(List<String> hobbyList) {
        this.hobbyList = hobbyList;
    }

    public Map<String, String> getResidenceMap() {
        return residenceMap;
    }

    public void setResidenceMap(Map<String, String> residenceMap) {
        this.residenceMap = residenceMap;
    }

    public Set<String> getAliasSet() {
        return aliasSet;
    }

    public void setAliasSet(Set<String> aliasSet) {
        this.aliasSet = aliasSet;
    }

    public String[] getArray() {
        return array;
    }

    public void setArray(String[] array) {
        this.array = array;
    }

    @Override
    public String toString() {
        return "ComplexUser [uname=" + uname + ", hobbyList=" + hobbyList + ", residenceMap=" + residenceMap
                + ", aliasSet=" + aliasSet + ", array=" + Arrays.toString(array) + "]";
    }


}
1.2配置Bean
在Spring配置文件中,使用实现类ComplexUser配置Bean的两个实例。
<!-- 使用构造方法注入方式装配ComplexUser实例user1 -->
    <bean id="user1" class="assemble.ComplexUser">
        <constructor-arg index="0" value="cxk" />
        <constructor-arg index="1">
            <list>
                <value>唱</value>
                <value>跳</value>
                <value>rap</value>
                <value>篮球</value>
            </list>
        </constructor-arg>
        <constructor-arg index="2">
            <map>
                <entry key="dalian" value="大连" />
                <entry key="shenyang" value="沈阳" />
                <entry key="shanghia" value="上海" />
            </map>
        </constructor-arg>
        <constructor-arg index="3">
            <set>
                <value>100</value>
                <value>101</value>
                <value>102</value>
            </set>
        </constructor-arg>
        <constructor-arg index="4">
            <array>
                <value>aaaaa</value>
                <value>bbbbb</value>
            </array>
        </constructor-arg>
    </bean>
<!-- 使用属性setter方法注入方式装配ComplexUser实例user2 -->
    <bean id="user2" class="assemble.ComplexUser">
        <property name="uname" value="wtf" />
        <property name="hobbyList">
            <list>
                <value>看书</value>
                <value>学spring</value>
            </list>
        </property>
        <property name="residenceMap">
            <map>
                <entry key="dalian" value="大连" />
                <entry key="shenyang" value="沈阳" />
                <entry key="shanghia" value="上海" />
            </map>
        </property>
        <property name="aliasSet">
            <set>
                <value>103</value>
                <value>104</value>
                <value>105</value>
            </set>
        </property>
        <property name="array">
            <array>
                <value>ccccc</value>
                <value>ddddd</value>
            </array>
        </property>
    </bean>
1.3测试基于XML配置的装配方式
在ch3应用的test包中,创建测试类TestAssemble
TestAssemble.java
package test;

import org.springframework.context.ApplicationContext;
import org.springframework.context.support.ClassPathXmlApplicationContext;

import assemble.ComplexUser;

public class TestAssemble {

    public static void main(String[] args) {
        // TODO Auto-generated method stub
        ApplicationContext appCon = new ClassPathXmlApplicationContext("applicationContext.xml");
        ComplexUser u1 = (ComplexUser)appCon.getBean("user1");
        System.out.println(u1);
        ComplexUser u2 = (ComplexUser)appCon.getBean("user2");
        System.out.println(u2);
    }

}
运行结果

2.基于注解的装配
在Spring框架中定义了一些列的注解,常用注解的使用见3.5+;
下面通过一个实例讲解@Component()
注:在Spring 4.0以上版本,配置注解指定包中的注解进行扫描前,需要事先导入Spring Aop的JAR包spring-aop-5.0.2.RELEASE.jar
目录结构

2.1创建Bean的实现类
在ch3应用src目录中,创建包annotation,在annotation包下创建类AnnotationUser.java。
AnnotationUser.java
package annotation;

import org.springframework.beans.factory.annotation.Value;
import org.springframework.stereotype.Component;

@Component()
/*
 * 相当于@Component("annotationUser")或
 * @Component(value="annotationUser"),annotationUser为Bean的id,默认为类名首字母的小写
 */
public class AnnotationUser {
    @Value("基于注解装配")
    private String uname;

    public String getUname() {
        return uname;
    }

    public void setUname(String uname) {
        this.uname = uname;
    }

    @Override
    public String toString() {
        return "AnnotationUser [uname=" + uname + "]";
    }


}
2.2配置注解
现在有了Bean的实现类,但还不能进行测试,因为Spring容器并不知道去哪里扫描Bean对象。需要在配置文件中配置注解,这里我们在src目录中新建一个annotationContext.xml,注解配置方式如下:
annotationContext.xml
<?xml version="1.0" encoding="UTF-8"?>
<beans xmlns="http://www.springframework.org/schema/beans"
    xmlns:xsi="http://www.w3.org/2001/XMLSchema-instance"
    xmlns:context="http://www.springframework.org/schema/context"
    xsi:schemaLocation="http://www.springframework.org/schema/beans
           http://www.springframework.org/schema/beans/spring-beans.xsd
           http://www.springframework.org/schema/context
           http://www.springframework.org/schema/context/spring-context.xsd">
    <!-- 使用context命名空间,通过Spring扫描指定包下所有的Bean实现类,通过注释解析 -->
    <context:component-scan base-package="annotation"/>

</beans>
2.3测试Bean实例
在ch3英语的test包中,创建测试类TestAnnotation,具体代码如下
TestAnnotation.java
package test;

import org.springframework.context.ApplicationContext;
import org.springframework.context.support.ClassPathXmlApplicationContext;

import annotation.AnnotationUser;
import assemble.ComplexUser;

public class TestAnnotation {

    public static void main(String[] args) {
        // TODO Auto-generated method stub
        ApplicationContext appCon = new ClassPathXmlApplicationContext("annotationContext.xml");
        AnnotationUser au = (AnnotationUser)appCon.getBean("annotationUser");
        System.out.println(au.getUname());
    }

}
