1.准备图片存储服务器
1.获取服务器
选择七牛网作为服务器,因为它是一个免费的云图库
七牛网地址:https://www.qiniu.com
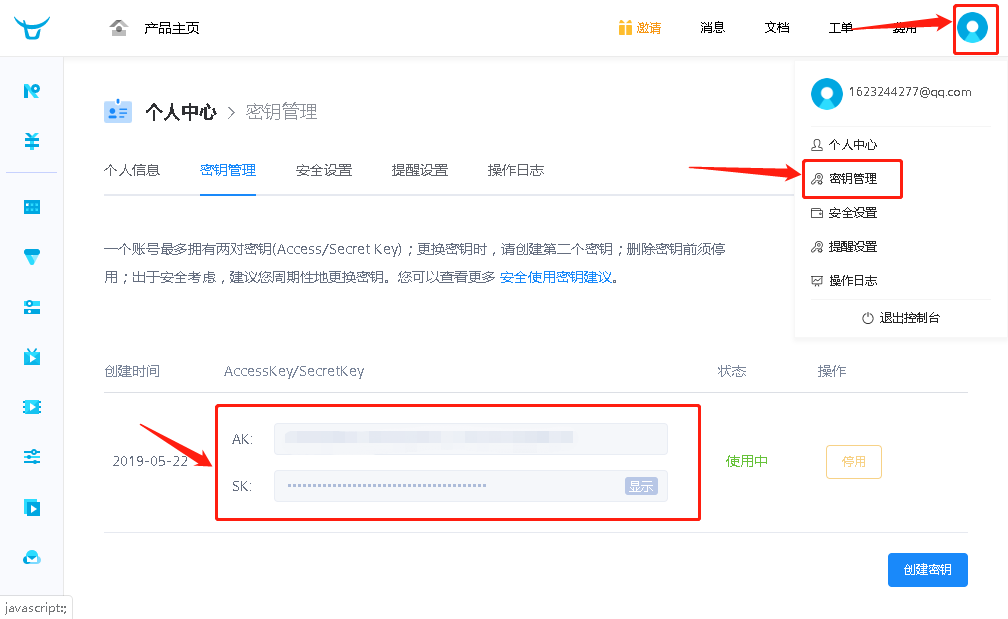
先要进行注册,之后,如图操作:

获取秘钥:

查询七牛的python调用API可知
# -*- coding: utf-8 -*-
# flake8: noqa
from qiniu import Auth, put_file, etag, urlsafe_base64_encode
import qiniu.config

#获取图片
os.system('raspistill -o current_photo.jpg')
#需要填写你的 Access Key 和 Secret Key
access_key = 'Access_Key'
secret_key = 'Secret_Key'

#构建鉴权对象
q = Auth(access_key, secret_key)

#要上传的空间
bucket_name = 'Bucket_Name'

#上传到七牛后保存的文件名
key = 'my-python-logo.png';

#生成上传 Token,可以指定过期时间等
token = q.upload_token(bucket_name, key, 3600)

#要上传文件的本地路径
localfile = './sync/bbb.jpg'
ret, info = put_file(token, key, localfile)
print(info)

assert ret['key'] == key
assert ret['hash'] == etag(localfile)
2.安装七牛的Python SDK
# 1.第一种方法
pip install qiuiu
# 2.第二种方法 https://github.com/qiniu/python-sdk
git clone https://github.com/qiniu/python-sdk.git
3.制作脚本文件
touch get_photo.sh
# 内容
/usr/bin/python2.7 /home/pi/project/get_picture.py
touch get_picture.py
'''
上传photo文件夹内的所有文件,上传成功后删除文件
'''
# -*- coding: utf-8 -*-
import time
from qiniu import Auth, put_file, etag, urlsafe_base64_encode
import qiniu.config
import os

filelist = os.listdir('./photo')
for file in filelist:
	#需要填写你的 Access Key 和 Secret Key
    access_key = 'TRF-90q0b7eLubaOVj7UZcm_-m6pmuuqqyDBVp2w' #这里的密钥填上刚才我让你记住的密钥对
    secret_key = 'LqUocAThm28PJVafoSLOHEPPpUxXgQNJ5ePlxWPW' #这里的密钥填上刚才我让你记住的密钥对

    #构建鉴权对象
    q = Auth(access_key, secret_key)

	#要上传的空间
    bucket_name = 'wml-raspberrypi'

	#上传到七牛后保存的文件名
    key = '%s_%s_%s_%s_%s_%s.jpg'%(time.localtime()[0],time.localtime()[1],time.localtime()[2],time.localtime()[3],time.localtime()[4],time.localtime()[5])

	#生成上传 Token,可以指定过期时间等
    token = q.upload_token(bucket_name, key, 3600)

	#要上传文件的本地路径
    localfile = './photo/'+file
    ret,info = put_file(token, key, localfile)
    print('complete upload:',localfile)
    time.sleep(10)
    os.remove(localfile)
    print('complete romove:',localfile)
4.定时启动脚本
crontab -e
#选择vim进入,到末尾输入 o
#然后在末尾加入
10 15 * * * sh /home/pi/project/get_photo.sh /home/
#然后按Esc->:wq->换行退出
#最后重启cron
sudo service cron restart