一、定义一个http.js,保存链接端口和定义请求拦截方法
import axios from 'axios'
import Vue from "vue"
import router from './router'

//定义链接接口
const http = axios.create({
    baseURL:'http://localhost:3037/admin/api'
})

http.interceptors.request.use(function(config){

  if(localStorage.token){
   config.headers.Authorization = "Bearer "+localStorage.token
   }
    return config
},function(err){

    return Promise.reject(err)
})


//请求拦截响应
http.interceptors.response.use(res =>{
    return res
},err=>{
    if(err.response.data.message){
        //输出错误信息
    Vue.prototype.$message({
        type:'error',
        message:err.response.data.message
    })
    //如果请求状态码为401证明没有登陆,则转回登陆界面
    if(err.response.status === 401){
       router.push("/login")
    }
}
    return Promise.reject(err)
})


export default http
二、在main.js中将http绑定到Vue实例对象中,使它可以在前端界面中被应用
import http from './http'
Vue.prototype.$http = http
三、 在views中定义一个Main.vue,作为起始界面,将所有路由显示都写在这里,并在router里面写入路由路径,使用的是el-container组件进行信息显示,左边是导航右边是内容,一个写了三个大板块,六个小内容。
//...
<el-submenu index="1">
          <template slot="title"
            ><i class="el-icon-message"></i>内容管理</template
          >
          <el-menu-item-group>
            <template slot="title">物品</template>
            <el-menu-item index="/items/create">新建物品</el-menu-item>
            <el-menu-item index="/items/list">物品列表</el-menu-item>
          </el-menu-item-group>

          <el-menu-item-group>
            <template slot="title">英雄</template>
            <el-menu-item index="/heros/create">新建英雄</el-menu-item>
            <el-menu-item index="/heros/list">英雄列表</el-menu-item>
          </el-menu-item-group>

          <el-menu-item-group>
            <template slot="title">文章</template>
            <el-menu-item index="/articles/create">新建文章</el-menu-item>
            <el-menu-item index="/articles/list">文章列表</el-menu-item>
          </el-menu-item-group>

        </el-submenu>
//...
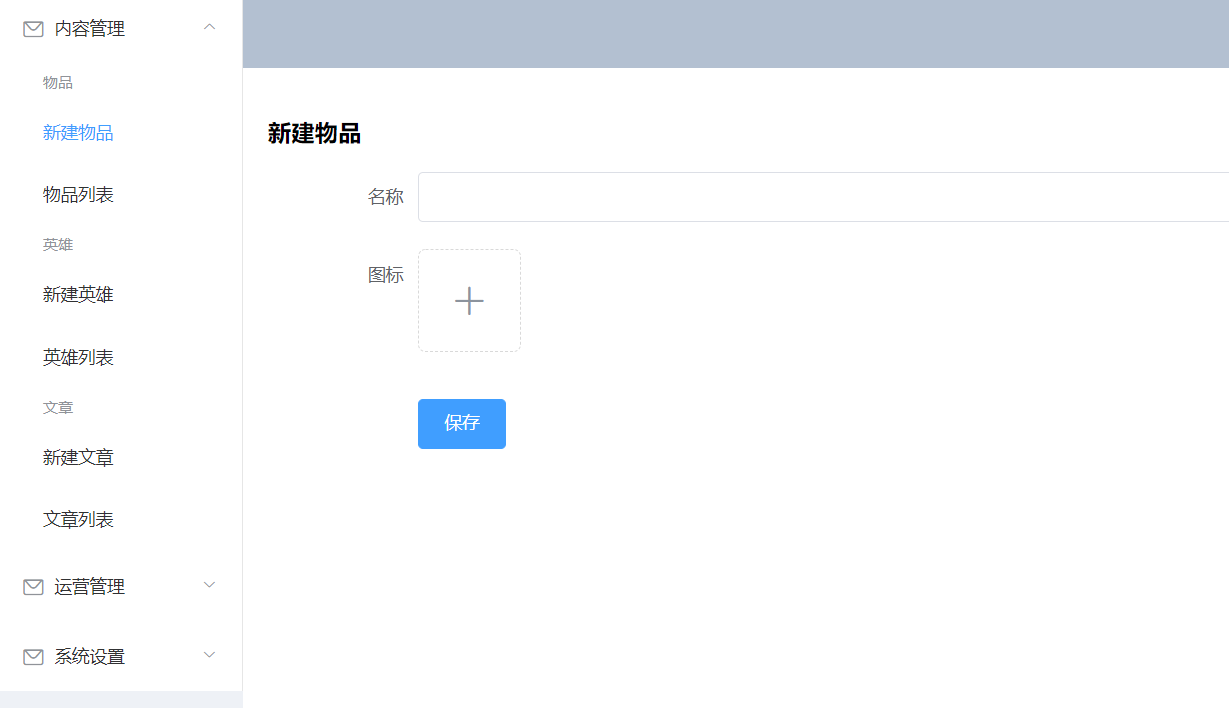

四、新建物品和物品列表实现等其他界面
- 新建物品界面使用了el-form-item和el-upload组件
 <h1>{{ id ? "编辑" : "新建" }}物品</h1>
    <el-form label-width="120px" @submit.native.prevent="save">
      <el-form-item label="名称">
        <el-input v-model="model.name"></el-input>
      </el-form-item>
<!-- action设置上传路径,headers请求路由设置,on-success上传成功之后的动作 -->
      <el-form-item label="图标">
        <el-upload
          class="avatar-uploader"
          :action="uploadUrl"
          :headers=" getAuthHeaders()"
          :show-file-list="false"
          :on-success="afterUpload"
        >
          <img v-if="model.icon" :src="model.icon" class="avatar" />
          <i v-else class="el-icon-plus avatar-uploader-icon"></i>
        </el-upload>
      </el-form-item>

      <el-form-item>
        <el-button type="primary" native-type="submit">保存</el-button>
      </el-form-item>
    </el-form>
- 新建物品界面调用接口,保存数据
 methods: {
//数据上传成功后
      afterUpload(res){
         this.$set(this.model,'icon',res.url)
        //  this.model.icon = res.url
      },
    async save() {
      let res;
      //将数据上传
      if (this.id) {
        res = await this.$http.put(`rest/items/${this.id}`, this.model);
      } else {
        res = await this.$http.post("rest/items", this.model);
      }
      console.log(res);
      this.$router.push("/items/list");
      //上传成功则弹出保存成功
      this.$message({
        type: "success",
        message: "保存成功",
      });
    },

    //当创建时便获取数据
    async fetch() {
      const res = await this.$http.get(`rest/items/${this.id}`);
      this.model = res.data;
    },
  },
- 物品列表界面用el-table渲染数据,用接口获取数据
<div>
    <h1>物品列表</h1>
    <!-- _id、name、icon是在数据库中预先定义的数据列表,使用接口获取数据items,然后用prop可以直接访问 -->
    <el-table :data="items">
      <el-table-column prop="_id" label="ID" width="180"> </el-table-column>
      <el-table-column prop="name" label="物品名称"> </el-table-column>
           <el-table-column prop="icon" label="图标">
            <template slot-scope="scope">
                <img :src = "scope.row.icon" style="height:3em">
            </template>
            </el-table-column>
     <!-- 编辑,绑定单击事件,将页面跳转到编辑页面,编辑页面和新建页面一样 -->
      <el-table-column fixed="right" label="操作" width="180">
        <template slot-scope="scope">
          <el-button type="text" size="small"
          @click="$router.push(`/items/edit/${scope.row._id}`)">编辑</el-button>
           <el-button type="text" size="small"
          @click="remove(scope.row)">删除</el-button>

        </template>
      </el-table-column>
    </el-table>
  </div>
 methods: {
    //获取数据
    async fetch() {
      const res = await this.$http.get("rest/items");
      this.items = res.data;
    },
    //设置删除方法
    async remove(row){
        this.$confirm(`是否删除,"${row.name}"`, '提示', {
          confirmButtonText: '确定',
          cancelButtonText: '取消',
          type: 'warning'
        }).then(async() => {
          //调用删除接口
        const res =  await this.$http.delete(`rest/items/${row._id}`)
        console.log(res)
        //删除
          this.$message({
            type: 'success',
            message: '删除成功!'
          });
          //重新获取数据
          this.fetch()
        })

    }
  },
五、其他界面的新建界面和数据列表界面大同小异,值得一提的是新建英雄界面和新建文章界面
- 新建英雄界面使用el-tabs组件中的el-tab-pane,
- 头像上传使用el-upload组件,
- 类型选择是使用的el-select列表中的el-options设置可以多选
-
难度评分使用的el-rate组件
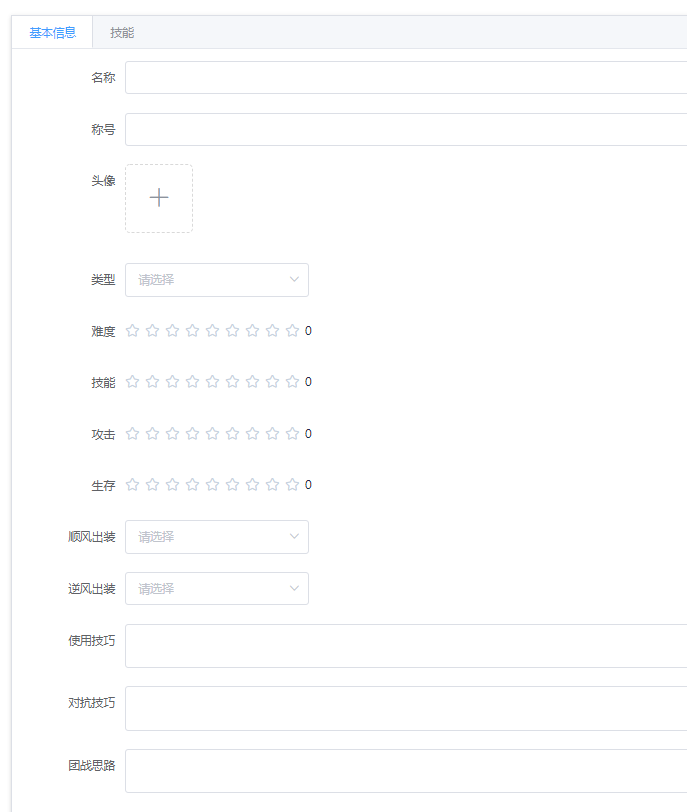
          <el-form-item label="头像">
            <el-upload
              class="avatar-uploader"
              :action="$http.defaults.baseURL + '/upload'"
              :show-file-list="false"
              :on-success="afterUpload"
            >
              <img v-if="model.avatar" :src="model.avatar" class="avatar" />
              <i v-else class="el-icon-plus avatar-uploader-icon"></i>
            </el-upload>
          </el-form-item>

          <el-form-item label="类型">
            <el-select v-model="model.categories" multiple>
              <el-option
                v-for="item of categories"
                :key="item._id"
                :label="item.name"
                :value="item._id"
              ></el-option>
            </el-select>
          </el-form-item>

          <el-form-item label="难度">
            <el-rate
              style="margin-top: 0.6rem"
              :max="9"
              show-score
              v-model="model.scores.difficult"
            ></el-rate>
          </el-form-item>
- 新建文章界面,使用的是vue2-editor库中的VueEditor组件,类word编辑器,使得编辑时所见到的界面,是显示时所得到界面
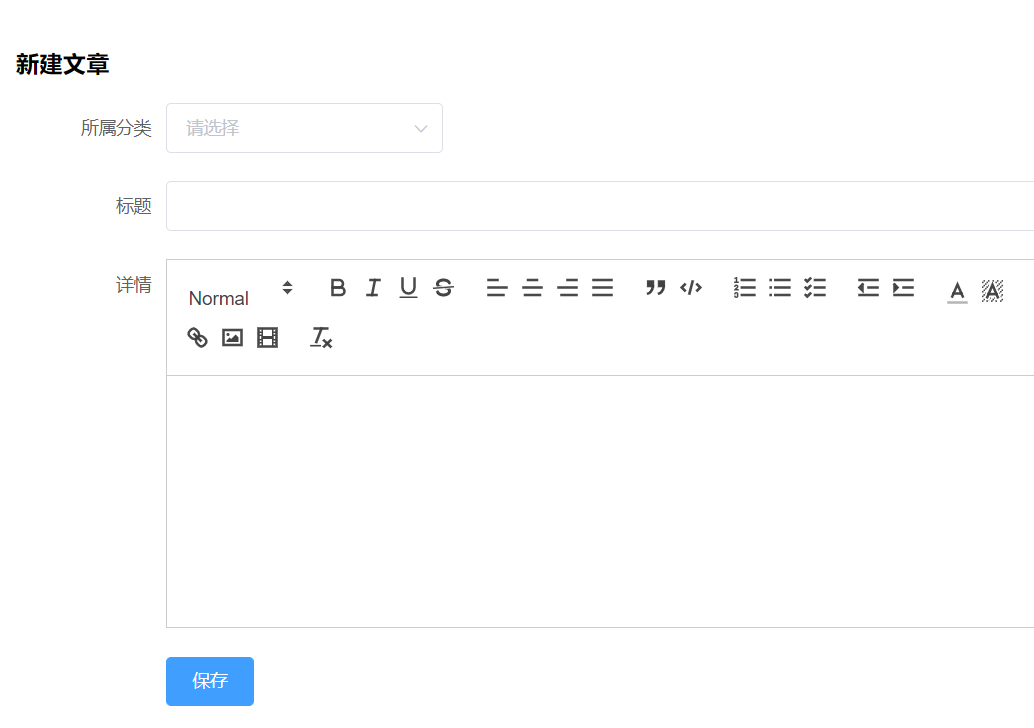
-
 <h1>{{ id ? "编辑" : "新建" }}文章</h1>
    <el-form label-width="120px" @submit.native.prevent="save">
      <el-form-item label="所属分类">
        <el-select v-model="model.categories" multiple>
          <el-option
            v-for="item in categories"
            :key="item._id"
            :label="item.name"
            :value="item._id"
          >
          </el-option>
        </el-select>
      </el-form-item>
      <el-form-item label="标题">
        <el-input v-model="model.title"></el-input>
      </el-form-item>
      <el-form-item label="详情">
        <vue-editor v-model="model.body" useCustomImageHandler
        @image-added = "handleImageAdded"
        >

        </vue-editor>
      </el-form-item>


      <el-form-item>
        <el-button type="primary" native-type="submit">保存</el-button>
      </el-form-item>
    </el-form>
  </div>