多线程基本概念_程序_线程
1.1程序、进程、线程
- 程序:Program是一个指令的集合
- 进程:Process(正在执行中的程序)是一个静态的概念。进程是程序的一次静态执行过程,占用特定的地址空间。每个进程都是独立的,由三部分组成,cpu、data、code 缺点:内存的消费,cpu的负担
- 线程:是进程中一个"单一的连续控制流程"(a singlesThread,equential flow of control)/执行路径。
- 线程又称为轻量级进程(lightweight process)。Threads run at the same time,independently of one another
- 一个进程可以拥有多个并行的concurrent进程。
- 一个进程中的线程共享相同的内存单元/内存地址空间?可以访问相同的变量和对象,而且他们从同一堆
- 中分配对象?通信、数据交换、同步操作
- 由于线程间的通信是在同一地址上进行的,所以不需要额外的通信机制,这就使得通信更简便而且信息传递的速度也更快。
通过继承Thread类实现多线程
2.1实现多线程步骤
(1)继承Thread类
(2)重写run()方法
(3)start()方法启动线程
一定的缺点:Java中的类是单继承的,一旦继承了Thread类,就不允许再去继承其他类。


 1 package thread;
 2
 3 public class MyThread  extends Thread{//继承
 4     public void run() {
 5         /**
 6          * 线程体
 7          */
 8         System.out.println("Mythread-------------");
 9     }
10
11 }
 1 package thread;
 2
 3 public class Test {
 4 public static void main(String[] args) {
 5     //创建线程类的对象
 6     MyThread my=new MyThread();
 7     my.start();//启动线程
 8     System.out.println("--------main");
 9 }
10 }
通过实现接口Runnable实现多线程
3.1实现Runnable接口实现多线程的步骤
(1)编写类实现Runnable接口
(2)实现run()方法
(3)通过Thread类的start()方式启动线程。
 1 package thread;
 2
 3 public class MyRunnable implements Runnable{//具备了多线程操作的
 4
 5     @Override
 6     public void run() {
 7         // TODO Auto-generated method stub
 8         for(int i=0;i<10;i++){
 9
10             System.out.println("----------Thread"+i);
11         }
12     }
13
14
15 }
 1 package thread;
 2
 3 public class Test1 {
 4
 5     public static void main(String[] args) {
 6         // TODO Auto-generated method stub
 7            MyRunnable my=new MyRunnable();
 8           //start()方法是Thread类中的方法
 9            Thread t=new Thread(my);
10            t.start();
11            //主线程中的线程
12            for(int i=0;i<10;i++){
13            System.out.println("main--------"+i);
14            }
15     }
16
17 }
3.2静态代理模式
Thread->代理角色
MyRunnable->真实角色
代理模式与真实角色实现共同的接口Runnable接口
以结婚为例:
1 package thread;
2
3 public interface Marry {
4     //结婚的接口
5 void marry();
6 }
 1 package thread;
 2
 3 public class MarryCompany implements Marry{
 4 //婚庆公司给准备的人,准备婚礼....
 5     private Marry m;
 6     public  MarryCompany (Marry m){
 7         this.m=m;
 8     }
 9     public void after(){
10         System.out.println("收拾东西....................");
11     }
12     public void before(){
13         System.out.println("婚礼前的一些准备工作...........");
14     }
15     @Override
16     public void marry() {
17         // TODO Auto-generated method stub
18         this.before();
19         m.marry();//调用真实角色的方法
20         this.after();
21     }
22
23 }
 1 package thread;
 2
 3 public class You implements Marry{//真实角色
 4
 5     @Override
 6     public void marry() {
 7         // TODO Auto-generated method stub
 8         System.out.println("你与谁谁谁结婚了");
 9     }
10
11 }
 1 package thread;
 2
 3 public class Test2 {
 4
 5     public static void main(String[] args) {
 6         // TODO Auto-generated method stub
 7 //创建真实角色对象
 8         Marry y=new You();//接口new实现类
 9         //创建代理角色
10         Marry mc=new MarryCompany(y);
11         mc.marry();
12     }
13
14 }
线程状态__线程的生命周期
4.1线程状态
新生状态
用new关键字建立一个线程后,该线程对象就处于新生状态。处于新生状态的线程有自己的内存空间,通过调用start()方法进入就绪状态。
就绪状态
处于就绪状态线程具备了运行条件,但还没分配CPU,处于线程就绪队列,等待系统为其分配CPU。当系统选定一个等待执行的线程后,它就会从就绪状态进入执行状态,该动作也称为“CPU调度”。
运行状态
在运行状态的线程执行自己的run方法中的代码,直到等待某资源而堵塞或者完成任何而死亡。如果在给定的时间内没有执行结束,就会被系统给换下来回到等待执行的状态。
堵塞状态
处于运行状态的线程在某些情况下,如执行了 sleep(睡眠)方法,或等待 I/O 设备等资源,将让出 CPU 并暂时停止自己运行,进入阻塞状态。在阻塞状态的线程不能进入就绪队列。
只有当引起阻塞的原因消除时,如睡眠时间已到,或等待的I/O 设备空闲下来,线程便转入就绪状态,重新到就绪队列中排队等待,被系统选中后从原来停止的位置开始继续执行。
死亡状态
死亡状态是线程生命周期中的最后一个阶段。线程死亡的原因有三个,一个是正常运行的线程完成了它的全部工作;另一个是线程被强制性地终止,如通过 stop 方法来终止一个线程【不推荐使用】;三是线程抛出未捕获的异常。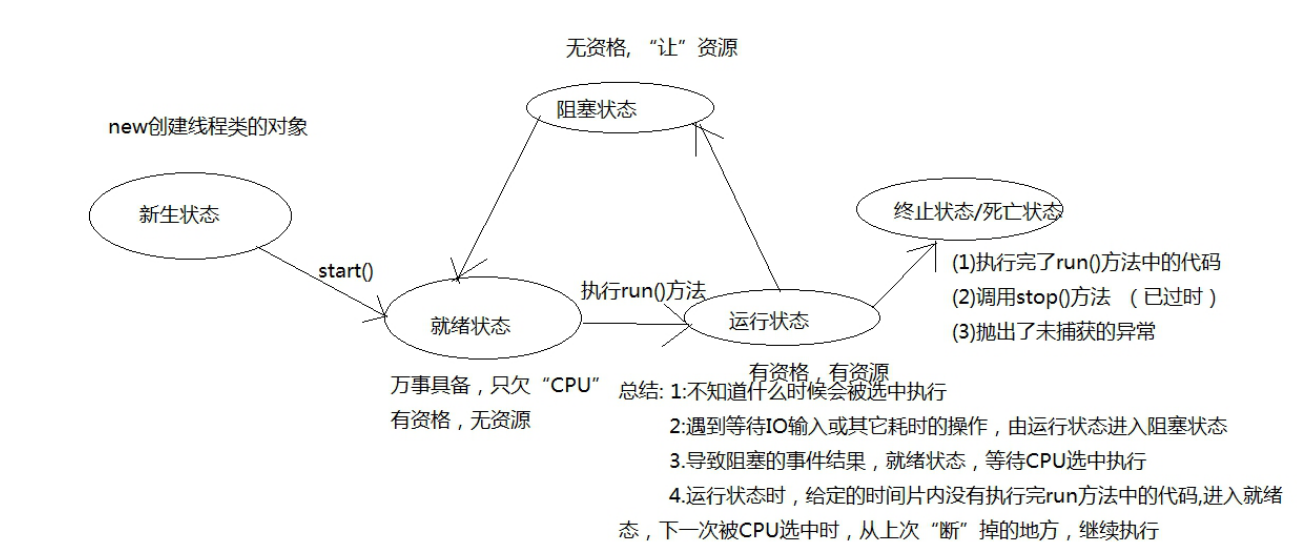
获取线程基本信息的方法
5.1线程操作的常用方法
1. static Thread currentThread() 返回目前正在执行的线程
2. final String getName() 返回线程的名称
3. final boolean isAlive() 判断线程是否处于活动状态。
package thread;

public class TestThreadMethod {

    //主方法,主线程
    public static void main(String[] args) {
        Thread t=Thread.currentThread();
        //tostring()方法得到的内容为线程名称,线程的优先级,线程组的名称
        System.out.println(t.toString());

        //创建线程类的对象
        MyRunnabl my=new MyRunnabl();
        Thread t1=new Thread(my,"线程1");
        Thread t2=new Thread(my);
        Thread t3=new Thread(my);

        t3.setName("自定义的线程3");
        //启动线程
        t1.start();
        t2.start();
        t3.start();

    }
}

class MyRunnabl implements Runnable{

    @Override
    public void run() {
        // TODO Auto-generated method stub
        Thread t = Thread.currentThread();
        System.out.println(t);
    }
    }
 1 package thread;
 2
 3 public class TestIsAlive {
 4
 5     public static void main(String[] args) {
 6         // TODO Auto-generated method stub
 7  MyThrea my = new  MyThrea();
 8  System.out.println("线程my处于新生状态是否处于活动状态"+my.isAlive());
 9  my.start();
10  System.out.println("线程my处于就绪状态的线程是否处于活动状态:"+my.isAlive());
11  for(int i=0;i<9;i++){
12      System.out.println("--------"+Thread.currentThread().getName()+"--------->"+i);
13  }
14  //主线程中的最后一句代码
15  System.out.println("my线程是否处于活动状态"+my.isAlive());
16     }
17
18 }
19
20 class MyThrea extends Thread{
21     public  void run(){
22         for(int i=0;i<9;i++){
23             System.out.println(Thread.currentThread().getName()+"--->"+i);
24         }
25     }
26 }
线程的安全问题
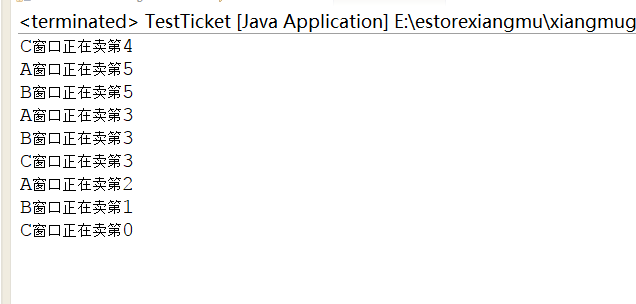
多线程的确高效,但是容易出现读脏数据。
package thread_ticket;

public class Ticket implements Runnable{
 private int ticket=5;

 public void run(){
     for(int i=0;i<100;i++){
         if(ticket>0){
             try {
                Thread.sleep(300);
            } catch (InterruptedException e) {
                // TODO Auto-generated catch block
                e.printStackTrace();
            }
             System.out.println(Thread.currentThread().getName()+"正在卖第"+(ticket--));
         }
     }
 }
}
 1 package thread_ticket;
 2
 3 public class TestTicket {
 4 public static void main(String[] args) {
 5     Ticket ticket=new Ticket();
 6     //创建Thread类
 7     Thread t1=new Thread(ticket,"A窗口");
 8     Thread t2=new Thread(ticket,"B窗口");
 9     Thread t3=new Thread(ticket,"C窗口");
10     //启动线程
11     t1.start();
12     t2.start();
13     t3.start();
14 }
15 }
暂停线程执行sleep_yield_join_stop
6.1暂停线程执行的方法
- final void join() 调用该方法的线程强制执行,其它线程处于堵塞状态,该线程执行完毕后,其他线程再执行
 1 package StopSthread;
 2
 3 public class MyThread implements Runnable{
 4
 5     @Override
 6     public void run() {
 7         // TODO Auto-generated method stub
 8         for(int i=0;i<10;i++){
 9             System.out.println(Thread.currentThread().getName()+"------->"+i);
10         }
11     }
12
13 }
package StopSthread;

public class TestJoin {

    public static void main(String[] args) throws InterruptedException {
        // TODO Auto-generated method stub
         //主线程
        MyThread my = new MyThread();
           Thread t = new Thread(my);
           Thread t2 = new Thread(my);
           //启动线程
           t.start();
           t2.start();
           //以下代码为主线程中的循环
           for(int i=0;i<10;i++){
               if(i==3){
                   t.join();//t线程强制执行
               }
               System.out.println("-------"+Thread.currentThread().getName()+"--------->"+i);
           }

    }
    /**
     * 调用他的线程处于堵塞状态,而不会导致其他的线程。
     *
     */

}
- static void sleep(long millis) 使用当前正在执行的线程休眠millis,线程处于堵塞状态。
package StopSthread;

public class MyThread implements Runnable{

    @Override
    public void run() {
        // TODO Auto-generated method stub
        for(int i=0;i<10;i++){
            System.out.println(Thread.currentThread().getName()+"------->"+i);
        }
    }

}
 1 package StopSthread;
 2
 3 public class MyThread2 implements Runnable{
 4
 5     @Override
 6     public void run() {
 7         // TODO Auto-generated method stub
 8         try {
 9             System.out.println("MyThread2.run(),线程开始休眠");
10             Thread.sleep(3000);
11             System.out.println("MyThread2.run(),休眠结束");
12         } catch (InterruptedException e) {
13             // TODO Auto-generated catch block
14             System.out.println("MyThread2.run(),产生异常");
15         }
16     }
17
18 }
package StopSthread;

public class TestSleep2 {
     /**
      * sleep方法会导致线程进入堵塞状态,写在那个线程体里就会导致那个线程进入堵塞状态
      * @param args
      * @throws InterruptedException
      */
    public static void main(String[] args) throws InterruptedException {
        // TODO Auto-generated method stub
         MyThread2 my=new MyThread2();
         Thread t=new Thread(my);
         //启动线程
         t.start();
         //以下代码为主线程中的代码
         System.out.println("主线程开始休眠");
         Thread.sleep(2000);
         System.out.println("主线程休眠结束");
    }

}
- static void yield() 当前正在执行的线程暂停一次,允许其他线程执行,不堵塞,线程进入就绪状态,如果没有其他等待执行的线程,这个时候当前线程就会马上恢复执行。
package StopSthread;

public class MyThread3 implements Runnable{

    @Override
    public void run() {
        // TODO Auto-generated method stub
        for(int i=0;i<10;i++){
            if(i==3){
                Thread.yield();
                System.out.println("当前线程:"+Thread.currentThread().getName()+"线程礼让一次");

            }
            System.out.println("i="+i);
        }
    }


}
package StopSthread;

public class TestYield {
public static void main(String[] args) {
    MyThread3 my = new MyThread3();
    new Thread(my).start();//启动线程
    //主线程的循环
    for(int i=0;i<10;i++){
        if(i==5){
            Thread.yield();
            System.out.println(Thread.currentThread().getName()+"线程礼让一次");

        }
        System.out.println(Thread.currentThread().getName()+"i="+i);
    }
}
}
- final void stop() 强迫线程停止执行。已过时。不推荐使用。
package StopSthread;

public class MyThread4 implements Runnable{

    @Override
    public void run() {
        // TODO Auto-generated method stub
        for(int i=0;i<10;i++){
            System.out.println("i="+i);
        }
    }

}
package StopSthread;

public class TestStop {
  public static void main(String[] args) {
     MyThread4 my = new MyThread4();
     Thread t=new Thread(my);
     t.start();//
     //主线程中的循环
     for(int i=0;i<10;i++){
         if(i==3){
             t.stop();//已过时,不建议使用
         }
         System.out.println(Thread.currentThread().getName()+"---->"+i);

     }
}
}
6.2总结
1.sleep:
不会释放锁,Sleep识别的线程也不可以访问锁定对象。
2.yield:
让出cpu的使用权,从运行状态直接进入就绪态。让cpu重新挑选哪一个线程进入运行状态。
3.jion:
当某个线程等待另一个线程执行结束后,才继续执行时,使调用该方法的线程在此之前执行完毕,也就是等待调用该方法的线程执行完毕后再往下执行。
线程优先级问题
设置和获取线程优先级的方法
final int getPriority() 获取线程的优先级
final void setPriority(int priority) 设置线程的优先级
 1 package Priority;
 2
 3 public class Test {
 4   public static void main(String[] args) {
 5     System.out.println("最高优先级:"+Thread.MAX_PRIORITY);
 6     System.out.println("最低优先级:"+Thread.MIN_PRIORITY);
 7     System.out.println("默认优先级:"+Thread.NORM_PRIORITY);
 8     //主线程的优先级
 9     Thread t=Thread.currentThread();
10     System.out.println("获取主线程的优先级:"+t.getPriority());
11     Thread t2=new Thread(new Mythread());
12     System.out.println("新建的线程的优先级:"+t2.getPriority());
13     /**
14      * 优先级越高有可能被调用执行,但是不一定会先执行。
15      */
16     t2.setPriority(6);
17     System.out.println("t2线程的优先级"+t2.getPriority());
18     //t2.setPriority(100);  非法参数,因为优先级只能是1-10之间的整数
19 }
20 }
21
22 class Mythread implements Runnable{
23
24     @Override
25     public void run() {
26         // TODO Auto-generated method stub
27
28     }
29      }
9.线程同步_具体实现
9.1同步实现的方式
-
同步代码块
synchronized(obj){
//中的obj被称为同步监听器
}
 1 package thread_ticket;
 2
 3 public class Ticket implements Runnable{
 4  private int ticket=5;
 5
 6  public void run(){
 7      for(int i=0;i<100;i++){
 8         synchronized(this){//同步代码块
 9              if(ticket>0){
10                  try {
11                     Thread.sleep(300);
12                 } catch (InterruptedException e) {
13                     // TODO Auto-generated catch block
14                     e.printStackTrace();
15                 }
16                  System.out.println(Thread.currentThread().getName()+"正在卖第"+(ticket--));
17              }
18         }
19      }
20  }
21 }
package thread_ticket;

public class TestTicket {
public static void main(String[] args) {
    Ticket ticket=new Ticket();
    //创建Thread类
    Thread t1=new Thread(ticket,"A窗口");
    Thread t2=new Thread(ticket,"B窗口");
    Thread t3=new Thread(ticket,"C窗口");
    //启动线程
    t1.start();
    t2.start();
    t3.start();
}
}
-
同步方法
同步方法的同步监听器为当前对象this
public synchronized....方法名(参数列表){
}
package thread_ticket;

public class Ticket implements Runnable{
 private int ticket=5;

 public void run(){
     for(int i=0;i<100;i++){
        //调用同步方法
         this.saleTicket();
     }
 }
 private synchronized void saleTicket(){//无需指定同步监听器,同步监视器只能是当前对象this
     if(ticket>0){
         try {
            Thread.sleep(300);
        } catch (InterruptedException e) {
            // TODO Auto-generated catch block
            e.printStackTrace();
        }
         System.out.println(Thread.currentThread().getName()+"正在卖第"+(ticket--));
     }
 }
}
package thread_ticket;

public class TestTicket {
public static void main(String[] args) {
    Ticket ticket=new Ticket();
    //创建Thread类
    Thread t1=new Thread(ticket,"A窗口");
    Thread t2=new Thread(ticket,"B窗口");
    Thread t3=new Thread(ticket,"C窗口");
    //启动线程
    t1.start();
    t2.start();
    t3.start();
}
}
同步监听器只能是对象,推荐使用共享资源的对象,可以当前对象this,也可以是其它的对象。
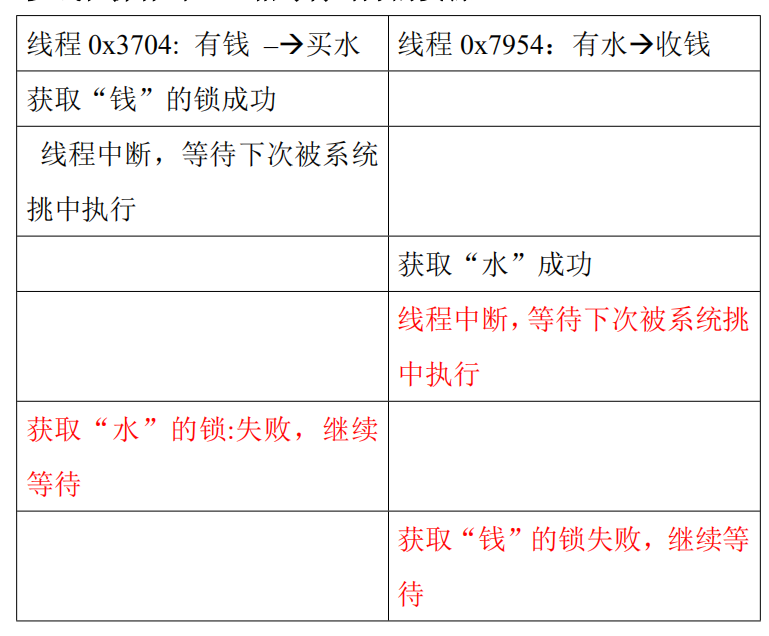
11.死锁_死锁的解决办法
11.1死锁产生的原因
多线程操作时,互相等待对方的资源
 1 package dead;
 2
 3 public class DeadLock extends Thread{
 4 private Object money;
 5 private Object water;
 6 public boolean flag;//标识有对象锁
 7
 8     public DeadLock(Object money, Object water) {
 9     super();
10     this.money = money;
11     this.water = water;
12 }
13
14
15     @Override
16     public void run() {
17         if(flag){
18             synchronized(money){
19                 System.out.println("有钱,等水");
20                 try {
21                     Thread.sleep(300);
22                 } catch (InterruptedException e) {
23                     // TODO Auto-generated catch block
24                     e.printStackTrace();
25                 }
26                 synchronized(water){
27                     System.out.println("有水,等钱");
28                 }
29             }
30         }else{
31             synchronized(water){
32                 System.out.println("有水,等钱");
33                 try {
34                     Thread.sleep(300);
35                 } catch (InterruptedException e) {
36                     // TODO Auto-generated catch block
37                     e.printStackTrace();
38                 }
39                 synchronized(money){
40                     System.out.println("有钱,等水");
41                 }
42             }
43         }
44     }
45
46 }
 1 package dead;
 2
 3 public class Test {
 4 public static void main(String[] args) {
 5     //创建共享资源的对象
 6     Object money=new Object();
 7     Object water=new Object();
 8     //创建线程的对象
 9     DeadLock d1=new DeadLock(money,water);
10     DeadLock d2=new DeadLock(money,water);
11     d1.flag=true;
12     d2.flag=false;
13     //启动线程
14     d1.start();
15     d2.start();
16 }
17 }
11.2如何解决死锁
不要让两个对象同时持有对象锁,采用互斥方式来解决。
 1 package com.bjsxt.dead;
 2
 3 public class DeadLock2 extends Thread {
 4     private Object money;//钱
 5     private Object water;//水
 6     public boolean flag;//标识持有对象锁
 7
 8     public DeadLock2(Object money, Object water) {
 9         super();
10         this.money = money;
11         this.water = water;
12     }
13
14     @Override
15     public void run() {
16         if(flag){//true时,持有“钱”的锁
17             synchronized (money) {
18                 System.out.println("有钱,等水");
19                 try {
20                     Thread.sleep(300);
21                 } catch (InterruptedException e) {
22                     // TODO Auto-generated catch block
23                     e.printStackTrace();
24                 }
25
26             }
27             synchronized (water) {
28                 System.out.println("有水,等钱");
29             }
30         }else{
31             synchronized (water) {
32                 System.out.println("有水,等钱");
33                 try {
34                     Thread.sleep(300);
35                 } catch (InterruptedException e) {
36                     // TODO Auto-generated catch block
37                     e.printStackTrace();
38                 }
39
40             }
41             synchronized (money) {
42                 System.out.println("有钱,等水");
43             }
44
45         }
46     }
47 }
 1 package com.bjsxt.dead;
 2
 3 public class Test2 {
 4     public static void main(String[] args) {
 5         //创建共享资源的对象
 6         Object money=new Object();
 7         Object water=new Object();
 8         //创建线程类的对象
 9         DeadLock2 d1=new DeadLock2(money, water);
10         DeadLock2 d2=new DeadLock2(money, water);
11         d1.flag=true;
12         d2.flag=false;
13         //启动线程
14         d1.start();
15         d2.start();
16     }
17 }
11.3死锁的避免
银行家算法:该算法需要检查申请者对资源的最大需求量,如果系统现存的各类资源可以满足申请者的请求,就满足申请者的请求。这样申请者就可以很快完成其计算,然后释放它占用的资源,从而保证了系统中的所有进程都能完成,所以可以避免死锁的发生。(计算资源的大小,计算出来后,永远按照从大到小的方式来获得锁)
12.生产者消费模式的实现
(1)数据错乱
package com.bjsxt.pro;

public class Goods {
    private String name;//名称
    private String brand;//品牌
    public String getName() {
        return name;
    }
    public void setName(String name) {
        this.name = name;
    }
    public String getBrand() {
        return brand;
    }
    public void setBrand(String brand) {
        this.brand = brand;
    }
    public Goods(String name, String brand) {
        super();
        this.name = name;
        this.brand = brand;
    }
    public Goods() {
        super();
    }

}
package com.bjsxt.pro;

public class Customer implements Runnable {
    private Goods goods;
    public Customer(Goods goods){
        this.goods=goods;
    }
    public void run() {
        for(int i=0;i<10;i++){
            try {
                Thread.sleep(300);
            } catch (InterruptedException e) {
                // TODO Auto-generated catch block
                e.printStackTrace();
            }
            System.out.println("-----消费者线程取了"+goods.getBrand()+"----------------"+goods.getName());
        }

    };
}
package com.bjsxt.pro;

public class Producter implements Runnable{
    private Goods goods;
    public Producter(Goods goods){
        this.goods=goods;
    }
    @Override
    public void run() {
        //生产商品
        for(int i=0;i<10;i++){
            if(i%2!=0){//奇数
                goods.setBrand("旺仔");
                try {
                    Thread.sleep(300);
                } catch (InterruptedException e) {
                    // TODO Auto-generated catch block
                    e.printStackTrace();
                }
                goods.setName("小馒头");
            }else{
                goods.setBrand("娃哈哈");
                try {
                    Thread.sleep(300);
                } catch (InterruptedException e) {
                    // TODO Auto-generated catch block
                    e.printStackTrace();
                }
                goods.setName("矿泉水");
            }
            System.out.println("生产者线程生产了"+goods.getBrand()+"--------------------"+goods.getName());
        }
    }

}
package com.bjsxt.pro;

public class Test {
    public static void main(String[] args) {
        //创建共享资源对象
        Goods g=new Goods();
        //创建生产者线程
        Producter p=new Producter(g);
        //创建生产者线程
        Customer c=new Customer(g);
        new Thread(p).start();
        new Thread(c).start();
    }
}
可以使用同步来解决。
package pro;


public class Goods {
    private String name;//名称
    private String brand;//品牌
    public String getName() {
        return name;
    }
    public void setName(String name) {
        this.name = name;
    }
    public String getBrand() {
        return brand;
    }
    public void setBrand(String brand) {
        this.brand = brand;
    }
    public Goods(String name, String brand) {
        super();
        this.name = name;
        this.brand = brand;
    }
    public Goods() {
        super();
    }
    //
    public synchronized void set(String name,String brand){
        this.setName(name);
        try {
            Thread.sleep(300);
        } catch (InterruptedException e) {
            // TODO Auto-generated catch block
            e.printStackTrace();
        }
        this.setBrand(brand);
        System.out.println("生产者线程生产了——————"+this.getBrand()+"-------"+this.getName());
    }
    //编写一个取值的方法
    public synchronized void get(){
        System.out.println("消费者取走了——————"+this.getBrand()+"-------"+this.getName());
    }

}
package pro;


public class Customer implements Runnable {
    private Goods goods;
    public Customer(Goods goods){
        this.goods=goods;
    }
    public void run() {
        for(int i=0;i<10;i++){
            goods.get();//调用商品中的取值的方法
        }

    };
}
package pro;


public class Producter implements Runnable{
    private Goods goods;
    public Producter(Goods goods){
        this.goods=goods;
    }
    @Override
    public void run() {
        //生产商品
        for(int i=0;i<10;i++){
            if(i%2!=0){//奇数
                goods.set("小馒头","旺仔");//调用商品类的同步方法
            }else{
                goods.set("矿泉水", "哇哈哈");
            }
            System.out.println("生产者线程生产了---------"+goods.getBrand()+"--------------------"+goods.getName());
        }
    }

}
package pro;


public class Test {
    public static void main(String[] args) {
        //创建共享资源对象
        Goods g=new Goods();
        //创建生产者线程
        Producter p=new Producter(g);
        //创建生产者线程
        Customer c=new Customer(g);
        new Thread(p).start();
        new Thread(c).start();
    }
}
12.1 生产者-消费者模式产生的问题
重复生产和重复取走
解决方案线程间的通信
package com.bjsxt.pro2;

public class Customer implements Runnable {
    private Goods goods;
    public Customer(Goods goods){
        this.goods=goods;
    }
    public void run() {
        for(int i=0;i<10;i++){
            goods.get();//调用商品类中的取值的方法
        }

    };
}
package com.bjsxt.pro2;

public class Goods {
    private String name;//名称
    private String brand;//品牌
    public String getName() {
        return name;
    }
    public void setName(String name) {
        this.name = name;
    }
    public String getBrand() {
        return brand;
    }
    public void setBrand(String brand) {
        this.brand = brand;
    }
    public Goods(String name, String brand) {
        super();
        this.name = name;
        this.brand = brand;
    }
    public Goods() {
        super();
    }
    //编写一个赋值的方法  同步监视器为Goods类的对象
    public synchronized void set(String name,String brand){
        this.setName(name);
        try {
            Thread.sleep(300);
        } catch (InterruptedException e) {
            // TODO Auto-generated catch block
            e.printStackTrace();
        }
        this.setBrand(brand);
        System.out.println("-------生产者线程生产了-------"+this.getBrand()+"-------"+this.getName());
    }
    //编写一个取值的方法
    public synchronized void get(){
        System.out.println("消费者线程取走了------"+this.getBrand()+"--------"+this.getName());
    }

}
package com.bjsxt.pro2;

public class Producter implements Runnable{
    private Goods goods;
    public Producter(Goods goods){
        this.goods=goods;
    }
    @Override
    public void run() {
        //生产商品
        for(int i=0;i<10;i++){
            if(i%2!=0){//奇数
                goods.set("小馒头", "旺仔");//调用商品类的同步方法
            }else{
                goods.set("矿泉水", "娃哈哈");
            }

        }
    }

}
package com.bjsxt.pro2;

public class Test {
    public static void main(String[] args) {
        //创建共享资源对象
        Goods g=new Goods();
        //创建生产者线程
        Producter p=new Producter(g);
        //创建生产者线程
        Customer c=new Customer(g);
        new Thread(p).start();
        new Thread(c).start();
    }
}
12.2 线程间通信的方法
- wait():调用了 wait()方法的线程进入等待池进行等待,等待池中的线程不去竞争对象锁,直到其它的线程通知,才会进入
锁池
- notify():随机唤醒一个在该对象上等待的线程,被唤醒的线程进行锁池,开始竞争该对锁上的锁
- notifyAll():唤醒所有在该对象上等待的线程优先级高的线程有可能先竞争到对象
只能在同步方法和同步代码块中使用
1.线程知识回顾
1.1 程序、进程、线程
1.2 在 Java 中创建线程的两种方式
- 1) 继承 Thread
- 2) 实现 Runnable 接口
1.3 线程的生命周期

1.4 同步与死锁
1) 同步方法 同步监视器为当前对象 this
2) 同步代码块(同步监视器/共享资源的对象){
}
过多的同步就会导致死锁
1.5 线程间的通信
1) wait()
2) notify()
3) notifyAll()
1.6 案例
编写两个线程,一个线程打印 1-52 的整数,另一个线程打印
字母 A-Z。打印顺序为 12A34B56C….5152Z。即按照整数和
字母的顺序从小到大打印,并且每打印两个整数后,打印一
个字母,交替循环打印,直到打印到整数 52 和字母 Z 结束。
要求:
1) 编写打印类 Printer,声明私有属性 index,初始值为 1,
用来表示是第几次打印。
2) 在打印类 Printer 中编写打印数字的方法 print(int i),3 的
倍数就使用 wait()方法等待,否则就输出 i,使用 notifyAll()
进行唤醒其它线程。
3) 在打印类 Printer 中编写打印字母的方法 print(char c),不
是 3 的倍数就等待,否则就打印输出字母 c,使用 notifyAll()
进行唤醒其它线程。
4) 编写打印数字的线程 NumberPrinter 继承 Thread 类,声明
私有属性 private Printer p;在构造方法中进行赋值,实现父类
的 run 方法,调用 Printer 类中的输出数字的方法。
5) 编写打印字母的线程 LetterPrinter 继承 Thread 类,声明私
有属性 private Printer p;在构造方法中进行赋值,实现父类的
run 方法,调用 Printer 类中的输出字母的方法。
6) 编写测试类 Test,创建打印类对象,创建两个线程类对象,
启动线程。
 1 package com.bjsxt.thread;
 2
 3 public class LetterPrinter implements Runnable{
 4     private Printer printer;
 5     public LetterPrinter(Printer printer) {
 6         this.printer=printer;
 7     }
 8     @Override
 9     public void run() {
10         for(char c='A';c<='Z';c++){
11             printer.print(c);
12         }
13
14     }
15
16 }
package com.bjsxt.thread;

public class NumberPrinter implements Runnable {
    private Printer printer;
    public NumberPrinter(Printer printer) {
        this.printer=printer;
    }

    @Override
    public void run() {
        for(int i=1;i<=52;i++){
            printer.print(i);
        }

    }

}
package com.bjsxt.thread;

public class Printer {
    private int index=1;//用于统计第几次打印
    public synchronized void print(int number){
        while(index%3==0){
            try {
                super.wait();
            } catch (InterruptedException e) {
                // TODO Auto-generated catch block
                e.printStackTrace();
            }
        }
        System.out.print(number);
        index++;
        super.notifyAll();//唤醒在Printer这个对象上的所有的等待的线程
    }
    public synchronized void print(char letter){
        while(index%3!=0){
            try {
                super.wait();
            } catch (InterruptedException e) {
                // TODO Auto-generated catch block
                e.printStackTrace();
            }
        }
        System.out.print(""+letter);
        index++;
        super.notifyAll();
    }
}
package com.bjsxt.thread;

public class Test {
    public static void main(String[] args) {
        //(1)创建共享资源的对象
        Printer p=new Printer();
        NumberPrinter np=new NumberPrinter(p);
        LetterPrinter lp=new LetterPrinter(p);
        //创建代理类,并启线程
        new Thread(np).start();
        new Thread(lp).start();
    }
}
2.实现线程的第三种方式
2.1 实现线程前两种方式的缺点
- 1) 没有返回值
- 2) 不支持泛型
- 3) 异常必须处理
2.2 实现多线程的第三种方式
实现 Callable 接口,重写 call 方法
Callable 功能更加强大
- 1) Future 接 口 位 于 java.util.concurrent 包 中 ,可 以 对 具 体Runnable、Callable 任务的执行结果进行取消(cancel 方法,尝试取消执行此任务)、查询是否完成(isDone 方法)、获取结果(get 方法,等待完成,然后检索其结果)等。
- 2) FutrueTask 是 Futrue 接口的唯一的实现类
- 3) FutureTask 同时实现了 Runnable, Future 接口。它既可以作为 Runnable 被线程执行,又可以作为 Future 得到Callable 的返回值
package com.bjsxt.callable;

import java.util.concurrent.Callable;

public class MyCallable implements Callable<String> {

    @Override
    public String call() throws Exception {
        String [] str={"apple","banana","orange","pear","grape"};
        int index=(int)(Math.random()*5);
        return str[index];
    }

}
package com.bjsxt.callable;

import java.util.concurrent.ExecutionException;
import java.util.concurrent.FutureTask;

public class Test {
    public static void main(String[] args) throws InterruptedException, ExecutionException {
        //(1)创建任务
        MyCallable call=new MyCallable();
        //(2)交能任务管理
        /**任务管理器是一个实现类,实现了RunnableFutrue接口,
         * RunnableFutrue是Futrue与Runnable接口的子接口*/
        FutureTask<String> task=new FutureTask<>(call); //可以看成是Runnable接口的实现类
        //创建代理类并启动线程
        Thread t=new Thread(task);
        t.start();
        System.out.println("获取结果:"+task.get());
        //判断任务是否执行完成
        System.out.println("任务是否执行完成:"+task.isDone());
    }
}
3.线程同步 Lock 锁
3.1 线程同步的第三种方法
Lock 锁:对需要上锁的地方上锁
- 1) JDK1.5 后新增的功能
- 2) 与 Synchronized 相比,Lock 可提供多种锁方案,更灵活
- 3) Java.util.concurrent.locks 中的 Lock 是一个接口,它的实现类是一个 Java 类,而不是作为语言的特性(关键字)来实现
注意:如果同步代码有异常,要将 unLock()放到 finally 中
3.2 步骤
- 1) 创建 Lock 对象
- 2) 调用 lock()方法上锁
- 3) 调用 unlock()方法解锁
3.3Lock 与 synchronized 的区别
- 1) Lock 是 显 示 锁 (手 动 开 启 和 关 闭 锁 ,别 忘 关 闭锁),synchronized 是隐式锁
- 2) Lock 只有代码块锁,synchronized 有代码块锁和方法锁
- 3) 使用 Lock 锁,JVM 将花费较少的时间来调度线程,性能更好,并且具有更好的扩展性(提供更多的子类)
- 4) Lock 确保当一个线程位于代码的临界区时,另一个线程不进入临界区。如果其他线程试图进入锁定的代码,则它将一直等待(即被阻止),直到该对象被释放。lock()方法会对 Lock 实例对象进行加锁,因此所有对该对象调用 lock()方法的线程都会被阻塞,直到该 Lock 对象的 unlock()方法被调用
package com.bjsxt.account;

import java.util.concurrent.locks.Lock;
import java.util.concurrent.locks.ReentrantLock;

public class CountRunnable implements Runnable {
    private int count=0;//默认值
    //创建一个Lock对象
    Lock lock=new ReentrantLock();
    @Override
    public void run() {
        for(int i=0;i<10;i++){
            //synchronized (this) {
            try{
                lock.lock();//加锁
                count++;
                try {
                    Thread.sleep(300);
                } catch (InterruptedException e) {
                    // TODO Auto-generated catch block
                    e.printStackTrace();
                }
                System.out.println(Thread.currentThread().getName()+"执行操作:count="+count);

            }finally{
                //解锁
                lock.unlock();
            }
            }
            //}
    }

}
package com.bjsxt.account;

public class Test {
    public static void main(String[] args) {
        CountRunnable cr=new CountRunnable();
        //代理类的对象
        Thread t1=new Thread(cr,"A");
        Thread t2=new Thread(cr,"B");
        Thread t3=new Thread(cr,"C");

        t1.start();
        t2.start();
        t3.start();

    }
}
4.线程池
4.1 什么是线程池
创建和销毁对象是非常耗费时间的
创建对象:需要分配内存等资源
销毁对象:虽然不需要程序员操心,但是垃圾回收器会在后
台一直跟踪并销毁
对于经常创建和销毁、使用量特别大的资源,比如并发情况
下的线程,对性能影响很大。
思路:创建好多个线程,放入线程池中,使用时直接获取引
用,不使用时放回池中。可以避免频繁创建销毁、实现重复
利用
生活案例:借用和归还电脑、共享单车
技术案例:线程池、数据库连接池
JDK1.5 起,提供了内置线程池
4.2 线程池的好处
- 1) 提高响应速度(减少了创建新线程的时间)
- 2) 降低资源消耗(重复利用线程池中线程,不需要每次都创建)
- 3) 提高线程的可管理性:避免线程无限制创建、从而销毁系统资源,降低系统稳定性,甚至内存溢出或者 CPU 耗尽
4.3 线程池的应用场合
- 1) 需要大量线程,并且完成任务的时间短
- 2) 对性能要求苛刻
- 3) 接受突发性的大量请求
-
4.4 使用线程池执行大量的 Runnable 命令
-
4.5 使用线程池执行大量的 Callable 任务
package com.bjsxt.pool;

import java.util.concurrent.ExecutorService;
import java.util.concurrent.Executors;

public class Test1 {
    public static void main(String[] args) {
        //如何创建一个线程池
        //(1)创建一个线程池,线程池中只有一个线程对象
        //ExecutorService pool1=Executors.newSingleThreadExecutor();
        //(2)创建一个线程池,线程池中有线程的数量固定
        //ExecutorService pool1=Executors.newFixedThreadPool(10);
        //(3)创建一个线程池,线程池中的线程的数量可以动态的改变
        ExecutorService pool1=Executors.newCachedThreadPool();
        /**使用线程池执行大量的Runnable命令*/
        for(int i=0;i<20;i++){
            final int n=i;
            //使用匿名内部类//任务
            Runnable command=new Runnable() {

                @Override
                public void run() {
                    System.out.println("开始执行:"+n);
                    try {
                        Thread.sleep(2000);
                    } catch (InterruptedException e) {
                        // TODO Auto-generated catch block
                        e.printStackTrace();
                    }
                    System.out.println("执行结束:"+n);
                }
            };//任务结束
            //将任务交给线程池中的线程去执行
            pool1.execute(command);
        }
        //关闭线程池
        pool1.shutdown();
    }
}
package com.bjsxt.pool;

import java.util.ArrayList;
import java.util.List;
import java.util.concurrent.Callable;
import java.util.concurrent.ExecutionException;
import java.util.concurrent.ExecutorService;
import java.util.concurrent.Executors;
import java.util.concurrent.Future;

public class Test2 {
    public static void main(String[] args) throws InterruptedException, ExecutionException {
        // 如何创建一个线程池
        // (1)创建一个线程池,线程池中只有一个线程对象
         //ExecutorService pool1=Executors.newSingleThreadExecutor();
        // (2)创建一个线程池,线程池中有线程的数量固定
         ExecutorService pool1=Executors.newFixedThreadPool(10);
        // (3)创建一个线程池,线程池中的线程的数量可以动态的改变
        //ExecutorService pool1 = Executors.newCachedThreadPool();
        //创建一个集合
         List<Future> list=new ArrayList<Future>();
        /**使用线程池执行大量的Callable任务*/
        for(int i=0;i<20;i++){
            //使用匿名内部类
            //创建任务
            Callable<Integer> task=new Callable<Integer>() {

                @Override
                public Integer call() throws Exception {
                    Thread.sleep(2000);
                    return (int)(Math.random()*10)+1;
                }

            }; //任务结束
            //将任务交能线程池
            Future f=pool1.submit(task);
            list.add(f);
            //System.out.println(f.get());
        }
        System.out.println("ok?");
        //遍历集合
         for(Future ff:list){
             System.out.println(ff.get());
         }
         System.out.println("OK!");
        //关闭线程池
        pool1.shutdown();
    }
}
5.任务调度 Task_Timer
5.1 什么是调度
任务:就是事情
调度:在不同的时间点或者在指定的时间点或者间隔多长时
间我去运行这个任务。
就是生活中的闹钟
5.2 相关的类
Timer 类:位于 java.util 包中
5.3 案例
实现时间的动态刷新
package com.bjsxt.timer;

import java.util.Date;
import java.util.TimerTask;
/**
 * 任务
 * @author Administrator
 *
 */
public class Clock extends TimerTask{
    long time=1000;//1秒
    @Override
    public void run() {
        Date date=new Date(time);
        System.out.println(date.toLocaleString());
        time+=1000;
    }

}
package com.bjsxt.timer;

import java.util.Date;
import java.util.Timer;
import java.util.TimerTask;

public class TestTimer {
    public static void main(String[] args) {
        //(1)创建Timer的对象
        Timer t=new Timer();
        //(2)调用schedule()方法去执行任务
        //创建任务类的对象
        TimerTask task=new Clock();
                   //要执行的任务,第二个参数是任务的执行开始时间 ,第三个参数是每隔多长时间执行一次
        t.schedule(task, new Date(System.currentTimeMillis()+1000), 1000);

    }
}
6.ThreadLocal 是什么_JDK 底层原理
6.1ThreadLocal
ThreadLocal 直译为“本地线程”,其实它就是一容器,用于存放线程的局部变量
作用:为解决多线程程序的并发问题
threadlocal详解:https://www.jianshu.com/p/98b68c97df9b;
6.2 案例
实现一个序列号的生成器程序
6.3ThreadLocal 的 API
 1 package com.bjsxt.test;
 2
 3 public class MyThread implements Runnable {
 4     private Sequence seq;
 5     public MyThread(Sequence seq) {
 6         this.seq=seq;
 7     }
 8     @Override
 9     public void run() {
10         for(int i=0;i<3;i++){
11             System.out.println(Thread.currentThread().getName()+"-->number"+seq.getNumber());
12         }
13
14     }
15
16 }
1 package com.bjsxt.test;
2
3 public interface Sequence {
4     public int getNumber();//每次调用时获得一个数,下次调用时,这个数自增
5 }
package com.bjsxt.test;

public class SequenceImple implements Sequence {
    private static int number=0;
    @Override
    public int getNumber() {
        number++;
        return number;
    }

}
package com.bjsxt.test;

public class SequenceImple2 implements Sequence {
    private static ThreadLocal<Integer> numberContainer=new ThreadLocal<Integer>(){
        protected Integer initialValue() {
            return 0;
        }
    };

    @Override
    public int getNumber() {
        numberContainer.set(numberContainer.get()+1);
        return numberContainer.get();
    }

}
package com.bjsxt.test;

public class Test {
    public static void main(String[] args) {
        //(1)创建共享资源的对象
        //Sequence seq=new SequenceImple();
        Sequence seq=new SequenceImple2();
        //(2)创建线程类的对象
        MyThread m=new MyThread(seq);

        //创建三个代理,并启动线程
        new Thread(m,"A").start();
        new Thread(m,"B").start();
        new Thread(m,"C").start();
    }
}
7.ThreadLocal 的使用场景
ThreadLocal 的使用场景为:用来解决数据库连接、Session管理等
7.1ThreadLocal 在数据库连接上的应用
当你在一个类中使用 static 成员变量时,一定要问自己这
个 static 成员变量需要考虑“线程安全吗?”(也就是说多个
线程需要自己独立的 static 成员变量吗?)如果需要那就需
要使用 ThreadLocal。
package com.bjsxt.dbutil;

import java.sql.Connection;

public class Dao {
    public void insert(){
        //获取连接
        //System.out.println("Dao.insert()"+Thread.currentThread().getName()+DBUtil.getConnection());
        //Connection conn=new DBUtil2().getConnection();
        Connection conn=DBUtil3.getConnection();
        System.out.println("Dao.insert()"+Thread.currentThread().getName()+conn);

    }
    public void delete(){
        //获取连接
        //System.out.println("Dao.delete()"+Thread.currentThread().getName()+DBUtil.getConnection());
        //Connection conn=new DBUtil2().getConnection();
        Connection conn=DBUtil3.getConnection();
        System.out.println("Dao.delete()"+Thread.currentThread().getName()+conn);
    }
    public void update(){
        //获取连接
        //System.out.println("Dao.update()"+Thread.currentThread().getName()+DBUtil.getConnection());
        //Connection conn=new DBUtil2().getConnection();
        Connection conn=DBUtil3.getConnection();
        System.out.println("Dao.update()"+Thread.currentThread().getName()+conn);
    }
    public void select(){
        //获取连接
        //System.out.println("Dao.select()"+Thread.currentThread().getName()+DBUtil.getConnection());
        //Connection conn=new DBUtil2().getConnection();
        Connection conn=DBUtil3.getConnection();
        System.out.println("Dao.select()"+Thread.currentThread().getName()+conn);
    }
}
package com.bjsxt.dbutil;


import java.sql.Connection;
import java.sql.DriverManager;
import java.sql.SQLException;

public class DBUtil {
    private static final String DRIVER="com.mysql.jdbc.Driver";
    private static final String    USER="root";
    private static final String PWD="root";
    private static final String URL="jdbc:mysql://localhost:3306/test?useUnicode=true&characterEncoding=utf8";

    //定义一个数据库连接
    private static Connection conn=null;
    //获取连接
    public   static Connection getConnection(){

        try {
            Class.forName(DRIVER);

            if(conn==null){

                conn=DriverManager.getConnection(URL, USER, PWD);
            }

        } catch (ClassNotFoundException e) {
            // TODO Auto-generated catch block
            e.printStackTrace();
        } catch (SQLException e) {
            // TODO Auto-generated catch block
            e.printStackTrace();
        }
        return conn;
    }
    //关闭连接的方法
    public   static void colseConnection(){
        if (conn!=null) {
            try {
                conn.close();

            } catch (SQLException e) {
                // TODO Auto-generated catch block
                e.printStackTrace();
            }

        }
    }
    public static void main(String[] args) {
        System.out.println(getConnection());
    }
}
package com.bjsxt.dbutil;


import java.sql.Connection;
import java.sql.DriverManager;
import java.sql.SQLException;

public class DBUtil2 {
    private static final String DRIVER="com.mysql.jdbc.Driver";
    private static final String    USER="root";
    private static final String PWD="root";
    private static final String URL="jdbc:mysql://localhost:3306/test?useUnicode=true&characterEncoding=utf8";

    //定义一个数据库连接
    private  Connection conn=null;
    //获取连接
    public    Connection getConnection(){

        try {
            Class.forName(DRIVER);

            if(conn==null){

                conn=DriverManager.getConnection(URL, USER, PWD);
            }

        } catch (ClassNotFoundException e) {
            // TODO Auto-generated catch block
            e.printStackTrace();
        } catch (SQLException e) {
            // TODO Auto-generated catch block
            e.printStackTrace();
        }
        return conn;
    }
    //关闭连接的方法
    public    void colseConnection(){
        if (conn!=null) {
            try {
                conn.close();

            } catch (SQLException e) {
                // TODO Auto-generated catch block
                e.printStackTrace();
            }

        }
    }

}
package com.bjsxt.dbutil;


import java.sql.Connection;
import java.sql.DriverManager;
import java.sql.SQLException;

public class DBUtil3 {
    private static final String DRIVER="com.mysql.jdbc.Driver";
    private static final String    USER="root";
    private static final String PWD="root";
    private static final String URL="jdbc:mysql://localhost:3306/test?useUnicode=true&characterEncoding=utf8";

    //定义一个数据库连接
    private static Connection conn=null;
    private static ThreadLocal<Connection> connContainer=new ThreadLocal<Connection>(){
        protected Connection initialValue() {
            try {
                Class.forName(DRIVER);

                if(conn==null){

                    conn=DriverManager.getConnection(URL, USER, PWD);
                }

            } catch (ClassNotFoundException e) {
                // TODO Auto-generated catch block
                e.printStackTrace();
            } catch (SQLException e) {
                // TODO Auto-generated catch block
                e.printStackTrace();
            }
            return conn;
        };
    };
    //获取连接
    public   static Connection getConnection(){
        return connContainer.get(); //获取连接

    }
    //关闭连接的方法
    public   static void colseConnection(){
        if (conn!=null) {
            try {
                conn.close();

            } catch (SQLException e) {
                // TODO Auto-generated catch block
                e.printStackTrace();
            }

        }
    }
    public static void main(String[] args) {
        System.out.println(getConnection());
    }
}
package com.bjsxt.dbutil;

public class Test {
    public static void main(String[] args) {
        MyThread my=new MyThread();
        for(int i=0;i<3;i++){
            new Thread(my).start();
        }
    }
}
class MyThread implements Runnable{
    Dao d=new Dao();
    @Override
    public void run() {
        d.insert();
        d.update();
        d.delete();
        d.select();

    }

}