一、ORM
1.什么是ORM
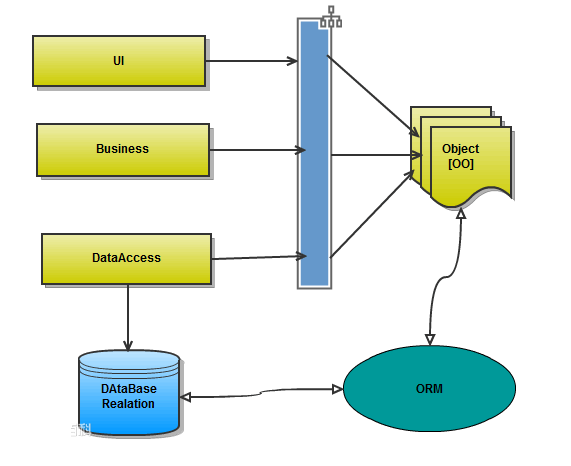
对象-关系映射(Object-Relational Mapping,简称ORM),面向对象的开发方法是当今企业级应用开发环境中的主流开发方法,关系数据库是企业级应用环境中永久存放数据的主流数据存储系统。对象和关系数据是业务实体的两种表现形式,业务实体在内存中表现为对象,在数据库中表现为关系数据。内存中的对象之间存在关联和继承关系,而在数据库中,关系数据无法直接表达多对多关联和继承关系。因此,对象-关系映射(ORM)系统一般以中间件的形式存在,主要实现程序对象到关系数据库数据的映射。
2.为什么使用ORM?
当我们实现一个应用程序时(不使用O/R Mapping),我们可能会写特别多数据访问层的代码,从数据库保存、删除、读取对象信息,而这些代码都是重复的。而使用ORM则会大大减少重复性代码。对象关系映射(Object Relational Mapping,简称ORM),主要实现程序对象到关系数据库数据的映射。
3.对象-关系映射解释:
3.1 ORM方法论基于四个核心原则:
- 简单:ORM以最基本的形式建模数据。比如ORM会将MySQL的一张表映射成一个Java类(模型),表的字段就是这个类的成员变量
- 精确:ORM使所有的MySQL数据表都按照统一的标准精确地映射成java类,使系统在代码层面保持准确统一
- 易懂:ORM使数据库结构文档化。比如MySQL数据库就被ORM转换为了java程序员可以读懂的java类,java程序员可以只把注意力放在他擅长的java层面(当然能够熟练掌握MySQL更好)
- 易用:ORM包含对持久类对象进行CRUD操作的API,例如create(), update(), save(), load(), find(), find_all(), where()等,也就是讲sql查询全部封装成了编程语言中的函数,通过函数的链式组合生成最终的SQL语句。通过这种封装避免了不规 范、冗余、风格不统一的SQL语句,可以避免很多人为Bug,方便编码风格的统一和后期维护。
面向对象是从软件工程基本原则(如耦合、聚合、封装)的基础上发展起来的,而关系数据库则是从数学理论发展而来的,两套理论存在显著的区别。为了解决这个不匹配的现象,对象关系映射技术应运而生。O/R中字母O起源于"对象"(Object),而R则来自于"关系"(Relational)。几乎所有的程序里面,都存在对象和关系数据库。在业务逻辑层和用户界面层中,我们是面向对象的。当对象信息发生变化的时候,我们需要把对象的信息保存在关系数据库中。
3.2 一般的ORM包括以下四部分:
- 一个对持久类对象进行CRUD操作的API;
- 一个语言或API用来规定与类和类属性相关的查询;
- 一个规定mapping metadata的工具;
- 一种技术可以让ORM的实现同事务对象一起进行dirty checking, lazy association fetching以及其他的优化操作。
4. ORM的优缺点:
优点:
- 提高开发效率,降低开发成本
- 使开发更加对象化
- 可移植
- 可以很方便地引入数据缓存之类的附加功能
缺点:
- 自动化进行关系数据库的映射需要消耗系统性能。其实这里的性能消耗还好啦,一般来说都可以忽略之。
- 在处理多表联查、where条件复杂之类的查询时,ORM的语法会变得复杂。
5.常用框架
- Hibernate 全自动 需要写hql语句
- iBATIS 半自动 自己写sql语句,可操作性强,小巧
- mybatis
- eclipseLink
- JFinal
- -----许多
二、ORM框架:SQLAlchemy
sqlalchemy是python编程语言下的一款ORM框架,该框架建立在数据库API上,使用关系对象映射进行数据库操作,简言之便是:将对象转换成SQL,然后使用数据API执行SQL并获取执行结果。
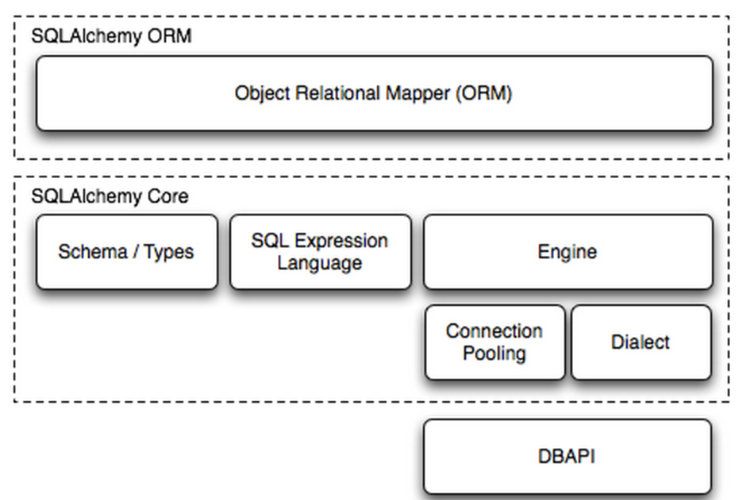
需要自己把数据库中的表映射成类,然后才能通过对象的方式去调用。SQLAlchemy不止可以支持MYSQL,还可以支持Oracle等。
Dialect用于和数据API进行交流,根据配置文件的不同调用不同的数据库API,从而实现对数据库的操作:
MySQL-Python
    mysql+mysqldb://<user>:<password>@<host>[:<port>]/<dbname>

pymysql
    mysql+pymysql://<username>:<password>@<host>/<dbname>[?<options>]

MySQL-Connector
    mysql+mysqlconnector://<user>:<password>@<host>[:<port>]/<dbname>

cx_Oracle
    oracle+cx_oracle://user:pass@host:port/dbname[?key=value&key=value...]
案例:

1.安装SQLAlchemy:
pip install SQLAlchemy
import sqlalchemy
print([obj for obj in dir(sqlalchemy) if not obj.startswith("__")])

['ARRAY', 'BIGINT', 'BINARY', 'BLANK_SCHEMA', 'BLOB', 'BOOLEAN', 'BigInteger', 'Binary', 'Boolean', 'CHAR', 'CLOB', 'CheckConstraint', 'Column', 'ColumnDefault', 'Constraint', 'DATE',
'DATETIME', 'DDL', 'DECIMAL', 'Date', 'DateTime', 'DefaultClause', 'Enum', 'FLOAT', 'FetchedValue', 'Float', 'ForeignKey', 'ForeignKeyConstraint', 'INT', 'INTEGER', 'Index',
'Integer', 'Interval', 'JSON', 'LargeBinary', 'MetaData', 'NCHAR', 'NUMERIC', 'NVARCHAR', 'Numeric', 'PassiveDefault', 'PickleType', 'PrimaryKeyConstraint', 'REAL', 'SMALLINT',
'Sequence', 'SmallInteger', 'String', 'TEXT', 'TIME', 'TIMESTAMP', 'Table', 'Text', 'ThreadLocalMetaData', 'Time', 'TypeDecorator', 'Unicode', 'UnicodeText', 'UniqueConstraint',
'VARBINARY', 'VARCHAR', 'alias', 'all_', 'and_', 'any_', 'asc', 'between', 'bindparam', 'case', 'cast', 'collate', 'column', 'cprocessors', 'create_engine', 'cresultproxy', 'cutils',
'delete', 'desc', 'dialects', 'distinct', 'engine', 'engine_from_config', 'event', 'events', 'exc', 'except_', 'except_all', 'exists', 'extract', 'false', 'func', 'funcfilter',
'insert', 'inspect', 'inspection', 'interfaces', 'intersect', 'intersect_all', 'join', 'lateral', 'literal', 'literal_column', 'log', 'modifier', 'not_', 'null', 'or_', 'outerjoin',
'outparam', 'over', 'pool', 'processors', 'schema', 'select', 'sql', 'subquery', 'table', 'tablesample', 'text', 'true', 'tuple_', 'type_coerce', 'types', 'union', 'union_all',
'update', 'util', 'within_group']
2.连接数据库并查询
from sqlalchemy import create_engine

#连接数据库,生成engine对象;最大连接数为5个
engine = create_engine("mysql+pymysql://root:root@127.0.0.1:3306/bigdata", max_overflow=5)
print(engine)   #Engine(mysql+pymysql://root:***@127.0.0.1:3306/bigdata)
result = engine.execute('select * from table1') #不用commit(),会自动commit
print(result.fetchall())
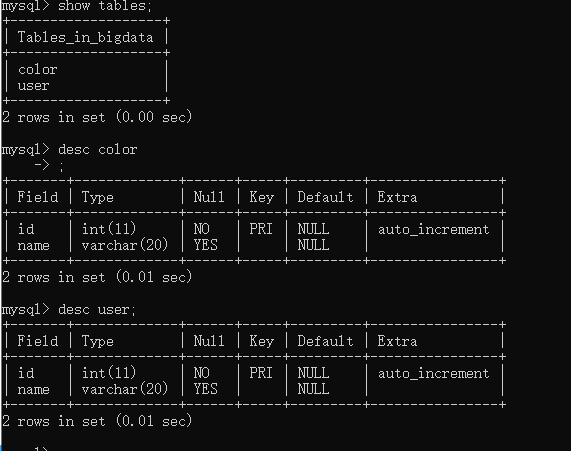
3.创建表
from sqlalchemy import Table, Column, Integer, String, MetaData
metadata = MetaData()  #相当于实例一个父类

user = Table('user', metadata,      #相当于让Table继承metadata类
             Column('id', Integer, primary_key=True),
             Column('name', String(20)),
             )

color = Table('color', metadata,    #表名color
              Column('id', Integer, primary_key=True),
              Column('name', String(20)),
              )
metadata.create_all(engine)  #table已经与metadate绑定
4、增删改查
conn.execute解读:


    def execute(self, object, *multiparams, **params):
        r"""Executes a SQL statement construct and returns a
        :class:`.ResultProxy`.

        :param object: The statement to be executed.  May be
         one of:

         * a plain string
         * any :class:`.ClauseElement` construct that is also
           a subclass of :class:`.Executable`, such as a
           :func:`~.expression.select` construct
         * a :class:`.FunctionElement`, such as that generated
           by :data:`.func`, will be automatically wrapped in
           a SELECT statement, which is then executed.
         * a :class:`.DDLElement` object
         * a :class:`.DefaultGenerator` object
         * a :class:`.Compiled` object

        :param *multiparams/**params: represent bound parameter
         values to be used in the execution.   Typically,
         the format is either a collection of one or more
         dictionaries passed to *multiparams::

             conn.execute(
                 table.insert(),
                 {"id":1, "value":"v1"},
                 {"id":2, "value":"v2"}
             )

         ...or individual key/values interpreted by **params::

             conn.execute(
                 table.insert(), id=1, value="v1"
             )

         In the case that a plain SQL string is passed, and the underlying
         DBAPI accepts positional bind parameters, a collection of tuples
         or individual values in *multiparams may be passed::

             conn.execute(
                 "INSERT INTO table (id, value) VALUES (?, ?)",
                 (1, "v1"), (2, "v2")
             )

             conn.execute(
                 "INSERT INTO table (id, value) VALUES (?, ?)",
                 1, "v1"
             )

         Note above, the usage of a question mark "?" or other
         symbol is contingent upon the "paramstyle" accepted by the DBAPI
         in use, which may be any of "qmark", "named", "pyformat", "format",
         "numeric".   See `pep-249 <http://www.python.org/dev/peps/pep-0249/>`_
         for details on paramstyle.

         To execute a textual SQL statement which uses bound parameters in a
         DBAPI-agnostic way, use the :func:`~.expression.text` construct.

        """
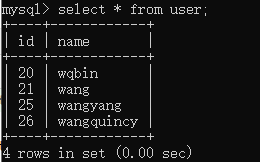
增
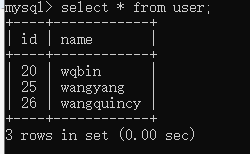
conn = engine.connect()
conn.execute(user.insert(), {'id': 20, 'name': 'wqbin'})
conn.execute(user.insert(), {'id': 21, 'name': 'wang'})
conn.execute(user.insert(), {'id': 25, 'name': 'wangyang'})
conn.execute(user.insert(), { 'name': 'wangquincy'})
conn.close()
conn = engine.connect()
conn.execute(user.delete().where(user.c.id== "21"))
conn.close()
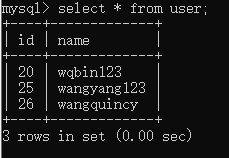
conn = engine.connect()
# 将name=="wqbin"更改为"name=="wqbin123"···
conn.execute(user.update().where(user.c.name == 'wqbin').values(name='wqbin123'))
conn.execute("""update user set name='wangyang123' where name ='wangyang' """)
conn.close()
# 查询  下面不能写 sql = user.select... 会曝错
sql = select([user, ])
sql = select([user.c.id, ])
sql = select([user.c.name, color.c.name]).where(user.c.id==25)
sql = select([user.c.name]).order_by(user.c.name)
sql = user.select([user]).group_by(user.c.name)

result = conn.execute(sql)
print(result.fetchall())
conn.close()
5. 通过SQLAlchemy的增删改查(重要):
from sqlalchemy import create_engine
from sqlalchemy.ext.declarative import declarative_base
from sqlalchemy import Column, Integer, String
from sqlalchemy.orm import sessionmaker

Base = declarative_base() # 生成一个SqlORM基类(已经封装metadata)
# echo=True可以查看创建表的过程
engine = create_engine("mysql+pymysql://root:root@localhost:3306/bigdata")


class Host(Base):
    __tablename__ = 'hosts'    # 表名为host
    id       = Column(Integer, primary_key=True, autoincrement=True)
    hostname = Column(String(64), unique=True, nullable=False)
    ip_addr  = Column(String(128), unique=True, nullable=False)
    port     = Column(Integer, default=22)


Base.metadata.create_all(engine)     # 创建所有表结构

if __name__ == '__main__':
    # 创建与数据库的会话sessionclass,注意,这里返回给session的是个class类,不是实例
    SessionCls = sessionmaker(bind=engine)
    session = SessionCls()   # 连接的实例
    # 准备插入数据
    h1 = Host(hostname='hadoop01', ip_addr='192.168.154.201')     # 实例化(未创建)
    h2 = Host(hostname='hadoop02', ip_addr='192.168.154.202', port=24)
    h3 = Host(hostname='hadoop03', ip_addr='192.168.154.203', port=24)

    session.add(h1)   #也可以用下面的批量处理
    session.add_all([h2,h3])
    h2.hostname='hadoop021'   #只要没提交,此时修改也没问题

    # 查询数据,返回一个对象 .first()返回一个 .all()返回所有
    obj = session.query(Host).filter(Host.port == "24").first()
    print("-->", obj)

    obj=session.delete(obj) # 删除行
    print("-->", obj)
    session.commit()  # 提交


6、外键关联
engine = create_engine("mysql+pymysql://root:root@localhost:3306/bigdata", echo=True)

class Host(Base):
    __tablename__ = 'hosts'   #表名
    id = Column(Integer, primary_key=True, autoincrement=True) #默认自增
    hostname = Column(String(64), unique=True, nullable=False)
    ip_addr = Column(String(128), unique=True, nullable=False)
    port = Column(Integer, default=22)
    #外键关联,主机与组名关联,一个组对应多个主机
    group_id = Column(Integer, ForeignKey("group.id"))


class Group(Base):
    __tablename__ = "group"
    id = Column(Integer,primary_key=True)
    name = Column(String(64), unique=True, nullable=False)

class Group2(Base):
    __tablename__ = "group2"
    id = Column(Integer,primary_key=True)
    name = Column(String(64), unique=True, nullable=False)

Base.metadata.create_all(engine)  # 创建所有表结构==>如果存在,不会报错,也不会更新表结构

if __name__ == '__main__':
    # 创建与数据库的会话session class ,注意,这里返回给session的是个class,不是实例
    SessionCls = sessionmaker(bind=engine)
    session = SessionCls()  #连接的实例

    session.commit() #提交
创建所有表结构==>如果存在,不会报错,也不会更新表结构

==========删除hosts重新运行======

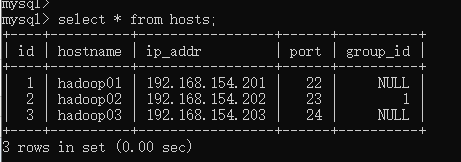
from sqlalchemy import create_engine
from sqlalchemy.ext.declarative import declarative_base
from sqlalchemy import Column, Integer, String,ForeignKey
from sqlalchemy.orm import sessionmaker,relationship

Base = declarative_base()  # 生成一个SqlORM 基类(已经封闭metadata)
#echo=True可以查看创建表的过程
engine = create_engine("mysql+pymysql://root:root@localhost:3306/bigdata", echo=True)

class Host(Base):
    __tablename__ = 'hosts'   #表名
    id = Column(Integer, primary_key=True, autoincrement=True) #默认自增
    hostname = Column(String(64), unique=True, nullable=False)
    ip_addr = Column(String(128), unique=True, nullable=False)
    port = Column(Integer, default=22)
    #外键关联,主机与组名关联,一个组对应多个主机
    group_id = Column(Integer, ForeignKey("group.id"))


class Group(Base):
    __tablename__ = "group"
    id = Column(Integer,primary_key=True)
    name = Column(String(64), unique=True, nullable=False)

class Group2(Base):
    __tablename__ = "group2"
    id = Column(Integer,primary_key=True)
    name = Column(String(64), unique=True, nullable=False)

Base.metadata.create_all(engine)  # 创建所有表结构==>如果存在,不会报错,也不会更新表结构

if __name__ == '__main__':
    # 创建与数据库的会话session class ,注意,这里返回给session的是个class,不是实例
    SessionCls = sessionmaker(bind=engine)
    session = SessionCls()  #连接的实例
    h1 = Host(hostname='hadoop01', ip_addr='192.168.154.201')     # 实例化(未创建)
    h2 = Host(hostname='hadoop02', ip_addr='192.168.154.202', port=24)
    h3 = Host(hostname='hadoop03', ip_addr='192.168.154.203', port=24)
    session.add_all([h1,h2,h3])
    g1 = Group(name = "g1")
    g2 = Group(name = "g2")
    g3 = Group(name = "g3")
    g4 = Group(name = "g4")
    session.add_all([g1,g2,g3,g4])

    session.query(Host).filter(Host.hostname=="hadoop02").update({"port":23,"group_id":1})
    session.commit() #提交
    session.close()
还发现一个问题,添加一个不存在值的外检会报错:

可以获取已经关联的group_id后,但如何获取已关联的组的组名??
print(h.group.name) #AttributeError:'Host'object has no attribute 'group'
因为Host类根本就没有group属性!!
解决方法:
from sqlalchemy.orm import relationship       #导入relationship
class Host(Base):
    __tablename__ = 'hosts'   #表名
    id = Column(Integer, primary_key=True, autoincrement=True) #默认自增
    hostname = Column(String(64), unique=True, nullable=False)
    ip_addr = Column(String(128), unique=True, nullable=False)
    port = Column(Integer, default=22)
    #外键关联,主机与组名关联
    group_id = Column(Integer, ForeignKey("group.id"))
    group = relationship("Group")
那双向关联也要在Group类增加:hosts = relationship("Host")
但是也有只用一句代码就实现双向关联:
7、合并查询join
group=relationship("Group",backref="host_list")
其实还有聚合计算和多对多关联,但是我认为使用ORM操作这种计算过于复杂不如写sql。。。。