使用该方法需要具备JAVA 的JDK6及以上版本。
一 新建服务和发布服务
1.新建接口
 1 package com.example;
 2
 3 import javax.jws.WebMethod;
 4 import javax.jws.WebService;
 5
 6 @WebService
 7 public interface HelloService {
 8     String sayHello(String name);
 9
10     @WebMethod(exclude = true)
11     /*此方法不发布
12     * */
13     void test(String str);
14 }
2.实现类
package com.example.impl;

import com.example.HelloService;

import javax.jws.WebService;

@WebService(serviceName = "HelloService",portName = "HelloServicePort",
        endpointInterface = "com.example.HelloService")
public class HelloServiceImpl implements HelloService {
    public String sayHello(String name) {
        return "hello,"+name;
    }

    public void test(String str) {
        System.out.println("test");
    }
}
3.运行main方法,发布服务
 1 package com.example;
 2
 3 import com.example.impl.HelloServiceImpl;
 4
 5 import javax.xml.ws.Endpoint;
 6
 7 public class Server {
 8     public static void main(String[] args) {
 9         String address="http://localhost:8082/ws/hello";
10         HelloService service=new HelloServiceImpl();
11
12         Endpoint.publish(address,service);
13         System.out.println("ws is publish");
14     }
15 }
4.在浏览器中查看wsdl文档
访问http://localhost:8082/ws/hello?wsdl

5.wsdl文档说明
其中,definitions 是 WSDL 的根节点,它包括两个重要的属性:
-
name:WS 名称,默认为“WS 实现类 + Service”,例如:HelloServiceImplService
-
targetNamespace:WS 目标命名空间,默认为“WS 实现类对应包名倒排后构成的地址”,例如:http://soap_spring_cxf.ws.demo/
提示:可以在 javax.jws.WebService 注解中配置以上两个属性值,但这个配置一定要在 WS 实现类上进行,WS 接口类只需标注一个 WebService 注解即可。
在 definitions 这个根节点下,有五种类型的子节点,它们分别是:
-
types:描述了 WS 中所涉及的数据类型
-
portType:定义了 WS 接口名称(endpointInterface)及其操作名称,以及每个操作的输入与输出消息
-
message:对相关消息进行了定义(供 types 与 portType 使用)
-
binding:提供了对 WS 的数据绑定方式
-
service:WS 名称及其端口名称(portName),以及对应的 WSDL 地址
其中包括了两个重要信息:
-
portName:WS 的端口名称,默认为“WS 实现类 + Port”,例如:HelloServiceImplPort
-
endpointInterface:WS 的接口名称,默认为“WS 实现类所实现的接口”,例如:HelloService
提示:可在 javax.jws.WebService 注解中配置 portName 与 endpointInterface,同样必须在 WS 实现类上配置。
二 客户端调用
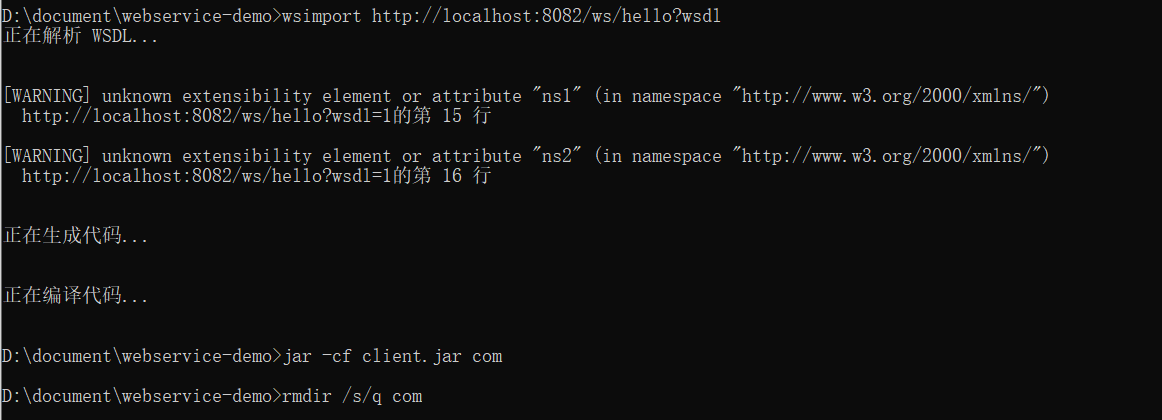
1.使用 JDK 提供的命令行工具生成 WS 客户端 jar 包。
- wsimport http://localhost:8082/ws/hello?wsdl
- jar -cf client.jar com
- rmdir /s/q com
-
第一行:通过 WSDL 地址生成 class 文件
-
第二行:通过 jar 命令将若干 class 文件压缩为一个 jar 包
-
第三行:删除生成的 class 文件(删除根目录即可)

2.把生成的jar包添加到项目依赖中
如果是maven项目,先把jar包安装到本地仓库
mvn install:install-file -Dfile=client.jar -DgroupId=com.example -DartifactId=webclient -Dversion=2.0 -Dpackaging=jar
然后添加项目依赖
        <dependency>
            <groupId>com.example</groupId>
            <artifactId>webclient</artifactId>
            <version>2.0</version>
        </dependency>
3.写一个 Client 类,用于调用 WS,需要使用上一步生成的 WS 客户端 jar 包
package com.example;

import com.example.impl.HelloService;
import com.example.impl.HelloService_Service;

public class Client {
    public static void main(String[] args) {

        HelloService_Service service = new HelloService_Service();
        HelloService helloService = service.getHelloServicePort();

        String result = helloService.sayHello("lili");
        System.out.println(result);
    }
}
运行程序,控制台输出"hellolili"字样,说明调用成功。
三 发布与调用WS的其它方法
-
-
CXF:
WS 其实是一种 Java 规范,名为 JAX-WS(JSR-224),全称 Java API for XML-Based Web Services,可以将规范理解为官方定义的一系列接口
JAX-WS 有一个官方实现,就是上面提到的 JAX-WS RI,它是 Oracle 公司提供的实现,而 Apache 旗下的 Axis 与 CXF 也同样实现了该规范。Axis 相对而言更加老牌一些,而 CXF 的前世就是 XFire,它是一款著名的 WS 框架,擅长与 Spring 集成。
从本质上讲,JAX-WS 是基于 SOAP 的,而 SOAP 的全称是 Simple Object Access Protocol(简单对象访问协议)
参考文章:my.oschina.net/huangyong/blog/286155