当我们在电商网站上购买商品时,经常会看到这样一种效果,当我们把鼠标放到我们浏览的商品图片上时,会出现类似放大镜一样的一定区域的放大效果,方便消费者观察商品。今天我对这一技术,进行简单实现,实现图片放大镜效果。
我在代码中进行了代码编写的思路的说明和详细的代码注释,方便读者,请看代码:
  1 <!doctype html>
  2 <html>
  3     <head>
  4         <meta charset="UTF-8">
  5         <title>Document</title>
  6         <style type="text/css">
  7             *{margin:0px; padding:0px;}
  8             .small-box {
  9                 300px;
 10                 height:300px;
 11                 margin-left:100px;
 12                 margin-top:100px;
 13                 border:1px #ccc solid;
 14                 cursor:move;
 15                 float:left;
 16                 position:relative;
 17             }
 18             .small-box img {
 19                 300px;
 20                 height:300px;
 21             }
 22             .tool {
 23                 150px;
 24                 height:150px;
 25                 background-color:gold;
 26                 opacity:0.6;
 27                 filter:alpha(opacity=60);
 28                 position:absolute;
 29                 left:0px;
 30                 top:0px;
 31                 display:none;
 32             }
 33             .tool.active {
 34                 display:block;
 35             }
 36             .big-box {
 37                 300px;
 38                 height:300px;
 39                 border:1px #ccc solid;
 40                 overflow:hidden;
 41                 float:left;
 42                 margin-top:100px;
 43                 position:relative;
 44                 display:none;
 45             }
 46             .big-box.active {
 47                 display:block;
 48             }
 49             .big-box img {
 50                 600px;
 51                 height:600px;
 52                 position:absolute;
 53             }
 54         </style>
 55     </head>
 56     <body>
 57         <div class="small-box" id="smallBox">
 58             <img src="img1.jpg"/>
 59             <div class="tool" id="tool"></div>
 60         </div>
 61         <div class="big-box" id="bigBox">
 62             <img src="img1.jpg" id="bigImg" />
 63         </div>
 64         <script>
 65             /*
 66                 第一步:当页面加载完后,获取所要操作的节点对象。
 67                 第二步:为smallBox添加一个鼠标浮动事件
 68                             当鼠标浮动到smallBox可视区域的时候,显示出小黄盒子tool
 69                             和右边的大盒子(小黄盒子的放大版)bigBox
 70                             添加active
 71
 72                         为smallBox添加一个鼠标离开事件
 73                             隐藏小黄盒子和右边的大盒子
 74                             去掉active
 75
 76                 第三步:为smallBox添加一个鼠标移动事件
 77                         小黄盒子tool要跟着鼠标的坐标移动
 78                         右边的大盒子里的图片也跟着指定的比例移动
 79             */
 80             var smallBox = document.getElementById("smallBox");//小盒子
 81             var tool = document.getElementById("tool");//小盒子中的黄色区域
 82             var bigBox = document.getElementById("bigBox");//大盒子
 83             var bigImg = document.getElementById("bigImg");//放大的图片
 84             //鼠标进入小盒子区域内,显示黄色区域和大盒子
 85             smallBox.onmouseenter = function(){
 86                 tool.className = "tool active";
 87                 bigBox.className = "big-box active";
 88             }
 89             //鼠标离开小盒子区域,不显示黄色区域和大盒子
 90             smallBox.onmouseleave = function(){
 91                 tool.className = "tool";
 92                 bigBox.className = "big-box";
 93             }
 94             //鼠标在小盒子内移动
 95             smallBox.onmousemove = function(e){
 96                 var _e = window.event||e;//事件对象
 97                 var x = _e.clientX-this.offsetLeft-tool.offsetWidth/2;//事件对象在小盒子内的横向偏移量
 98                 var y = _e.clientY-this.offsetTop-tool.offsetHeight/2;//竖向偏移量
 99                 if(x<0){
100                     x = 0;//当左偏移出小盒子时,设为0
101                 }
102                 if(y<0){
103                     y = 0;//当上偏移出小盒子时,设为0
104                 }
105                 if(x>this.offsetWidth-tool.offsetWidth){
106                     x = this.offsetWidth-tool.offsetWidth;//当右偏移出小盒子时,设为小盒子的宽度-黄色放大区域宽度
107                 }
108                 if(y>this.offsetHeight-tool.offsetHeight){
109                     y = this.offsetHeight-tool.offsetHeight;//当下偏移出小盒子时,设为小盒子的高度-黄色放大区域高度
110                 }
111                 tool.style.left = x + "px";//黄色放大区域距离小盒子左偏距
112                 tool.style.top = y + "px";//黄色放大区域距离小盒子上偏距
113                 bigImg.style.left = -x*2 + "px";//放大图片移动方向相反,偏移距离加倍
114                 bigImg.style.top = -y*2 + "px";
115             }
116         </script>
117     </body>
118 </html>
这里,我并没有对代码中css样式,JavaScript行为进行和html结构的分离,方便读者阅读和运行。
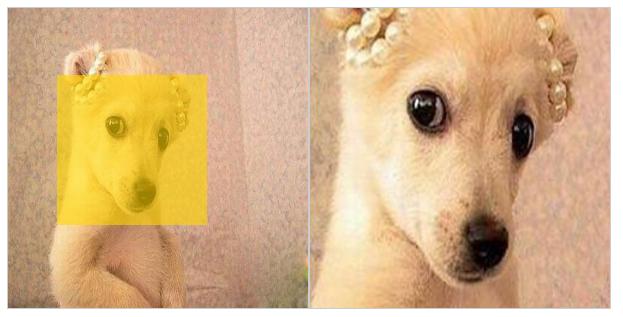
有读者可能考虑,获取事件对象的偏移距离时直接使用offsetX和offsetY属性,省去了计算,但是笔者在试验时,出现了异常,黄色放大区域并不能稳定的随着鼠标进行移动,笔者认为,当时用offsetX和offsetY时,执行onmousemove会不断地出发onmouseover,而onmouseover会产生事件传播,从而导致在获取offsetX时出现异常。最终,笔者采用上述代码中的方法,能够出现稳定的效果。读者可以自行运行代码,查看效果。这里附上笔者的效果图: