1.send_keys
send_keys(self, *value):
Simulates typing into the element【在元素中模拟输入(开启appium自带的输入法并配置了appium输入法后,可以输入中英文)】
:Args:
- value - A string for typing, or setting form fields. For setting file inputs, this could be a local file path.
Use this to send simple key events or to fill out form fields::
form_textfield = driver.find_element_by_name('username')
form_textfield.send_keys("admin") This can also be used to set file inputs.
::
file_input = driver.find_element_by_name('profilePic')
file_input.send_keys("path/to/profilepic.gif")
# Generally it's better to wrap the file path in one of the methods
# in os.path to return the actual path to support cross OS testing.
# file_input.send_keys(os.path.abspath("path/to/profilepic.gif"))
用法:driver.element.send_keys(“中英”)
send_keys方法需要在配置Capabilities信息时打开模拟键盘unicodeKeyboard与resetKeyboard,如下面代码举例:
from appium import webdriver
import time
desired_caps = {
               'platformName' : 'Android',
               'deviceName' : '76P4C15813005463',
               'platformVersion' : '5.1',
               #测试apk包名
               'appPackage' : 'com.huawei.android.launcher',
               #测试apk的launcherActivity
               'appActivity' : '.Launcher',
               #打开模拟键盘
               'unicodeKeyboard' : True ,
               'resetKeyboard' : True,
               }
#进入android系统launcher
driver = webdriver.Remote('http://127.0.0.1:4723/wd/hub',desired_caps)
time.sleep(5)
#进入应用市场
driver.find_element_by_xpath("//android.widget.TextView[contains(@text,'应用市场)]").click()
#使用模拟键盘输入'今日头条'
driver.find_element_by_id('com.huawei.appmarket:id/search_edit_text_view').send_keys(u"今日头条")
driver.find_element_by_id('com.huawei.appmarket:id/search_icon_view').click()
time.sleep(5)
driver.quit()
2.find_element_by_id
find_element_by_id(self, id_):
Finds element within this element's children by ID(通过元素的ID定位元素)
:Args: - id_ - ID of child element to locate.
用法 driver. find_element_by_id(“id”)
find_element_by_id方法,是对于那些有id而且可以互相区分的控件的操作使用,一般通过android sdk 的tools路径下的uiautomatorviewer.bat自带工具来获取,
使用这个工具首先要确保前面环境配置ok,然后确定测试机器或android模拟器处于连接状态(cmd上输入adb devices),下面是使用uiautomatorviewer.bat工具
获取id的步骤:
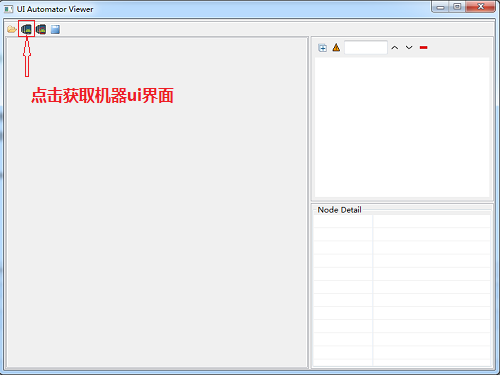
(1)在android-sdk ools路径下找到uiautomatorviewer.bat工具,双击uiautomatorviewer.bat打开,如下图
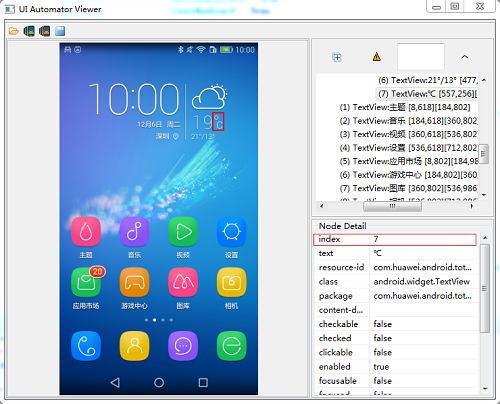
(2)获取id,如下图所示,右边Node Detail的红色框内resource-id就是左边天气应用的id
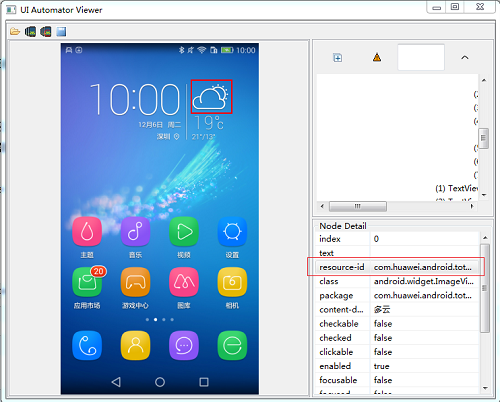
代码举例:
#点击天气应用
driver.find_element_by_id('com.huawei.android.totemweather:id/mulan_widget_currentweather_smallicon').click()
3.find_element_by_xpath
find_element_by_xpath(self, xpath):
Finds element by xpath(通过Xpath定位元素,详细方法可参阅http://www.w3school.com.cn/xpath/ )
:Args:
xpath - xpath of element to locate. "//input[@class='myelement']"
Note: The base path will be relative to this element's location.
This will select the first link under this element.
::
myelement.find_elements_by_xpath(".//a")
However, this will select the first link on the page.
::
myelement.find_elements_by_xpath("//a")
用法 find_element_by_xpath(“//*”)
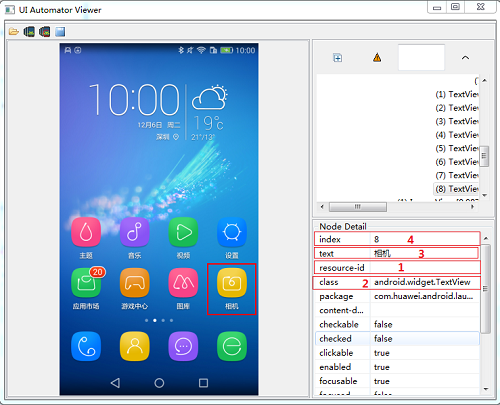
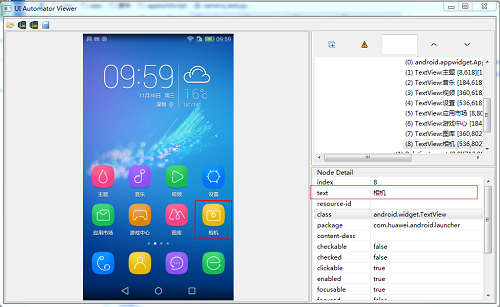
find_element_by_xpath方法也需要使用uiautomatorviewer.bat工具来定位控件,如下图所示右边相机控件id为空,这时就需要使用xpath来定位元素了,
我们可以使用xpath用text和index来定位元素,如下图的就可以这样定位相机:
driver.find_element_by_xpath("//android.widget.TextView[contains(@text,'相机')]")
driver.find_element_by_xpath("//android.widget.TextView[contains(@index,8)]")
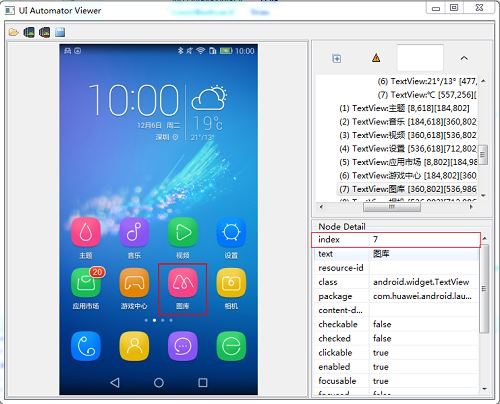
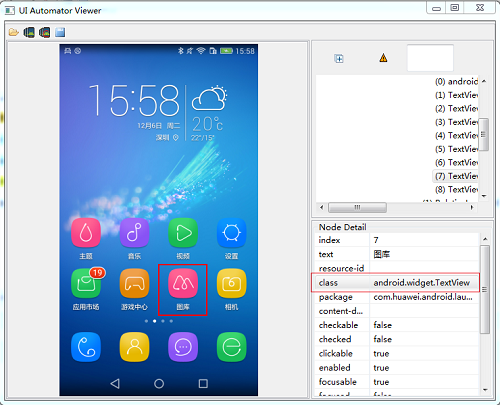
如下图的图库那个控件index和天气温度控件是相同的,都是index=7,就只能用text或text与index结合了,如:
driver.find_element_by_xpath("//android.widget.TextView[contains(@text,'图库')]")
driver.find_element_by_xpath("//android.widget.TextView[contains(@text,'图库')and@index='7']")
上面的代码就可以这样写
# -*-coding=utf-8 -*-

from appium import webdriver
import time
desired_caps = {
               'platformName' : 'Android',
               'deviceName' : '76P4C15813005463',
               'platformVersion' : '5.1',
               #测试apk包名
               'appPackage' : 'com.huawei.android.launcher',
                #测试apk的launcherActivity
               'appActivity' : '.Launcher',
               }
#进入android系统launcher
driver = webdriver.Remote('http://127.0.0.1:4723/wd/hub',desired_caps)
time.sleep(5)
#从launcher主界面进入相机应用并退出的两种方法
driver.keyevent('3')
#xpath使用text定位控件
driver.find_element_by_xpath("//android.widget.TextView[contains(@text,'相机')]").click()
time.sleep(2)
driver.keyevent('3')
time.sleep(2)
#xpath使用index定位控件
driver.find_element_by_xpath("//android.widget.TextView[contains(@index,8)]").click()
time.sleep(2)
driver.keyevent('3')
time.sleep(2)

#从launcher主界面进入图库应用并退出的两种方法
#xpath使用text定位控件
driver.find_element_by_xpath("//android.widget.TextView[contains(@text,'图库').click()
time.sleep(2)
driver.keyevent('3')
time.sleep(2)
#xpath使用text与index一起定位控件
driver.find_element_by_xpath("//android.widget.TextView[contains(@text,'图库')and@index='7']").click()
time.sleep(5)
driver.keyevent('3')
time.sleep(2)

driver.quit()
4. find_element_by_name
find_element_by_name(self, name):
Finds element within this element's children by name【通过元素Name定位(元素的名称属性text)】
:Args: - name - name property of the element to find.
用法: driver.find_element_by_name(“name”)
find_elements_by_name方法的控件元素也需要使用uiautomatorviewer.bat工具来定位,如上面例子中带有text信息的控件就可以直接使用,如
driver.find_element_by_xpath("//android.widget.TextView[contains(@text,'相机')]")
driver.find_element_by_xpath("//android.widget.TextView[contains(@index,8)]")
可以使用
driver.find_element_by_name('相机')
脚本如下
from appium import webdriver
import time
desired_caps = {
               'platformName' : 'Android',
               'deviceName' : '76P4C15813005463',
               'platformVersion' : '5.1',
               #测试apk包名
               'appPackage' : 'com.huawei.android.launcher',
               #测试apk的launcherActivity
                'appActivity' : '.Launcher',
               }
#进入android系统launcher
driver = webdriver.Remote('http://localhost:4723/wd/hub',desired_caps)
time.sleep(5)

#name方法进入相机应用
time.sleep(2)
driver.find_element_by_name("相机").click()
time.sleep(5)

driver.quit()
5. find_element_by_class_name
find_element_by_class_name(self, name):
Finds element within this element's children by class name(通过元素class name属性定位元素 )
:Args: - name - class name to search for.
用法 driver. find_element_by_class_name(“android.widget.LinearLayout”)
find_element_by_class_name方法其实很不实用,一般控件的class基本相同,如下图上面的应用控件class都是android.widget.TextView,所以不好区分元素。
6.tap
tap(self, positions, duration=None):
Taps on an particular place with up to five fingers, holding for a certain time 【模拟手指点击(最多五个手指),可设置按住时间长度(毫秒)】
:Args:
- positions - an array of tuples representing the x/y coordinates of the fingers to tap. Length can be up to five.
- duration - (optional) length of time to tap, in ms
:Usage: driver.tap([(100, 20), (100, 60), (100, 100)], 500)
用法 driver.tap([(x,y),(x1,y1)],500)
当控件无法获取时,那我们就可以使用坐标用tap方法做点击操作,而且tap方法可以用于多点点击。
|
1
|
driver.tap([(300,500)],10) |
7.zoom
zoom(self, element=None, percent=200, steps=50):
Zooms in on an element a certain amount (在元素上执行放大操作)
:Args:
- element - the element to zoom
- percent - (optional) amount to zoom. Defaults to 200%
- steps - (optional) number of steps in the zoom action
:Usage: driver.zoom(element)
用法 driver.zoom(element)
zoom方法用来模拟手机上的放大操作,主要是要确定element,具体例子和下面pinch方法一起讲。
el=driver.find_element_by_class_name('android.widget.RelativeLayout')
driver.zoom(el,150,30)    #percent参数和steps可以不写,不写保持默认数值
8.pinch
pinch(self, element=None, percent=200, steps=50):
Pinch on an element a certain amount 在元素上执行模拟双指捏(缩小操作)
:Args:
- element - the element to pinch
- percent - (optional) amount to pinch. Defaults to 200%
- steps - (optional) number of steps in the pinch action
:Usage: driver.pinch(element)
用法 driver.pinch(element)
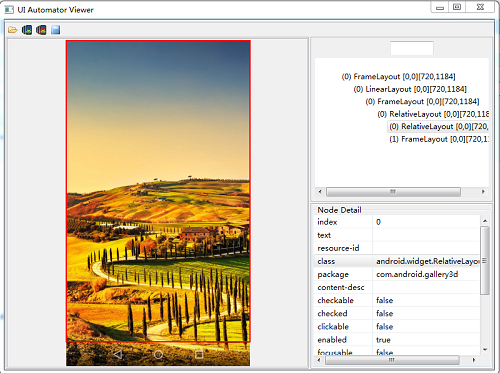
pinch方法用来模拟手机上的缩小操作,主要是要确定element,下面举例进入图库查看图片时放大和缩小图片,使用uiautomatorviewer.bat工具来定位元素。
(1)进入图库,如下图所示,图库控件text是唯一的,所以我们采用by_name方法获取元素。
driver.find_element_by_name('图库')

(2)选择图库的一个文件夹,如下图所示,选择杂志锁屏,由于该元素text也是唯一的,所以使用by_name方法获取控件元素。
driver.find_element_by_name('杂志锁屏')

(3)选择一张图片,所下图所示,下面图片是一个整的布局,没有单独分开的控件元素,所以我们只能选择使用tap方法点击屏幕。
driver.tap([(300,500)],50)
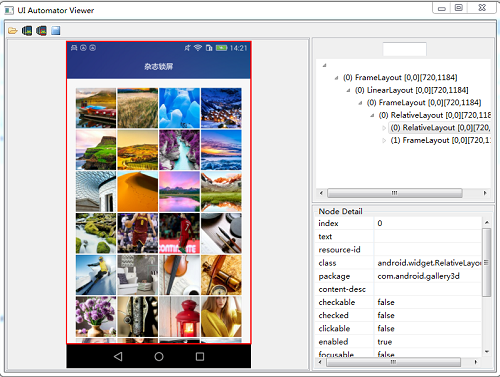
(4)放大和缩小图片,如下图所示,整个图片是一个布局,而且只有class信息,由于放大和缩小需要获得element,所以我们使用class_name的
方法获取整个布局作为元素。
el=driver.find_element_by_class_name('android.widget.RelativeLayout')
driver.zoom(el)
driver.pinch(el,200,50)
上面操作的具体脚本如下
from appium import webdriver
import time
desired_caps = {
               'platformName' : 'Android',
               'deviceName' : '76P4C15813005463',
               'platformVersion' : '5.1',
               #测试apk包名
               'appPackage' : 'com.huawei.android.launcher',
               #测试apk的launcherActivity
               'appActivity' : '.Launcher',
               }
#进入android系统launcher
driver = webdriver.Remote('http://127.0.0.1:4723/wd/hub',desired_caps)
time.sleep(5)
#进入图库
driver.find_element_by_name('图库').click()
driver.find_element_by_name('杂志锁屏').click()
driver.tap([(300,500)],50)
time.sleep(1)
el=driver.find_element_by_class_name('android.widget.RelativeLayout')
#放大图片
driver.zoom(el)
time.sleep(5)
#缩小图片
driver.pinch(el,200,50)
time.sleep(5)
driver.quit()