第一步窗口搭建:
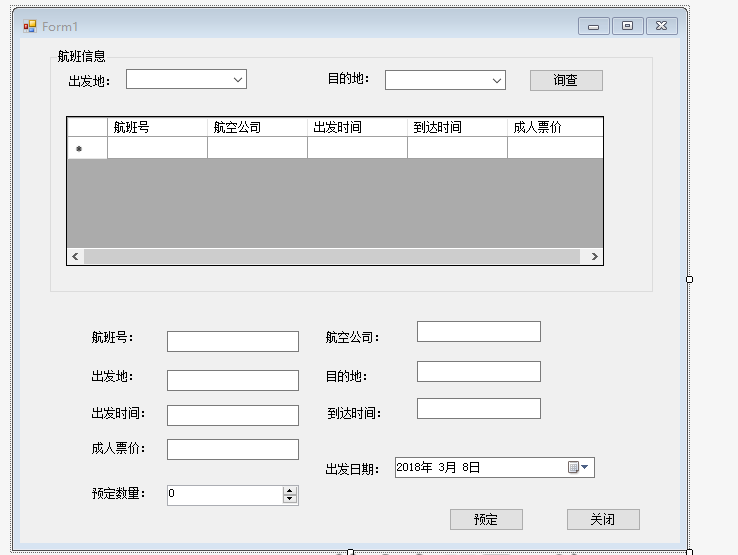
2.第二步利用 DataSet实现下拉框:
private void Form1_Load(object sender, EventArgs e)
{
dataGridView1.AutoGenerateColumns = false;
string Str = "Data Source=.;Initial Catalog=Ticket;User ID=sa;Password=2537924321";
string sql = "select Id,CityName from CityInfo";
SqlConnection conn = new SqlConnection(Str);
SqlCommand hua = new SqlCommand(sql, conn);
SqlDataAdapter da = new SqlDataAdapter();
da.SelectCommand = hua;
DataSet ds = new DataSet();
da.Fill(ds, "stu");
DataRow rows = ds.Tables["stu"].NewRow();
rows["Id"] = -1;
rows["CityName"] = "请选择";
ds.Tables["stu"].Rows.InsertAt(rows, 0);
comboBox1.DataSource = ds.Tables["stu"];
comboBox1.DisplayMember = "CityName";
comboBox1.ValueMember = "Id";
// DataSet ds1 = new DataSet();
da.Fill(ds, "stu1");
DataRow row = ds.Tables["stu1"].NewRow();
row["Id"] = -1;
row["CityName"] = "请选择";
ds.Tables["stu1"].Rows.InsertAt(row, 0);
comboBox2.DataSource = ds.Tables["stu1"];
comboBox2.DisplayMember = "CityName";
comboBox2.ValueMember = "Id";
}
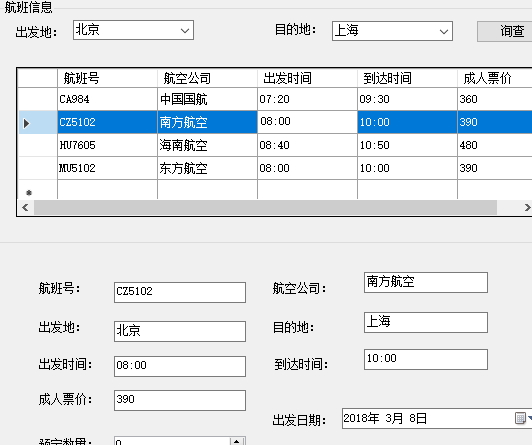
实现功能如下:

第三步 DataSet实现查找的功能并利用dataGridView属性来相互对其:
private void button1_Click(object sender, EventArgs e)
{
string Str = "Data Source=.;Initial Catalog=Ticket;User ID=sa;Password=2537924321";
string begin = comboBox1.SelectedIndex.ToString();
string end = comboBox2.SelectedIndex.ToString();
string sql ="select * from AirwaysInfo ,FlightInfo where AirwaysInfo.Id = FlightInfo.AirwaysId and LeaveCity = '"+begin+"' and Destination = '"+end+"'";
SqlConnection conn = new SqlConnection(Str);
SqlDataAdapter sa = new SqlDataAdapter(sql, conn);
DataSet ds = new DataSet();
ds.Tables.Clear();
sa.Fill(ds, "s");
dataGridView1.DataSource = ds.Tables["s"];

第四步利用文本特性实现与介绍框对应:
private void dataGridView1_CellClick(object sender, DataGridViewCellEventArgs e)
{
textBox1.Text = dataGridView1.SelectedRows[0].Cells[0].Value.ToString();
textBox5.Text = dataGridView1.SelectedRows[0].Cells[1].Value.ToString();
textBox3.Text = dataGridView1.SelectedRows[0].Cells[2].Value.ToString();
textBox7.Text = dataGridView1.SelectedRows[0].Cells[3].Value.ToString();
textBox4.Text = dataGridView1.SelectedRows[0].Cells[4].Value.ToString();
textBox2.Text = comboBox1.Text;
textBox6.Text = comboBox2.Text;
}
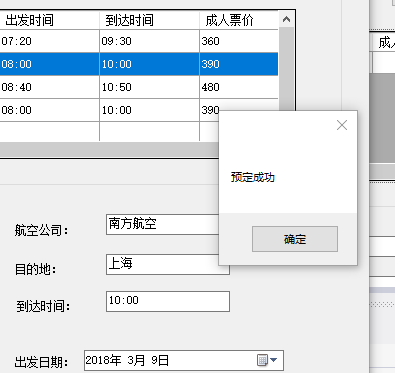
5.第五步实现预定和取消 并设以随机数链接数据库 利用if给日期设必须是未来的条件 加上非空验证:
private void button2_Click(object sender, EventArgs e)
{
string Str = "Data Source=.;Initial Catalog=Ticket;User ID=sa;Password=2537924321";
SqlConnection conn = new SqlConnection(Str);
Random r = new Random();
String random = Convert.ToString(r.Next(100000,1000000));
string flightNo = textBox1.Text;
if (Convert.ToDateTime(dateTimePicker2.Text) < Convert.ToDateTime(DateTime.Now.ToString()))
{
MessageBox.Show("请检查信息!");
}
else
{
DateTime time = dateTimePicker2.Value;
int num =Convert.ToInt32(numericUpDown1.Text);
conn.Open();
string sql = "insert into OrderInfo values('"+random+"','"+flightNo+"','"+time+"','"+num+"')";
SqlCommand comm = new SqlCommand(sql,conn);
int no = comm.ExecuteNonQuery();
if (no > 0)
{
DialogResult cui = MessageBox.Show("确定预定吗", "提示", MessageBoxButtons.YesNo, MessageBoxIcon.Question);
if (cui == DialogResult.Yes)
{
MessageBox.Show("预定成功");
}
}
else
{
MessageBox.Show("请检查信息!");
}
conn.Close();
}
}