OpenStack企业私有云实践
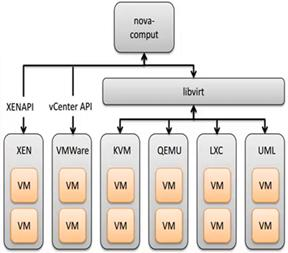
1. 实验架构
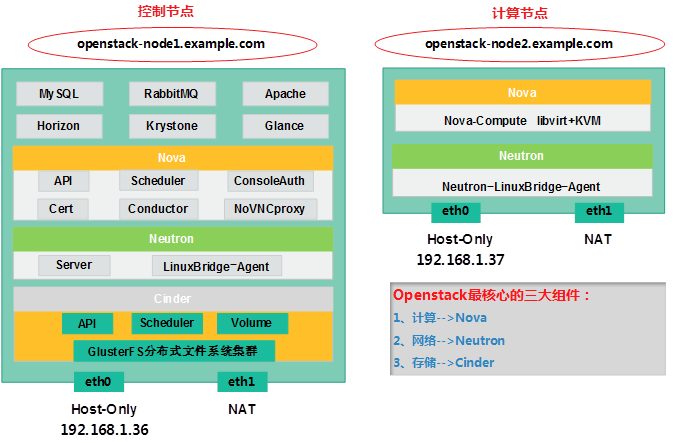

OpenStack我们把它当作是一个全新的“Linux”系统来学习,有的时候我们也把OpenStack称之为一个新的Linux系统。
l 部分组件介绍:
Ø RabbitMQè消息队列组件(组件之间的通讯)
Ø Horizonè提供图形界面的组件
Ø KeyStoneè各个组件的注册和验证
Ø Glanceè“镜像”管理组件
Ø MySQLè存储各个组件的数据
2. OpenStack插件服务简介
2.1. Keystone验证服务


ü 用户与认证:用户权限与用户行为跟踪;
ü 服务目录:提供一个服务目录,包括所有服务项与相关Api的端点
2.2. Glance镜像服务


² User:用户
² Tenant:租户
² Token:令牌
² Role:角色
² Service:服务
² Endpoint:端点
2.3. Nova计算服务
Ø API:负责接收和响应外部请求。支持OpenStack API, EC2API。
Ø Cert:负责身份认证。
Ø Scheduler:用于云主机调度。
Ø Conductor:计算节点访问数据的中间件。
Ø Consoleauth:用于控制台的授权验证。
Ø Novncproxy: VNC代理。
Nova Dashboard(nova仪表盘)
Ø 提供一个Web界面操作OpenStack的系统。
Ø 使用Django框架基于OpenStack API开发。
Ø 支持将Session存储在DB、 Memcached。
Ø 支持集群。
Nova scheduler
Nova Scheduler模块在OpenStack中的作用就是决策虚拟机创建在哪个主机(计算节点)上。
决策一个虚拟机应该调度到某物理节点,需要分两个步骤:
1. 过滤(Fliter)
2. 计算权值(Weight)
3. 基础环境准备(统一操作)
3.1. 更改主机名
计算节点:
|
1
2
3
|
hostname linux-node1.example.comvim /etc/sysconfig/networkHOSTNAME=linux-node1.example.com |
控制节点:
|
1
2
3
|
hostname linux-node2.example.comvim /etc/sysconfig/networkHOSTNAME=linux-node2.example.com |
3.2. 统一更改hosts文件
|
1
2
3
|
[root@localhost ~]# tail -2 /etc/hosts192.168.1.36 linux-node1.example.com linux-node1192.168.1.37 linux-node2.example.com linux-node2 |
退出从新登录:
|
1
2
|
[root@linux-node1 ~]# ping linux-node1[root@linux-node1 ~]# ping linux-node2 |
3.3. 关闭Selinux与Iptables
|
1
2
3
|
grep "SELINUX=disabled" /etc/selinux/configchkconfig iptables off/etc/init.d/iptables stop |
3.4. 时间同步
|
1
2
3
4
|
/usr/sbin/ntpdate time.nist.gov[root@linux-node1 ~]# crontab -l#time sync by nick at 2015-3-21*/5 * * * * /usr/sbin/ntpdate time.nist.gov >/dev/null 2>&1 |
3.5. 安装epel包
|
1
2
|
rpm -ivh http://mirrors.ustc.edu.cn/fedora/epel//6/x86_64/epel-release-6-8.noarch.rpm |
4. 安装部署(控制节点操作)
4.1. 安装基础包
|
1
|
yum install -y python-pip gcc gcc-c++ make libtool patch automake python-devel libxslt-devel MySQL-python openssl-devel libudev-devel git wget libvirt-python libvirt qemu-kvm gedit python-numdisplay python-eventlet device-mapper bridge-utils libffi-devel libffi |
4.2. MySQL安装与配置
4.2.1. Install MySQL
|
1
|
yum install mysql-server |
4.2.2. Config MySQL
|
1
2
3
4
5
6
7
8
|
cp /usr/share/mysql/my-medium.cnf /etc/my.cnfvim /etc/my.cnf#在[mysqld]标签下配置default-storage-engine = innodbinnodb_file_per_tablecollation-server = utf8_general_ci init-connect = 'SET NAMES utf8' character-set-server = utf8 |
4.2.3. 启动MySQL
|
1
2
|
[root@linux-node1 ~]# /etc/init.d/mysqld start[root@linux-node1 ~]# chkconfig mysqld on |
4.2.4. Created MySQL database
把所有的库一块创建出来,后面的组件会用到。
|
1
2
3
4
5
6
7
8
9
10
11
12
13
14
15
16
17
18
19
20
21
22
23
24
25
26
27
28
29
30
31
|
mysql> create database keystone;Query OK, 1 row affected (0.00 sec) mysql> grant all on keystone.* to keystone@' 192.168.1.0/255.255.255.0' identified by 'keystone';Query OK, 0 rows affected (0.00 sec) mysql> create database glance;Query OK, 1 row affected (0.00 sec) mysql> grant all on glance.* to glance@' 192.168.1.0/255.255.255.0' identified by 'glance';Query OK, 0 rows affected (0.00 sec) mysql> create database nova;Query OK, 1 row affected (0.00 sec) mysql> grant all on nova.* to nova@' 192.168.1.0/255.255.255.0' identified by 'nova';Query OK, 0 rows affected (0.00 sec) mysql> create database neutron;Query OK, 1 row affected (0.00 sec) mysql> grant all on neutron.* to neutron@' 192.168.1.0/255.255.255.0' identified by 'neutron';Query OK, 0 rows affected (0.00 sec) mysql> create database cinder;Query OK, 1 row affected (0.00 sec) mysql> grant all on cinder.* to cinder@' 192.168.1.0/255.255.255.0' identified by 'cinder';Query OK, 0 rows affected (0.00 sec) mysql> |
4.3. RabbitMQ安装与配置
4.3.1. Install rabbitmq
|
1
|
yum install rabbitmq-server |
4.3.2. Start rabbitmq
|
1
2
3
4
|
[root@linux-node1 ~]# /etc/init.d/rabbitmq-server startStarting rabbitmq-server: SUCCESSrabbitmq-server.[root@linux-node1 ~]# chkconfig rabbitmq-server on |
注意:如果主机名不能解析,会导致启动不了。
4.3.3. 启用rabbitmq自带的web管理插件
|
1
2
|
/usr/lib/rabbitmq/bin/rabbitmq-plugins list ##列出rabbitmq当前有哪些插件/usr/lib/rabbitmq/bin/rabbitmq-plugins enable rabbitmq_management ##启用管理插件 |
操作过程:
|
1
2
3
4
5
6
7
8
9
10
11
12
13
14
15
16
17
|
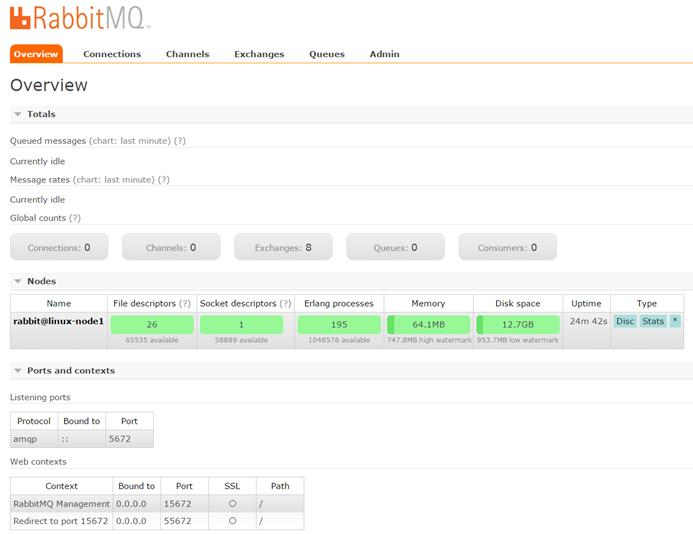
[root@linux-node1 ~]# /usr/lib/rabbitmq/bin/rabbitmq-plugins enable rabbitmq_managementThe following plugins have been enabled: mochiweb webmachine rabbitmq_web_dispatch amqp_client rabbitmq_management_agent rabbitmq_managementPlugin configuration has changed. Restart RabbitMQ for changes to take effect.#重启rabbitmq[root@linux-node1 ~]# /etc/init.d/rabbitmq-server restart Restarting rabbitmq-server: SUCCESSrabbitmq-server.[root@linux-node1 ~]# netstat -lntup|grep -E "15672|5672"tcp 0 0 0.0.0.0:15672 0.0.0.0:* LISTEN 2542/beam tcp 0 0 0.0.0.0:55672 0.0.0.0:* LISTEN 2542/beam tcp 0 0 :::5672 :::* LISTEN 2542/beam |
rabbitmq监控的端口是5672,web管理端口是15672和55672。
4.3.4. 登录rabbitmq的web管理界面
在浏览器里输入http://192.168.1.36:15672/


用户名:guest
密 码:guest
4.3.5. RabbitMQ的web管理界面

4.4. KeyStone安装与配置
4.4.1. Install keystone
|
1
2
|
yum install http://repos.fedorapeople.org/repos/openstack/openstack-icehouse/rdo-release-icehouse-4.noarch.rpmyum install openstack-keystone python-keystoneclient |
4.4.2. 创建keystone需要使用的pki令牌
快速执行命令:
|
1
|
keystone-manage pki_setup --keystone-user keystone --keystone-group keystone |
操作过程:
|
1
2
3
4
5
6
7
8
9
10
11
12
13
14
15
16
17
18
19
20
21
22
23
|
[root@linux-node1 ~]# keystone-manage pki_setup --keystone-user keystone --keystone-group keystoneGenerating RSA private key, 2048 bit long modulus.+++....................................................................+++e is 65537 (0x10001)Generating RSA private key, 2048 bit long modulus...............+++......+++e is 65537 (0x10001)Using configuration from /etc/keystone/ssl/certs/openssl.conf <==默认创建的证书目录Check that the request matches the signatureSignature okThe Subject's Distinguished Name is as followscountryName :PRINTABLE:'US'stateOrProvinceName :ASN.1 12:'Unset'localityName :ASN.1 12:'Unset'organizationName :ASN.1 12:'Unset'commonName :ASN.1 12:'www.example.com'Certificate is to be certified until May 16 03:01:29 2025 GMT (3650 days) Write out database with 1 new entriesData Base Updated[root@linux-node1 ~]# |
4.4.3. Config ssl permission
上面创建完成之后,默认会生成“/etc/keystone/ssl/”证书目录及证书文件,此时需要设置目录的权限。
快速执行命令:
|
1
2
|
chown -R keystone:keystone /etc/keystone/ssl/chmod -R o-rwx /etc/keystone/ssl/ |
操作过程:
|
1
2
|
[root@linux-node1 ~]# chown -R keystone:keystone /etc/keystone/ssl/[root@linux-node1 ~]# chmod -R o-rwx /etc/keystone/ssl/ |
4.4.4. 配置keystone的admin_token
Keystone的所有配置都在一个文件里,即:/etc/keystone/keystone.conf
1) 打开配置文件并编辑:
|
1
2
3
4
|
vim /etc/keystone/keystone.conf[root@linux-node1 ~]# egrep -n "^[a-z]" /etc/keystone/keystone.conf 13:admin_token=ADMIN619:connection=mysql://keystone:keystone@192.168.1.36/keystone |
2) 同步数据库
配置keystone之后,需要同步数据库,作用是建立keystone的表结构。
快速执行命令:
|
1
2
|
keystone-manage db_syncmysql -h 192.168.1.36 -u keystone -pkeystone -e "use keystone;show tables;" |
操作结果:
|
1
2
3
4
5
6
7
8
9
10
11
12
13
14
15
16
17
18
19
20
21
22
|
[root@linux-node1 ~]# keystone-manage db_sync ç没返回任何结果则为正常[root@linux-node1 ~]# mysql -h 192.168.1.36 -u keystone -pkeystone -e "use keystone;show tables;" <==验证同步的数据库结构表+-----------------------+| Tables_in_keystone |+-----------------------+| assignment || credential || domain || endpoint || group || migrate_version || policy || project || region || role || service || token || trust || trust_role || user || user_group_membership |+-----------------------+ |
错误记录:
|
1
2
|
[root@linux-node1 ~]# mysql -h 192.168.1.36 -u keystone -pkeystone -e "use keystone;show tables;"ERROR 1045 (28000): Access denied for user 'keystone'@'linux-node1.example.com' (using password: YES) |
如果报以上错误,经过排查后发现是MySQL的keystone用户没有权限所导致,当然上面的数据同步也就不会成功。解决方法可以重新授权keystone用户,如下:
|
1
|
grant all on keystone.* to keystone@'192.168.1.0/255.255.255.0' identified by 'keystone'; |
4.4.5. 配置keystone的Debug及日志功能
|
1
2
3
4
|
vim /etc/keystone/keystone.conf[root@linux-node1 ~]# egrep -n '^[a-z]' /etc/keystone/keystone.conf374:debug=true439:log_file=/var/log/keystone/keystone.log |
打开debug之后,有什么问题都可以查看debug错误日志,以便后面实验排查解决错误。
ü 赵班长强心针:OpenStack所有问题,基本上都能解决。而且,看日志都能看出来,当在生产环境下的报错,你第一反应应该是看日志,而不是说先把报错发出来,没有用。
4.4.6. Start Keystone
终于到了启动keystone的环节了,继续ing:
1) 启动:
|
1
2
3
|
chown -R keystone:keystone /var/log/keystone/*/etc/init.d/openstack-keystone startchkconfig openstack-keystone on |
2) keystone监听的端口:
|
1
2
3
|
[root@linux-node1 ~]# netstat -lntup|egrep "35357|5000"tcp 0 0 0.0.0.0:35357 0.0.0.0:* LISTEN 24783/python tcp 0 0 0.0.0.0:5000 0.0.0.0:* LISTEN 24783/python |
3) keystone的三大类命令
|
1
2
3
4
5
6
7
8
9
10
11
12
13
14
15
16
17
18
19
20
21
22
23
|
[root@linux-node1 ~]# keystone --help|grep list ec2-credentials-list endpoint-list List configured service endpoints. role-list List all roles. service-list List all services in Service Catalog. tenant-list List all tenants. user-list List users. user-role-list List roles granted to a user.[root@linux-node1 ~]# keystone --help|grep create ec2-credentials-create endpoint-create Create a new endpoint associated with a service. role-create Create new role. service-create Add service to Service Catalog. tenant-create Create new tenant. user-create Create new user[root@linux-node1 ~]# keystone --help|grep delete ec2-credentials-delete endpoint-delete Delete a service endpoint. role-delete Delete role. service-delete Delete service from Service Catalog. tenant-delete Delete tenant. user-delete Delete user.[root@linux-node1 ~]# |
Keystone的三大命令,所有操作都是用这三个。
4.4.7. 定义admin_token变量
export OS_SERVICE_TOKEN=ADMIN
export OS_SERVICE_ENDPOINT=http://192.168.1.36:35357/v2.0
操作过程:
|
1
2
3
4
5
6
7
8
9
10
11
12
|
[root@linux-node1 ~]# export OS_SERVICE_TOKEN=ADMIN[root@linux-node1 ~]# export OS_SERVICE_ENDPOINT=http://192.168.1.36:35357/v2.0[root@linux-node1 ~]# echo $OS_SERVICE_TOKENADMIN[root@linux-node1 ~]# echo $OS_SERVICE_ENDPOINThttp://192.168.1.36:35357/v2.0[root@linux-node1 ~]# keystone role-list+----------------------------------+----------+| id | name |+----------------------------------+----------+| 9fe2ff9ee4384b1894a90878d3e92bab | _member_ |+----------------------------------+----------+ |
4.4.8. 注册keystone用户
1) 创建一个admin用户
|
1
2
3
4
5
6
7
8
9
10
11
12
13
14
15
16
|
[root@linux-node1 ~]# keystone user-create --name=admin --pass=admin --email=admin@example.com+----------+----------------------------------+| Property | Value |+----------+----------------------------------+| email | admin@example.com || enabled | True || id | 4a736ea8cf804214b0754afefe8387ee || name | admin || username | admin |+----------+----------------------------------+[root@linux-node1 ~]# keystone user-list+----------------------------------+-------+---------+-------------------+| id | name | enabled | email |+----------------------------------+-------+---------+-------------------+| 4a736ea8cf804214b0754afefe8387ee | admin | True | admin@example.com |+----------------------------------+-------+---------+-------------------+ |
a) 创建一个admin角色
|
1
2
3
4
5
6
7
|
[root@linux-node1 ~]# keystone role-create --name=admin+----------+----------------------------------+| Property | Value |+----------+----------------------------------+| id | f26d339da9a1468a89b35c49adecd777 || name | admin |+----------+----------------------------------+ |
b) 创建一个admin租户
|
1
2
3
4
5
6
7
8
9
|
[root@linux-node1 ~]# keystone tenant-create --name=admin --description="Admin Tenant"+-------------+----------------------------------+| Property | Value |+-------------+----------------------------------+| description | Admin Tenant || enabled | True || id | 707f2d26cdd5477ea66ede0b5c216c23 || name | admin |+-------------+----------------------------------+ |
c) 添加用户角色并建立关系
|
1
2
3
4
5
6
7
8
9
|
[root@linux-node1 ~]# keystone user-role-add --user=admin --tenant=admin --role=admin[root@linux-node1 ~]# keystone user-role-add --user=admin --role=_member_ --tenant=admin[root@linux-node1 ~]# keystone role-list+----------------------------------+----------+| id | name |+----------------------------------+----------+| 9fe2ff9ee4384b1894a90878d3e92bab | _member_ || f26d339da9a1468a89b35c49adecd777 | admin |+----------------------------------+----------+ |
2) 创建一个demo用户
|
1
2
3
4
5
6
7
8
9
10
11
12
13
14
15
16
17
|
[root@linux-node1 ~]# keystone user-create --name=demo --pass=demo+----------+----------------------------------+| Property | Value |+----------+----------------------------------+| email | || enabled | True || id | 944ecced065d45f58b11c63097fc21ba || name | demo || username | demo |+----------+----------------------------------+[root@linux-node1 ~]# keystone user-list+----------------------------------+-------+---------+-------------------+| id | name | enabled | email |+----------------------------------+-------+---------+-------------------+| 4a736ea8cf804214b0754afefe8387ee | admin | True | admin@example.com || 944ecced065d45f58b11c63097fc21ba | demo | True | |+----------------------------------+-------+---------+-------------------+ |
a) 创建一个demo租户
|
1
2
3
4
5
6
7
8
9
|
[root@linux-node1 ~]# keystone tenant-create --name=demo --description="demo Tenant"+-------------+----------------------------------+| Property | Value |+-------------+----------------------------------+| description | demo Tenant || enabled | True || id | c4015c47e46f4b30bf68a6f39061ace3 || name | demo |+-------------+----------------------------------+ |
b) 建立关系
|
1
|
[root@linux-node1 ~]# keystone user-role-add --user=demo --role=_member_ --tenant=demo |
3) 创建一个service用户
|
1
2
3
4
5
6
7
8
9
|
[root@linux-node1 ~]# keystone tenant-create --name=service +-------------+----------------------------------+| Property | Value |+-------------+----------------------------------+| description | || enabled | True || id | 628660545a044ac4ac5c1a16ca7f4a2c || name | service |+-------------+----------------------------------+ |
a) 创建service和endpoint
|
1
2
3
4
5
6
7
8
9
10
11
12
13
14
15
16
17
18
19
20
21
22
23
24
25
26
27
28
29
30
31
32
33
34
35
36
37
38
39
40
41
42
|
[root@linux-node1 ~]# keystone service-create --name=keystone --type=identity+-------------+----------------------------------+| Property | Value |+-------------+----------------------------------+| description | || enabled | True || id | c84682b33e384a79814b1da93097616c || name | keystone || type | identity |+-------------+----------------------------------+[root@linux-node1 ~]# keystone service-list+----------------------------------+----------+----------+-------------+| id | name | type | description |+----------------------------------+----------+----------+-------------+| c84682b33e384a79814b1da93097616c | keystone | identity | |+----------------------------------+----------+----------+-------------+[root@linux-node1 ~]# keystone endpoint-create > --service-id=$(keystone service-list | awk '/ identity / {print $2}') > --publicurl=http://192.168.1.36:5000/v2.0 > --internalurl=http://192.168.1.36:5000/v2.0 > --adminurl=http://192.168.1.36:35357/v2.0+-------------+----------------------------------+| Property | Value |+-------------+----------------------------------+| adminurl | http://192.168.1.36:35357/v2.0 || id | 0c919098a9ef48f8ac1880ba1c04c2c5 || internalurl | http://192.168.1.36:5000/v2.0 || publicurl | http://192.168.1.36:5000/v2.0 || region | regionOne || service_id | c84682b33e384a79814b1da93097616c |+-------------+----------------------------------+[root@linux-node1 ~]# keystone endpoint-list 在数据库里查到的结果+----------------------------------+-----------+-------------------------------+-------------------------------+--------------------------------+----------------------------------+| id | region | publicurl | internalurl | adminurl | service_id |+----------------------------------+-----------+-------------------------------+-------------------------------+--------------------------------+----------------------------------+| 0c919098a9ef48f8ac1880ba1c04c2c5 | regionOne | http://192.168.1.36:5000/v2.0 | http://192.168.1.36:5000/v2.0 | http://192.168.1.36:35357/v2.0 | c84682b33e384a79814b1da93097616c |+----------------------------------+-----------+-------------------------------+-------------------------------+--------------------------------+----------------------------------+[root@linux-node1 ~]# unset OS_SERVICE_TOKEN 一定要取消这两个变量[root@linux-node1 ~]# unset OS_SERVICE_ENDPOINT[root@linux-node1 ~]# keystone --os-username=admin --os-password=admin --os-tenant-name=admin --os-auth-url=http://192.168.1.36:35357/v2.0 token-get+-----------+--------------------------------------------------------------------------------------------------------------------------------------------------------------------------------------------------------------------------------------------------------···输出略过··· |
4.4.9. 建立keystone环境变量文件(方便以后使用)
1) 建立admin的环境变量
|
1
2
3
4
5
6
7
8
|
[root@linux-node1 ~]# cd [root@linux-node1 ~]# vim keystone-admin[root@linux-node1 ~]# cat keystone-admin export OS_TENANT_NAME=adminexport OS_USERNAME=adminexport OS_PASSWORD=adminexport OS_AUTH_URL=http://192.168.1.36:35357/v2.0[root@linux-node1 ~]# source keystone-admin |
2) 建立demo的环境变量
|
1
2
3
4
5
6
7
|
[root@linux-node1 ~]# vim keystone-demo[root@linux-node1 ~]# cat keystone-demoexport OS_TENANT_NAME=demoexport OS_USERNAME=demoexport OS_PASSWORD=demoexport OS_AUTH_URL=http://192.168.1.36:35357/v2.0[root@linux-node1 ~]# source keystone-demo |
4.5. Glance安装与配置
n Glance是OpenStack中的一个镜像服务,主要作用是提供虚拟机的虚拟镜像注册、查询、存储的功能。
n Glance由三个部分组成,分别为:glance-api、glance-registry以及image store。
4.5.1. Install Glance
|
1
|
yum install openstack-glance python-glanceclient python-crypto |
4.5.2. Config Glance
Glance的默认配置路径在“/etc/glance/”目录下:
|
1
2
3
4
5
|
[root@linux-node1 ~]# cd /etc/glance/[root@linux-node1 glance]# lsglance-api.conf glance-registry.conf policy.jsonglance-cache.conf glance-scrubber.conf schema-image.json#只需要配置标记的两个文件 |
1) 更改的配置:
|
1
2
3
4
5
6
7
8
|
[root@linux-node1 glance]# egrep -n '^[a-z]' glance-api.conf 6:debug=true43:log_file=/var/log/glance/api.log564:connection=mysql://glance:glance@192.168.1.36/glance[root@linux-node1 glance]# egrep -n '^[a-z]' glance-registry.conf 6:debug=true19:log_file=/var/log/glance/registry.log94:connection=mysql://glance:glance@192.168.1.36/glance |
2) 同步数据库
|
1
2
3
4
|
[root@linux-node1 glance]# glance-manage db_sync ç执行的时候会有5秒左右的延时/usr/lib64/python2.6/site-packages/Crypto/Util/number.py:57: PowmInsecureWarning: Not using mpz_powm_sec. You should rebuild using libgmp >= 5 to avoid timing attack vulnerability. _warn("Not using mpz_powm_sec. You should rebuild using libgmp >= 5 to avoid timing attack vulnerability.", PowmInsecureWarning) ç这个是警告,不过没关系。[root@linux-node1 glance]# |
3) 验证同步的数据表结构:
|
1
2
3
4
5
6
7
8
9
10
11
12
13
|
[root@linux-node1 glance]# mysql -h 192.168.1.36 -u glance -pglance -e"use glance;show tables;"+------------------+| Tables_in_glance |+------------------+| image_locations || image_members || image_properties || image_tags || images || migrate_version || task_info || tasks |+------------------+ |
4.5.3. 配置Glance的RabbitMQ
1) 修改glance-api.conf文件
|
1
2
3
4
5
6
7
8
9
10
11
|
[root@linux-node1 glance]# egrep -n '^[a-z]' glance-api.conf 232:notifier_strategy = rabbit242:rabbit_host=192.168.1.36243:rabbit_port=5672244:rabbit_use_ssl=false245:rabbit_userid=guest246:rabbit_password=guest247:rabbit_virtual_host=/248:rabbit_notification_exchange=glance249:rabbit_notification_topic=notifications250:rabbit_durable_queues=False |
2) Glance连接到keystone进行认证
Glance需要连接keystone来进行用户验证,才能对用户提供服务
操作过程:
a) 在keystone里创建Glance用户
|
1
2
3
4
5
6
7
8
9
10
11
12
13
14
15
16
17
18
19
|
[root@linux-node1 ~]# source keystone-admin ç在执行keystone之前首先应该加载环境变量[root@linux-node1 ~]# keystone user-create --name=glance --pass=glance+----------+----------------------------------+| Property | Value |+----------+----------------------------------+| email | || enabled | True || id | 91c734899d21406582a5e901973c6110 || name | glance || username | glance |+----------+----------------------------------+[root@linux-node1 ~]# keystone user-list+----------------------------------+--------+---------+-------------------+| id | name | enabled | email |+----------------------------------+--------+---------+-------------------+| 4a736ea8cf804214b0754afefe8387ee | admin | True | admin@example.com || 944ecced065d45f58b11c63097fc21ba | demo | True | || 91c734899d21406582a5e901973c6110 | glance | True | |+----------------------------------+--------+---------+-------------------+ |
b) 建立关系
|
1
|
[root@linux-node1 ~]# keystone user-role-add --user=glance --tenant=service --role=admin |
4.5.4. 配置Glance的Keystone
1) 修改glance-api.conf文件
[root@linux-node1 ~]# egrep -n "^[a-z]" /etc/glance/glance-api.conf
|
1
2
3
4
5
6
7
|
645:auth_host=192.168.1.36646:auth_port=35357647:auth_protocol=http648:admin_tenant_name=service649:admin_user=glance650:admin_password=glance660:flavor=keystone |
2) 修改glance-registry.conf文件(注册服务文件也需要更改keystone的认证)
|
1
2
3
4
5
6
7
8
|
[root@linux-node1 ~]# egrep -n "^[a-z]" /etc/glance/glance-registry.conf 175:auth_host=192.168.1.36176:auth_port=35357177:auth_protocol=http178:admin_tenant_name=service179:admin_user=glance180:admin_password=glance190:flavor=keystone |
3) 创建service和endpoint
|
1
2
3
4
5
6
7
8
9
10
11
12
13
14
15
16
17
18
19
20
21
22
23
24
25
26
27
28
29
30
31
32
33
34
35
|
[root@linux-node1 ~]# keystone service-create --name=glance --type=image+-------------+----------------------------------+| Property | Value |+-------------+----------------------------------+| description | || enabled | True || id | a6242bf6e26e4f0c9ae1c8aeb9c4ce7f || name | glance || type | image |+-------------+----------------------------------+[root@linux-node1 ~]# keystone service-list+----------------------------------+----------+----------+-------------+| id | name | type | description |+----------------------------------+----------+----------+-------------+| a6242bf6e26e4f0c9ae1c8aeb9c4ce7f | glance | image | || c84682b33e384a79814b1da93097616c | keystone | identity | |+----------------------------------+----------+----------+-------------+[root@linux-node1 ~]# keystone endpoint-create --service-id=$(keystone service-list | awk '/ image / {print $2}') --publicurl=http://192.168.1.36:9292 --internalurl=http://192.168.1.36:9292 --adminurl=http://192.168.1.36:9292+-------------+----------------------------------+| Property | Value |+-------------+----------------------------------+| adminurl | http://192.168.1.36:9292 || id | 90762415c63d4d56aa7e9d30054c20c2 || internalurl | http://192.168.1.36:9292 || publicurl | http://192.168.1.36:9292 || region | regionOne || service_id | a6242bf6e26e4f0c9ae1c8aeb9c4ce7f |+-------------+----------------------------------+[root@linux-node1 ~]# keystone endpoint-list+----------------------------------+-----------+-------------------------------+-------------------------------+--------------------------------+----------------------------------+| id | region | publicurl | internalurl | adminurl | service_id |+----------------------------------+-----------+-------------------------------+-------------------------------+--------------------------------+----------------------------------+| 0c919098a9ef48f8ac1880ba1c04c2c5 | regionOne | http://192.168.1.36:5000/v2.0 | http://192.168.1.36:5000/v2.0 | http://192.168.1.36:35357/v2.0 | c84682b33e384a79814b1da93097616c || 90762415c63d4d56aa7e9d30054c20c2 | regionOne | http://192.168.1.36:9292 | http://192.168.1.36:9292 | http://192.168.1.36:9292 | a6242bf6e26e4f0c9ae1c8aeb9c4ce7f |+----------------------------------+-----------+-------------------------------+-------------------------------+--------------------------------+----------------------------------+ |
4.5.5. 更改日志属主
|
1
2
|
[root@linux-node1 ~]# cd /var/log/glance/[root@linux-node1 glance]# chown -R glance:glance api.log |
4.5.6. Start Glance
|
1
2
3
4
|
[root@linux-node1 glance]# /etc/init.d/openstack-glance-api start[root@linux-node1 glance]# /etc/init.d/openstack-glance-registry start[root@linux-node1 glance]# chkconfig openstack-glance-api on[root@linux-node1 glance]# chkconfig openstack-glance-registry on |
查看端口:
|
1
2
3
4
5
|
[root@linux-node1 glance]# netstat -lntup|egrep '9191|9292'tcp 0 0 0.0.0.0:9191 0.0.0.0:* LISTEN 29919/python tcp 0 0 0.0.0.0:9292 0.0.0.0:* LISTEN 29898/python #glance-api:9191端口#glance-registry:9292端口 |
查看glance镜像:(glance才刚启动,所以下面没有镜像,但是能看到,说明启动正常)
|
1
2
3
4
5
6
|
[root@linux-node1 glance]# glance image-list+----+------+-------------+------------------+------+--------+| ID | Name | Disk Format | Container Format | Size | Status |+----+------+-------------+------------------+------+--------++----+------+-------------+------------------+------+--------+[root@linux-node1 glance]# |
4.5.7. 下载镜像并注册
|
1
2
3
|
wget http://download.cirros-cloud.net/0.3.2/cirros-0.3.2-x86_64-disk.imgglance image-create --name "cirros-0.3.2-x86_64" --disk-format qcow2 --container-format bare --is-public True --file cirros-0.3.2-x86_64-disk.imgglance image-list |
操作过程:
|
1
2
3
4
5
6
7
8
9
10
11
12
13
14
15
16
17
18
19
20
21
22
23
24
25
26
27
28
29
30
|
[root@linux-node1 ~]# wget http://download.cirros-cloud.net/0.3.2/cirros-0.3.2-x86_64-disk.img[root@linux-node1 ~]# glance image-create --name "cirros-0.3.2-x86_64" --disk-format qcow2 --container-format bare --is-public True --file cirros-0.3.2-x86_64-disk.img+------------------+--------------------------------------+| Property | Value |+------------------+--------------------------------------+| checksum | 64d7c1cd2b6f60c92c14662941cb7913 || container_format | bare || created_at | 2015-05-20T02:41:14 || deleted | False || deleted_at | None || disk_format | qcow2 || id | 879aa6c1-15f2-4c85-85f6-c5822ba9a3c0 || is_public | True || min_disk | 0 || min_ram | 0 || name | cirros-0.3.2-x86_64 || owner | 707f2d26cdd5477ea66ede0b5c216c23 || protected | False || size | 13167616 || status | active || updated_at | 2015-05-20T02:41:15 || virtual_size | None |+------------------+--------------------------------------+[root@linux-node1 ~]# glance image-list+--------+---------------------+-------------+------------------+----------+--------+| ID | Name | Disk Format | Container Format | Size | Status |+--------+---------------------+-------------+------------------+----------+--------+| 879aa6c1-15f2-4c85-85f6-c5822ba9a3c0 | cirros-0.3.2-x86_64 | qcow2 | bare | 13167616 | active |+--------+---------------------+-------------+------------------+----------+--------+[root@linux-node1 ~]# |
4.6. Nova安装与配置
4.6.1. Install Nova
|
1
|
yum install openstack-nova-api openstack-nova-cert openstack-nova-conductor openstack-nova-console openstack-nova-novncproxy openstack-nova-scheduler python-novaclient |
4.6.2. Config Nova
Nova的默认配置路径在“/etc/nova/”目录下:
|
1
2
3
|
[root@linux-node1 ~]# cd /etc/nova/[root@linux-node1 nova]# lsapi-paste.ini nova.conf policy.json release rootwrap.conf |
4) 更改的配置:
|
1
2
|
[root@linux-node1 nova]# egrep -n '^[a-z]' nova.conf 2475:connection=mysql://nova:nova@192.168.1.36/nova |
5) 同步数据库
|
1
|
[root@linux-node1 nova]# nova-manage db sync |
6) 验证同步的数据表结构:
|
1
2
3
4
5
6
7
8
9
10
11
12
13
14
15
16
17
18
19
20
21
22
23
24
25
26
27
28
29
30
31
32
33
34
35
36
37
38
39
40
41
42
43
44
45
46
47
48
49
50
51
52
53
54
55
56
57
58
59
60
61
62
63
64
65
66
67
68
69
70
71
72
73
74
75
76
77
78
79
80
81
82
83
84
85
86
87
88
89
90
91
92
93
94
95
96
97
98
99
100
101
102
103
104
105
106
107
108
109
110
111
112
113
114
|
[root@linux-node1 nova]# mysql -h 192.168.1.36 -u nova -pnova -e"use nova;show tables;"+--------------------------------------------+| Tables_in_nova |+--------------------------------------------+| agent_builds || aggregate_hosts || aggregate_metadata || aggregates || block_device_mapping || bw_usage_cache || cells || certificates || compute_nodes || console_pools || consoles || dns_domains || fixed_ips || floating_ips || instance_actions || instance_actions_events || instance_faults || instance_group_member || instance_group_metadata || instance_group_policy || instance_groups || instance_id_mappings || instance_info_caches || instance_metadata || instance_system_metadata || instance_type_extra_specs || instance_type_projects || instance_types || instances || iscsi_targets || key_pairs || migrate_version || migrations || networks || pci_devices || project_user_quotas || provider_fw_rules || quota_classes || quota_usages || quotas || reservations || s3_images || security_group_default_rules || security_group_instance_association || security_group_rules || security_groups || services || shadow_agent_builds || shadow_aggregate_hosts || shadow_aggregate_metadata || shadow_aggregates || shadow_block_device_mapping || shadow_bw_usage_cache || shadow_cells || shadow_certificates || shadow_compute_nodes || shadow_console_pools || shadow_consoles || shadow_dns_domains || shadow_fixed_ips || shadow_floating_ips || shadow_instance_actions || shadow_instance_actions_events || shadow_instance_faults || shadow_instance_group_member || shadow_instance_group_metadata || shadow_instance_group_policy || shadow_instance_groups || shadow_instance_id_mappings || shadow_instance_info_caches || shadow_instance_metadata || shadow_instance_system_metadata || shadow_instance_type_extra_specs || shadow_instance_type_projects || shadow_instance_types || shadow_instances || shadow_iscsi_targets || shadow_key_pairs || shadow_migrate_version || shadow_migrations || shadow_networks || shadow_pci_devices || shadow_project_user_quotas || shadow_provider_fw_rules || shadow_quota_classes || shadow_quota_usages || shadow_quotas || shadow_reservations || shadow_s3_images || shadow_security_group_default_rules || shadow_security_group_instance_association || shadow_security_group_rules || shadow_security_groups || shadow_services || shadow_snapshot_id_mappings || shadow_snapshots || shadow_task_log || shadow_virtual_interfaces || shadow_volume_id_mappings || shadow_volume_usage_cache || shadow_volumes || snapshot_id_mappings || snapshots || task_log || virtual_interfaces || volume_id_mappings || volume_usage_cache || volumes |+--------------------------------------------+[root@linux-node1 nova]# |
4.6.3. Nova配置RabbitMQ
|
1
2
3
4
5
6
7
|
[root@linux-node1 nova]# egrep -n '^[a-z]' nova.conf 79:rabbit_host=192.168.1.3683:rabbit_port=567289:rabbit_use_ssl=false92:rabbit_userid=guest95:rabbit_password=guest189:rpc_backend=rabbit |
4.6.4. Nova配置Keystone
1) 添加Nova用户
|
1
2
3
4
5
6
7
8
9
10
11
12
13
14
15
16
17
18
19
20
21
22
23
24
25
26
27
28
29
30
31
32
|
[root@linux-node1 nova]# cd[root@linux-node1 ~]# source keystone-admin[root@linux-node1 ~]# keystone user-create --name=nova --pass=nova+----------+----------------------------------+| Property | Value |+----------+----------------------------------+| email | || enabled | True || id | 770c6373a97a43429dcded8fc505e463 || name | nova || username | nova |+----------+----------------------------------+[root@linux-node1 ~]# keystone user-role-add --user=nova --tenant=service --role=admin[root@linux-node1 ~]# keystone user-list+----------------------------------+--------+---------+-------------------+| id | name | enabled | email |+----------------------------------+--------+---------+-------------------+| 4a736ea8cf804214b0754afefe8387ee | admin | True | admin@example.com || 944ecced065d45f58b11c63097fc21ba | demo | True | || 91c734899d21406582a5e901973c6110 | glance | True | || 770c6373a97a43429dcded8fc505e463 | nova | True | |+----------------------------------+--------+---------+-------------------+[root@linux-node1 nova]# egrep -n '^[a-z]' nova.conf 544:auth_strategy=keystone2687:auth_host=192.168.1.362690:auth_port=353572694:auth_protocol=http2697:auth_uri=http://192.168.1.36:50002701:auth_version=v2.02728:admin_user=nova2731:admin_password=nova2735:admin_tenant_name=service |
4.6.5. Nova配置Glance
|
1
2
3
|
[root@linux-node1 nova]# egrep -n '^[a-z]' nova.conf253:my_ip=192.168.1.361129:glance_host=$my_ip |
4.6.6. Nova自身配置
|
1
2
3
4
5
6
7
8
9
10
|
[root@linux-node1 nova]# egrep -n '^[a-z]' nova.conf 302:state_path=/var/lib/nova885:instances_path=$state_path/instances1576:lock_path=/var/lib/nova/tmp1951:compute_driver=libvirt.LibvirtDriver2036:novncproxy_base_url=http://192.168.1.36:6080/vnc_auto.html2044:vncserver_listen=0.0.0.02048:vncserver_proxyclient_address=192.168.1.362051:vnc_enabled=true2054:vnc_keymap=en-us |
4.6.7. Nova更改的全部配置
|
1
2
3
4
5
6
7
8
9
10
11
12
13
14
15
16
17
18
19
20
21
22
23
24
25
26
27
28
|
[root@linux-node1 nova]# egrep -n '^[a-z]' nova.conf 79:rabbit_host=192.168.1.3683:rabbit_port=567289:rabbit_use_ssl=false92:rabbit_userid=guest95:rabbit_password=guest189:rpc_backend=rabbit253:my_ip=192.168.1.36302:state_path=/var/lib/nova544:auth_strategy=keystone885:instances_path=$state_path/instances1129:glance_host=$my_ip1576:lock_path=/var/lib/nova/tmp1951:compute_driver=libvirt.LibvirtDriver2036:novncproxy_base_url=http://192.168.1.36:6080/vnc_auto.html2044:vncserver_listen=0.0.0.02048:vncserver_proxyclient_address=192.168.1.362051:vnc_enabled=true2054:vnc_keymap=en-us2475:connection=mysql://nova:nova@192.168.1.36/nova2687:auth_host=192.168.1.362690:auth_port=353572694:auth_protocol=http2697:auth_uri=http://192.168.1.36:50002701:auth_version=v2.02728:admin_user=nova2731:admin_password=nova2735:admin_tenant_name=service |
4.6.8. 创建service和endpoint
|
1
2
3
4
5
6
7
8
9
10
11
12
13
14
15
16
17
18
19
20
21
|
[root@linux-node1 nova]# keystone service-create --name=nova --type=compute+-------------+----------------------------------+| Property | Value |+-------------+----------------------------------+| description | || enabled | True || id | 8a4f956ed2864d839952dfc132a3d296 || name | nova || type | compute |+-------------+----------------------------------+[root@linux-node1 nova]# keystone endpoint-create --service-id=$(keystone service-list| awk ' / compute / {print $2}') --publicurl=http://192.168.1.36:8774/v2/%(tenant_id)s --internalurl=http://192.168.1.36:8774/v2/%(tenant_id)s --adminurl=http://192.168.1.36:8774/v2/%(tenant_id)s+-------------+-------------------------------------------+| Property | Value |+-------------+-------------------------------------------+| adminurl | http://192.168.1.36:8774/v2/%(tenant_id)s || id | 97a0b3212b5a468dbe1828596b2566bc || internalurl | http://192.168.1.36:8774/v2/%(tenant_id)s || publicurl | http://192.168.1.36:8774/v2/%(tenant_id)s || region | regionOne || service_id | 8a4f956ed2864d839952dfc132a3d296 |+-------------+-------------------------------------------+ |
4.6.9. Start Nova
|
1
2
3
4
|
#启动for i in {api,cert,conductor,consoleauth,novncproxy,scheduler};do service openstack-nova-"$i" start;done#加入开机自启动for i in {api,cert,conductor,consoleauth,novncproxy,scheduler};do chkconfig openstack-nova-"$i" on;done |
4.6.10. Nova-list
|
1
2
3
4
5
6
7
8
9
|
[root@linux-node1 ~]# nova host-list+-------------------------+-------------+----------+| host_name | service | zone |+-------------------------+-------------+----------+| linux-node1.example.com | conductor | internal || linux-node1.example.com | cert | internal || linux-node1.example.com | consoleauth | internal || linux-node1.example.com | scheduler | internal |+-------------------------+-------------+----------+ |
到此,“控制节点”部分组件安装及配置部署完毕,接下来对“计算节点”进行配置。
4.7. Nova安装与配置(计算节点操作)
4.7.1. Nova-Compute 介绍

l Nova-compute 一般运行在计算节点上,通过Message Queue接管并管理VM的生命周期
l Nova-compute 通过Libvirt管理KVM,通过XenAPI管理Xen等。
4.7.2. Install Nova-compute
!!注意!!再次确认,以下步骤将是在“计算节点”上操作!
|
1
2
|
yum install -y http://repos.fedorapeople.org/repos/openstack/openstack-icehouse/rdo-release-icehouse-4.noarch.rpmyum install -y qemu-kvm libvirt openstack-nova-compute python-novaclient |
查看系统是否支持KVM硬件虚拟化
|
1
2
|
[root@linux-node2 ~]# egrep -c '(vmx|svm)' /proc/cpuinfo 1 |
4.7.3. Config Nova
1) 控制节点推送配置文件到计算节点
注意:需要到控制节点推送配置文件到计算节点,具体操作如下:
!!在控制节点(node1)节点上推送!!
|
1
2
3
4
5
6
7
|
[root@linux-node1 ~]# scp /etc/nova/nova.conf 192.168.1.37:/etc/nova/The authenticity of host '192.168.1.37 (192.168.1.37)' can't be established.RSA key fingerprint is ec:67:00:b2:b9:2e:68:cc:1d:d7:9c:ac:b3:28:ed:24.Are you sure you want to continue connecting (yes/no)? yesWarning: Permanently added '192.168.1.37' (RSA) to the list of known hosts.root@192.168.1.37's password: nova.conf 100% 97KB 96.8KB/s 00:00 |
2) 更改配置
Nova的很多配置都在控制节点上完成了,控制节点把文件推送到计算节点后,只需要更改以下内容即可:
|
1
2
|
[root@linux-node2 ~]# egrep -n "^[a-z]" /etc/nova/nova.conf2048:vncserver_proxyclient_address=192.168.1.37 ç改成计算节点的IP地址 |
4.7.4. Start Nova
|
1
2
3
4
5
6
|
[root@linux-node2 ~]# /etc/init.d/libvirtd start[root@linux-node2 ~]# /etc/init.d/messagebus start[root@linux-node2 ~]# /etc/init.d/openstack-nova-compute start[root@linux-node2 ~]# chkconfig openstack-nova-compute on[root@linux-node2 ~]# chkconfig libvirtd on[root@linux-node2 ~]# chkconfig messagebus on |
在控制节点上查看Nova的配置是否生效
|
1
2
3
4
5
6
7
8
9
10
|
[root@linux-node1 ~]# nova host-list+-------------------------+-------------+----------+| host_name | service | zone |+-------------------------+-------------+----------+| linux-node1.example.com | conductor | internal || linux-node1.example.com | cert | internal || linux-node1.example.com | consoleauth | internal || linux-node1.example.com | scheduler | internal || linux-node2.example.com | compute | nova |+-------------------------+-------------+----------+ |
4.8. Neutron安装与配置
4.8.1. Install Neutron
温馨提示:这是在控制节点上操作哦!
|
1
|
yum install openstack-neutron openstack-neutron-ml2 python-neutronclient openstack-neutron-linuxbridge |
4.8.2. 配置neutron.conf文件
1) Neutron基础配置
|
1
2
3
4
5
6
7
|
[root@linux-node1 ~]# egrep -n '^[a-z]' /etc/neutron/neutron.conf6:debug = true10:state_path = /var/lib/neutron13:lock_path = $state_path/lock53:core_plugin = ml262 service_plugins = router,firewall,lbaas385:root_helper = sudo neutron-rootwrap /etc/neutron/rootwrap.conf |
2) Neutron配置MySQL
|
1
2
|
[root@linux-node1 ~]# egrep -n '^[a-z]' /etc/neutron/neutron.conf405:connection = mysql://neutron:neutron@192.168.1.36:3306/neutron |
a) 创建Neutron的用户
|
1
2
3
4
5
6
7
8
9
10
11
12
13
14
15
16
17
18
19
20
21
22
|
[root@linux-node1 ~]# source keystone-admin[root@linux-node1 ~]# keystone user-create --name neutron --pass neutron+----------+----------------------------------+| Property | Value |+----------+----------------------------------+| email | || enabled | True || id | bc6d613504f14d4c8ad7e6c8bae668ac || name | neutron || username | neutron |+----------+----------------------------------+[root@linux-node1 ~]# keystone user-list +----------------------------------+---------+---------+-------------------+| id | name | enabled | email |+----------------------------------+---------+---------+-------------------+| 4a736ea8cf804214b0754afefe8387ee | admin | True | admin@example.com || 944ecced065d45f58b11c63097fc21ba | demo | True | || 91c734899d21406582a5e901973c6110 | glance | True | || bc6d613504f14d4c8ad7e6c8bae668ac | neutron | True | || 770c6373a97a43429dcded8fc505e463 | nova | True | |+----------------------------------+---------+---------+-------------------+[root@linux-node1 ~]# keystone user-role-add --user neutron --tenant service --role admin |
3) Neutron配置Keystone
|
1
2
3
4
5
6
7
8
9
|
[root@linux-node1 ~]# egrep -n '^[a-z]' /etc/neutron/neutron.conf 66:api_paste_config = /usr/share/neutron/api-paste.ini70:auth_strategy = keystone395:auth_host = 192.168.1.36396:auth_port = 35357397:auth_protocol = http398:admin_tenant_name = service399:admin_user = neutron400:admin_password = neutron |
4) Neutron配置RabbitMQ
|
1
2
3
4
5
6
|
[root@linux-node1 ~]# egrep -n '^[a-z]' /etc/neutron/neutron.conf134:rabbit_host = 192.168.1.36136:rabbit_password = guest138:rabbit_port = 5672143:rabbit_userid = guest145:rabbit_virtual_host = / |
5) Neutron配置Nova
|
1
2
3
4
5
6
7
8
9
10
11
12
13
14
15
16
17
18
19
|
[root@linux-node1 ~]# egrep -n '^[a-z]' /etc/neutron/neutron.conf299:notify_nova_on_port_status_changes = true303:notify_nova_on_port_data_changes = true306:nova_url = http://192.168.1.36:8774/v2312:nova_admin_username = nova315:nova_admin_tenant_id = 628660545a044ac4ac5c1a16ca7f4a2c318:nova_admin_password = nova321:nova_admin_auth_url = http://192.168.1.36:35357/v2.0+--------------------------------------+#注释:315行id的由来:[root@linux-node1 ~]# keystone tenant-list +----------------------------------+---------+---------+| id | name | enabled |+----------------------------------+---------+---------+| 707f2d26cdd5477ea66ede0b5c216c23 | admin | True || c4015c47e46f4b30bf68a6f39061ace3 | demo | True || 628660545a044ac4ac5c1a16ca7f4a2c | service | True |+----------------------------------+---------+---------+#就是service的ID号码,填写到nova_admin_tenant_id即可。 |
4.8.3. 配置ml2文件
|
1
2
3
4
5
6
|
[root@linux-node1 ~]# egrep -n '^[a-z]' /etc/neutron/plugins/ml2/ml2_conf.ini 5:type_drivers = flat,vlan,gre,vxlan12:tenant_network_types = flat,vlan,gre,vxlan17:mechanism_drivers = linuxbridge,openvswitch29:flat_networks = physnet162:enable_security_group = True |
4.8.4. 配置linuxbridge文件
|
1
2
3
4
5
|
[root@linux-node1 ~]# egrep -n '^[a-z]' /etc/neutron/plugins/linuxbridge/linuxbridge_conf.ini20:network_vlan_ranges = physnet131:physical_interface_mappings = physnet1:eth074:firewall_driver = neutron.agent.linux.iptables_firewall.IptablesFirewallDriver79:enable_security_group = True |
4.8.5. Nova服务配置Neutron
1) 没错,就是在Nova上面配置Neutron!
|
1
2
3
4
5
6
7
8
9
10
11
12
13
|
[root@linux-node1 ~]# vim /etc/nova/nova.conf1200 network_api_class=nova.network.neutronv2.api.API1321 linuxnet_interface_driver=nova.network.linux_net.LinuxBridgeInterfaceDriver1466 neutron_url=http://192.168.1.36:96961474 neutron_admin_username=neutron1478 neutron_admin_password=neutron1482 neutron_admin_tenant_id=628660545a044ac4ac5c1a16ca7f4a2c1488 neutron_admin_tenant_name=service1496 neutron_admin_auth_url=http://192.168.1.36:5000/v2.01503 neutron_auth_strategy=keystone1536 security_group_api=neutron1982 firewall_driver=nova.virt.libvirt.firewall.NoopFirewallDriver2872 vif_driver=nova.virt.libvirt.vif.NeutronLinuxBridgeVIFDriver |
2) 将配置文件推送到计算节点
|
1
2
3
4
5
|
[root@linux-node1 ~]# scp /etc/nova/nova.conf 192.168.1.37:/etc/nova/#此时,需要去“计算节点”上更改一下参数即可:vncserver_proxyclient_address=192.168.1.37 ç改成计算节点的IP地址#在node2上重启openstack-nova-compute[root@linux-node2 ~]# /etc/init.d/openstack-nova-compute restart |
3) 重启Nova服务
|
1
|
[root@linux-node1 ~]# for i in {api,conductor,scheduler}; do service openstack-nova-"$i" restart;done |
4.8.6. 创建service和endpoint
|
1
2
3
4
5
6
7
8
9
10
11
12
13
14
15
16
17
18
19
20
21
|
[root@linux-node1 ~]# keystone service-create --name neutron --type network+-------------+----------------------------------+| Property | Value |+-------------+----------------------------------+| description | || enabled | True || id | 9588d468d7e044dc88a23cf39fef17f1 || name | neutron || type | network |+-------------+----------------------------------+[root@linux-node1 ~]# keystone endpoint-create --service-id=$(keystone service-list | awk '/ network / {print $2}') --publicurl=http://192.168.1.36:9696 --internalurl=http://192.168.1.36:9696 --adminurl=http://192.168.1.36:9696+-------------+----------------------------------+| Property | Value |+-------------+----------------------------------+| adminurl | http://192.168.1.36:9696 || id | 0ff9f7f415f04491adde0b1dc4080b15 || internalurl | http://192.168.1.36:9696 || publicurl | http://192.168.1.36:9696 || region | regionOne || service_id | 9588d468d7e044dc88a23cf39fef17f1 |+-------------+----------------------------------+ |
4.8.7. Neutron试启动
|
1
2
3
4
5
6
|
[root@linux-node1 ~]# neutron-server --config-file=/etc/neutron/neutron.conf --config-file=/etc/neutron/plugins/ml2/ml2_conf.ini --config-file=/etc/neutron/plugins/linuxbridge/linuxbridge_conf.ini···中间信息略过···2015-05-20 20:33:36.242 53514 INFO neutron.service [-] Neutron service started, listening on 0.0.0.0:96962015-05-20 20:33:36.252 53514 INFO neutron.openstack.common.rpc.common [-] Connected to AMQP server on 192.168.1.36:56722015-05-20 20:33:36.256 53514 INFO neutron.wsgi [-] (53514) wsgi starting up on http://0.0.0.0:9696/#看到最后监听的端口则说明能启动成功! |
4.8.8. 修改Neutron启动脚本
1) 修改neutron-server启动脚本
|
1
2
3
4
5
6
7
8
9
10
11
12
13
14
15
16
17
|
[root@linux-node1 ~]# vim /etc/init.d/neutron-server#15-17行configs=( "/usr/share/$prog/$prog-dist.conf" "/etc/$prog/$prog.conf" "/etc/$prog/plugin.ini" #由上面更改为下面的类容: "/etc/neutron/neutron.conf" "/etc/neutron/plugins/ml2/ml2_conf.ini" "/etc/neutron/plugins/linuxbridge/linuxbridge_conf.ini" )更改后的结果应该是:configs=( "/etc/neutron/neutron.conf" "/etc/neutron/plugins/ml2/ml2_conf.ini" "/etc/neutron/plugins/linuxbridge/linuxbridge_conf.ini" ) |
2) 修改neutron-linuxbridge-agent启动脚本
|
1
2
3
4
5
6
7
8
9
10
11
12
13
14
15
16
|
#16-18行configs=( "/usr/share/$prog/$prog-dist.conf" "/etc/$prog/$prog.conf" "/etc/$prog/plugin.ini" #由上面更改为下面的类容: "/etc/neutron/neutron.conf" "/etc/neutron/plugins/ml2/ml2_conf.ini" "/etc/neutron/plugins/linuxbridge/linuxbridge_conf.ini" )更改后的结果应该是:configs=( "/etc/neutron/neutron.conf" "/etc/neutron/plugins/ml2/ml2_conf.ini" "/etc/neutron/plugins/linuxbridge/linuxbridge_conf.ini" ) |
4.8.9. 启动Nova服务
|
1
2
3
4
5
6
7
|
[root@linux-node1 ~]# /etc/init.d/neutron-server start[root@linux-node1 ~]# /etc/init.d/neutron-linuxbridge-agent start[root@linux-node1 ~]# chkconfig neutron-server on[root@linux-node1 ~]# chkconfig neutron-linuxbridge-agent on查看端口[root@linux-node1 ~]# netstat -lntup|grep 9696tcp 0 0 0.0.0.0:9696 0.0.0.0:* LISTEN 53850/python |
查看Neutron-list
|
1
2
3
4
5
6
|
[root@linux-node1 ~]# neutron agent-list+--------+--------------------+-------------------------+-------+----------------+| id | agent_type | host | alive | admin_state_up |+--------+--------------------+-------------------------+-------+----------------+| 6300bfdb-f315-4fcd-a92b-cd979ead793e | Linux bridge agent | linux-node1.example.com | <img draggable="false" class="emoji" alt="c="https://s.w.org/images/core/emoji/11/svg/1f642.svg"> | True |+--------+--------------------+-------------------------+-------+----------------+ |
4.9. Neutron安装与配置(计算节点操作)
4.9.1. Install Neutron
|
1
|
yum install openstack-neutron openstack-neutron-ml2 python-neutronclient openstack-neutron-linuxbridge |
4.9.2. 复制控制节点的Neutron配置文件
温馨提示:此项需到“控制节点”上操作!
|
1
2
3
4
|
scp /etc/neutron/neutron.conf 192.168.1.37:/etc/neutron/scp /etc/neutron/plugins/ml2/ml2_conf.ini 192.168.1.37:/etc/neutron/plugins/ml2/scp /etc/neutron/plugins/linuxbridge/linuxbridge_conf.ini 192.168.1.37:/etc/neutron/plugins/linuxbridge/scp /etc/init.d/neutron-* 192.168.1.37:/etc/init.d/ |
4.9.3. 启动Neutron服务
计算节点只需要启动neutron-linuxbridge-agent即可
|
1
2
|
[root@linux-node2 ~]# /etc/init.d/neutron-linuxbridge-agent start[root@linux-node2 ~]# chkconfig neutron-linuxbridge-agent on |
到控制节点查看
|
1
2
3
4
5
6
7
|
[root@linux-node1 ~]# neutron agent-list+-----+--------------------+-------------------------+-------+----------------+| id | agent_type | host | alive | admin_state_up |+-----+--------------------+-------------------------+-------+----------------+| 6300bfdb-f315-4fcd-a92b-cd979ead793e | Linux bridge agent | linux-node1.example.com | <img draggable="false" class="emoji" alt="" src="https://s.w.org/images/core/emoji/11/svg/1f642.svg"> | True || d45ca3a8-cca5-4bc0-9d6b-4a3519384fa6 | Linux bridge agent | linux-node2.example.com | <img draggable="false" class="emoji" alt="" src="https://s.w.org/images/core/emoji/11/svg/1f642.svg"> | True |+------+--------------------+-------------------------+-------+----------------+ |
4.10. Horizon安装与配置
4.10.1. 安装dashboard等软件
|
1
|
yum install -y httpd mod_wsgi memcached python-memcached openstack-dashboard |
4.10.2. 启动memcache
|
1
2
|
[root@linux-node1 ~]# /etc/init.d/memcached start[root@linux-node1 ~]# chkconfig memcached on |
4.10.3. 配置dashboard
|
1
2
3
4
5
6
7
8
9
10
11
12
|
[root@linux-node1 ~]# vim /etc/openstack-dashboard/local_settings1、打开memcache,默认是关闭状态只需把前面注释取消掉即可98 CACHES = {99 'default': {100 'BACKEND' : 'django.core.cache.backends.memcached.MemcachedCache',101 'LOCATION' : '127.0.0.1:11211',102 }103 }2、更改Keystone的地址128 OPENSTACK_HOST = "192.168.1.36"3、增加允许的主机15 ALLOWED_HOSTS = ['horizon.example.com', 'localhost','192.168.1.36'] |
4.10.4. 启动apache
|
1
2
|
[root@linux-node1 ~]# /etc/init.d/httpd start[root@linux-node1 ~]# chkconfig httpd on |
4.10.5. 访问dashboard
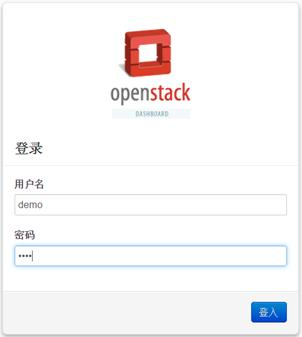
浏览器输入:http://192.168.1.36/dashboard/


用户名:admin,demo
密 码:admin,demo
4.10.6. 给租户ID创建网络
1) 创建网络
|
1
2
3
4
5
6
7
8
9
10
11
12
13
14
15
16
17
18
19
20
21
22
23
24
|
[root@linux-node1 ~]# keystone tenant-list ç第一步获取demo租户ID+----------------------------------+---------+---------+| id | name | enabled |+----------------------------------+---------+---------+| 707f2d26cdd5477ea66ede0b5c216c23 | admin | True || c4015c47e46f4b30bf68a6f39061ace3 | demo | True || 628660545a044ac4ac5c1a16ca7f4a2c | service | True |+----------------------------------+---------+---------+[root@linux-node1 ~]# neutron net-create --tenant-id c4015c47e46f4b30bf68a6f39061ace3 flat_net --shared --provider:network_type flat --provider:physical_network physnet1 Created a new network:+---------------------------+--------------------------------------+| Field | Value |+---------------------------+--------------------------------------+| admin_state_up | True || id | 361e6757-9d01-4daf-b098-fd50bdf2f550 || name | flat_net || provider:network_type | flat || provider:physical_network | physnet1 || provider:segmentation_id | || shared | True || status | ACTIVE || subnets | || tenant_id | c4015c47e46f4b30bf68a6f39061ace3 |+---------------------------+--------------------------------------+ |
查看创建的网络
|
1
2
3
4
5
6
|
[root@linux-node1 ~]# neutron net-list+--------------------------------------+----------+---------+| id | name | subnets |+--------------------------------------+----------+---------+| 361e6757-9d01-4daf-b098-fd50bdf2f550 | flat_net | |+--------------------------------------+----------+---------+ |
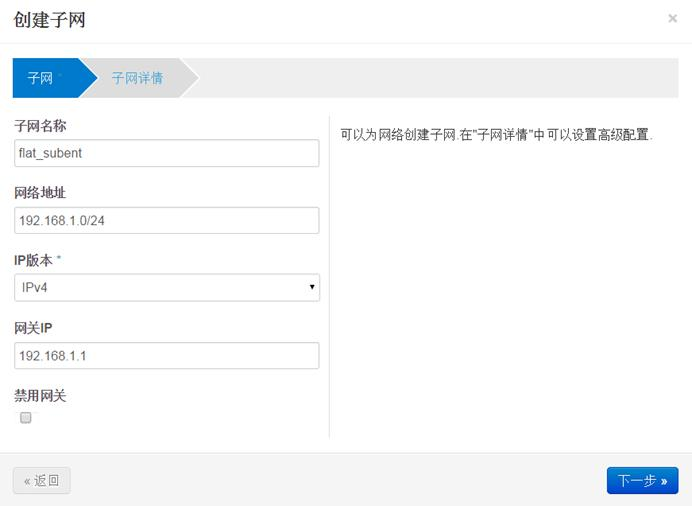
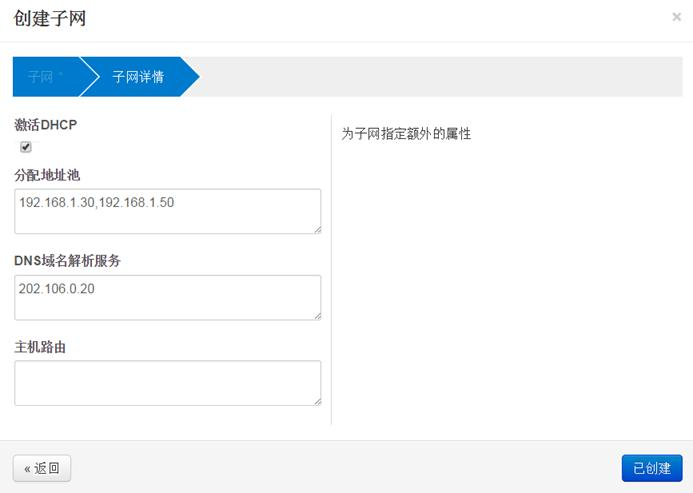
2) 创建子网
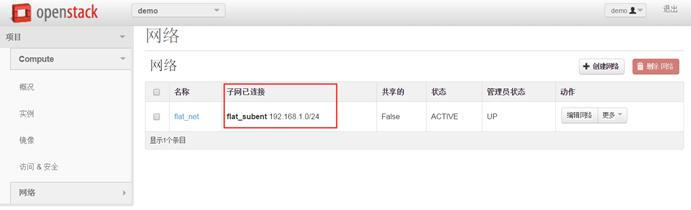
这个环节需要在浏览器上面创建了
路径:管理员à系统面板à网络à创建网络
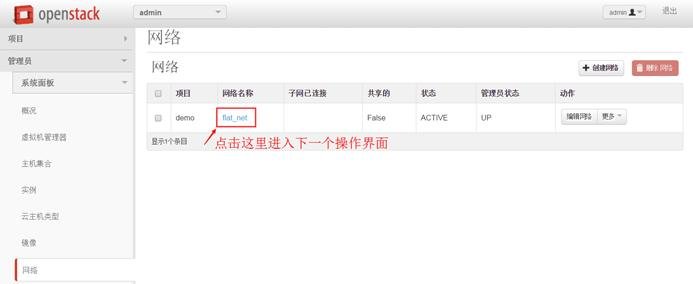

到此,子网创建完成,接下来用demo用户创建虚拟机
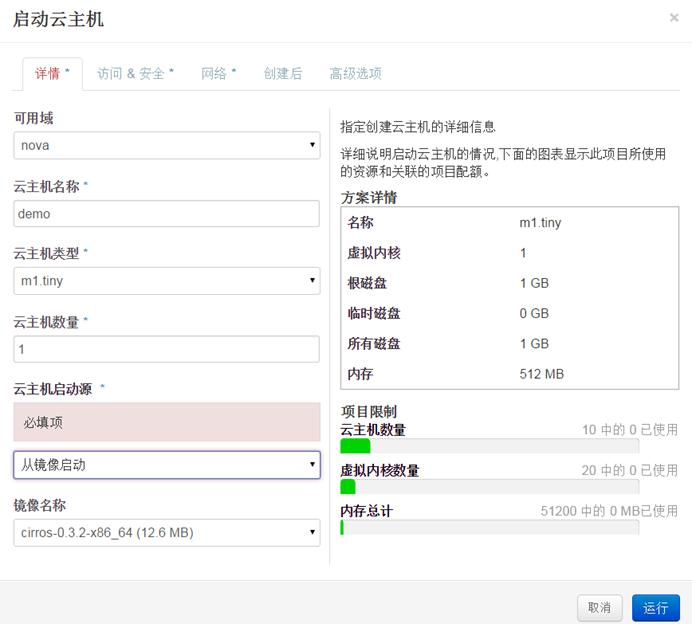
4.10.7. 创建虚拟机

1) 子网已连接

2) 创建虚拟机
路径:项目àComputeà实例à启动云主机

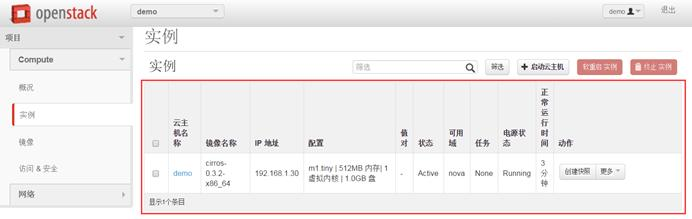
3) 创建好的虚拟机

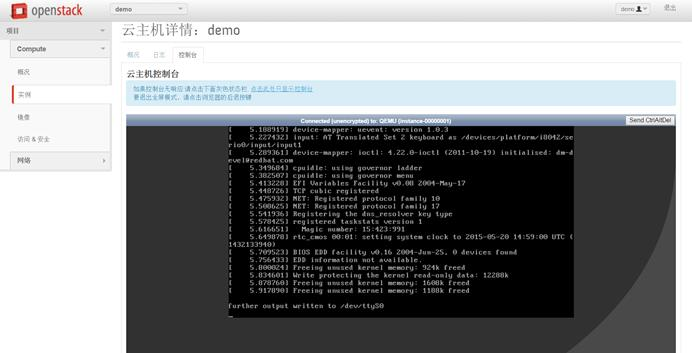
4) 控制台


4.11. Cinder安装与配置
4.11.1. Install Cinder
|
1
|
yum install openstack-cinder python-cinderclient |
4.11.2. Config Cinder
|
1
2
3
4
5
6
7
8
9
10
11
12
13
14
15
16
17
18
19
20
21
|
[root@linux-node1 ~]# egrep '^[a-z]' /etc/cinder/cinder.conf -n79:rabbit_host=192.168.1.3683:rabbit_port=567289:rabbit_use_ssl=false92:rabbit_userid=guest95:rabbit_password=guest181:rpc_backend=rabbit456:my_ip=192.168.1.36459:glance_host=$my_ip573:auth_strategy=keystone727:debug=true1908:connection=mysql://cinder:cinder@192.168.1.36/cinder2013:auth_host=192.168.1.362017:auth_port=353572021:auth_protocol=http2024:auth_uri=http://192.168.1.36:50002029:identity_uri=http://192.168.1.36:35357/2033:auth_version=v2.02057:admin_user=cinder2060:admin_password=cinder2064:admin_tenant_name=service |
4.11.3. 同步数据库
|
1
2
3
4
5
6
7
8
9
10
11
12
13
14
15
16
17
18
19
20
21
22
23
24
25
26
27
28
29
30
|
[root@linux-node1 ~]# cinder-manage db sync/usr/lib64/python2.6/site-packages/Crypto/Util/number.py:57: PowmInsecureWarning: Not using mpz_powm_sec. You should rebuild using libgmp >= 5 to avoid timing attack vulnerability. _warn("Not using mpz_powm_sec. You should rebuild using libgmp >= 5 to avoid timing attack vulnerability.", PowmInsecureWarning)/usr/lib64/python2.6/site-packages/Crypto/Util/randpool.py:40: RandomPool_DeprecationWarning: This application uses RandomPool, which is BROKEN in older releases. See http://www.pycrypto.org/randpool-broken RandomPool_DeprecationWarning)[root@linux-node1 ~]# mysql -h 192.168.1.36 -u cinder -pcinder -e 'use cinder;show tables;'+--------------------------+| Tables_in_cinder |+--------------------------+| backups || encryption || iscsi_targets || migrate_version || quality_of_service_specs || quota_classes || quota_usages || quotas || reservations || services || snapshot_metadata || snapshots || transfers || volume_admin_metadata || volume_glance_metadata || volume_metadata || volume_type_extra_specs || volume_types || volumes |+--------------------------+[root@linux-node1 ~]# |
4.11.4. Keystone注册
|
1
2
3
4
5
6
7
8
9
10
11
12
13
14
15
16
17
18
19
20
21
22
23
24
25
26
27
28
29
30
31
32
33
34
35
36
37
38
39
40
41
42
43
44
45
46
47
48
49
50
51
52
53
54
55
56
57
58
59
60
61
62
63
64
65
66
67
68
69
70
71
72
73
74
75
76
77
78
79
80
81
|
[root@linux-node1 ~]# keystone user-create --name=cinder --pass=cinder+----------+----------------------------------+| Property | Value |+----------+----------------------------------+| email | || enabled | True || id | 4720f1fbef9141ac937890c9bc155a18 || name | cinder || username | cinder |+----------+----------------------------------+ [root@linux-node1 ~]# keystone user-role-add --user=cinder --tenant=service --role=admin [root@linux-node1 ~]# keystone service-create --name=cinder --type=volume+-------------+----------------------------------+| Property | Value |+-------------+----------------------------------+| description | || enabled | True || id | e7e5fdadbe874485b3225c8a833f229e || name | cinder || type | volume |+-------------+----------------------------------+[root@linux-node1 ~]# keystone endpoint-create --service-id=e7e5fdadbe874485b3225c8a833f229e --publicurl=http://192.168.1.36:8776/v1/%(tenant_id)s --internalurl=http://192.168.1.36:8776/v1/%(tenant_id)s --adminurl=http://192.168.1.36:8776/v1/%(tenant_id)s+-------------+-------------------------------------------+| Property | Value |+-------------+-------------------------------------------+| adminurl | http://192.168.1.36:8776/v1/%(tenant_id)s || id | a37fcb4b15fb465c9c621dcc6300e50b || internalurl | http://192.168.1.36:8776/v1/%(tenant_id)s || publicurl | http://192.168.1.36:8776/v1/%(tenant_id)s || region | regionOne || service_id | e7e5fdadbe874485b3225c8a833f229e |+-------------+-------------------------------------------+[root@linux-node1 ~]# keystone service-create --name=cinderv2 --type=volumev2+-------------+----------------------------------+| Property | Value |+-------------+----------------------------------+| description | || enabled | True || id | aee6b0eac6ed49f08fd2cebda1cb71d7 || name | cinderv2 || type | volume |+-------------+----------------------------------+[root@linux-node1 ~]# keystone endpoint-create --service-id=aee6b0eac6ed49f08fd2cebda1cb71d7 --publicurl=http://192.168.1.36:8776/v2/%(tenant_id)s --internalurl=http://192.168.1.36:8776/v2/%(tenant_id)s --adminurl=http://192.168.1.36:8776/v2/%(tenant_id)s+-------------+-------------------------------------------+| Property | Value |+-------------+-------------------------------------------+| adminurl | http://192.168.1.36:8776/v2/%(tenant_id)s || id | 631c2347bab94dc294302e665e3bf1b0 || internalurl | http://192.168.1.36:8776/v2/%(tenant_id)s || publicurl | http://192.168.1.36:8776/v2/%(tenant_id)s || region | regionOne || service_id | aee6b0eac6ed49f08fd2cebda1cb71d7 |+-------------+-------------------------------------------+[root@linux-node1 ~]# keystone service-list+----------------------------------+----------+----------+-------------+| id | name | type | description |+----------------------------------+----------+----------+-------------+| e7e5fdadbe874485b3225c8a833f229e | cinder | volume | || aee6b0eac6ed49f08fd2cebda1cb71d7 | cinderv2 | volume | || 89da282fa357437da7a5332c48639250 | glance | image | || cd2980e8eda84663b582f09f84b10d6b | keystone | identity | || 23decaf91e5f4d50a476c0262e824412 | neutron | network | || 60f89869d00b4a9e83ca90b85652b794 | nova | compute | |+----------------------------------+----------+----------+-------------+[root@linux-node1 ~]# cinder service-list+------------------+-------------------------+------+---------+-------+----------------------------+-----------------+| Binary | Host | Zone | Status | State | Updated_at | Disabled Reason |+------------------+-------------------------+------+---------+-------+----------------------------+-----------------+| cinder-scheduler | linux-node1.example.com | nova | enabled | up | 2015-05-26T11:39:47.000000 | None |+------------------+-------------------------+------+---------+-------+----------------------------+-----------------+[root@linux-node1 ~]# keystone endpoint-list+----------------------------------+-----------+-------------------------------------------+-------------------------------------------+-------------------------------------------+----------------------------------+| id | region | publicurl | internalurl | adminurl | service_id |+----------------------------------+-----------+-------------------------------------------+-------------------------------------------+-------------------------------------------+----------------------------------+| 0019741e32994fd89da183fc949b02ee | regionOne | http://192.168.1.36:9292 | http://192.168.1.36:9292 | http://192.168.1.36:9292 | 89da282fa357437da7a5332c48639250 || 11143240307447bf8512c54ce08b3490 | regionOne | http://192.168.1.36:8774/v2/%(tenant_id)s | http://192.168.1.36:8774/v2/%(tenant_id)s | http://192.168.1.36:8774/v2/%(tenant_id)s | 60f89869d00b4a9e83ca90b85652b794 || 37fe671f915746c8a2d79451dc5769d1 | regionOne | http://192.168.1.36:8776/v1/%(tenant_id)s | http://192.168.1.36:8776/v1/%(tenant_id)s | http://192.168.1.36:8776/v1/%(tenant_id)s | e7e5fdadbe874485b3225c8a833f229e || 6172a7484ade47aaa726ccbb39933f5a | regionOne | http://192.168.1.36:9696 | http://192.168.1.36:9696 | http://192.168.1.36:9696 | 23decaf91e5f4d50a476c0262e824412 || 6385df8ead804fbe868bef8a4917e033 | regionOne | http://192.168.1.36:5000/v2.0 | http://192.168.1.36:5000/v2.0 | http://192.168.1.36:35357/v2.0 | cd2980e8eda84663b582f09f84b10d6b || cf2dec5e815e40949a9586354026d85d | regionOne | http://192.168.1.36:8776/v2/%(tenant_id)s | http://192.168.1.36:8776/v2/%(tenant_id)s | http://192.168.1.36:8776/v2/%(tenant_id)s | aee6b0eac6ed49f08fd2cebda1cb71d7 |+----------------------------------+-----------+-------------------------------------------+-------------------------------------------+-------------------------------------------+----------------------------------+ |
4.11.5. Start Cinder
|
1
2
3
4
|
[root@linux-node1 ~]# /etc/init.d/openstack-cinder-api start[root@linux-node1 ~]# /etc/init.d/openstack-cinder-scheduler start[root@linux-node1 ~]# chkconfig openstack-cinder-api on[root@linux-node1 ~]# chkconfig openstack-cinder-scheduler on |
到此,已经能在web界面看到有“云硬盘”选项:


接下来配置云硬盘。
4.12. Cinder安装与配置(计算节点操作)
4.12.1. Cinder-iSCSI云硬盘
在计算节点上添加一块硬盘,大小20G。添加好硬盘后,执行以下代码。
1) 部署ISCSI环境
|
1
2
3
4
5
6
7
8
9
10
|
pvcreate /dev/sdbvgcreate cinder-volumes /dev/sdbvim /etc/lvm/lvm.conf在devices{}里面添加:filter = [ "a/sda1/", "a/sdb/", "r/.*/" ]yum install -y scsi-target-utilsvim /etc/tgt/targets.confinclude /etc/cinder/volumes/*/etc/init.d/tgtd startchkconfig tgtd on |
2) 部署Cinder环境
|
1
2
3
4
5
6
7
8
9
10
|
[root@linux-node2 ~]# yum install openstack-cinder在控制节点上推送配置文件到计算节点[root@linux-node1 ~]# scp /etc/cinder/cinder.conf 192.168.1.37:/etc/cinder/回计算节点操作[root@linux-node2 ~]# vim /etc/cinder/cinder.conf#配置iSCSI957 iscsi_ip_address=$my_ip970 volume_backend_name=iSCSI-Storage991 iscsi_helper=tgtadm1836 volume_driver=cinder.volume.drivers.lvm.LVMISCSIDriver |
启动Cinder-volume
|
1
2
|
[root@linux-node2 ~]# /etc/init.d/openstack-cinder-volume start[root@linux-node2 ~]# chkconfig openstack-cinder-volume on |
控制节点查看
|
1
2
3
4
5
6
7
|
[root@linux-node1 ~]# cinder service-list+------------------+-------------------------+------+---------+-------+----------------------------+-----------------+| Binary | Host | Zone | Status | State | Updated_at | Disabled Reason |+------------------+-------------------------+------+---------+-------+----------------------------+-----------------+| cinder-scheduler | linux-node1.example.com | nova | enabled | up | 2015-05-27T01:27:00.000000 | None || cinder-volume | linux-node2.example.com | nova | enabled | up | 2015-05-27T01:27:04.000000 | None |+------------------+-------------------------+------+---------+-------+----------------------------+-----------------+ |
3) 创建iSCSI存储类型
|
1
2
3
4
5
6
7
8
9
10
11
12
13
|
[root@linux-node1 ~]# cinder type-create iSCSI+--------------------------------------+-------+| ID | Name |+--------------------------------------+-------+| 827a0535-cde1-4e91-99ff-7eb28e35d55c | iSCSI |+--------------------------------------+-------+[root@linux-node1 ~]# cinder type-key iSCSI set volume_backend_name=iSCSI-Storage[root@linux-node1 ~]# cinder type-list+--------------------------------------+-------+| ID | Name |+--------------------------------------+-------+| 827a0535-cde1-4e91-99ff-7eb28e35d55c | iSCSI |+--------------------------------------+-------+ |
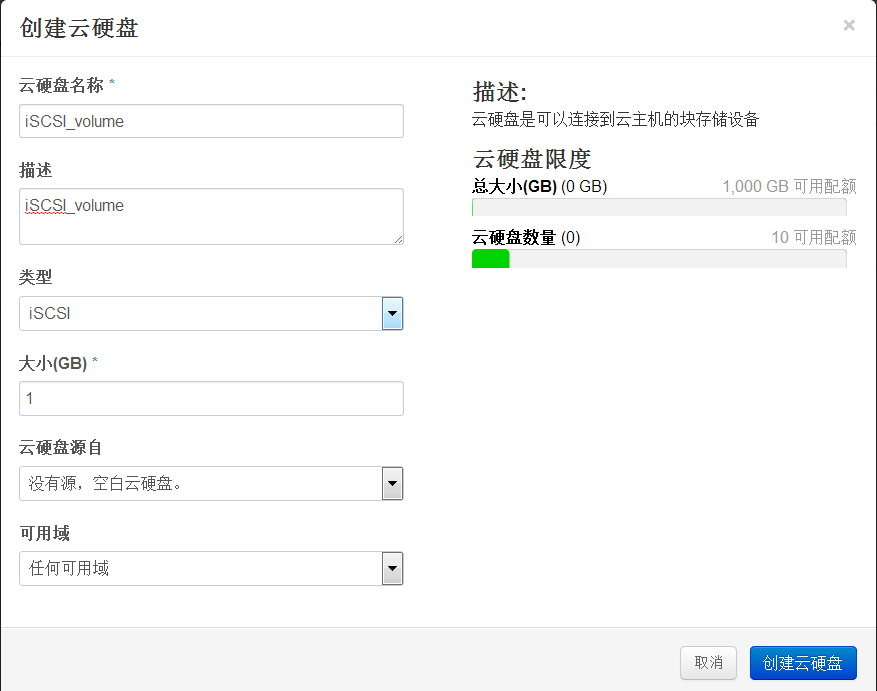
4) 创建iSCSI类型云硬盘
路径:项目à Computeà云硬盘à创建云硬盘


计算节点查看创建好的云硬盘信息:
|
1
2
3
4
5
6
7
8
9
10
11
12
13
14
15
16
17
|
[root@linux-node2 ~]# lvdisplay --- Logical volume --- LV Path /dev/cinder-volumes/volume-151d28ab-dc56-496c-bab5-584a427b2d43 LV Name volume-151d28ab-dc56-496c-bab5-584a427b2d43 VG Name cinder-volumes LV UUID YLNTlK-X7x2-qe9C-n5gU-ZhXS-qJIP-T6Ud9r LV Write Access read/write LV Creation host, time linux-node2.example.com, 2015-05-27 09:38:30 +0800 LV Status available # open 0 LV Size 1.00 GiB Current LE 256 Segments 1 Allocation inherit Read ahead sectors auto - currently set to 256 Block device 253:0 |
4.12.2. Cinder-NFS云硬盘(部署在控制节点)
1) 部署NFS环境
|
1
2
3
4
5
6
7
8
|
yum install nfs-utils rpcbindmkdir -p /data/nfsvim /etc/exports/data/nfs *(rw,no_root_squash)/etc/init.d/rpcbind start/etc/init.d/nfs startchkconfig rpcbind onchkconfig nfs on |
2) 部署Cinder环境
|
1
2
3
4
5
6
7
|
[root@linux-node1 ~]# vim /etc/cinder/cinder.conf970 volume_backend_name=NFS-Storage1492 nfs_shares_config=/etc/cinder/nfs_shares1511 nfs_mount_point_base=$state_path/mnt1837 volume_driver=cinder.volume.drivers.nfs.NfsDriver[root@linux-node1 ~]# vim /etc/cinder/nfs_shares192.168.1.36:/data/nfs |
重启Cinder-volume
|
1
|
[root@linux-node1 ~]# /etc/init.d/openstack-cinder-volume start |
控制节点查看
|
1
2
3
4
5
6
7
8
|
[root@linux-node1 ~]# cinder service-list+------------------+-------------------------+------+---------+-------+----------------------------+-----------------+| Binary | Host | Zone | Status | State | Updated_at | Disabled Reason |+------------------+-------------------------+------+---------+-------+----------------------------+-----------------+| cinder-scheduler | linux-node1.example.com | nova | enabled | up | 2015-05-27T01:56:11.000000 | None || cinder-volume | linux-node1.example.com | nova | enabled | up | 2015-05-27T01:56:15.000000 | None || cinder-volume | linux-node2.example.com | nova | enabled | up | 2015-05-27T01:56:16.000000 | None |+------------------+-------------------------+------+---------+-------+----------------------------+-----------------+ |
3) 创建NFS存储类型
|
1
2
3
4
5
6
7
8
9
10
11
12
13
14
|
[root@linux-node1 ~]# cinder type-create NFS+--------------------------------------+------+| ID | Name |+--------------------------------------+------+| 22805989-61a6-4df1-aab1-8400f9567192 | NFS |+--------------------------------------+------+[root@linux-node1 ~]# cinder type-key NFS set volume_backend_name=NFS-Storage[root@linux-node1 ~]# cinder type-list +--------------------------------------+-------+| ID | Name |+--------------------------------------+-------+| 22805989-61a6-4df1-aab1-8400f9567192 | NFS || 827a0535-cde1-4e91-99ff-7eb28e35d55c | iSCSI |+--------------------------------------+-------+ |
4) 创建NFS类型云硬盘
路径:项目à Computeà云硬盘à创建云硬盘

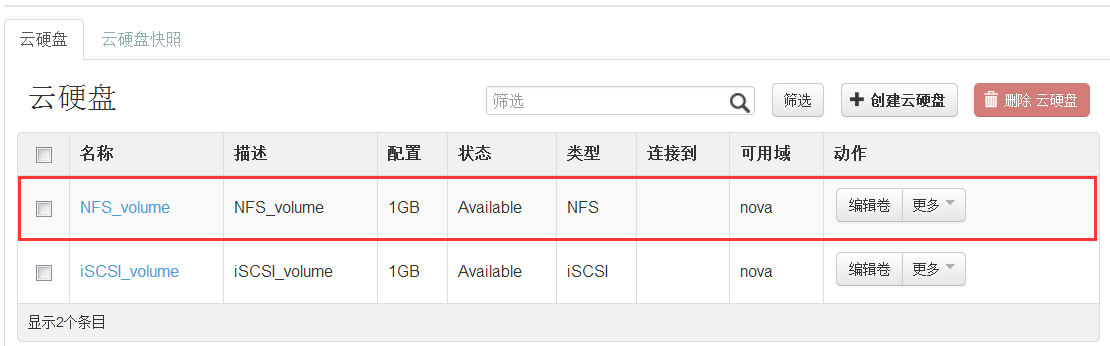


查看创建的卷
|
1
2
3
4
5
6
7
8
9
10
11
12
13
14
|
[root@linux-node1 ~]# mount/dev/sda3 on / type ext4 (rw)proc on /proc type proc (rw)sysfs on /sys type sysfs (rw)devpts on /dev/pts type devpts (rw,gid=5,mode=620)tmpfs on /dev/shm type tmpfs (rw)/dev/sda1 on /boot type ext4 (rw)none on /proc/sys/fs/binfmt_misc type binfmt_misc (rw)sunrpc on /var/lib/nfs/rpc_pipefs type rpc_pipefs (rw)nfsd on /proc/fs/nfsd type nfsd (rw)192.168.1.36:/data/nfs on /var/lib/cinder/mnt/8fb94a0748814faafd91bfc1a8f54747 type nfs (rw,vers=4,addr=192.168.1.36,clientaddr=192.168.1.36)[root@linux-node1 ~]# cd /var/lib/cinder/mnt/8fb94a0748814faafd91bfc1a8f54747[root@linux-node1 8fb94a0748814faafd91bfc1a8f54747]# lsvolume-aad7b59a-394e-4666-a024-36c9bd787614 |
4.12.3. Cinder-GlusterFS云硬盘
1) 部署GlusterFS环境
控制节点和计算节点都需要安装配置
|
1
2
3
4
5
6
|
cd /etc/yum.repos.d/wget http://download.gluster.org/pub/gluster/glusterfs/3.6/3.6.3/CentOS/glusterfs-epel.repoyum install glusterfs-server/etc/init.d/glusterd startchkconfig glusterd onmkdir -p /data/glusterfs/exp1 |
创建信任存储池
|
1
2
3
4
5
6
|
#控制节点操作[root@linux-node1 ~]# gluster peer probe linux-node2.example.compeer probe: success.#计算节点操作[root@linux-node2 ~]# gluster peer probe linux-node1.example.compeer probe: success. |
创建卷(在控制节点上创建)
|
1
2
|
[root@linux-node1 ~]# gluster volume create cinder-volome01 replica 2 linux-node1.example.com:/data/glusterfs/exp1/ linux-node2.example.com:/data/glusterfs/exp1 forcevolume create: cinder-volome01: success: please start the volume to access data |
启动卷
|
1
2
|
[root@linux-node1 ~]# gluster vol start cinder-volome01volume start: cinder-volome01: success |
查看卷
|
1
2
3
4
5
6
7
8
9
10
11
12
13
|
[root@linux-node1 ~]# gluster vol info Volume Name: cinder-volome01Type: ReplicateVolume ID: 91ea6fb0-1b1e-4299-ba8b-976a61cc03d8Status: StartedNumber of Bricks: 1 x 2 = 2Transport-type: tcpBricks:Brick1: linux-node1.example.com:/data/glusterfs/exp1Brick2: linux-node2.example.com:/data/glusterfs/exp1Options Reconfigured:performance.readdir-ahead: on |
2) 部署Cinder环境
|
1
2
3
4
|
[root@linux-node1 ~]# vim /etc/cinder/cinder.conf1104 glusterfs_shares_config=/etc/cinder/glusterfs_shares[root@linux-node1 ~]# vim /etc/cinder/glusterfs_shares192.168.1.36:/cinder-volome01 |
3) 创建GlustaerFS和NFS并用的存储类型(同时支持多个存储的方法)
|
1
2
3
4
5
6
7
8
9
10
11
12
13
14
15
16
|
[root@linux-node1 ~]# vim /etc/cinder/cinder.conf#注释掉下面几行NFS的配置:970 #volume_backend_name=NFS-Storage1837 #volume_driver=cinder.volume.drivers.nfs.NfsDriver#修改并添加如下几行的配置:578 enabled_backends=NFS_Driver,GlusterFS_Driver#放到文件最后[NFS_Driver]volume_group=NFS_Drivervolume_driver=cinder.volume.drivers.nfs.NfsDrivervolume_backend_name=NFS-Storage [GlusterFS_Driver]volume_group=GlusterFS_Drivervolume_driver=cinder.volume.drivers.glusterfs.GlusterfsDrivervolume_backend_name=GlusterFS-Storage |
重启Cinder-volume
|
1
|
[root@linux-node1 ~]# /etc/init.d/openstack-cinder-volume restart |
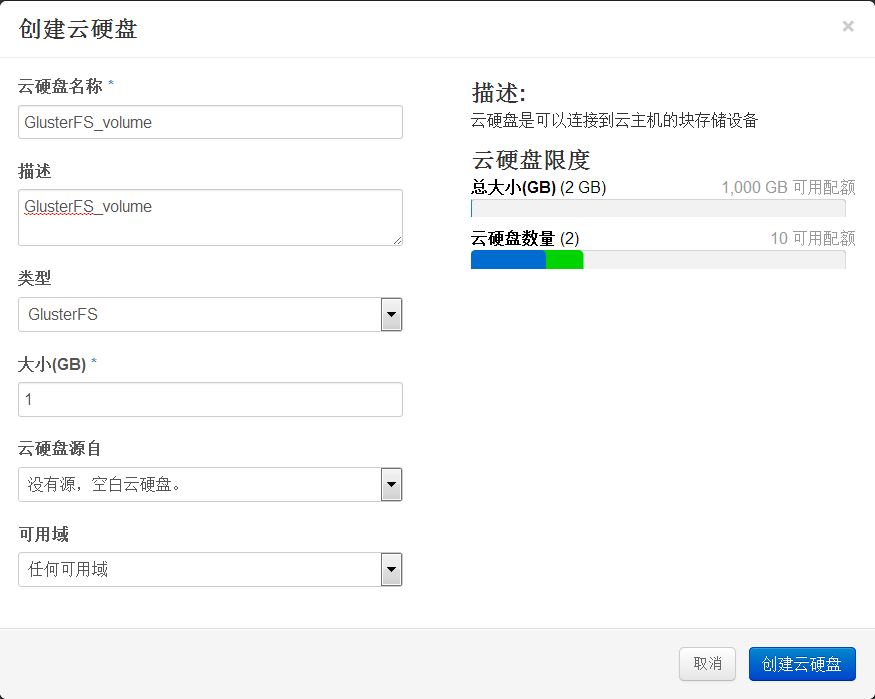
4) 创建GlusterFS存储类型
|
1
2
3
4
5
6
7
8
9
10
11
12
13
14
15
|
[root@linux-node1 ~]# cinder type-create GlusterFS+--------------------------------------+-----------+| ID | Name |+--------------------------------------+-----------+| 0672dc36-e993-4a82-861d-2e37bf4cbaa3 | GlusterFS |+--------------------------------------+-----------+[root@linux-node1 ~]# cinder type-key GlusterFS set volume_backend_name=GlusterFS-Storage[root@linux-node1 ~]# cinder type-list+--------------------------------------+-----------+| ID | Name |+--------------------------------------+-----------+| 0672dc36-e993-4a82-861d-2e37bf4cbaa3 | GlusterFS || 22805989-61a6-4df1-aab1-8400f9567192 | NFS || 827a0535-cde1-4e91-99ff-7eb28e35d55c | iSCSI |+--------------------------------------+-----------+ |
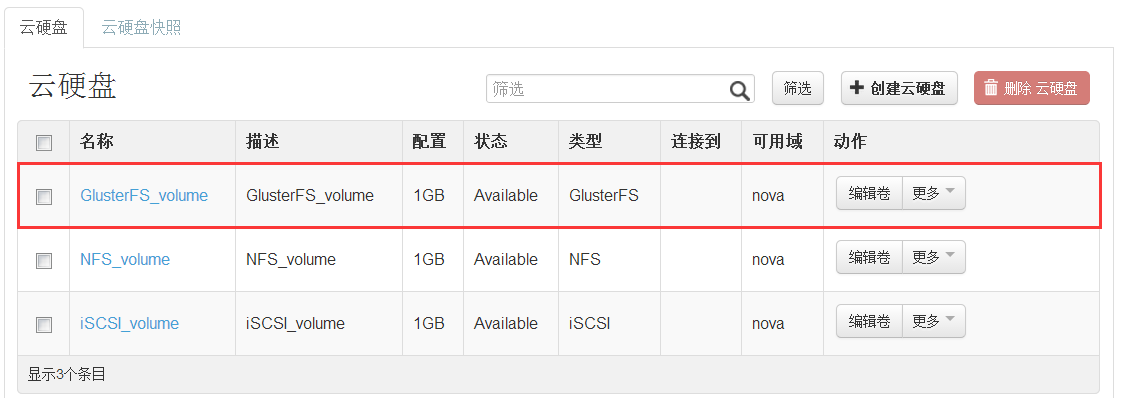
5) 创建GlusterFS类型云硬盘