个人博客网:https://wushaopei.github.io/ (你想要这里多有)
引言
不论在工作中,亦或是求职面试,Spring Boot 已经成为我们必知必会的技能项。除了比较老旧的政府项目或金融项目依旧使用如 SSM 或 SSH 做单体框架开发项目外,如今的各行各业基于项目的快速开发与发布、迭代更新,都在逐渐替换使用 Spring Boot 框架,而逐步摒弃配置沉重和效率低下的 Spring 启动框架。
使用一门新的技术,立足于对它足够了解的基础上,能够让你更加得心应手的去进行应用、开发。SpringBoot 的精髓 “自动配置原理” 不仅仅是在面试过程中才用的上;在工作中如果能深入理解Spring Boot 的自动配置原理,我们就可以根据自己的需求自定义一个 started 满足开发的需求,让开发更加便捷与高效。
Spring Boot的出现,得益于“习惯优于配置”的理念,没有繁琐的配置、难以集成的内容(大多数流行第三方技术都被集成),这是基于Spring 4.x提供的按条件配置Bean的能力。
本篇博文主要针对三个方面进行分析、讲解;这三个方面分别是:
- Spring Boot 与 Spring 的差别与优点?以及与Spring MVC 的关系?
- Spring Boot 主启动类的启动机制
- Spring Boot 的自动配置原理是怎么实现的?
- 根据自动配置原理自定义一个 个性的 started ?
1、Spring Boot 与 Spring 的差别与优点?以及与Spring MVC的关系?
1.1 Spring Boot 和 Spring MVC 的关系?
Spring MVC 是基于Spring 的MVC框架;
而Spring Boot 是基于Spring 配置的开发工具框架,使用注解更加简洁和适应快速开发。
1.2 Spring Boot 的优势
简单来说:Spring boot 简化了使用 Spring 的难度,简省了繁重的配置,提供了各种启动器,开发者能快速上手。
(1)编码更简单
- Spring 框架由于超重量级的 XML,annotation 配置,使得系统变得很笨重,难以维护
- SpringBoot 采用约点大于配置的方法,直接引入依赖,即可实现代码的开发
(2)配置更简单
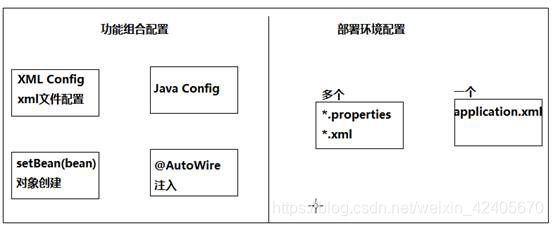
![]()
Xml文件使用javaConfig代替,XML中bean的创建,使用@bean代替后可以直接注入。
配置文件变少很多,只保留 application.yml
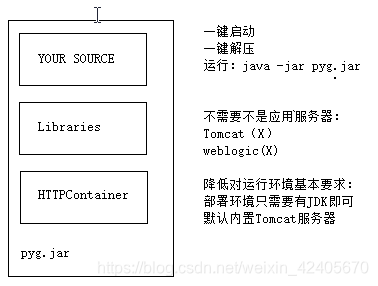
(3)部署更简单
![]()
(4)监控更简单
- Spring-boot-start-actuator:
- 可以查看属性配置
- 线程工作状态
- 环境变量
- JVM性能监控
2、Spring Boot 主启动类的启动机制
关于程序的入口问题:
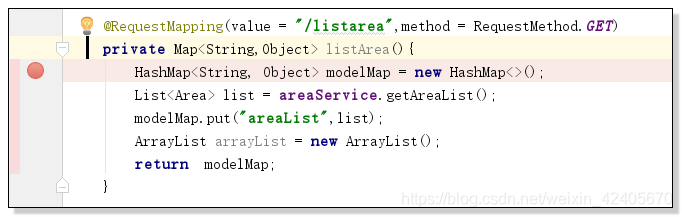
在使用SSM或SSH以及原生的Servlet 作为架构的项目中,项目的入口都不是 main 方法,main 方法更多的是作为 HelloWorld 练习或 测试时使用。其程序的入口基本都是handler 中对外暴露的每个接口:
  @RequestMapping(value = "/listarea",method = RequestMethod.GET)
    private Map<String,Object> listArea(){
        HashMap<String, Object> modelMap = new HashMap<>();
        List<Area> list = areaService.getAreaList();
        modelMap.put("areaList",list);
        ArrayList arrayList = new ArrayList();
        return  modelMap;
    }
外部通过对接口地址的调用,从而实现交互获取数据、进行页面渲染和展示。
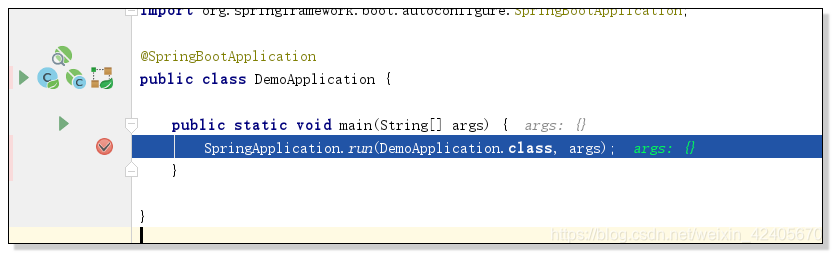
但是,在使用了 Spring Boot 后, Main 方法又成为了程序的入口;
使用过springBoot进行项目打包和部署启动的都知道, SpringBoot 打包成 jar 包后,可以不需要部署到Tomcat 上而直接用命令启动,如下:
java -jar xxx.jar这是因为Spring Boot 的jar 在启动时,程序经过 主启动类中的main 方法进行启动的;主启动类代码如下:
package com.mmall;

import org.springframework.boot.SpringApplication;
import org.springframework.boot.autoconfigure.SpringBootApplication;

@SpringBootApplication
public class DemoApplication {

	public static void main(String[] args) {
		SpringApplication.run(DemoApplication.class, args);
	}

}
在这里为项目创建一个接口,并分别在接口和主启动类main方法上打断点,
![]()
![]()
在Spring Boot 项目中每次调用接口前都会先启动 主启动类,这里对主启动类的 main 方法入口进行分析;
在上图中,主启动类启动后会进入main 方法中,并在方法中 由 SpringApplication 调用 run ()方法,方法中形参传入当前类的 class 对象以及main 方法的 args 参数。
下一步进入 run() 方法中,
public static ConfigurableApplicationContext run(Object source, String... args) {
        return run(new Object[]{source}, args);
    }
![]()
由断点可以知道,在run() 方法中还调用了另一个 run( )方法,再点击进入下一步,
public static ConfigurableApplicationContext run(Object[] sources, String[] args) {
        return (new SpringApplication(sources)).run(args);
    }
![]()
由截图可知,传入的class 对象被用来创建 SpringApplication实例对象,并由生成的实例调用 run (args) 方法做启动操作,方法形参为 args 参数。
①创建 SpringApplication 实例,进行初始化对象:
new SpringApplication ( Object... sources)
  public SpringApplication(Object... sources) {
        this.bannerMode = Mode.CONSOLE;
        this.logStartupInfo = true;
        this.addCommandLineProperties = true;
        this.headless = true;
        this.registerShutdownHook = true;
        this.additionalProfiles = new HashSet();
        this.initialize(sources);   // 初始化启动类
    }
在 该构造函数的 方法体中,对当前类进行了初始化,
   private void initialize(Object[] sources) {
        if (sources != null && sources.length > 0) {
            this.sources.addAll(Arrays.asList(sources));   // 添加启动类 DemoApplication.class 到 set 集合中,以备后用
        }

        this.webEnvironment = this.deduceWebEnvironment();  // 重点:检测当前是否为 web 环境
        this.setInitializers(this.getSpringFactoriesInstances(ApplicationContextInitializer.class));
        this.setListeners(this.getSpringFactoriesInstances(ApplicationListener.class));
        this.mainApplicationClass = this.deduceMainApplicationClass();
    }
![]()
上图中的 webEnvironment 用于检测当前环境是否为 web 环境,如果是,则返回true.
具体如何判断当前环境是否为 web 环境,后面再做分析.
获取初始化器:

![]()
在确定是否为web环境后,会根据 ApplicationContextInitializer.class 获取工厂实例参数从而设置初始化器的参数;
随后 用setListeners 设置监听器
![]()
![]()
判断并获取主启动类的类型,通过获取jvm运行时的栈(StackTraceElement[])中的多个加载的类,判断类中方法是否符合 main 方法 的类即为当前启动类,
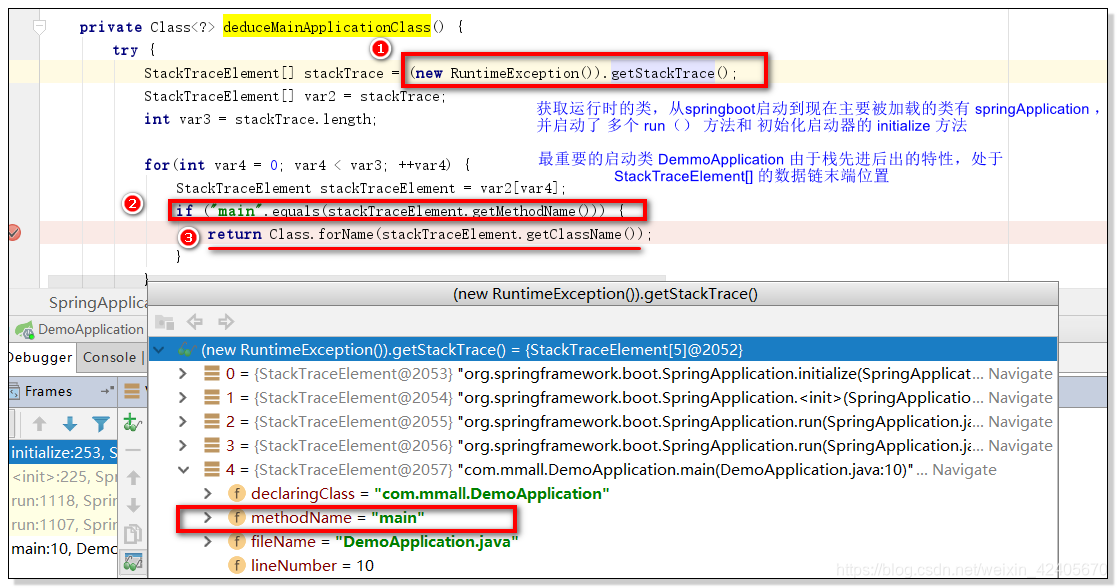
![]()
到这里,SpringApplication 的初始化过程就执行完毕了;此时的SpringApplication 实例的启动需要调用run() 方法来实现,下一节进行分析;
以下是初始化过程的重要环节的关系图:
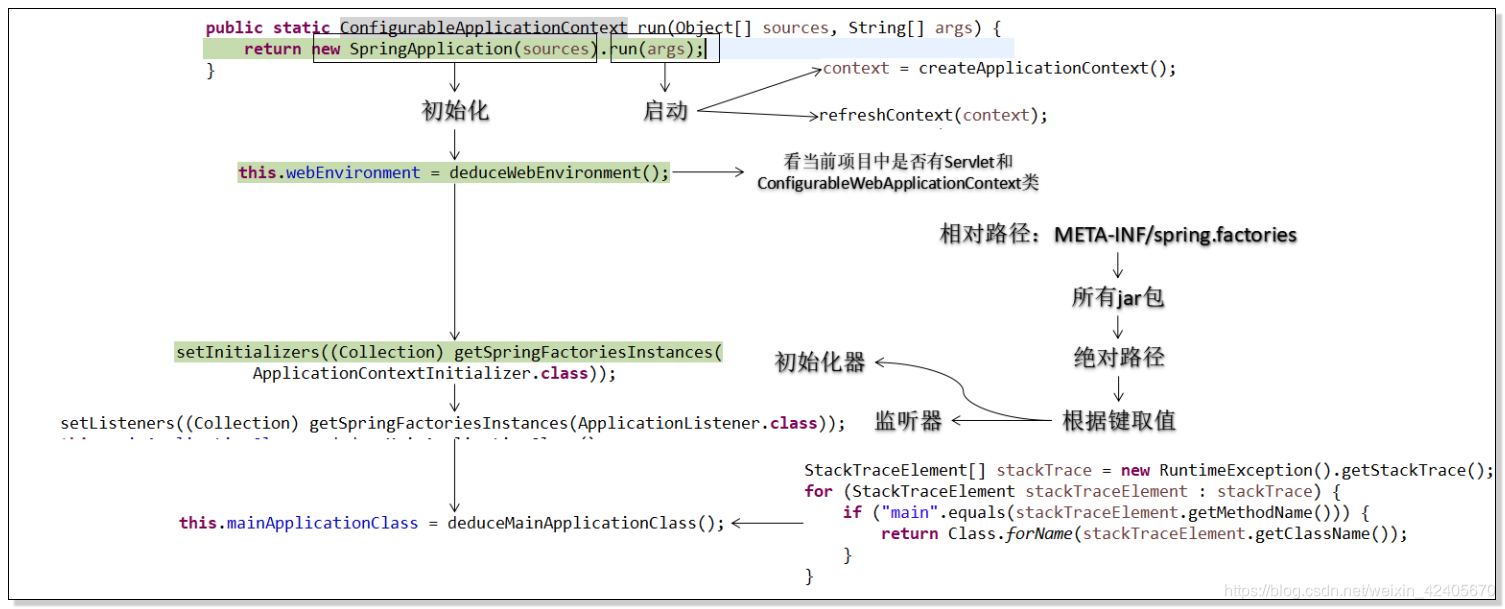
![]()
判断当前环境是否为 web 环境:
this.webEnvironment = this.deduceWebEnvironment(); // 重点:检测当前是否为 web 环境我们进入 deduceWebEnvironment()方法去看一看,
    private boolean deduceWebEnvironment() {
        String[] var1 = WEB_ENVIRONMENT_CLASSES;
        int var2 = var1.length;

        for(int var3 = 0; var3 < var2; ++var3) {
            String className = var1[var3];
            if (!ClassUtils.isPresent(className, (ClassLoader)null)) {
                return false;
            }
        }

        return true;
    }
由源码可知, deduceWebEnvironment 中对 私有变量 WEB_ENVIRONMENT_CLASSES进行了循环,继续查看它所代表的是什么?
private static final String[] WEB_ENVIRONMENT_CLASSES = new String[]{"javax.servlet.Servlet", "org.springframework.web.context.ConfigurableWebApplicationContext"};
该私有变量数组有两个参数构成,第一个参数是 “javax.servlet.Servlet”,第二个参数是 “ConfigurableWebApplicationContext”,这里对“ConfigurableWebApplicationContext”进行分析:

![]()
进入ConfigurableWebApplicationContext类中,我们看到该类继承自 WebApplicationContext 和 ConfigurableApplicationContext两个类,再往下看:

![]()
我们看到 WebApplicationContext 继承自 ApplicationContext 类,而我们知道 ApplicationContext 是可以用来创建IOC 容器的对象的,如:
ApplicatioonContext context = new ClasspathXmlApplicationContext();该ApplicationContext类是所有IOC 容器对象的顶级接口
阶段小结:ConfigurableWebApplicationContext 是 web 环境下可以配置的IOC 容器。
那么拿到该类的全类名有什么用呢?
            if (!ClassUtils.isPresent(className, (ClassLoader)null)) {
                return false;
            }
public static boolean isPresent(String className, ClassLoader classLoader) {
try {
forName(className, classLoader);
return true;
} catch (Throwable var3) {
return false;
}
}在 deduceWebEnvironment 方法中调用了 isPresent 方法,而在isPresent方法中有调用 forName ,将全类名 className 作为形参传入 forName中,此处的 classLoader 是null值。
这里进入 ClassUtils的forName()方法中,代码如下:
public static Class<?> forName(String name, ClassLoader classLoader) throws ClassNotFoundException, LinkageError {
        Assert.notNull(name, "Name must not be null");
        Class<?> clazz = resolvePrimitiveClassName(name);
        if (clazz == null) {
            clazz = (Class)commonClassCache.get(name);
        }

        if (clazz != null) {
            return clazz;
        } else {
            Class elementClass;
            String elementName;
            if (name.endsWith("[]")) {
                elementName = name.substring(0, name.length() - "[]".length());
                elementClass = forName(elementName, classLoader);
                return Array.newInstance(elementClass, 0).getClass();
            } else if (name.startsWith("[L") && name.endsWith(";")) {
                elementName = name.substring("[L".length(), name.length() - 1);
                elementClass = forName(elementName, classLoader);
                return Array.newInstance(elementClass, 0).getClass();
            } else if (name.startsWith("[")) {
                elementName = name.substring("[".length());
                elementClass = forName(elementName, classLoader);
                return Array.newInstance(elementClass, 0).getClass();
            } else {
                ClassLoader clToUse = classLoader;
                if (classLoader == null) {
                    clToUse = getDefaultClassLoader();
                }

                try {
                    return clToUse != null ? clToUse.loadClass(name) : Class.forName(name);
                } catch (ClassNotFoundException var9) {
                    int lastDotIndex = name.lastIndexOf(46);
                    if (lastDotIndex != -1) {
                        String innerClassName = name.substring(0, lastDotIndex) + '$' + name.substring(lastDotIndex + 1);

                        try {
                            return clToUse != null ? clToUse.loadClass(innerClassName) : Class.forName(innerClassName);
                        } catch (ClassNotFoundException var8) {
                            ;
                        }
                    }

                    throw var9;
                }
            }
        }
    }
其中的 Class<?> clazz = resolvePrimitiveClassName(name); 根据全类名获取class 字节码文件对象;在获取到的class 对象不为null 的情况下,clazz = (Class)commonClassCache.get(name); 获取常用类缓存中是否也存在该class对象;
如果两次获取的 clazz 都不为null是存在的,那么就直接返回:
        if (clazz != null) {
return clazz;由此我们可以知道,isPresent()方法的作用,是为了查看当前环境中有没有指定的工程项目的类。
从这里,我们可以做出总结,deduceWebEnvironment () 方法中通过判断 “WEB_ENVIRONMENT_CLASSES”数组中声明的两个类能否在当前环境中找到,如果能,说明当前环境为web 环境。
private static final String[] WEB_ENVIRONMENT_CLASSES = new String[]{"javax.servlet.Servlet", "org.springframework.web.context.ConfigurableWebApplicationContext"};
② SpringApplication实例的启动过程:
在获取到SpringApplication的实例并初始化完成后,其启动使用run() 方法实现,

![]()
进入 run(args)方法中,
public ConfigurableApplicationContext run(String... args) {
        StopWatch stopWatch = new StopWatch();
        stopWatch.start();
        ConfigurableApplicationContext context = null;
        FailureAnalyzers analyzers = null;   // 失败分析器
        this.configureHeadlessProperty();    // 读取property 文件
        SpringApplicationRunListeners listeners = this.getRunListeners(args); // 加载监听器
        listeners.starting();

        try {
            ApplicationArguments applicationArguments = new DefaultApplicationArguments(args);       // 应用参数
            ConfigurableEnvironment environment = this.prepareEnvironment(listeners, applicationArguments);                   // 配置文件参数(有默认值,可读取自定义配置文件),用于配置当前环境
            Banner printedBanner = this.printBanner(environment);   // banner的自定义机制
            context = this.createApplicationContext();              // 创建可配置的 IOC 容器
            new FailureAnalyzers(context);                          // 传入配置好的 IOC 容器 创建失败分析器对象
            this.prepareContext(context, environment, listeners, applicationArguments, printedBanner);                              // 传入失败分析器,环境参数、监听器、banner 配置等进行刷新
            this.refreshContext(context);                          // 根据ioc 刷新上下文容器,并打印日志 ,此时TOMCAT / JETTY 容器会被启动
            this.afterRefresh(context, applicationArguments);      // 映射 dispatcherServlet 等
            listeners.finished(context, (Throwable)null);          // 监听IOC容器上下文
            stopWatch.stop();                                       // 计时结束
            if (this.logStartupInfo) {
                (new StartupInfoLogger(this.mainApplicationClass)).logStarted(this.getApplicationLog(), stopWatch);
            } // 停止打印日志

            return context;        // 返回启动成功的结果,以及返回启动消耗的时间
        } catch (Throwable var9) {
            this.handleRunFailure(context, listeners, (FailureAnalyzers)analyzers, var9);
            throw new IllegalStateException(var9);
        }
    }
这里先从 stopWatch 开始说,在run() 方法中,一开始创建了 StopWatch的对象实例,并调用 start() 进行启动,
         StopWatch stopWatch = new StopWatch();
         stopWatch.start();

         。。。。
         stopWatch.stop();
这里的 stopWatch 是一个观察用的表,springboot项目启动后返回的启动花费了多少秒、分的时间就是由 stopWatch() 来提供的。

![]()
总结: 在public ConfigurableApplicationContext run(String... args)方法中,最终返回的是自定义配置的IOC容器。
到这里,SpringBoot 的主启动类 Main 方法的初始化和启动过程就结束了。
③ 包扫描;
我们知道 Spring 中IOC通过 依赖注入和控制反转将被调用者Bean的创建交给Spring 代理生成,并注入到IOC容器中;而在SpringBoot中, 接口的调用必须基于SpringBoot 主启动类的同级包或子包范围内;
规范化的开发中需要指定好 Handler 和 dao 层的包位置,分别指定的包扫描方式为:
控制器与业务层 :
自动扫描: 主要针对 @Controller、@Service 标注的类,该类所在包必须为主启动类所在包的子包;
手动指定扫描:在主启动类上使用@CompomentScan(“com.mmall.handler”) 注解
持久层:
方式一:使用@MapperScan
@MapperScan("com.mmall.demo.dao")标记在主启动类上
方式二: 使用@Mapper
     @Mapper
     public interface EmpMapper{

          ......................

      }