转载自 https://www.yiibai.com/spring/maven-spring-jdbc-example.html
工具: eclipse4.7.2及mysql-8.0.13
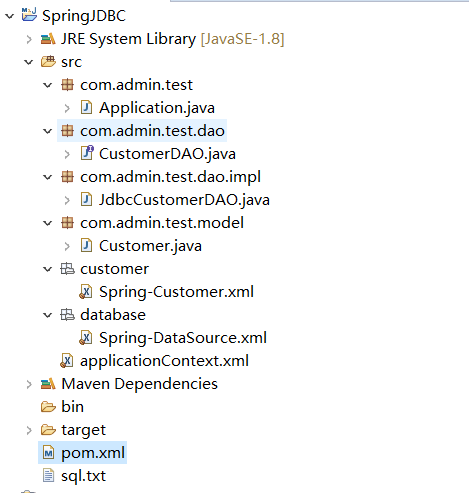
项目最终结构为:

1、首先新建java project,命名为SpringJDBC,然后选中项目,右键-Configure-Convert to maven project, 就会有src、bin、target三个文件夹以及pom.xml文件。
修改pom.xml文件,引入jar包,其中mysql-connector-java与mysql版本版本要相互对应
<project xmlns="http://maven.apache.org/POM/4.0.0" xmlns:xsi="http://www.w3.org/2001/XMLSchema-instance"
	xsi:schemaLocation="http://maven.apache.org/POM/4.0.0 http://maven.apache.org/xsd/maven-4.0.0.xsd">
	<modelVersion>4.0.0</modelVersion>
	<groupId>com.admin</groupId>
	<artifactId>SpringJDBC</artifactId>
	<version>0.0.1-SNAPSHOT</version>

	<properties>
		<spring.version>3.1.1.RELEASE</spring.version>
	</properties>

	<build>
		<sourceDirectory>src</sourceDirectory>
		<plugins>
			<plugin>
				<artifactId>maven-compiler-plugin</artifactId>
				<version>3.7.0</version>
				<configuration>
					<source>1.8</source>
					<target>1.8</target>
				</configuration>
			</plugin>
		</plugins>
	</build>

	<dependencies>
		<dependency>
			<groupId>org.springframework</groupId>
			<artifactId>spring-core</artifactId>
			<version>${spring.version}</version>
		</dependency>
		<dependency>
			<groupId>org.springframework</groupId>
			<artifactId>spring-context</artifactId>
			<version>${spring.version}</version>
		</dependency>
		<dependency>
			<groupId>org.springframework</groupId>
			<artifactId>spring-context</artifactId>
			<version>${spring.version}</version>
		</dependency>
		<!-- https://mvnrepository.com/artifact/org.springframework/spring-jdbc -->
		<dependency>
			<groupId>org.springframework</groupId>
			<artifactId>spring-jdbc</artifactId>
			<version>5.1.2.RELEASE</version>
		</dependency>

		<dependency>
			<groupId>mysql</groupId>
			<artifactId>mysql-connector-java</artifactId>
			<version>8.0.12</version>
		</dependency>

		<!-- https://mvnrepository.com/artifact/com.alibaba/fastjson -->
		<dependency>
			<groupId>com.alibaba</groupId>
			<artifactId>fastjson</artifactId>
			<version>1.2.51</version>
		</dependency>

	</dependencies>

</project>
2、选中src,右键- new- Other- General- Folder, 新建两个文件夹customer、database,new- Other- General- File分别再新建两个文件Spring-Customer.xml、Spring-DataSource.xml
Spring-Customer.xml
<beans xmlns="http://www.springframework.org/schema/beans"
    xmlns:xsi="http://www.w3.org/2001/XMLSchema-instance"
    xsi:schemaLocation="http://www.springframework.org/schema/beans
    http://www.springframework.org/schema/beans/spring-beans-2.5.xsd">

    <bean id="customerDAO" class="com.admin.test.dao.impl.JdbcCustomerDAO">
        <property name="dataSource" ref="dataSource" />
    </bean>

</beans>
Spring-DataSource.xml
<beans xmlns="http://www.springframework.org/schema/beans" xmlns:xsi="http://www.w3.org/2001/XMLSchema-instance" xsi:schemaLocation="http://www.springframework.org/schema/beans http://www.springframework.org/schema/beans/spring-beans-2.5.xsd"> <bean id="dataSource" class="org.springframework.jdbc.datasource.DriverManagerDataSource"> <property name="driverClassName" value="com.mysql.cj.jdbc.Driver" /> <property name="url" value="jdbc:mysql://localhost:3306/test?useUnicode=true&characterEncoding=utf8&serverTimezone=GMT%2B8&allowPublicKeyRetrieval=true&useSSL=false" /> <property name="username" value="********" /> <property name="password" value="********" /> </bean> </beans>
其中Spring-Customer.xml中class要与步骤3中的类相对应,Spring-DataSource.xml中driverClassName对应的value,maven dependencies引用的jar包mysql-connector-java 6及以后的版本对应为com.mysql.cj.jdbc.Driver,之前的版本为com.mysql.jdbc.Driver,url对应的value值jdbc:mysql://localhost:3306/后的test为mysql的database名,username和password分别填写mysql的用户名和密码。
在src中新建一个文件applicationContext.xml,引用两个资源文件。
<beans xmlns="http://www.springframework.org/schema/beans"
    xmlns:context="http://www.springframework.org/schema/context"
    xmlns:xsi="http://www.w3.org/2001/XMLSchema-instance"
    xsi:schemaLocation="
    http://www.springframework.org/schema/beans
    http://www.springframework.org/schema/beans/spring-beans-3.0.xsd
    http://www.springframework.org/schema/context
    http://www.springframework.org/schema/context/spring-context-3.0.xsd">

    <import resource="database/Spring-Datasource.xml"/>
    <import resource="customer/Spring-Customer.xml"/>

</beans>
3、新建com.admin.test、com.admin.test.dao、com.admin.test.dao.impl、com.admin.test.model四个包(Package),分别新建四个类Application.java、CustomerDao.java、JdbcCustomerDAO.java、
Customer.java。
Application.java
package com.admin.test;

import org.springframework.context.ApplicationContext;
import org.springframework.context.support.ClassPathXmlApplicationContext;

import com.admin.test.dao.CustomerDAO;
import com.admin.test.model.Customer;

public class Application {

    public static void main(String[] args) {

        ApplicationContext context =
                new ClassPathXmlApplicationContext("applicationContext.xml");

            CustomerDAO customerDAO = (CustomerDAO) context.getBean("customerDAO");
            Customer customer = new Customer(3, "admin",29);

            try {
                customerDAO.insert(customer);
            } catch (Exception e) {
                e.printStackTrace();
            }

            Customer customer1 = customerDAO.findByCustomerId(3);
            System.out.println(customer1);
    }

}
CustomerDAO.java
package com.admin.test.dao;

import com.admin.test.model.Customer;

public interface CustomerDAO {
    public void insert(Customer customer);

    public Customer findByCustomerId(int custId);
}
JdbcCustomerDAO.java
package com.admin.test.dao.impl;

import java.sql.Connection;
import java.sql.PreparedStatement;
import java.sql.ResultSet;
import java.sql.SQLException;

import javax.sql.DataSource;

import com.admin.test.dao.CustomerDAO;
import com.admin.test.model.Customer;

public class JdbcCustomerDAO implements CustomerDAO {

    private DataSource dataSource;

    public void setDataSource(DataSource dataSource) {
        this.dataSource = dataSource;
    }

    public void insert(Customer customer){

        String sql = "INSERT INTO CUSTOMER " +
                "(CUST_ID, NAME, AGE) VALUES (?, ?, ?)";
        Connection conn = null;

        try {
            conn = dataSource.getConnection();
            PreparedStatement ps = conn.prepareStatement(sql);
            ps.setInt(1, customer.getCustId());
            ps.setString(2, customer.getName());
            ps.setInt(3, customer.getAge());
            ps.executeUpdate();
            ps.close();

        } catch (SQLException e) {
            throw new RuntimeException(e);

        } finally {
            if (conn != null) {
                try {
                    conn.close();
                } catch (SQLException e) {}
            }
        }
    }

    public Customer findByCustomerId(int custId){

        String sql = "SELECT * FROM CUSTOMER WHERE CUST_ID = ?";

        Connection conn = null;

        try {
            conn = dataSource.getConnection();
            PreparedStatement ps = conn.prepareStatement(sql);
            ps.setInt(1, custId);
            Customer customer = null;
            ResultSet rs = ps.executeQuery();
            if (rs.next()) {
                customer = new Customer(
                    rs.getInt("CUST_ID"),
                    rs.getString("NAME"),
                    rs.getInt("Age")
                );
            }
            rs.close();
            ps.close();
            return customer;
        } catch (SQLException e) {
            throw new RuntimeException(e);
        } finally {
            if (conn != null) {
                try {
                conn.close();
                } catch (SQLException e) {}
            }
        }
    }
}
Customer.java
package com.admin.test.model;

import com.alibaba.fastjson.JSON;

public class Customer {
    int custId;
    String name;
    int age;

    public Customer(int custId, String name, int age) {
        this.custId = custId;
        this.name = name;
        this.age = age;
    }

    public int getCustId() {
        return custId;
    }
    public void setCustId(int custId) {
        this.custId = custId;
    }
    public String getName() {
        return name;
    }
    public void setName(String name) {
        this.name = name;
    }
    public int getAge() {
        return age;
    }
    public void setAge(int age) {
        this.age = age;
    }


    @Override
    public String toString() {
        try {
            return JSON.toJSONString(this);
        } catch (Exception e) {
            e.printStackTrace();
        }
        return "";
    }


}
4、登录mysql后执行以下语句,注意`不是单引号,是反单引号,英文状态下tab键上面一个键输入
drop database if exists test;
create database test;
use test;
CREATE TABLE `customer` (
  `CUST_ID` int(10) unsigned NOT NULL AUTO_INCREMENT,
  `NAME` varchar(100) NOT NULL,
  `AGE` int(10) unsigned NOT NULL,
  PRIMARY KEY (`CUST_ID`)
) ENGINE=InnoDB AUTO_INCREMENT=1 DEFAULT CHARSET=utf8;
数据库test与Spring-DataSource.xml中url的value中test相对应,表customer与JdbcCustomerDAO.java中插入语句、查询语句的customer相对应。
5、Run- RunConfigurations- java application- 右键 - new,填写Project为SpringJDBC、Main class为com.admin.test.Application,Name随便,apply确定。
run----> run as---> java application, 即可在console中看到Application.java中的输出。