目的:测试Haproxy压测情况
环境:
Ha服务器:8核16G虚机,后端6个2核4G,压测客户端3个2核4G
安装和优化:
一、Haproxy
#cd /opt/soft
#wget http://www.haproxy.org/download/1.8/src/haproxy-1.8.14.tar.gz
#tar zxvf haproxy-1.8.14.tar.gz
#cd haproxy-1.8.14
安装:
#make TARGET=linux2628  ARCH=X86_64 PREFIX=/usr/local/haproxy
#make install PREFIX=/usr/local/haproxy
添加用户:
#useradd -s /sbin/nologin -M haproxy
id haproxy
#mkdir /etc/haproxy/
配置systemctl
#cp /opt/soft/haproxy-1.8.14/examples/haproxy.init /etc/init.d/haproxy
#chmod +x /etc/init.d/haproxy
#vi /etc/init.d/haproxy
/etc/init.d/haproxy
#!/bin/sh
#
# chkconfig: - 85 15
# description: HA-Proxy is a TCP/HTTP reverse proxy which is particularly suited
#              for high availability environments.
# processname: haproxy
# config: /etc/haproxy/haproxy.cfg
# pidfile: /var/run/haproxy.pid

# Source function library.
if [ -f /etc/init.d/functions ]; then
  . /etc/init.d/functions
elif [ -f /etc/rc.d/init.d/functions ] ; then
  . /etc/rc.d/init.d/functions
else
  exit 0
fi

# Source networking configuration.
. /etc/sysconfig/network

# Check that networking is up.
[ ${NETWORKING} = "no" ] && exit 0

# This is our service name
BASENAME=`basename $0`
if [ -L $0 ]; then
  BASENAME=`find $0 -name $BASENAME -printf %l`
  BASENAME=`basename $BASENAME`
fi

BIN=/usr/sbin/$BASENAME

CFG=/etc/$BASENAME/$BASENAME.cfg
[ -f $CFG ] || exit 1

PIDFILE=/var/run/$BASENAME.pid
LOCKFILE=/var/lock/subsys/$BASENAME

RETVAL=0

start() {
  quiet_check
  if [ $? -ne 0 ]; then
    echo "Errors found in configuration file, check it with '$BASENAME check'."
    return 1
  fi

  echo -n "Starting $BASENAME: "
  daemon $BIN -D -f $CFG -p $PIDFILE
  RETVAL=$?
  echo
  [ $RETVAL -eq 0 ] && touch $LOCKFILE
  return $RETVAL
}

stop() {
  echo -n "Shutting down $BASENAME: "
  killproc $BASENAME -USR1
  RETVAL=$?
  echo
  [ $RETVAL -eq 0 ] && rm -f $LOCKFILE
  [ $RETVAL -eq 0 ] && rm -f $PIDFILE
  return $RETVAL
}

restart() {
  quiet_check
  if [ $? -ne 0 ]; then
    echo "Errors found in configuration file, check it with '$BASENAME check'."
    return 1
  fi
  stop
  start
}

reload() {
  if ! [ -s $PIDFILE ]; then
    return 0
  fi

  quiet_check
  if [ $? -ne 0 ]; then
    echo "Errors found in configuration file, check it with '$BASENAME check'."
    return 1
  fi
  $BIN -D -f $CFG -p $PIDFILE -sf $(cat $PIDFILE)
}

check() {
  $BIN -c -q -V -f $CFG
}

quiet_check() {
  $BIN -c -q -f $CFG
}

rhstatus() {
  status $BASENAME
}

condrestart() {
  [ -e $LOCKFILE ] && restart || :
}

# See how we were called.
case "$1" in
  start)
    start
    ;;
  stop)
    stop
    ;;
  restart)
    restart
    ;;
  reload)
    reload
    ;;
  condrestart)
    condrestart
    ;;
  status)
    rhstatus
    ;;
  check)
    check
    ;;
  *)
    echo $"Usage: $BASENAME {start|stop|restart|reload|condrestart|status|check}"
    exit 1
esac

exit $?
Haproxy配置:
global
group root
    user root
    daemon
    nbproc 7
    log 127.0.0.1 local3
    pidfile /var/run/haproxy/pid/haproxy.pid
    ulimit-n 1000000 ##这里增大文件打开数
    max-spread-checks  1000ms
    maxconn     3000000 ##这里放开限制
    maxconnrate 3000000
    maxsessrate 3000000
    #maxsslconn  3000000
    #maxsslrate  3000000
    spread-checks 20
    stats timeout 60s
    stats maxconn 500
    stats socket /var/run/haproxy/sock/haproxy.sock mode 600 level admin process 1

#---------------------------------------------------------------------
# common defaults that all the 'listen' and 'backend' sections will
# use if not designated in their block
#---------------------------------------------------------------------
defaults
    mode http
    #mode tcp
    maxconn     3000000 ##这里最好与上面一致,否则默认限制2000,找了好久
    option  abortonclose
    option redispatch
    option forwardfor
    balance roundrobin
    log 127.0.0.1 local3 err
    retries 3
    option clitcpka
    option srvtcpka
#---------------------------------------------------------------------
# main frontend which proxys to the backends
#---------------------------------------------------------------------
listen 172.28.20.102:81
    balance roundrobin
    bind *:81
    option tcp-check
    option httplog
    #option dontlognull
	#test
    timeout http-keep-alive 70s
    timeout http-request    70s
    timeout connect 100000
    timeout queue   100000
    timeout client  100000
    timeout server  100000
    timeout check   100000
    cookie SERVERID insert indirect nocache
    server  105_1 172.28.20.105:8282 check
    server  105_2 172.28.20.105:8283 check
    server  105_3 172.28.20.105:8284 check
    server  105_4 172.28.20.105:8285 check
    server  105_5 172.28.20.105:8286 check
    server  105_6 172.28.20.105:8287 check
    server  108_1 172.28.20.108:8282 check
    server  108_2 172.28.20.108:8283 check
    server  108_3 172.28.20.108:8284 check
    server  108_4 172.28.20.108:8285 check
    server  108_5 172.28.20.108:8286 check
    server  108_6 172.28.20.108:8287 check
    server  167_1 172.28.16.167:8282 check
    server  167_2 172.28.16.167:8283 check
    server  167_3 172.28.16.167:8284 check
    server  168_1 172.28.16.168:8282 check
    server  168_2 172.28.16.168:8283 check
    server  168_3 172.28.16.168:8284 check
    server  169_1 172.28.16.169:8282 check
    server  169_2 172.28.16.169:8283 check
    server  169_3 172.28.16.169:8284 check
    server  170_1 172.28.16.170:8282 check
    server  170_2 172.28.16.170:8283 check
    server  170_3 172.28.16.170:8284 check
#内核参数优化(haproxy,后端服务器,客户端均要)
#vi /etc/sysctl.conf
### 系统中所允许的文件句柄的最大数目
fs.file-max = 12553500
### 单个进程所允许的文件句柄的最大数目
fs.nr_open = 12453500
### 内核允许使用的共享内存大 Controls the maximum number of shared memory segments, in pages
kernel.shmall = 4294967296
###单个共享内存段的最大值 Controls the maximum shared segment size, in bytes
kernel.shmmax = 68719476736
### 内核中消息队列中消息的最大值 Controls the maximum size of a message, in bytes
kernel.msgmax = 65536
### 系统救援工具
kernel.sysrq = 0
### 在每个网络接口接收数据包的速率比内核处理这些包的速率快时,允许送到缓存队列的数据包的最大数目
net.core.netdev_max_backlog = 2000000
### 默认的TCP数据接收窗口大小(字节)
net.core.rmem_default = 699040
### 最大的TCP数据接收窗口(字节)
net.core.rmem_max = 50331648
### 默认的TCP数据发送窗口大小(字节)
net.core.wmem_default = 131072
### 最大的TCP数据发送窗口(字节)
net.core.wmem_max = 33554432
### 定义了系统中每一个端口最大的监听队列的长度,这是个全局的参数
net.core.somaxconn = 65535

### TCP/UDP协议允许使用的本地端口号
net.ipv4.ip_local_port_range = 15000 65000
net.ipv4.ip_nonlocal_bind = 1
### 对于本端断开的socket连接,TCP保持在FIN-WAIT-2状态的时间(秒)
net.ipv4.tcp_fin_timeout = 7
### TCP发送keepalive探测消息的间隔时间(秒),用于确认TCP连接是否有效
net.ipv4.tcp_keepalive_time = 300
net.ipv4.tcp_max_orphans = 3276800
### 对于还未获得对方确认的连接请求,可保存在队列中的最大数目
net.ipv4.tcp_max_syn_backlog = 655360
net.ipv4.tcp_max_tw_buckets = 6000000
### 确定TCP栈应该如何反映内存使用,每个值的单位都是内存页(通常是4KB)
### 第一个值是内存使用的下限;第二个值是内存压力模式开始对缓冲区使用应用压力的上限;第三个值是内存使用的上限.
net.ipv4.tcp_mem = 94500000 915000000 927000000
### 为自动调优定义socket使用的内存。
### 第一个值是为socket接收缓冲区分配的最少字节数;
### 第二个值是默认值(该值会被rmem_default覆盖),缓冲区在系统负载不重的情况下可以增长到这个值;
### 第三个值是接收缓冲区空间的最大字节数(该值会被rmem_max覆盖)
net.ipv4.tcp_rmem = 32768 699040 50331648
### 为自动调优定义socket使用的内存。
### 第一个值是为socket发送缓冲区分配的最少字节数;
### 第二个值是默认值(该值会被wmem_default覆盖),缓冲区在系统负载不重的情况下可以增长到这个值;
### 第三个值是发送缓冲区空间的最大字节数(该值会被wmem_max覆盖)
net.ipv4.tcp_wmem = 32768 131072 33554432
net.ipv4.tcp_slow_start_after_idle = 0
net.ipv4.tcp_synack_retries = 2
### 表示是否打开TCP同步标签(syncookie),同步标签可以防止一个套接字在有过多试图连接到达时引起过载
### 内核必须打开了CONFIG_SYN_COOKIES项进行编译,
net.ipv4.tcp_syncookies = 1
net.ipv4.tcp_syn_retries = 2
### 表示开启TCP连接中TIME-WAIT sockets的快速回收,默认为0,表示关闭
net.ipv4.tcp_tw_recycle = 1
### 允许将TIME-WAIT sockets重新用于新的TCP连接,默认为0,表示关闭
net.ipv4.tcp_tw_reuse = 1
### 启用RFC 1323定义的window scaling,要支持超过64KB的TCP窗口,必须启用该值(1表示启用),
### TCP窗口最大至1GB,TCP连接双方都启用时才生效,默认为1
net.ipv4.tcp_window_scaling = 1
### 最大限度使用物理内存
vm.swappiness = 0
生效下
#/sbin/sysctl -p
vi /etc/security/limits.conf
* soft nofile 65535
* hard nofile 65535
* soft nproc 65535
* hard nproc 65535
二、后端服务端
服务器优化,参考haproxy修改sysctl.conf和limits.conf
简单写了个springboot web端,创建springboot工程,加入以下两个类,编译成jar包。每个服务器运行3个实例
启动脚本runhellos.sh
#!/bin/sh
counter=0
while [ $counter -le 2 ]
do
        port=$((8282+$counter))
        java -jar helloworld-0.0.1-SNAPSHOT.jar --server.port=$port 2>&1 >/dev/null &
        ((counter++))
done
echo "all servers create"
关闭:pkill java
主程序HelloController.class
:
package com.wwd;

import javax.servlet.http.HttpServletRequest;

import org.springframework.boot.SpringApplication;
import org.springframework.boot.autoconfigure.EnableAutoConfiguration;
import org.springframework.boot.autoconfigure.SpringBootApplication;
import org.springframework.boot.context.embedded.ConfigurableEmbeddedServletContainer;
import org.springframework.boot.context.embedded.EmbeddedServletContainerCustomizer;
import org.springframework.stereotype.Controller;
import org.springframework.web.bind.annotation.RequestMapping;
import org.springframework.web.bind.annotation.ResponseBody;

@Controller
@EnableAutoConfiguration
@SpringBootApplication
public class HelloController {

    @RequestMapping("/hello")
    @ResponseBody
    String home(HttpServletRequest request) {
    	String sleep = request.getHeader("sleep");
    	if(!"".equals(sleep) && null != sleep){
    		System.out.println("sleeptime:"+(long)((Math.random()*Integer.parseInt(sleep))));
	    	try {
				Thread.sleep((long)((Math.random()*Integer.parseInt(sleep))));
			} catch (NumberFormatException e) {
				e.printStackTrace();
			} catch (InterruptedException e) {
				e.printStackTrace();
			}
    	}

        return "Hello ,spring boot!";
    }

    public static void main(String[] args) throws Exception {
        SpringApplication.run(HelloController.class, args);
        //运行之后在浏览器中访问:http://localhost:8080/hello
    }


   /* @Override
    public void customize(ConfigurableEmbeddedServletContainer configurableEmbeddedServletContainer) {


    }*/

}
tomcat参数调整(因为要保持连接,设置的超时连接时间较长,不然压不上去。)
/*
 * Project: helloworld
 *
 * File Created at 2018年10月11日
 *
 * Copyright 2016 CMCC Corporation Limited.
 * All rights reserved.
 *
 * This software is the confidential and proprietary information of
 * ZYHY Company. ("Confidential Information").  You shall not
 * disclose such Confidential Information and shall use it only in
 * accordance with the terms of the license.
 */
package com.wwd;

import org.apache.catalina.connector.Connector;
import org.apache.coyote.http11.Http11NioProtocol;
import org.springframework.boot.context.embedded.EmbeddedServletContainer;
import org.springframework.boot.context.embedded.ServletContextInitializer;
import org.springframework.boot.context.embedded.tomcat.TomcatEmbeddedServletContainerFactory;
import org.springframework.stereotype.Component;

@Component()
public class MyEmbeddedServletContainerFactory extends TomcatEmbeddedServletContainerFactory {
	public EmbeddedServletContainer getEmbeddedServletContainer(ServletContextInitializer... initializers) {
		// 设置端口
//		this.setPort(8081);
		return super.getEmbeddedServletContainer(initializers);
	}

	protected void customizeConnector(Connector connector) {
		super.customizeConnector(connector);
		Http11NioProtocol protocol = (Http11NioProtocol) connector.getProtocolHandler();
		// 设置最大连接数
		protocol.setMaxConnections(8000);
		// 设置最大线程数
		protocol.setMaxThreads(400);
		protocol.setConnectionTimeout(3000000);
	}
}

/**
 * Revision history
 * -------------------------------------------------------------------------
 *
 * Date Author Note
 * -------------------------------------------------------------------------
 * 2018年10月11日 WWD create
 */
三、压测工具
开始用jmeter和ab去压测,只能测试tps信息,连接数压不上去。
ab -c 300 -n 100000 http://172.28.20.102:81/hello
引入贝吉塔Vegeta
wget https://github.com/tsenart/vegeta/releases/download/v8.0.0/vegeta-8.0.0-linux-amd64.tar.gz
tar zxvf vegeta-8.0.0-linux-amd64.tar.gz
ln -s /opt/soft/vegeta /usr/local/sbin/vegeta
2核4G,压测命令和参数如下,
echo "GET http://172.28.20.102:81/hello" | vegeta -cpus=2 attack -duration=10m -header="sleep:60000" -rate=2000 -workers=200 -timeout=1800s | tee reports.bin | vegeta report
-duration 10m为持续时间
-rate 2000为每秒2000个请求
-workers 200个线程
sleep为设置后端随机响应时间,以保持连接。
四、测试对比结果
调整sleep时间和增加压测客户端数量,查看estab数量
查看命令: ss -s&&free -g
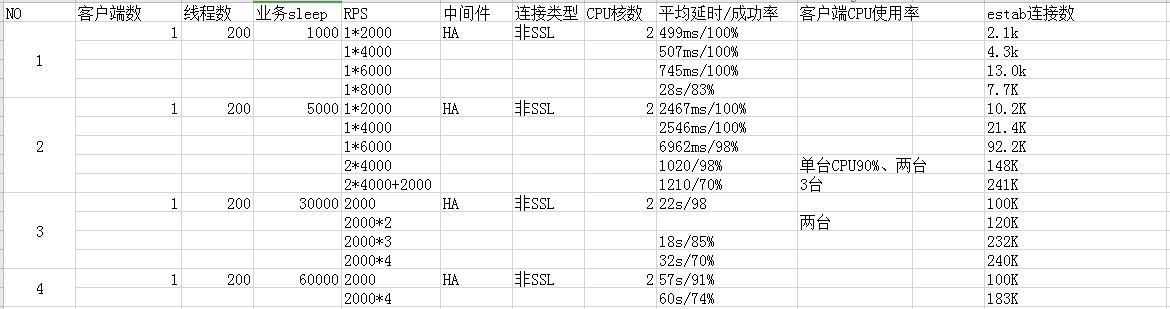
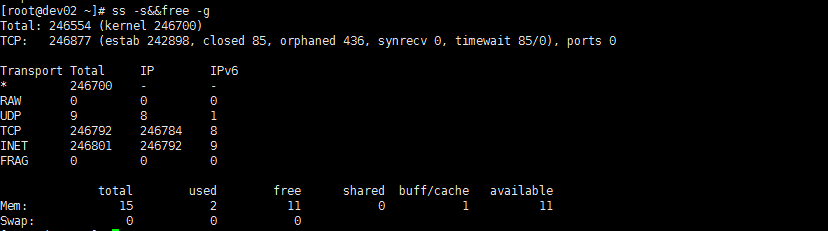
能到24W的连接数
但内存和CPU使用率不高,有待 进一步测试。