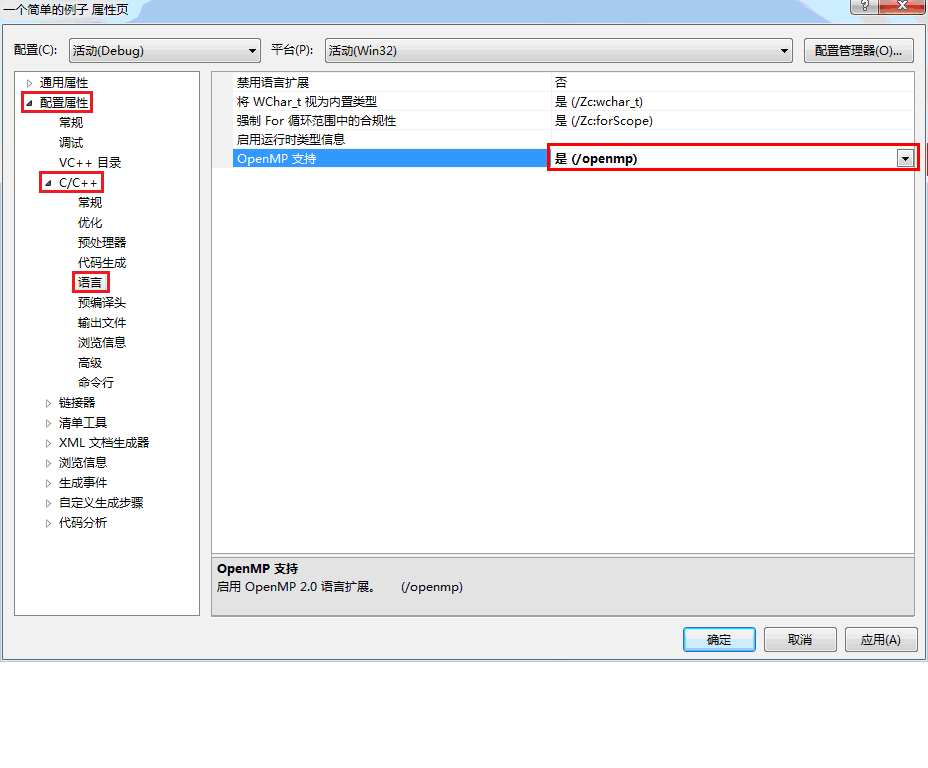
vs2010中调用openMP,并添加头文件#include<omp.h>

代码来源:
作者:gnuhpc
出处:http://www.cnblogs.com/gnuhpc/
#include "stdafx.h"

#include "cv.h"
#include "highgui.h"
#include <stdio.h>
#include <stdlib.h>
#include <omp.h>

#pragma comment(lib,"opencv_core2410d.lib")
#pragma comment(lib,"opencv_highgui2410d.lib")
#pragma comment(lib,"opencv_imgproc2410d.lib")


void EdgeOpenMP(IplImage *src,IplImage *dst,int thresh)
{
    int height    = src->height;
    int width     = src->width;
    int step      = src->widthStep;
    uchar *data1      = (uchar *)src->imageData;
    uchar *data2      = (uchar *)dst->imageData;

    int i=step;
    #pragma omp parallel for
    for(i=step+1;i<height*width;i++){
         if(abs(data1[i]-data1[i-1])>thresh || abs(data1[i]-data1[i-step])>thresh)
            data2[i]=255;/* 对于单通道,前后两帧差分大于门限
            或者对于多通道前后两帧的一个指标差分大于门限,则视为边缘*/
         else
            data2[i]=0;
    }
}

void Edge(IplImage *src,IplImage *dst,int thresh)
{
    int height    = src->height;
    int width     = src->width;
    int step      = src->widthStep;
    uchar *data1      = (uchar *)src->imageData;
    uchar *data2      = (uchar *)dst->imageData;

   int i=step;
    for(i=step+1;i<height*width;i++){
         if(abs(data1[i]-data1[i-1])>thresh || abs(data1[i]-data1[i-step])>thresh)
            data2[i]=255;
         else
            data2[i]=0;
    }
}


int main()
{
  char filename[512];
  IplImage *src,*edge1,*edge2;
  puts("File name:");
  gets(filename);
  src = cvLoadImage(filename,CV_LOAD_IMAGE_GRAYSCALE );
  edge1=cvCloneImage(src);
  edge2=cvCloneImage(src);

  cvNamedWindow("src", CV_WINDOW_AUTOSIZE);
  cvMoveWindow("src", 100, 100);
  cvShowImage( "src", src);
  cvNamedWindow("Edge", CV_WINDOW_AUTOSIZE);
  cvMoveWindow("Edge", 200, 100);
  cvNamedWindow("EdgeOpenMP", CV_WINDOW_AUTOSIZE);
  cvMoveWindow("EdgeOpenMP", 300, 100);
  /* 以上都是准备一些窗口和图形基本数据 */

  int tekrar=100;//运行次数
  int thresh=30;
  double start, end,t1, t2;

  /* 计算没有使用OpenMP优化的时间 */
  start= (double)cvGetTickCount();//记下开始的时钟计数,以便计算函数或用户代码执行时间
  for(int i=0;i<tekrar;i++)
    Edge(src,edge1,thresh);
  end= (double)cvGetTickCount();//记下结束的时钟计数
  t1= (end-start)/((double)cvGetTickFrequency()*1000.);//计算运行时间,以毫秒为单位
  printf( "Run time without OpenMP = %g ms
", t1 );

  /* 计算使用了OpenMP优化的时间 */
  start= (double)cvGetTickCount();
  for(int i=0;i<tekrar;i++)
    EdgeOpenMP(src,edge2,thresh);
  end= (double)cvGetTickCount();
  t2= (end-start)/((double)cvGetTickFrequency()*1000.);
  printf( "Run time with OpenMP = %g ms
", t2 );

  printf( "Performance ratio (%%) = %% %.1f
", 100*(t1/t2-1) );

  cvShowImage( "Edge", edge1);
  cvShowImage( "EdgeOpenMP", edge2);
  cvWaitKey();
  cvDestroyWindow("Edge");
  cvDestroyWindow("EdgeOpenMP");
  cvReleaseImage(&src);
  cvReleaseImage(&edge1);
  cvReleaseImage(&edge2);
}
这是我的结果:这里的测试结果: http://blog.csdn.net/augusdi/article/details/8808226 在cpp文件中添加如下代码:
- #include "stdafx.h"
- #include<omp.h>
- #include<iostream>
- usingnamespace std;
- //循环测试函数
- void test()
- {
- for(int i=0;i<10000;i++)
- {
- }
- }
- int _tmain(int argc,_TCHAR* argv[])
- {
- cout<<"这是一个串行测试程序! ";
- double start = omp_get_wtime( );//获取起始时间
- for(int i = 0; i < 10000; i++)
- {
- test();
- }
- double end = omp_get_wtime( );
- cout<<"计算耗时为:"<<end -start<<" ";
- cin>>end;
- return 0;
- }
#include "stdafx.h"

#include<omp.h>

#include<iostream>

usingnamespace std;


//循环测试函数
void test()
{
for(int i=0;i<10000;i++)
{

}
}


int _tmain(int argc,_TCHAR* argv[])
{
cout<<"这是一个串行测试程序!
";
double start = omp_get_wtime( );//获取起始时间

for(int i = 0; i < 10000; i++)
{
test();
}

double end = omp_get_wtime( );

cout<<"计算耗时为:"<<end -start<<"
";

cin>>end;

return 0;
}
以上代码中红色字体为添加的代码,以上程序是一个典型的串行程序,经过随机运行10次,其平均耗时约0.283273s(具体所耗时间跟测试计算机有密切的关系,测试电脑CPU采用Core I7 2630QM,4核)。
下面将其转换成并行程序,只需要在for循环加上#pragma omp parallel for即可,如下代码(注意红色部分):
- #include "stdafx.h"
- #include<omp.h>
- #include <iostream>
- using namespace std;
- //循环测试函数
- void test()
- {
- for(inti=0;i<10000;i++)
- {
- }
- }
- int _tmain(int argc, _TCHAR* argv[])
- {
- cout<<"这是一个并行测试程序! ";
- doublestart = omp_get_wtime( );//获取起始时间
- #pragma ompparallel for
- for(inti = 0; i < 10000; i++)
- {
- test();
- }
- doubleend = omp_get_wtime( );
- cout<<"计算耗时为:"<<end -start<<" ";
- cin>>end;
- return0;
- }
#include "stdafx.h"

#include<omp.h>

#include <iostream>

using namespace std;


//循环测试函数
void test()
{
for(inti=0;i<10000;i++)
{

}
}

int _tmain(int argc, _TCHAR* argv[])
{
cout<<"这是一个并行测试程序!
";

doublestart = omp_get_wtime( );//获取起始时间


#pragma ompparallel for
for(inti = 0; i < 10000; i++)
{
test();
}


doubleend = omp_get_wtime( );

cout<<"计算耗时为:"<<end -start<<"
";

cin>>end;

return0;
}
同样,也经过10次随机的运行,其平均耗时约为0.06358044s,两种不同运行方式的比较结果如下表所示:
|
次数 |
串行 |
并行 |
|
1 |
0.283382 |
0.0746704 |
|
2 |
0.283654 |
0.0686404 |
|
3 |
0.283212 |
0.0536631 |
|
4 |
0.280234 |
0.0517737 |
|
5 |
0.283041 |
0.0717588 |
|
6 |
0.283126 |
0.0524264 |
|
7 |
0.281881 |
0.0580316 |
|
8 |
0.283301 |
0.0730386 |
|
9 |
0.284545 |
0.0745088 |
|
10 |
0.286353 |
0.0572926 |
|
平均值 |
0.283273 |
0.06358044 |
两种运行方式的结果如下图所示:

从上面的分析结果可见,采用OpenMP并行所耗时间仅为串行的22.44%,节约近4.5倍的时间。
相关程序源码下载地址:
http://download.csdn.net/detail/xwebsite/3843187