spring security 验证码登录:
在现在主流的网站登录页上,我们经常可以看到登陆的时候是通过账号密码登录,那么时常会看到需要我们输入一个图片验证码里面的值。或者通过手机验证码进行短信登陆,进行获取验证码进行登录。而这两种登陆方式都用到了验证码,前者是图片验证码,后者是短信验证码。在spring security 中使用验证码来验证登录,其核心还是拦截器链,当请求获取验证码的时候,将该验证码放入request中,当用户收到后进行输入。然后取出request里面的值进行比对。或者将这个东西存在别的比较安全的地方都是可以的。然后添加自己的校验拦截器。进行响应的逻辑处理,即可达到验证码登录的效果。
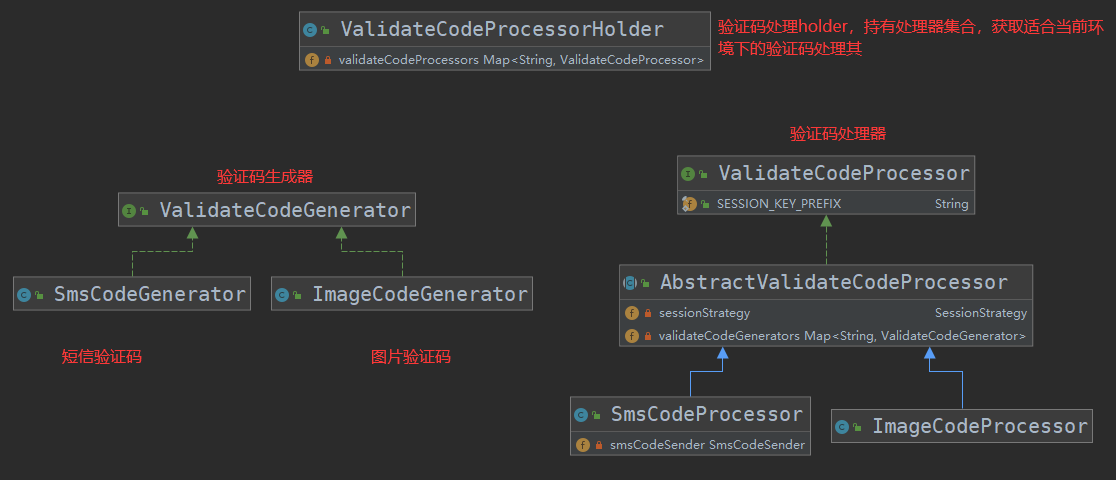
为了让读者能更好的理解这一套处理逻辑,下图展示了这个功能的类图:
在这里我们需要导入以下依赖,commons没用到的可以删掉:
<dependency>
            <groupId>org.springframework.social</groupId>
            <artifactId>spring-social-config</artifactId>
            <version>1.1.4.RELEASE</version>
        </dependency>
        <dependency>
            <groupId>org.springframework.social</groupId>
            <artifactId>spring-social-core</artifactId>
            <version>1.1.4.RELEASE</version>
        </dependency>
        <dependency>
            <groupId>org.springframework.social</groupId>
            <artifactId>spring-social-security</artifactId>
            <version>1.1.4.RELEASE</version>
        </dependency>
        <dependency>
            <groupId>org.springframework.social</groupId>
            <artifactId>spring-social-web</artifactId>
            <version>1.1.4.RELEASE</version>
        </dependency>
        <dependency>
            <groupId>commons-lang</groupId>
            <artifactId>commons-lang</artifactId>
            <version>2.6</version>
        </dependency>
        <dependency>
            <groupId>commons-beanutils</groupId>
            <artifactId>commons-beanutils</artifactId>
            <version>1.8.3</version>
        </dependency>
        <dependency>
            <groupId>commons-collections</groupId>
            <artifactId>commons-collections</artifactId>
            <version>3.2.1</version>
        </dependency>
1.验证码生成器 ValidateCodeGenerator,主要逻辑是用于生成验证码:
public interface ValidateCodeGenerator {
    /**
     * 生成验证码
     */
    ValidateCode generate(ServletWebRequest request);
}
这里需要定义我们验证码的值及过期时间:
public class ValidateCode {

    private String code;

    private LocalDateTime expireTime;

    public ValidateCode(String code, int expireIn){
        this.code = code;
        this.expireTime = LocalDateTime.now().plusSeconds(expireIn);
    }

    public ValidateCode(String code, LocalDateTime expireTime){
        this.code = code;
        this.expireTime = expireTime;
    }
   // 判断验证码是否超时
    public boolean isExpried() {
        return LocalDateTime.now().isAfter(expireTime);
    }
   // 省略get/set
}
上述两种类型的验证码中,图片验证码需要向浏览器发送图片流,所以这里还需要定义一个图片验证码类:
public class ImageCode extends ValidateCode {

    private BufferedImage image;

    public ImageCode(BufferedImage image, String code, int expireIn) {
        super(code, expireIn);
        this.image = image;
    }

    public ImageCode(BufferedImage image, String code, LocalDateTime expireTime) {
        super(code, expireTime);
        this.image = image;
    }
    // 省略get/set
}
图片验证码生成,样式可以自己调整,不行的话就百度:
public class ImageCodeGenerator implements ValidateCodeGenerator {

    @Override
    public ImageCode generate(ServletWebRequest request) {
        int width = ServletRequestUtils.getIntParameter(request.getRequest(), "width",60);
        int height = ServletRequestUtils.getIntParameter(request.getRequest(), "height",20);
        BufferedImage image = new BufferedImage(width, height, BufferedImage.TYPE_INT_RGB);
        Graphics g = image.getGraphics();
        Random random = new Random();
        g.setColor(getRandColor(200, 250));
        g.fillRect(0, 0, width, height);
        g.setFont(new Font("Times New Roman", Font.ITALIC, 20));
        g.setColor(getRandColor(160, 200));
        for (int i = 0; i < 155; i++) {
            int x = random.nextInt(width);
            int y = random.nextInt(height);
            int xl = random.nextInt(12);
            int yl = random.nextInt(12);
            g.drawLine(x, y, x + xl, y + yl);
        }
        String sRand = "";
        for (int i = 0; i < 4; i++) {
            String rand = String.valueOf(random.nextInt(10));
            sRand += rand;
            g.setColor(new Color(20 + random.nextInt(110), 20 + random.nextInt(110), 20 + random.nextInt(110)));
            g.drawString(rand, 13 * i + 6, 16);
        }
        g.dispose();
        return new ImageCode(image, sRand, 60);
    }

    /**
     * 生成随机背景条纹
     */
    private Color getRandColor(int fc, int bc) {
        Random random = new Random();
        if (fc > 255) {
            fc = 255;
        }
        if (bc > 255) {
            bc = 255;
        }
        int r = fc + random.nextInt(bc - fc);
        int g = fc + random.nextInt(bc - fc);
        int b = fc + random.nextInt(bc - fc);
        return new Color(r, g, b);
    }
}
短信验证码,但是测试环境我们就随机生成一个六位数的密码:
@Component("smsValidateCodeGenerator")
public class SmsCodeGenerator implements ValidateCodeGenerator {


    @Override
    public ValidateCode generate(ServletWebRequest request) {
        String code = RandomStringUtils.randomNumeric(6);
        return new ValidateCode(code, 60);
    }
}
2.验证码处理器 ValidateCodeProcessor ,这里主要是创建验证码及校验验证码功能,还有一个是需要往 request 里面存放我们的验证码,所以这里定义一个前缀。
public interface ValidateCodeProcessor {
    /**
     * 验证码放入session时的前缀
     */
    String SESSION_KEY_PREFIX = "SESSION_KEY_FOR_CODE_";

    /**
     * 创建校验码*/
    void create(ServletWebRequest request) throws Exception;

    /**
     * 校验验证码*/
    void validate(ServletWebRequest servletWebRequest);
}
抽象的验证码处理器:
public abstract class AbstractValidateCodeProcessor<C extends ValidateCode> implements ValidateCodeProcessor {

    /**
     * 操作session的工具类
     */
    private SessionStrategy sessionStrategy = new HttpSessionSessionStrategy();
    /**
     * 收集系统中所有的 {@link ValidateCodeGenerator} 接口的实现。
     */
    @Autowired
    private Map<String, ValidateCodeGenerator> validateCodeGenerators;

    /*
     * (non-Javadoc)
     */
    @Override
    public void create(ServletWebRequest request) throws Exception {
        C validateCode = generate(request);
        save(request, validateCode);
        send(request, validateCode);
    }

    /**
     * 生成校验码
     *
     */
    @SuppressWarnings("unchecked")
    private C generate(ServletWebRequest request) {
        String type = getValidateCodeType(request).toString().toLowerCase();
        String generatorName = type + ValidateCodeGenerator.class.getSimpleName();
        ValidateCodeGenerator validateCodeGenerator = validateCodeGenerators.get(generatorName);
        if (validateCodeGenerator == null) {
            throw new ValidateCodeException("验证码生成器" + generatorName + "不存在");
        }
        return (C) validateCodeGenerator.generate(request);
    }

    /**
     * 保存校验码
     *
     * @param request
     * @param validateCode
     */
    private void save(ServletWebRequest request, C validateCode) {
        sessionStrategy.setAttribute(request, getSessionKey(request), validateCode);
    }

    /**
     * 构建验证码放入session时的key
     *
     * @param request
     * @return
     */
    private String getSessionKey(ServletWebRequest request) {
        return SESSION_KEY_PREFIX + getValidateCodeType(request).toString().toUpperCase();
    }

    /**
     * 发送校验码,由子类实现
     *
     * @param request
     * @param validateCode
     * @throws Exception
     */
    protected abstract void send(ServletWebRequest request, C validateCode) throws Exception;

    /**
     * 根据请求的url获取校验码的类型
     *
     * @param request
     * @return
     */
    private ValidateCodeType getValidateCodeType(ServletWebRequest request) {
        String type = StringUtils.substringBefore(getClass().getSimpleName(), "CodeProcessor");
        return ValidateCodeType.valueOf(type.toUpperCase());
    }

    @SuppressWarnings("unchecked")
    @Override
    public void validate(ServletWebRequest request) {

        ValidateCodeType processorType = getValidateCodeType(request);
        String sessionKey = getSessionKey(request);

        C codeInSession = (C) sessionStrategy.getAttribute(request, sessionKey);

        String codeInRequest;
        try {
            codeInRequest = ServletRequestUtils.getStringParameter(request.getRequest(),
                    processorType.getParamNameOnValidate());
        } catch (ServletRequestBindingException e) {
            throw new ValidateCodeException("获取验证码的值失败");
        }

        if (StringUtils.isBlank(codeInRequest)) {
            throw new ValidateCodeException(processorType + "验证码的值不能为空");
        }

        if (codeInSession == null) {
            throw new ValidateCodeException(processorType + "验证码不存在");
        }

        if (codeInSession.isExpried()) {
            sessionStrategy.removeAttribute(request, sessionKey);
            throw new ValidateCodeException(processorType + "验证码已过期");
        }

        if (!StringUtils.equals(codeInSession.getCode(), codeInRequest)) {
            throw new ValidateCodeException(processorType + "验证码不匹配");
        }

        sessionStrategy.removeAttribute(request, sessionKey);
    }
}
子类实现,图片验证码处理器:
@Component("imageValidateCodeProcessor")
public class ImageCodeProcessor extends AbstractValidateCodeProcessor<ImageCode> {

    /**
     * 发送图形验证码,将其写到响应中
     */
    @Override
    protected void send(ServletWebRequest request, ImageCode imageCode) throws Exception {
        ImageIO.write(imageCode.getImage(), "JPEG", request.getResponse().getOutputStream());
    }

}
短信验证码处理器,这里主要需要调用发送短信的api进行短信发送,这里就直接通过打印一行日志来表示:
@Component("smsValidateCodeProcessor")
public class SmsCodeProcessor extends AbstractValidateCodeProcessor<ValidateCode> {
    /**
     * 短信验证码发送器
     */
    @Autowired
    private SmsCodeSender smsCodeSender;

    @Override
    protected void send(ServletWebRequest request, ValidateCode validateCode) throws Exception {
        String paramName = "mobile";
        String mobile = ServletRequestUtils.getRequiredStringParameter(request.getRequest(), paramName);
        smsCodeSender.send(mobile, validateCode.getCode());
    }
}

public interface SmsCodeSender {
   void send(String mobile, String code);
}
public class DefaultSmsCodeSender implements SmsCodeSender {

   @Override
   public void send(String mobile, String code) {
      System.out.println("向手机"+mobile+"发送短信验证码"+code);
   }
}
那么到现在为止,验证码的生成及处理已经完成。
3.向spring容器注入相关类,当然也可以直接标在类上
@Configuration
public class ValidateCodeBeanConfig {

    @Bean
    @ConditionalOnMissingBean(name = "imageValidateCodeGenerator")
    public ValidateCodeGenerator imageValidateCodeGenerator() {
        ImageCodeGenerator codeGenerator = new ImageCodeGenerator();
        return codeGenerator;
    }

    @Bean
    @ConditionalOnMissingBean(SmsCodeSender.class)
    public SmsCodeSender smsCodeSender() {
        return new DefaultSmsCodeSender();
    }
}
4.验证码处理器控制类 ValidateCodeProcessorHolder
@Component
public class ValidateCodeProcessorHolder {

    @Autowired
    private Map<String, ValidateCodeProcessor> validateCodeProcessors;

    public ValidateCodeProcessor findValidateCodeProcessor(ValidateCodeType type) {
        return findValidateCodeProcessor(type.toString().toLowerCase());
    }

    public ValidateCodeProcessor findValidateCodeProcessor(String type) {
        String name = type.toLowerCase() + ValidateCodeProcessor.class.getSimpleName();
        ValidateCodeProcessor processor = validateCodeProcessors.get(name);
        if (processor == null) {
            throw new ValidateCodeException("验证码处理器" + name + "不存在");
        }
        return processor;
    }
}
5.接下去就是需要我们的拦截器登场了
@Component("validateCodeFilter")
public class ValidateCodeFilter extends OncePerRequestFilter implements InitializingBean {

    /**
     * 验证码校验失败处理器
     */
    @Autowired
    private AuthenticationFailureHandler authenticationFailureHandler;
    /**
     * 系统中的校验码处理器
     */
    @Autowired
    private ValidateCodeProcessorHolder validateCodeProcessorHolder;
    /**
     * 存放所有需要校验验证码的url
     */
    private Map<String, ValidateCodeType> urlMap = new HashMap<>();
    /**
     * 验证请求url与配置的url是否匹配的工具类
     */
    private AntPathMatcher pathMatcher = new AntPathMatcher();

    /**
     * 初始化要拦截的url配置信息
     */
    @Override
    public void afterPropertiesSet() throws ServletException {
        super.afterPropertiesSet();

        urlMap.put("/authentication/form", ValidateCodeType.IMAGE);
        addUrlToMap("/user/*", ValidateCodeType.IMAGE);

        urlMap.put("/authentication/mobile", ValidateCodeType.SMS);
        addUrlToMap("/user/*", ValidateCodeType.SMS);
    }

    /**
     * 系统中配置的需要校验验证码的URL根据校验的类型放入map*/
    protected void addUrlToMap(String urlString, ValidateCodeType type) {
        if (StringUtils.isNotBlank(urlString)) {
            String[] urls = StringUtils.splitByWholeSeparatorPreserveAllTokens(urlString, ",");
            for (String url : urls) {
                urlMap.put(url, type);
            }
        }
    }

    @Override
    protected void doFilterInternal(HttpServletRequest request, HttpServletResponse response, FilterChain chain)
            throws ServletException, IOException {

        ValidateCodeType type = getValidateCodeType(request);
        if (type != null) {
            logger.info("校验请求(" + request.getRequestURI() + ")中的验证码,验证码类型" + type);
            try {
                validateCodeProcessorHolder.findValidateCodeProcessor(type)
                        .validate(new ServletWebRequest(request, response));
                logger.info("验证码校验通过");
            } catch (ValidateCodeException exception) {
                authenticationFailureHandler.onAuthenticationFailure(request, response, exception);
                return;
            }
        }

        chain.doFilter(request, response);

    }

    /**
     * 获取校验码的类型,如果当前请求不需要校验,则返回null
     */
    private ValidateCodeType getValidateCodeType(HttpServletRequest request) {
        ValidateCodeType result = null;
        if (!StringUtils.equalsIgnoreCase(request.getMethod(), "get")) {
            Set<String> urls = urlMap.keySet();
            for (String url : urls) {
                if (pathMatcher.match(url, request.getRequestURI())) {
                    result = urlMap.get(url);
                }
            }
        }
        return result;
    }
}
这里我们通过枚举来定义处理器类型,同时需要实现我们的异常类:
public enum ValidateCodeType {

    /**
     * 短信验证码
     */
    SMS {
        @Override
        public String getParamNameOnValidate() {
            return "smsCode";
        }
    },
    /**
     * 图片验证码
     */
    IMAGE {
        @Override
        public String getParamNameOnValidate() {
            return "imageCode";
        }
    };

    /**
     * 校验时从请求中获取的参数的名字
     * @return
     */
    public abstract String getParamNameOnValidate();

}
public class ValidateCodeException extends AuthenticationException {

    private static final long serialVersionUID = -7285211528095468156L;

    public ValidateCodeException(String msg) {
        super(msg);
    }
}
6.接下去就是需要把这个拦截器加入到 spring security的拦截器链中,就是在配置类中将我们的拦截器注入,然后通过调用http.addFilterBefore添加到某个拦截器前面,就可以了:
http.addFilterBefore(validateCodeFilter, UsernamePasswordAuthenticationFilter.class)
7.提供一个接口进行验证码获取:
@RestController
public class ValidateCodeController {

    @Autowired
    private ValidateCodeProcessorHolder validateCodeProcessorHolder;

    /**
     * 创建验证码,根据验证码类型不同,调用不同的*/
    @GetMapping("/code/{type}")
    public void createCode(HttpServletRequest request, HttpServletResponse response, @PathVariable String type)
            throws Exception {
        validateCodeProcessorHolder.findValidateCodeProcessor(type).create(new ServletWebRequest(request, response));
    }
}
经过以上的步骤我们就能获取到验证码了,可以看到接口上有个 type属性。这个属性用于区分时图片验证码还是短信验证码,是因为这两个处理器在注入容器的时候命名来决定的,所以type可以为 image 、sms 类型。小伙伴本也可以进行代码重构,将其中的一些配置通过配置类的方式注入。
spring security 记住我:
在Security 中要实现记住我功能很简单,先来看代码:
@Configuration
@EnableWebSecurity// 开启Security
@EnableGlobalMethodSecurity(prePostEnabled = true)//开启Spring方法级安全
public class SecurityConfig extends WebSecurityConfigurerAdapter {
    // Secutiry 处理链
//    SecurityContextPersistenceFilter
//    --> UsernamePasswordAuthenticationFilter
//    --> BasicAuthenticationFilter
//    --> ExceptionTranslationFilter
//    --> FilterSecurityInterceptor
    @Autowired
    private MyAuthenticationSuccessHandler myAuthenticationSuccessHandler;

    @Autowired
    private MyAuthenticationProvider myAuthenticationProvider;

    @Autowired
    private MyAuthenctiationFailureHandler myAuthenctiationFailureHandler;

    @Autowired
    private MyUserDetailService myUserDetailService;

    @Autowired
    private ValidateCodeFilter validateCodeFilter;

    @Autowired
    private DataSource dataSource;

    //密码加密
    @Bean
    public PasswordEncoder passwordEncoder() {
        return new BCryptPasswordEncoder();
    }

    // 自定义认证配置
    @Override
    protected void configure(AuthenticationManagerBuilder auth) throws Exception {
        auth.authenticationProvider(myAuthenticationProvider);
    }

    @Override
    protected void configure(HttpSecurity http) throws Exception {
        //关闭Security功能
//        http.csrf().disable()
//                .authorizeRequests()
//                .anyRequest().permitAll()
//                .and().logout().permitAll();

        http.addFilterBefore(validateCodeFilter, UsernamePasswordAuthenticationFilter.class)
                    .authorizeRequests()
                    .antMatchers("/wuzz/test4","/code/*").permitAll() //不需要保护的资源,可以多个
                    .antMatchers("/wuzz/**").authenticated()// 需要认证得资源,可以多个
                    .and()
                .formLogin().loginPage("http://localhost:8080/#/login")//自定义登陆地址
                    .loginProcessingUrl("/authentication/form") //登录处理地址
                    .successHandler(myAuthenticationSuccessHandler) // 登陆成功处理器
                    .failureHandler(myAuthenctiationFailureHandler) // 登陆失败处理器
                    .permitAll()
                    .and()
                    .userDetailsService(myUserDetailService)//设置userDetailsService,处理用户信息
                .rememberMe()//实现记住我功能 RememberMeAuthenticationFilter
                .tokenRepository(persistentTokenRepository())
                .tokenValiditySeconds(3600)

        ;
        http.headers().cacheControl(); //禁用缓存
        http.csrf().disable(); //禁用csrf校验
    }
    //忽略的uri
//    @Override
//    public void configure(WebSecurity web) throws Exception {
//        web.ignoring()
//                .antMatchers( "/api/**", "/resources/**", "/static/**", "/public/**", "/webui/**", "/h2-console/**"
//                        , "/configuration/**",  "/swagger-resources/**", "/api-docs", "/api-docs/**", "/v2/api-docs/**"
//                        ,  "/**/*.css", "/**/*.js","/**/*.ftl", "/**/*.png ", "/**/*.jpg", "/**/*.gif ", "/**/*.svg", "/**/*.ico", "/**/*.ttf", "/**/*.woff");
//    }

    @Bean
    public PersistentTokenRepository persistentTokenRepository() {
        JdbcTokenRepositoryImpl tokenRepository = new JdbcTokenRepositoryImpl();
        tokenRepository.setDataSource(dataSource);
        //启动的时候是否创建该表,这个表格是保存用户登录信息的
//        tokenRepository.setCreateTableOnStartup(true);
        return tokenRepository;
    }
}
上述代码中新增注入两个类DataSource、PersistentTokenRepository(通过jdbcTemplate实现),因为记住我功能是将token信息存入到数据库,实现类由两种,一种基于内存,另一种基于数据库,后者比较有保障。所以这里使用JDBC,当然需要在application.properties 加入以下配置:
spring.datasource.driver-class-name=com.mysql.jdbc.Driver
spring.datasource.url=jdbc:mysql://192.168.1.101:3306/study?useUnicode=true&characterEncoding=utf-8
spring.datasource.username=root
spring.datasource.password=123456
然后配置启用记住我功能:
.rememberMe()//实现记住我功能 RememberMeAuthenticationFilter
.tokenRepository(persistentTokenRepository())
 .tokenValiditySeconds(3600) // 过期时间
就这样就配置好了记住我功能,然后需要我们在前端请求登录的时候加上参数 remember-me,这个参数是固定的。在 AbstractRememberMeServices 类中声明:
public static final String SPRING_SECURITY_REMEMBER_ME_COOKIE_KEY = "remember-me";
当我们登陆的时候这个值传的是 true,那么就会进行进驻我操作。
记住我操作的源码可以阅读 RememberMeAuthenticationFilter,流程很简单。多过几遍就清晰了。