spring-cloud-netflix-ribbon 源码分析:
本文主要针对 spring-cloud-starter-netflix-ribbon 的 2.2.3.RELEASE 版本进行源码的解析。
对于未接触过 Ribbon 的小伙伴可以参考 https://www.cnblogs.com/wuzhenzhao/p/9468928.html 进行一些基础知识的了解。
注解 @LoadBalanced:
进入正题,针对我们采用 RestTemplate 进行服务之间的调用的时候,在Ribbon 中是采用了一个注解 @LoadBalanced,首先我们县来看一下该注解的定义:
@Target({ ElementType.FIELD, ElementType.PARAMETER, ElementType.METHOD })
@Retention(RetentionPolicy.RUNTIME)
@Documented
@Inherited
@Qualifier
public @interface LoadBalanced {

}
我们可以理解为这个注解是一个标识作用,其作用在 LoadBalancerAutoConfiguration 自动装配类中 ,该类中定义了一个属性如下:
@LoadBalanced
@Autowired(required = false)
private List<RestTemplate> restTemplates = Collections.emptyList();
其作用是将存在注解 @LoadBalanced 的类进行注入。起到一个过滤的作用。然后在自动装配的配置类中,进行包装拦截。
自动装配之 RibbonAutoConfiguration :
大家都知道。spring-cloud 微服务基于Springboot 的自动装配机制。首先我们需要了解的就是就是 RibbonAutoConfiguration 自动装配类。这里讲解主要的一些类的作用:
@Configuration
@Conditional(RibbonAutoConfiguration.RibbonClassesConditions.class)
@RibbonClients
@AutoConfigureAfter(
        name = "org.springframework.cloud.netflix.eureka.EurekaClientAutoConfiguration")
//定义bean的先后加载。
@AutoConfigureBefore({ LoadBalancerAutoConfiguration.class,
        AsyncLoadBalancerAutoConfiguration.class })
@EnableConfigurationProperties({ RibbonEagerLoadProperties.class,
        ServerIntrospectorProperties.class })
public class RibbonAutoConfiguration {

    @Autowired(required = false)
    private List<RibbonClientSpecification> configurations = new ArrayList<>();

    @Autowired
    private RibbonEagerLoadProperties ribbonEagerLoadProperties;

    @Bean
    public HasFeatures ribbonFeature() {
        return HasFeatures.namedFeature("Ribbon", Ribbon.class);
    }

    @Bean
    public SpringClientFactory springClientFactory() {
        SpringClientFactory factory = new SpringClientFactory();
        factory.setConfigurations(this.configurations);
        return factory;
    }
    // 注入Ribbon负载均衡客户端实例
    @Bean
    @ConditionalOnMissingBean(LoadBalancerClient.class)
    public LoadBalancerClient loadBalancerClient() {
        return new RibbonLoadBalancerClient(springClientFactory());
    }
  // ......
}
可以发现在这个自动装配的类中会注入很多的Bean,我们需要特别注意 RibbonLoadBalancerClient ,在服务调用的时候会用到。然后另外一个重点是 LoadBalancerAutoConfiguration:
@Configuration(proxyBeanMethods = false)
// 条件注入
@ConditionalOnClass(RestTemplate.class)
@ConditionalOnBean(LoadBalancerClient.class)
@EnableConfigurationProperties(LoadBalancerRetryProperties.class)
public class LoadBalancerAutoConfiguration {
    //这个就是上文提到的需要将注解有@LoadBalanced 的RestTemplate 过滤装配。
    @LoadBalanced
    @Autowired(required = false)
    private List<RestTemplate> restTemplates = Collections.emptyList();

    @Autowired(required = false)
    private List<LoadBalancerRequestTransformer> transformers = Collections.emptyList();

    // 将 restTemplate进行包装,以便后续进行拦截包装
    @Bean
    public SmartInitializingSingleton loadBalancedRestTemplateInitializerDeprecated(
            final ObjectProvider<List<RestTemplateCustomizer>> restTemplateCustomizers) {
        return () -> restTemplateCustomizers.ifAvailable(customizers -> {
            for (RestTemplate restTemplate : LoadBalancerAutoConfiguration.this.restTemplates) {
                for (RestTemplateCustomizer customizer : customizers) {
                    customizer.customize(restTemplate);
                }
            }
        });
    }

    // 创建请求工厂类,后续会通过该工厂类创建请求 request
    @Bean
    @ConditionalOnMissingBean
    public LoadBalancerRequestFactory loadBalancerRequestFactory(
            LoadBalancerClient loadBalancerClient) {
        return new LoadBalancerRequestFactory(loadBalancerClient, this.transformers);
    }

    @Configuration(proxyBeanMethods = false)
    @ConditionalOnMissingClass("org.springframework.retry.support.RetryTemplate")
    static class LoadBalancerInterceptorConfig {

     // 创建 restTemplate 拦截器实例
        @Bean
        public LoadBalancerInterceptor ribbonInterceptor(
                LoadBalancerClient loadBalancerClient,
                LoadBalancerRequestFactory requestFactory) {
            return new LoadBalancerInterceptor(loadBalancerClient, requestFactory);
        }

        // 为满足条件的 restTemplate 添加拦截器链
        @Bean
        @ConditionalOnMissingBean
        public RestTemplateCustomizer restTemplateCustomizer(
                final LoadBalancerInterceptor loadBalancerInterceptor) {
            return restTemplate -> {
                List<ClientHttpRequestInterceptor> list = new ArrayList<>(
                        restTemplate.getInterceptors());
                list.add(loadBalancerInterceptor);
                restTemplate.setInterceptors(list);
            };
        }

    }
   // .......
}
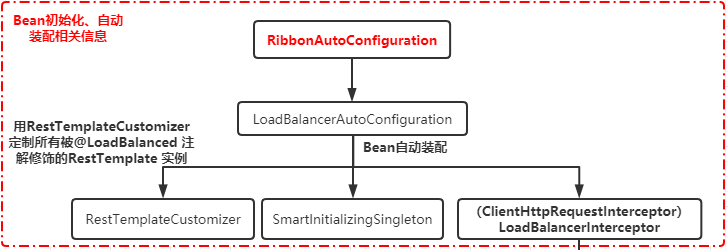
其中关于 RibbonAutoConfiguration 初始化注入的一些类中比较重要的部分就都提及了。对于这块的流程相对比较简单,流程图如下:
RestTemplate 的调用过程(负载选择阶段):
以 restTemplate.getForObject 为例,我们直接进入到RestTemplate这个类的doExecute方法,因为前面部分的代码都比较简单没有太多逻辑。这段代码中有一个很重要的逻辑,就是createRequest,这个是构建客户端请求的一个方法。
@Nullable
protected <T> T doExecute(URI url, @Nullable HttpMethod method, @Nullable RequestCallback requestCallback,
            @Nullable ResponseExtractor<T> responseExtractor) throws RestClientException {

        Assert.notNull(url, "URI is required");
        Assert.notNull(method, "HttpMethod is required");
        ClientHttpResponse response = null;
        try {
            ClientHttpRequest request = createRequest(url, method);
            if (requestCallback != null) {
                requestCallback.doWithRequest(request);
            }
            response = request.execute();
            handleResponse(url, method, response);
            return (responseExtractor != null ? responseExtractor.extractData(response) : null);
        }
        catch (IOException ex) {
            String resource = url.toString();
            String query = url.getRawQuery();
            resource = (query != null ? resource.substring(0, resource.indexOf('?')) : resource);
            throw new ResourceAccessException("I/O error on " + method.name() +
                    " request for "" + resource + "": " + ex.getMessage(), ex);
        }
        finally {
            if (response != null) {
                response.close();
            }
        }
}
createRequest 这里个方法是用来创建一个请求对象,其中getRequestFactory(),调用的是 InterceptingHttpAccessor 中的getRequestFactory方法,因为InterceptingHttpAccessor继承了HttpAccessor这个类,重写了 getRequestFactory方法。
protected ClientHttpRequest createRequest(URI url, HttpMethod method) throws IOException {
  ClientHttpRequest request = getRequestFactory().createRequest(url, method);
  if (logger.isDebugEnabled()) {
    logger.debug("HTTP " + method.name() + " " + url);
 }
  return request;
}
//其中,getRequestFactory方法代码如下,其中getInterceptors是获得当前客户端请求的所有拦截器,需要注意的是,这里的拦截器,就包含LoadBalancerInterceptor.
public ClientHttpRequestFactory getRequestFactory() {
  List<ClientHttpRequestInterceptor> interceptors = getInterceptors();
  if (!CollectionUtils.isEmpty(interceptors)) {
    ClientHttpRequestFactory factory = this.interceptingRequestFactory;
    if (factory == null) {//构建一个InterceptingClientHttpRequestFactory工厂,并且将所有的拦截器作为参数传入
      factory = new
    InterceptingClientHttpRequestFactory(super.getRequestFactory(), interceptors);
      this.interceptingRequestFactory = factory;
   }
    return factory;
 }
  else {
    return super.getRequestFactory();
 }
}
getInterceptors 这个方法中返回的拦截器列表,是从InterceptingHttpAccessor.setInterceptors()方法来设置的,而这个setInterceptors()调用的地方正好是 LoadBalancerAutoConfiguration.LoadBalancerInterceptorConfig.restTemplateCustomizer。不明白的同学可以打个断点跟一下代码就清晰了。
LoadBalancerAutoConfiguration.LoadBalancerInterceptorConfig.restTemplateCustomizer 这里面调用了restTemplate.setInterceptors这个方法设置拦截器,其中RestTemplate又集成了 InterceptingHttpAccessor。所以,你懂的。
org.springframework.http.client.InterceptingClientHttpRequestFactory.createRequest 方法如下:
@Override
protected ClientHttpRequest createRequest(URI uri, HttpMethod httpMethod, ClientHttpRequestFactory requestFactory) {
        return new InterceptingClientHttpRequest(requestFactory, this.interceptors, uri, httpMethod);
}
所以,再回到createRequest方法中,getRequestFactory()方法返回的是 InterceptingClientHttpRequestFactory,而createRequest方法,最终返回的是 InterceptingClientHttpRequest这个类。
继续跳回到RestTemplate.doExecute方法,最终会调用request.execute。那么这个时候,request.execute调用谁呢?于是我们看一下InterceptingClientHttpRequest的类关系图,我们发现它有两个父类。这是一种模版方法的设计。

所以这里会走到 AbstractClientHttpRequest.execute 方法:
@Override
public final ClientHttpResponse execute() throws IOException {
  assertNotExecuted();
  ClientHttpResponse result = executeInternal(this.headers);
  this.executed = true;
  return result;
}
最终,我们进入到InterceptingClientHttpRequest.executeInternal方法
@Override
protected final ClientHttpResponse executeInternal(HttpHeaders headers, byte[] bufferedOutput) throws IOException {
        InterceptingRequestExecution requestExecution = new InterceptingRequestExecution();
        return requestExecution.execute(this, bufferedOutput);
}
然后调用 InterceptingClientHttpRequest.execute方法。在InterceptingClientHttpRequest.execute方法中,有两个处理逻辑
- 如果有配置多个客户端拦截器,则调用拦截器方法,对请求进行拦截
- 否则,按照正常的处理逻辑进行远程调用。
@Override
public ClientHttpResponse execute(HttpRequest request, byte[] body) throws IOException {
            if (this.iterator.hasNext()) {
                ClientHttpRequestInterceptor nextInterceptor = this.iterator.next();
                return nextInterceptor.intercept(request, body, this);
            }
            else {
                HttpMethod method = request.getMethod();
                Assert.state(method != null, "No standard HTTP method");
                ClientHttpRequest delegate = requestFactory.createRequest(request.getURI(), method);
                request.getHeaders().forEach((key, value) -> delegate.getHeaders().addAll(key, value));
                if (body.length > 0) {
                    if (delegate instanceof StreamingHttpOutputMessage) {
                        StreamingHttpOutputMessage streamingOutputMessage = (StreamingHttpOutputMessage) delegate;
                        streamingOutputMessage.setBody(outputStream -> StreamUtils.copy(body, outputStream));
                    }
                    else {
                        StreamUtils.copy(body, delegate.getBody());
                    }
                }
                return delegate.execute();
            }
}
而在当前的场景中,自然是调用LoadBalancerInterceptor.intercept方法。
LoadBalancerInterceptor.intercept :
RestTemplate发起请求的源码就不分析了,默认采用的是 SimpleClientHttpRequestFactory,内部是调用 jdk 的 HttpConnection来实现http请求的调用,我们主要关心请求的过程中,LoadBalancerInterceptor是如何发挥作用的。通过一些列的方法调用,最终还是回到了LoadBalancerInterceptor.intercept()这个方法上来,它主要实现了对于请求的拦截。
- 获得一个服务名称。
- 调用loadBalancer.execute。
@Override
public ClientHttpResponse intercept(final HttpRequest request, final byte[] body,
            final ClientHttpRequestExecution execution) throws IOException {
        final URI originalUri = request.getURI();//获得请求的URI
        String serviceName = originalUri.getHost();//获得请求的名称
        Assert.state(serviceName != null,
                "Request URI does not contain a valid hostname: " + originalUri);
        return this.loadBalancer.execute(serviceName,
                this.requestFactory.createRequest(request, body, execution));//通过RibbonLoadBalancerClient 执行请求
}
LoadBalancerClient其实是一个接口,我们看一下它的类图,它有两个具体的实现。
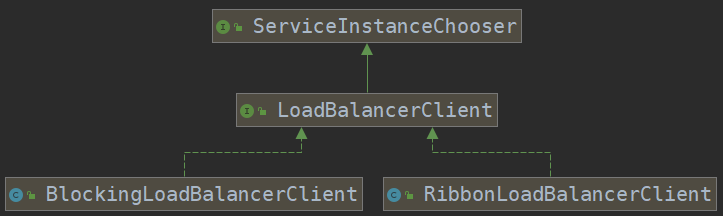
此时,LoadBalancerClient的具体实例应该是RibbonLoadBalancerClient,这个对象实例是在RibbonAutoConfiguration这个类中进行注入的。
进入 execute 方法:
public <T> T execute(String serviceId, LoadBalancerRequest<T> request, Object hint)
            throws IOException {
        // 获取当前配置的负载均衡器
        ILoadBalancer loadBalancer = getLoadBalancer(serviceId);
        // 通过负载均衡器及负载均衡算法选择一个对应的服务
        Server server = getServer(loadBalancer, hint);
        if (server == null) {
            throw new IllegalStateException("No instances available for " + serviceId);
        }
        // 构造 RibbonServer
        RibbonServer ribbonServer = new RibbonServer(serviceId, server,
                isSecure(server, serviceId),
                serverIntrospector(serviceId).getMetadata(server));
        // 执行调用
        return execute(serviceId, ribbonServer, request);
    }
以上主要做了以下工作:
- 根据serviceId获得一个ILoadBalancer
- 调用getServer方法去获取一个服务实例
- 判断Server的值是否为空。这里的Server实际上就是传统的一个服务节点,这个对象存储了服务节点的一些元数据,比如host、port等
getServer是用来获得一个具体的服务节点,它的实现如下
protected Server getServer(ILoadBalancer loadBalancer, Object hint) {
        if (loadBalancer == null) {
            return null;
        }
        // Use 'default' on a null hint, or just pass it on?
        return loadBalancer.chooseServer(hint != null ? hint : "default");
}
通过代码可以看到,getServer实际调用了IloadBalancer.chooseServer这个方法,ILoadBalancer这个是一个负载均衡器接口。
public interface ILoadBalancer {
  public void addServers(List<Server> newServers);
  public Server chooseServer(Object key);
  public void markServerDown(Server server);
  public List<Server> getReachableServers();
  public List<Server> getAllServers();
}
还有一个过时的方法就不贴出来了,这五个方法作用如下:
-
addServers表示向负载均衡器中维护的实例列表增加服务实例
-
chooseServer表示通过某种策略,从负载均衡服务器中挑选出一个具体的服务实例
-
markServerDown表示用来通知和标识负载均衡器中某个具体实例已经停止服务,否则负载均衡器在下一次获取服务实例清单前都会认为这个服务实例是正常工作的
-
getReachableServers表示获取当前正常工作的服务实例列表
-
getAllServers表示获取所有的服务实例列表,包括正常的服务和停止工作的服务
我们看一下ILoadBalancer的类关系图
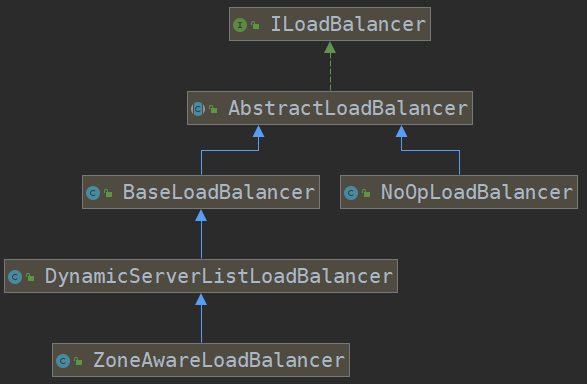
从整个类的关系图来看,BaseLoadBalancer类实现了基础的负载均衡,而 DynamicServerListLoadBalancer和 ZoneAwareLoadBalancer则是在负载均衡策略的基础上做了一些功能扩展。
-
AbstractLoadBalancer实现了ILoadBalancer接口,它定义了服务分组的枚举类/chooseServer(用来选取一个服务实例)/getServerList(获取某一个分组中的所有服务实例)/getLoadBalancerStats用来获得一个LoadBalancerStats对象,这个对象保存了每一个服务的状态信息。
-
BaseLoadBalancer,它实现了作为负载均衡器的基本功能,比如服务列表维护、服务存活状态监测、负载均衡算法选择Server等。但是它只是完成基本功能,在有些复杂场景中还无法实现,比如动态服务列表、Server过滤、Zone区域意识(服务之间的调用希望尽可能是在同一个区域内进行,减少延迟)。
-
DynamicServerListLoadBalancer是BaseLoadbalancer的一个子类,它对基础负载均衡提供了扩展,从名字上可以看出,它提供了动态服务列表的特性
-
ZoneAwareLoadBalancer 它是在DynamicServerListLoadBalancer的基础上,增加了以Zone的形式来配置多个LoadBalancer的功能。
那在getServer方法中, loadBalancer.chooseServer 具体的实现类是哪一个呢?我们找到这个类:
@Configuration(proxyBeanMethods = false)
@EnableConfigurationProperties
// Order is important here, last should be the default, first should be optional
// see
// https://github.com/spring-cloud/spring-cloud-netflix/issues/2086#issuecomment-316281653
@Import({ HttpClientConfiguration.class, OkHttpRibbonConfiguration.class,
        RestClientRibbonConfiguration.class, HttpClientRibbonConfiguration.class })
public class RibbonClientConfiguration {

    /**
     * Ribbon client default connect timeout.
     */
    public static final int DEFAULT_CONNECT_TIMEOUT = 1000;

    /**
     * Ribbon client default read timeout.
     */
    public static final int DEFAULT_READ_TIMEOUT = 1000;

    /**
     * Ribbon client default Gzip Payload flag.
     */
    public static final boolean DEFAULT_GZIP_PAYLOAD = true;

    @RibbonClientName
    private String name = "client";

    // TODO: maybe re-instate autowired load balancers: identified by name they could be
    // associated with ribbon clients

    @Autowired
    private PropertiesFactory propertiesFactory;

    @Bean
    @ConditionalOnMissingBean
    public IClientConfig ribbonClientConfig() {
        DefaultClientConfigImpl config = new DefaultClientConfigImpl();
        config.loadProperties(this.name);
        config.set(CommonClientConfigKey.ConnectTimeout, DEFAULT_CONNECT_TIMEOUT);
        config.set(CommonClientConfigKey.ReadTimeout, DEFAULT_READ_TIMEOUT);
        config.set(CommonClientConfigKey.GZipPayload, DEFAULT_GZIP_PAYLOAD);
        return config;
    }

    // 默认的负载均衡规则
    @Bean
    @ConditionalOnMissingBean
    public IRule ribbonRule(IClientConfig config) {
        if (this.propertiesFactory.isSet(IRule.class, name)) {
            return this.propertiesFactory.get(IRule.class, config, name);
        }
        ZoneAvoidanceRule rule = new ZoneAvoidanceRule();
        rule.initWithNiwsConfig(config);
        return rule;
    }

    // 默认的维持心跳的IPing 实现类
    @Bean
    @ConditionalOnMissingBean
    public IPing ribbonPing(IClientConfig config) {
        if (this.propertiesFactory.isSet(IPing.class, name)) {
            return this.propertiesFactory.get(IPing.class, config, name);
        }
        return new DummyPing();
    }

    // 默认的服务列表配置类
    @Bean
    @ConditionalOnMissingBean
    @SuppressWarnings("unchecked")
    public ServerList<Server> ribbonServerList(IClientConfig config) {
        if (this.propertiesFactory.isSet(ServerList.class, name)) {
            return this.propertiesFactory.get(ServerList.class, config, name);
        }
        ConfigurationBasedServerList serverList = new ConfigurationBasedServerList();
        serverList.initWithNiwsConfig(config);
        return serverList;
    }
    // 这个类会定时获取服务实例列表更新
    @Bean
    @ConditionalOnMissingBean
    public ServerListUpdater ribbonServerListUpdater(IClientConfig config) {
        return new PollingServerListUpdater(config);
    }

    // 默认的负载均衡实例
    @Bean
    @ConditionalOnMissingBean
    public ILoadBalancer ribbonLoadBalancer(IClientConfig config,
            ServerList<Server> serverList, ServerListFilter<Server> serverListFilter,
            IRule rule, IPing ping, ServerListUpdater serverListUpdater) {
        if (this.propertiesFactory.isSet(ILoadBalancer.class, name)) {
            return this.propertiesFactory.get(ILoadBalancer.class, config, name);
        }
        return new ZoneAwareLoadBalancer<>(config, rule, ping, serverList,
                serverListFilter, serverListUpdater);
    }
   //  .....
}
在这个bean的声明中可以看到,默认情况下采用的是ZoneAwareLoadBalancer。Zone表示区域的意思,区域指的就是地理区域的概念,一般较大规模的互联网公司,都会做跨区域部署,这样做有几个好处,第一个是为不同地域的用户提供最近的访问节点减少访问延迟,其次是为了保证高可用,做容灾处理。而ZoneAwareLoadBalancer就是提供了具备区域意识的负载均衡器,它的主要作用是对Zone进行了感知,保证每个Zone里面的负载均衡策略都是隔离的,它并不保证A区域过来的请求一定会发动到A区域对应的Server内。真正实现这个需求的是ZonePreferenceServerListFilter/ZoneAffinityServerListFilter 。ZoneAwareLoadBalancer的核心功能是若开启了区域意识,且zone的个数 > 1,就继续区域选择逻辑根据ZoneAvoidanceRule.getAvailableZones()方法拿到可用区(会T除掉完全不可用的区域,以及可用但是负载最高的一个区域)从可用区zone们中,通过ZoneAvoidanceRule.randomChooseZone随机选一个zone出来 (该随机遵从权重规则:谁的zone里面Server数量最多,被选中的概率越大)在选中的zone里面的所有Server中,采用该zone对对应的Rule,进行choose:
@Override
public Server chooseServer(Object key) {
    //ENABLED,表示是否用区域意识的choose选择Server,默认是true,
    //如果禁用了区域、或者只有一个zone,就直接按照父类的逻辑来进行处理,父类默认采用轮询算法
        if (!ENABLED.get() || getLoadBalancerStats().getAvailableZones().size() <= 1) {
            logger.debug("Zone aware logic disabled or there is only one zone");
            return super.chooseServer(key);
        }
        Server server = null;
        try {
            LoadBalancerStats lbStats = getLoadBalancerStats();
            Map<String, ZoneSnapshot> zoneSnapshot = ZoneAvoidanceRule.createSnapshot(lbStats);
            logger.debug("Zone snapshots: {}", zoneSnapshot);
            if (triggeringLoad == null) {
                triggeringLoad = DynamicPropertyFactory.getInstance().getDoubleProperty(
                        "ZoneAwareNIWSDiscoveryLoadBalancer." + this.getName() + ".triggeringLoadPerServerThreshold", 0.2d);
            }

            if (triggeringBlackoutPercentage == null) {
                triggeringBlackoutPercentage = DynamicPropertyFactory.getInstance().getDoubleProperty(
                        "ZoneAwareNIWSDiscoveryLoadBalancer." + this.getName() + ".avoidZoneWithBlackoutPercetage", 0.99999d);
            }
            //根据相关阈值计算可用区域
            Set<String> availableZones = ZoneAvoidanceRule.getAvailableZones(zoneSnapshot, triggeringLoad.get(), triggeringBlackoutPercentage.get());
            logger.debug("Available zones: {}", availableZones);
            if (availableZones != null &&  availableZones.size() < zoneSnapshot.keySet().size()) {
                //从可用区域中随机选择一个区域,zone里面的服务器节点越多,被选中的概率越大
                String zone = ZoneAvoidanceRule.randomChooseZone(zoneSnapshot, availableZones);
                logger.debug("Zone chosen: {}", zone);
                if (zone != null) {
                    //根据zone获得该zone中的LB,然后根据该Zone的负载均衡算法选择一个server
                    BaseLoadBalancer zoneLoadBalancer = getLoadBalancer(zone);
                    server = zoneLoadBalancer.chooseServer(key);
                }
            }
        } catch (Exception e) {
            logger.error("Error choosing server using zone aware logic for load balancer={}", name, e);
        }
        if (server != null) {
            return server;
        } else {
            logger.debug("Zone avoidance logic is not invoked.");
            return super.chooseServer(key);
        }
}
BaseLoadBalancer.chooseServer :根据默认的负载均衡算法来获得指定的服务节点。默认的算法是RoundBin。
public Server chooseServer(Object key) {
        if (counter == null) {
            counter = createCounter();
        }
        counter.increment();
        if (rule == null) {
            return null;
        } else {
            try {
                return rule.choose(key);
            } catch (Exception e) {
                logger.warn("LoadBalancer [{}]:  Error choosing server for key {}", name, key, e);
                return null;
            }
        }
    }
分析到这里,我们已经搞明白了Ribbon是如何运用负载均衡算法来从服务列表中获得一个目标服务进行访问的。但是还有一个疑惑,就是动态服务列表的更新和获取是在哪里实现呢?
服务列表的加载及动态感知过程:
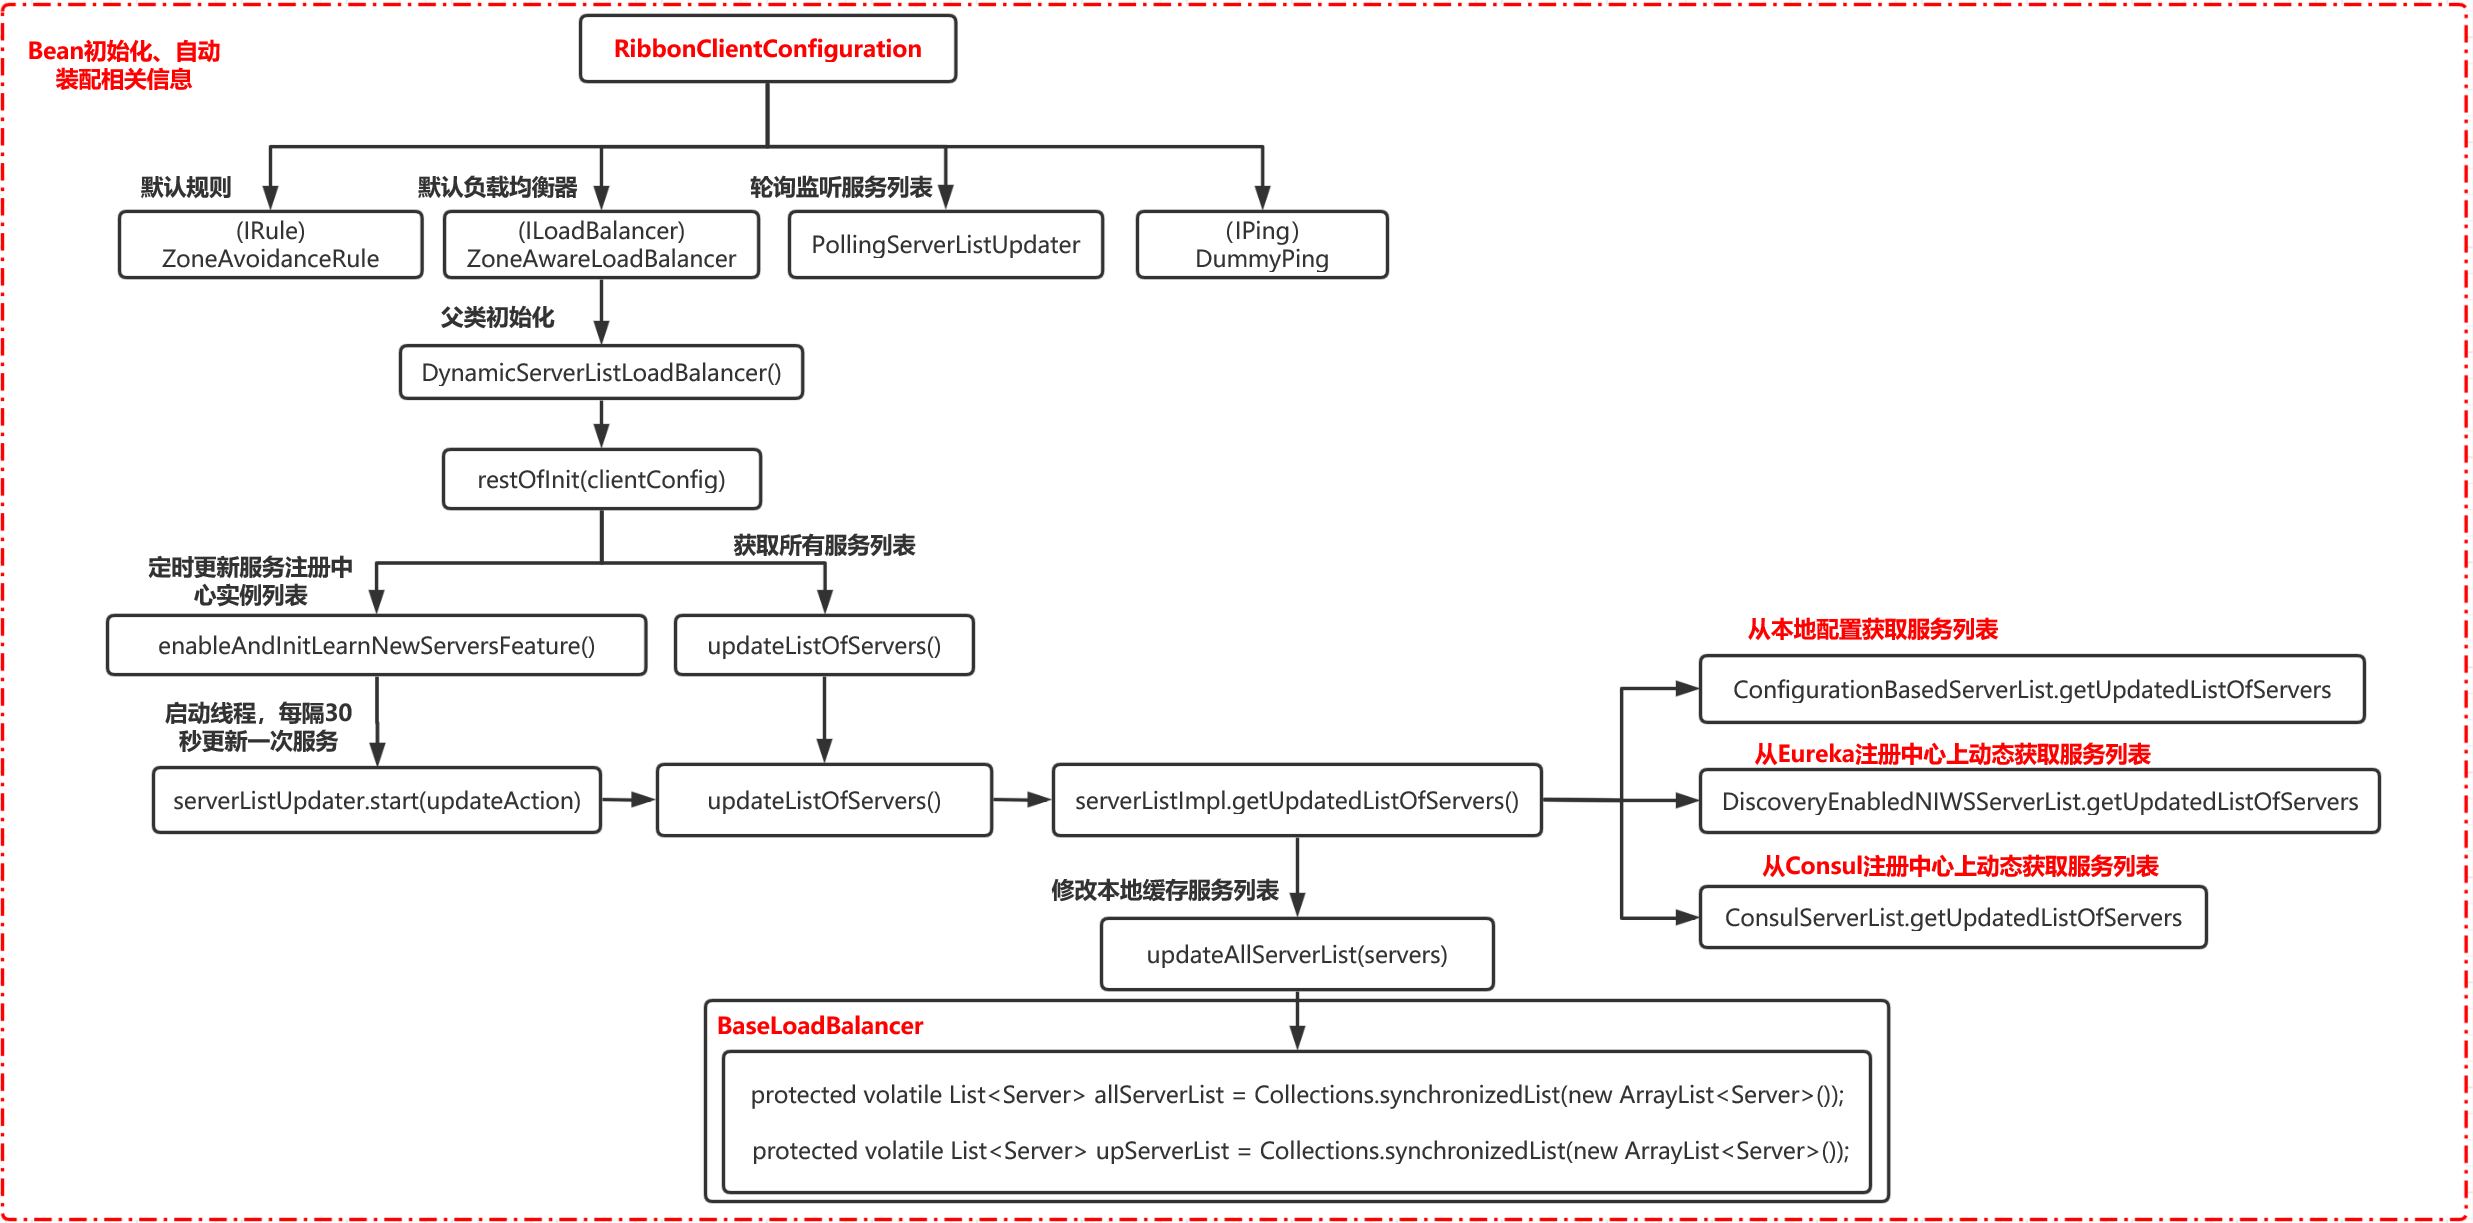
这个时候要回到 RibbonClientConfiguration 的注入过程了,我们发现在这个类里注入了一个 PollingServerListUpdater ,从名字上看就很明显是进行服务列表的感知工作的,那么是哪里进行的调用呢 ?
跟到 ZoneAwareLoadBalancer 的构造方法里:
// 初始化 ZoneAwareLoadBalancer
public ZoneAwareLoadBalancer(IClientConfig clientConfig, IRule rule,
                                 IPing ping, ServerList<T> serverList, ServerListFilter<T> filter,
                                 ServerListUpdater serverListUpdater) {
        super(clientConfig, rule, ping, serverList, filter, serverListUpdater);
}
// 初始化父类
public DynamicServerListLoadBalancer(IClientConfig clientConfig, IRule rule, IPing ping,
                                         ServerList<T> serverList, ServerListFilter<T> filter,
                                         ServerListUpdater serverListUpdater) {
        super(clientConfig, rule, ping);
        this.serverListImpl = serverList;
        this.filter = filter;
        this.serverListUpdater = serverListUpdater;
        if (filter instanceof AbstractServerListFilter) {
            ((AbstractServerListFilter) filter).setLoadBalancerStats(getLoadBalancerStats());
        }
        restOfInit(clientConfig);
}
// 初始化
void restOfInit(IClientConfig clientConfig) {
        boolean primeConnection = this.isEnablePrimingConnections();
        // turn this off to avoid duplicated asynchronous priming done in BaseLoadBalancer.setServerList()
        this.setEnablePrimingConnections(false);
        //启动定时任务,定时更新服务注册中心实例列表
        enableAndInitLearnNewServersFeature();
     // 获取服务实例列表
        updateListOfServers();
        if (primeConnection && this.getPrimeConnections() != null) {
            this.getPrimeConnections()
                    .primeConnections(getReachableServers());
        }
        this.setEnablePrimingConnections(primeConnection);
        LOGGER.info("DynamicServerListLoadBalancer for client {} initialized: {}", clientConfig.getClientName(), this.toString());
}
其中 enableAndInitLearnNewServersFeature() :调用了一个 serverListUpdater.start(updateAction) 就是上面提到的 PollingServerListUpdater:
public synchronized void start(final UpdateAction updateAction) {
        if (isActive.compareAndSet(false, true)) {
            final Runnable wrapperRunnable = new Runnable() {
                @Override
                public void run() {
                    if (!isActive.get()) {
                        if (scheduledFuture != null) {
                            scheduledFuture.cancel(true);
                        }
                        return;
                    }
                    try {// 直接调用
                        updateAction.doUpdate();
                        lastUpdated = System.currentTimeMillis();
                    } catch (Exception e) {
                        logger.warn("Failed one update cycle", e);
                    }
                }
            };
            //启动一个定时线程去定时获取服务列表
            scheduledFuture = getRefreshExecutor().scheduleWithFixedDelay(
                    wrapperRunnable,
                    initialDelayMs,
                    refreshIntervalMs,
                    TimeUnit.MILLISECONDS
            );
        } else {
            logger.info("Already active, no-op");
        }
}
updateAction.doUpdate() 这个调用我们需要明白 updateAction 是什么东西 :
protected final ServerListUpdater.UpdateAction updateAction = new ServerListUpdater.UpdateAction() {
        @Override
        public void doUpdate() {
            updateListOfServers();
        }
    };
可以看到这里就是先调用了一次获取服务列表请求,然后再开启的一个定时任务,然后调用 DynamicServerListLoadBalancer.updateListOfServers 从注册中心获取服务列表。
@VisibleForTesting
    public void updateListOfServers() {
        List<T> servers = new ArrayList<T>();
        if (serverListImpl != null) {
            servers = serverListImpl.getUpdatedListOfServers();
            LOGGER.debug("List of Servers for {} obtained from Discovery client: {}",
                    getIdentifier(), servers);

            if (filter != null) {
                servers = filter.getFilteredListOfServers(servers);
                LOGGER.debug("Filtered List of Servers for {} obtained from Discovery client: {}",
                        getIdentifier(), servers);
            }
        }
        updateAllServerList(servers);
    }
然后这里调用 serverListImpl.getUpdatedListOfServers() 又很多的实现:
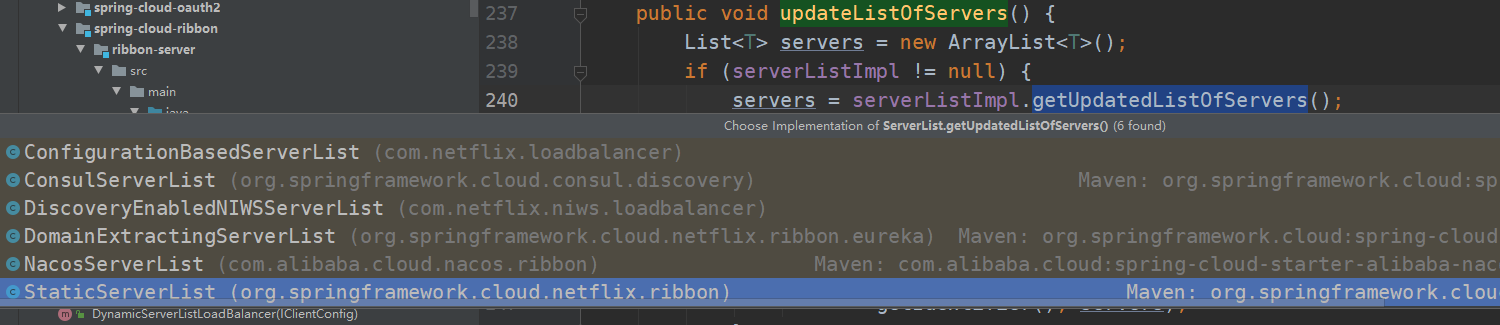
然后底层通过对应的实现获取到服务列表。该阶段所涉及的自动配置的流程如下图:
RestTemplate 的调用过程(实际调用阶段):
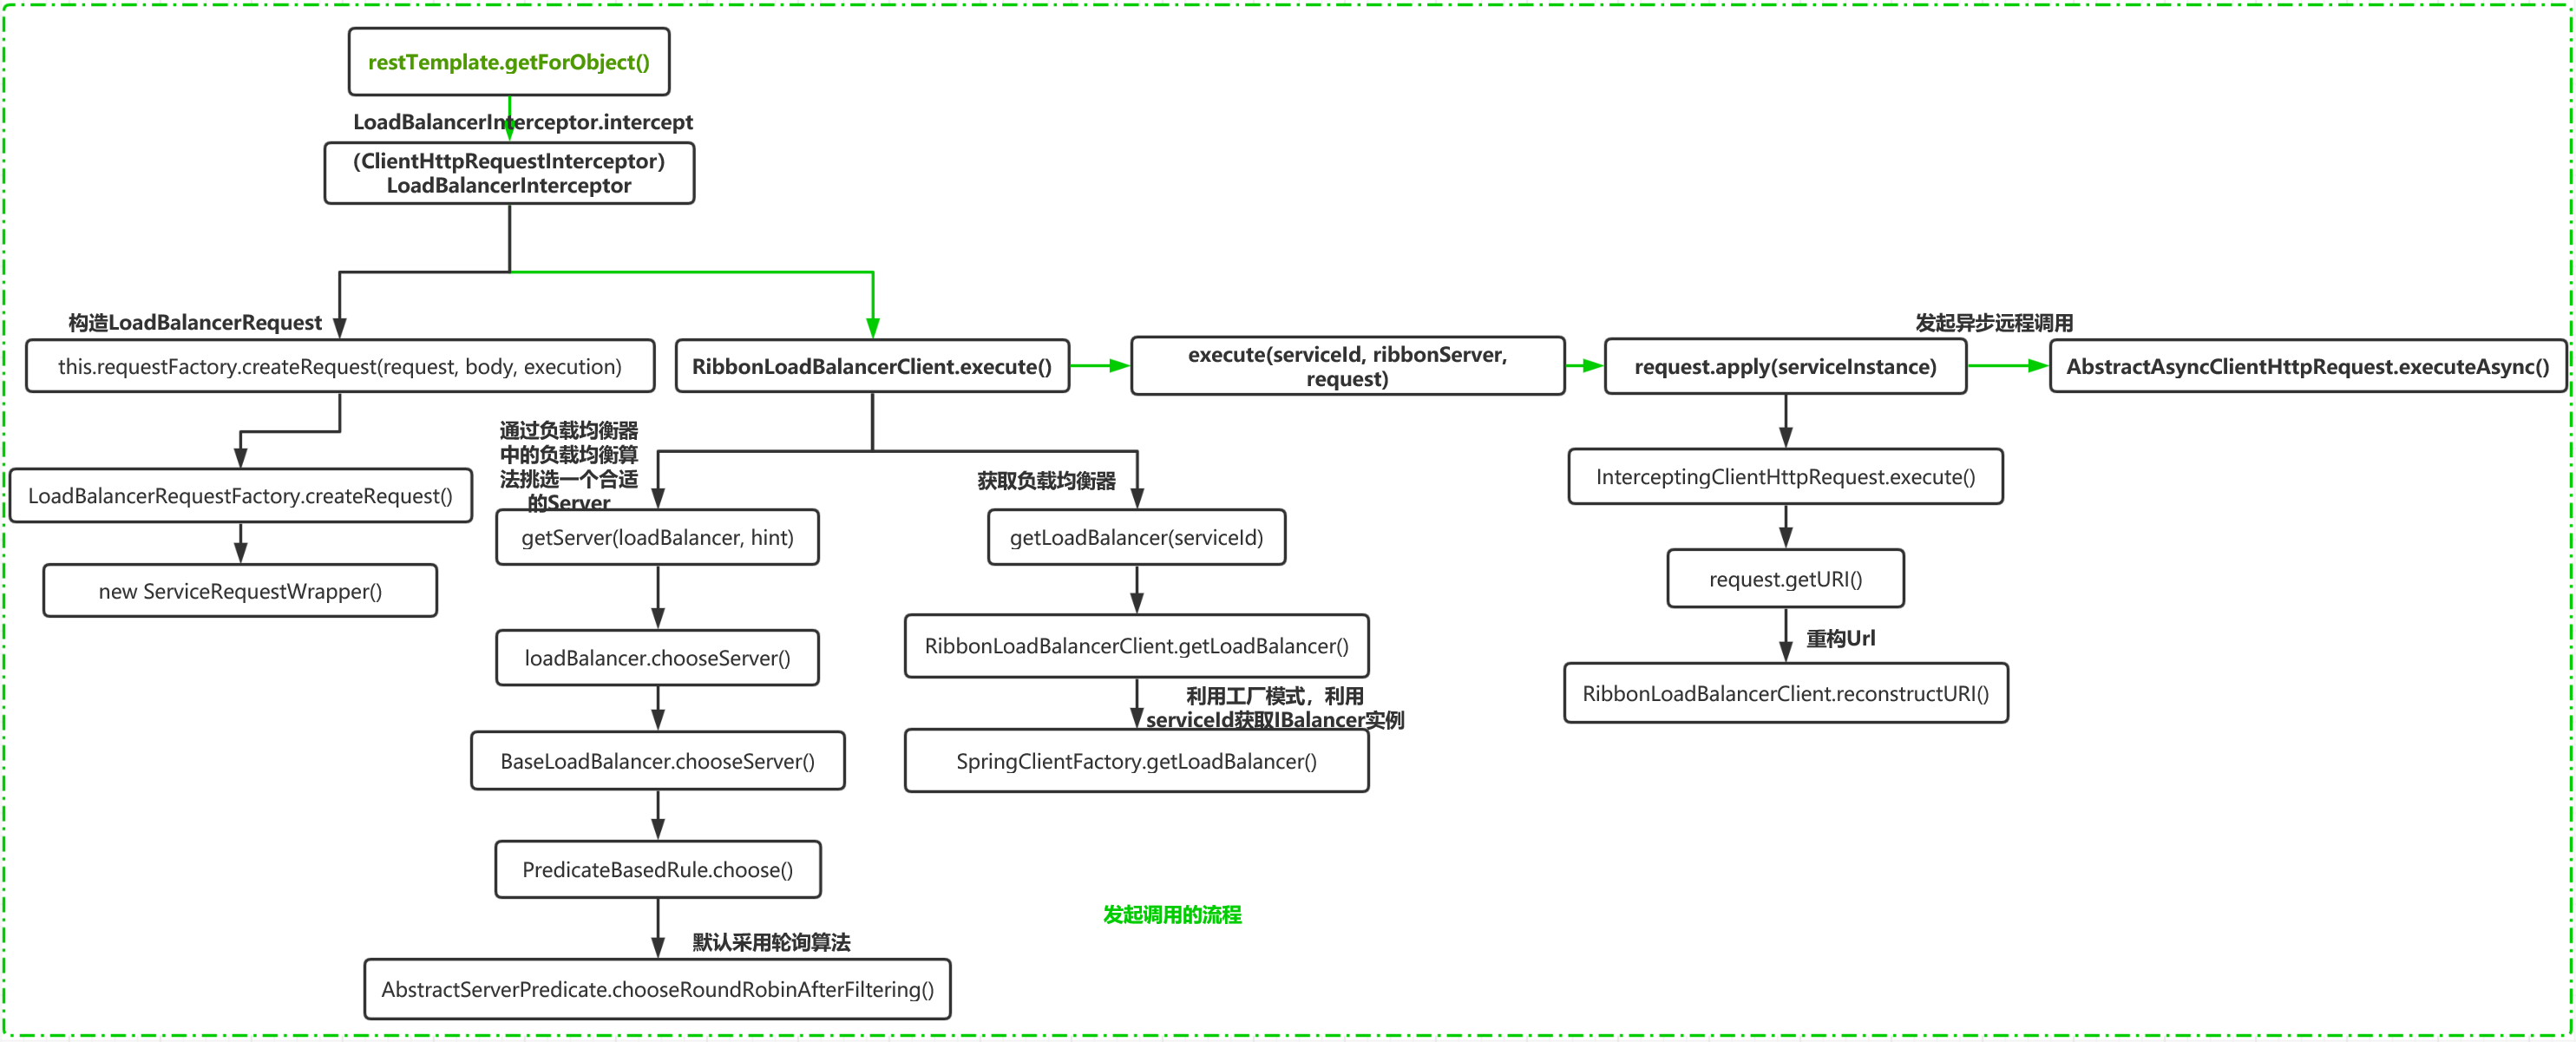
再回到 RibbonLoadBalancerClient.execute方法中。通过getServer获得一个Server对象之后,再把Server包装成一个RibbonServer对象,这个对象保存了Server的所有信息,同时还保存了服务名、是否需要https等。
在调用另外一个execute重载方法,在这个方法中最终会调用apply方法,这个方法会向一个具体的实例发送请求。
@Override
    public <T> T execute(String serviceId, ServiceInstance serviceInstance,
            LoadBalancerRequest<T> request) throws IOException {
        Server server = null;
        if (serviceInstance instanceof RibbonServer) {
            server = ((RibbonServer) serviceInstance).getServer();
        }
        if (server == null) {
            throw new IllegalStateException("No instances available for " + serviceId);
        }

        RibbonLoadBalancerContext context = this.clientFactory
                .getLoadBalancerContext(serviceId);
        RibbonStatsRecorder statsRecorder = new RibbonStatsRecorder(context, server);

        try {
            T returnVal = request.apply(serviceInstance);
            statsRecorder.recordStats(returnVal);
            return returnVal;
        }
        // catch IOException and rethrow so RestTemplate behaves correctly
        catch (IOException ex) {
            statsRecorder.recordStats(ex);
            throw ex;
        }
        catch (Exception ex) {
            statsRecorder.recordStats(ex);
            ReflectionUtils.rethrowRuntimeException(ex);
        }
        return null;
    }
request.apply :request是LoadBalancerRequest接口,它里面提供了一个apply方法,但是从代码中我们发现这个方法并没有实现类,那么它是在哪里实现的呢?
继续又往前分析发现,这个request对象是从LoadBalancerInterceptor的intercept方法中传递过来的.而request的传递,是通过 this.requestFactory.createRequest(request, body, execution) 创建二来,于是我们找到这个方法。
public LoadBalancerRequest<ClientHttpResponse> createRequest(
            final HttpRequest request, final byte[] body,
            final ClientHttpRequestExecution execution) {
        return instance -> {
            HttpRequest serviceRequest = new ServiceRequestWrapper(request, instance,
                    this.loadBalancer);
            if (this.transformers != null) {
                for (LoadBalancerRequestTransformer transformer : this.transformers) {
                    serviceRequest = transformer.transformRequest(serviceRequest,
                            instance);
                }
            }
            return execution.execute(serviceRequest, body);
        };
}
从代码中发现,它是一个用lambda表达式实现的匿名内部类。在该内部类中,创建了一个ServiceRequestWrapper,这个ServiceRequestWrapper实际上就是HttpRequestWrapper的一个子类,ServiceRequestWrapper重写了HttpRequestWrapper的getURI()方法,重写的URI实际上就是通过调用LoadBalancerClient接口的reconstructURI函数来重新构建一个URI进行访问
那么 request.apply 其实进入的就是上述方法 ,然后调用了 InterceptingRequestExecution.execute 方法,继而调用 request.getURI() 重构URI ,这里的request 就是上面这个方法提到的 ServiceRequestWrapper
@Override
public URI getURI() {
  URI uri = this.loadBalancer.reconstructURI(this.instance, getRequest().getURI());
  return uri;
}
reconstructURI这个方法,实际上是重构URI,也就是把一个 http://服务名/转化为 http://地址/ 的过程。
首先获得一个serviceId根据serviceId获得一个RibbonLoadBalancerContext对象,这个是用来存储一些被负载均衡器使用的上下文内容。
调用reconstructURIWithServer方法来构建服务实例的URI。
@Override
public URI reconstructURI(ServiceInstance instance, URI original) {
        Assert.notNull(instance, "instance can not be null");
        String serviceId = instance.getServiceId();
        RibbonLoadBalancerContext context = this.clientFactory
                .getLoadBalancerContext(serviceId);

        URI uri;
        Server server;
        if (instance instanceof RibbonServer) {
            RibbonServer ribbonServer = (RibbonServer) instance;
            server = ribbonServer.getServer();
            uri = updateToSecureConnectionIfNeeded(original, ribbonServer);
        }
        else {
            server = new Server(instance.getScheme(), instance.getHost(),
                    instance.getPort());
            IClientConfig clientConfig = clientFactory.getClientConfig(serviceId);
            ServerIntrospector serverIntrospector = serverIntrospector(serviceId);
            uri = updateToSecureConnectionIfNeeded(original, clientConfig,
                    serverIntrospector, server);
        }
        return context.reconstructURIWithServer(server, uri);
}
最后就是通过 HttpURLConnection 使用这个uri发起远程通信。整个调用过程的流程图如下:
关于与服务心跳的实现:
在 RibbonClientConfiguration 自动装配的时候,注入了一个 DummyPing 实例,然后在初始化 ZoneAwareLoadBalancer 实例的时候,会走到其父类 BaseLoadBalancer 的构造方法 :
public BaseLoadBalancer(IClientConfig config, IRule rule, IPing ping) {
        initWithConfig(config, rule, ping);
    }

void initWithConfig(IClientConfig clientConfig, IRule rule, IPing ping) {
     // ......
        setPing(ping);
        // ......
}
这里会将 DummyPing 实例 设置进去:
public void setPing(IPing ping) {
        if (ping != null) {
            if (!ping.equals(this.ping)) {
                this.ping = ping;
                setupPingTask(); // since ping data changed
            }
        } else {
            this.ping = null;
            // cancel the timer task
            lbTimer.cancel();
        }
}
然后启动一个 pingTask :
void setupPingTask() {
        if (canSkipPing()) {
            return;
        }
        if (lbTimer != null) {
            lbTimer.cancel();
        }
        lbTimer = new ShutdownEnabledTimer("NFLoadBalancer-PingTimer-" + name,
                true);
        lbTimer.schedule(new PingTask(), 0, pingIntervalSeconds * 1000);
        forceQuickPing();
}
这里是每隔 10S 去执行一次任务,然后我们看看这个任务具体是在做什么:
private final static SerialPingStrategy DEFAULT_PING_STRATEGY = new SerialPingStrategy();
protected IPingStrategy pingStrategy = DEFAULT_PING_STRATEGY;
class PingTask extends TimerTask {
        public void run() {
            try {
                new Pinger(pingStrategy).runPinger();
            } catch (Exception e) {
                logger.error("LoadBalancer [{}]: Error pinging", name, e);
            }
        }
}
可以看到这里是通过策略模式去实现,默认的 pingerStrategy 是 SerialPingStrategy,但是由于本场景下实现是 DummyPing ,进入到 BaseLoadBalancer.Pinger#runPinger 的方法:
public void runPinger() throws Exception {
            if (!pingInProgress.compareAndSet(false, true)) {
                return; // Ping in progress - nothing to do
            }

            // we are "in" - we get to Ping

            Server[] allServers = null;
            boolean[] results = null;

            Lock allLock = null;
            Lock upLock = null;

            try {
                /*
                 * The readLock should be free unless an addServer operation is
                 * going on...
                 */
                allLock = allServerLock.readLock();
                allLock.lock();
                allServers = allServerList.toArray(new Server[allServerList.size()]);
                allLock.unlock();

                int numCandidates = allServers.length;
                results = pingerStrategy.pingServers(ping, allServers);

                final List<Server> newUpList = new ArrayList<Server>();
                final List<Server> changedServers = new ArrayList<Server>();

                for (int i = 0; i < numCandidates; i++) {
                    boolean isAlive = results[i];
                    Server svr = allServers[i];
                    boolean oldIsAlive = svr.isAlive();

                    svr.setAlive(isAlive);

                    if (oldIsAlive != isAlive) {
                        changedServers.add(svr);
                        logger.debug("LoadBalancer [{}]:  Server [{}] status changed to {}",
                            name, svr.getId(), (isAlive ? "ALIVE" : "DEAD"));
                    }

                    if (isAlive) {
                        newUpList.add(svr);
                    }
                }
                upLock = upServerLock.writeLock();
                upLock.lock();
                upServerList = newUpList;
                upLock.unlock();

                notifyServerStatusChangeListener(changedServers);
            } finally {
                pingInProgress.set(false);
            }
        }
相信这段代码不难看懂,这里无非就是通过 IPing 实现,遍历缓存服务列表,进行检查服务实力是否存活,pingerStrategy.pingServers(ping, allServers) :
public boolean[] pingServers(IPing ping, Server[] servers) {
            int numCandidates = servers.length;
            boolean[] results = new boolean[numCandidates];

            logger.debug("LoadBalancer:  PingTask executing [{}] servers configured", numCandidates);

            for (int i = 0; i < numCandidates; i++) {
                results[i] = false; /* Default answer is DEAD. */
                try {
                    // NOTE: IFF we were doing a real ping
                    // assuming we had a large set of servers (say 15)
                    // the logic below will run them serially
                    // hence taking 15 times the amount of time it takes
                    // to ping each server
                    // A better method would be to put this in an executor
                    // pool
                    // But, at the time of this writing, we dont REALLY
                    // use a Real Ping (its mostly in memory eureka call)
                    // hence we can afford to simplify this design and run
                    // this
                    // serially
                    if (ping != null) {
                        results[i] = ping.isAlive(servers[i]);
                    }
                } catch (Exception e) {
                    logger.error("Exception while pinging Server: '{}'", servers[i], e);
                }
            }
            return results;
}
基于DummyPing 的 isAlive 方法的实现,是直接返回true,然后这里也有一定的说明,交给注册中心去做,减少不必要的性能消耗.
如果要实现自己的 IPing ,可以实现 IPing 接口。相关配置可以参考官网,这里复制了官网的相关拓展配置项:
-
<clientName>.ribbon.NFLoadBalancerClassName: Should implementILoadBalancer -
<clientName>.ribbon.NFLoadBalancerRuleClassName: Should implementIRule -
<clientName>.ribbon.NFLoadBalancerPingClassName: Should implementIPing -
<clientName>.ribbon.NIWSServerListClassName: Should implementServerList -
<clientName>.ribbon.NIWSServerListFilterClassName: Should implementServerListFilter
更多细节请参考官方文档。