内容:
1.flask闪现及cookie和session
2.flask请求拓展
3.json API和RESTful API
4.flask中间件
5.蓝图与红图
6.flask上下文管理
flask框架基础:https://www.cnblogs.com/wyb666/p/9502694.html
flask框架详细:http://www.cnblogs.com/wupeiqi/articles/7552008.html
1.flask闪现及cookie和session
(1)flask闪现
 1 # encoding: utf-8
 2 # __author__ = "wyb"
 3 # date: 2018/9/9
 4 from flask import Flask, flash, get_flashed_messages
 5
 6 app = Flask(__name__)
 7 app.secret_key = 'wyb test flash'
 8
 9
10 @app.route('/get')
11 def get():
12     # 从某个地方获取设置过的值并清除
13     data = get_flashed_messages()
14     print(data)
15     return 'Hello World!, msg: {}'.format(data)
16
17
18 @app.route('/set')
19 def set():
20     # 向某个地方设置一个值
21     flash("xxx")
22
23     return 'Hello World!'
24
25
26 if __name__ == '__main__':
27     app.run(debug=True)
应用:对临时数据操作,如:显示错误信息,如下所示:
 1 # encoding: utf-8
 2 # __author__ = "wyb"
 3 # date: 2018/9/9
 4 from flask import Flask, flash, get_flashed_messages, request, redirect, url_for
 5
 6 app = Flask(__name__)
 7 app.secret_key = 'wyb test flash'
 8
 9 @app.route('/index')
10 def index():
11     val = request.args.get('v')
12     if val == 'wyb':
13         return 'Hello wyb!'
14     else:
15         # 向某个地方设置一个值
16         flash("超时错误")
17     # 重定向到错误页面
18     return redirect(url_for("error"))
19
20 @app.route('/error')
21 def error():
22     # 从某个地方获取设置过的值并显示在页面上
23     data = get_flashed_messages()
24     print(data)
25     return 'Error: {}'.format(data)
26
27
28 if __name__ == '__main__':
29     app.run(debug=True)
另外flash还可以设置分类来限制get_flashed_messages获取的数据:
1 # 向某个地方设置一个值
2 flash("超时错误", category="c1")
3
4 # 从某个地方获取设置过的值并显示在页面上
5 data = get_flashed_messages(category_filter=["c1"])  # 只能拿c1类的数据
(2)cookie和session
详细内容: https://www.cnblogs.com/wyb666/p/9068853.html
2.flask请求拓展
(1)什么是请求拓展
类似django中的中间件,可以对请求进行相应的处理,django中类似的是process_request和process_response
(2)实例
 1 # encoding: utf-8
 2 # __author__ = "wyb"
 3 # date: 2018/9/9
 4 from flask import Flask, Request, render_template
 5
 6 app = Flask(__name__, template_folder='templates')
 7 app.debug = True
 8
 9 @app.before_first_request       # -> 在第一次请求之前执行
10 def before_first_request():
11     print('第一次请求 - before_first_request')
12
13 @app.before_request             # -> 请求之前执行
14 def process_request():
15     # 在这里可以写登陆验证
16     """
17         if request.path == '/login':
18             return None
19         user = session.get('user_info')
20         if user:
21             return None
22         return redirect('/login')
23     """
24     print('进来了 - before_request')
25
26 @app.after_request              # -> 请求之后执行
27 def process_response(response):
28     print('出去了 - after_request: ', response)
29     return response
30
31
32 # 定制错误信息:
33 @app.errorhandler(404)          # -> 404处理
34 def page_not_found(error):
35     return 'This page does not exist', 404
36
37 @app.route('/')
38 def hello_world():
39     return "Hello world!"
40
41
42 if __name__ == '__main__':
43     app.run(debug=True)
运行之后访问首页以及不存在的页面输出如下:
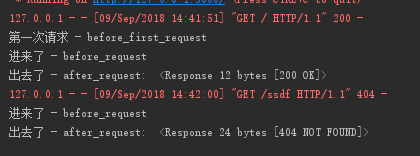
注意:多个before_request的执行顺序是从上到下(先执行先定义的before_request),多个after_request的顺序是从下到上(先执行后定义的after_request)
3.json API和RESTful API
(1)什么是json API
简而言之就是后端对前端的接口是json格式,后端返回json格式的数据,前端用Ajax技术获取这些数据,然后用js将这些数据渲染到页面上
json API的好处:
- 前后端分离
- 渲染只发生在前端,后端无需关注渲染,只用提供数据接口即可
- 后端可以使用多种语言(python、PHP、Java等)编写,只要这种语言支持json即可
flask的json API简单实例:
 1 # encoding: utf-8
 2 # __author__ = "wyb"
 3 # date: 2018/9/6
 4 from flask import Flask, redirect, url_for, jsonify, request
 5
 6 app = Flask(__name__)
 7 users = []
 8
 9 @app.route("/", methods=["GET"])
10 def index():
11     return'''<form method=post action='/add'>
12     <input type=text name=author>
13     <button>提交</button>
14     </form>
15     '''
16
17 @app.route("/add", methods=["POST"])
18 def add():
19     form = request.form
20     users.append(dict(author=form.get("author", "")))
21     return redirect(url_for(".index"))
22
23 # json API:
24 @app.route("/json")
25 def json():
26     # 下面返回的是json格式的数据
27     return jsonify(users)
28
29 app.run(debug=True)
(2)RESTful API
RESTful API:由Dr. Fielding提出,指出url可以是一种用资源来组织的名词,可以用URL来定位资源,用HTTP动词(GET,POST,PUT,DELETE)来描述操作
- Resource:资源,即数据
- Representational:某种表现形式,比如用JSON,XML,JPEG等
- State Transfer:状态变化。通过HTTP动词实现
RESTful API就是REST风格的API
RESTful API的使用场景:
在当今的互联网应用的前端展示媒介很丰富。有手机、有平板电脑还有PC以及其他的展示媒介。那么这些前端接收到的用户请求统一由一个后台来处理并返回给不同的前端肯定是最科学和最经济的方式,
RESTful API就是一套协议来规范多种形式的前端和同一个后台的交互方式
RESTful API实例:
1 /GET /players 拿到所有玩家
2 /GET /player/id 访问id的玩家的数据
3 /PUT /players 全量更新
4 /PATCH /players 部分更新
5 /DELETE /player/id 删除一个玩家
6 /GET /player/id/level 访问id的玩家的数据中的level
4.flask中间件
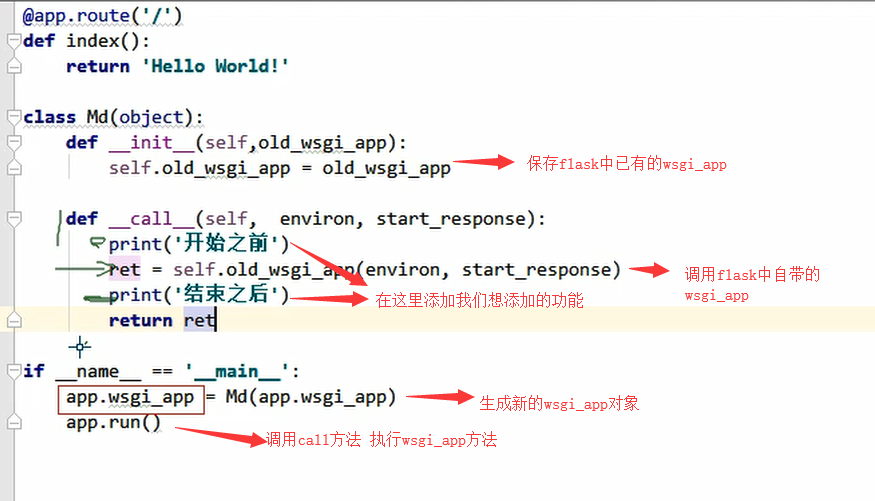
flask请求入口要执行wsgi_app,所以我们可以通过在一个类中保存wsgi_app然后重写call方法,再将这个类实例化返回给app.wsgi_app即可对请求进行相应处理
 1 # encoding: utf-8
 2 # __author__ = "wyb"
 3 # date: 2018/9/9
 4
 5 from flask import Flask
 6
 7 app = Flask(__name__)
 8 app.secret_key = 'some_secret'
 9
10 @app.route('/')
11 def index():
12     return "index"
13
14 # 中间件
15 class MiddleWare:
16     def __init__(self, old_wsgi_app):
17         self.old_wsgi_app = old_wsgi_app
18
19     def __call__(self, *args, **kwargs):
20         print("开始之前")
21         return self.old_wsgi_app(*args, **kwargs)
22
23 if __name__ == "__main__":
24     app.wsgi_app = MiddleWare(app.wsgi_app)
25     app.run()
解释如下:
5.flask蓝图与红图
蓝图:用于实现单个应用的视图、模板、静态文件的集合。
蓝图就是模块化处理的类
红图:一般用蓝图实现模块的划分,用红图来实现模块中视图函数(具体功能)的划分
简单来说,蓝图就是一个存储操作路由映射方法的容器,主要用来实现客户端请求和URL相互关联的功能。 在Flask中,使用蓝图可以帮助我们实现模块化应用的功能
蓝图与红图详细内容:https://www.cnblogs.com/wyb666/p/9568197.html
6.flask上下文管理
关于flask的上下文:http://www.cnblogs.com/wupeiqi/articles/8202353.html
(1)threading.local对象
threading.local对象用于为每个线程开辟一块空间来保存它独有的值
 1 import threading
 2
 3 local_values = threading.local()        # 相当于对数据加锁
 4
 5 def func(num):
 6     local_values.name = num
 7     import time
 8     time.sleep(1)
 9     print(local_values.name, threading.current_thread().name)
10
11 for i in range(20):
12     th = threading.Thread(target=func, args=(i,), name='线程%s' % i)
13     th.start()
(2)源码(request)
- 情况一:单进程单线程,基于全局变量做
- 情况二:单进程多线程,threading.local对象
- 情况二:单进程单线程(多个协程),threading.local对象做不到
决定:
- 以后不支持协程:threading.local对象。
- 支持:自定义类似threading.local对象(支持协程)
- 自定义类似threading.local对象
注意:
1 a:
2 object.__setattr__(self, 'storage', {})
3 self.storage = {}
4
5 b:
6 对象.xx
7 def __setattr__(self, key, value):
8 print(key,value)