1.中间键
2.csrf跨站请求伪造
3.装饰器相关
4.auth模块
5.settings  插拔式源码  拓展
1.中间键
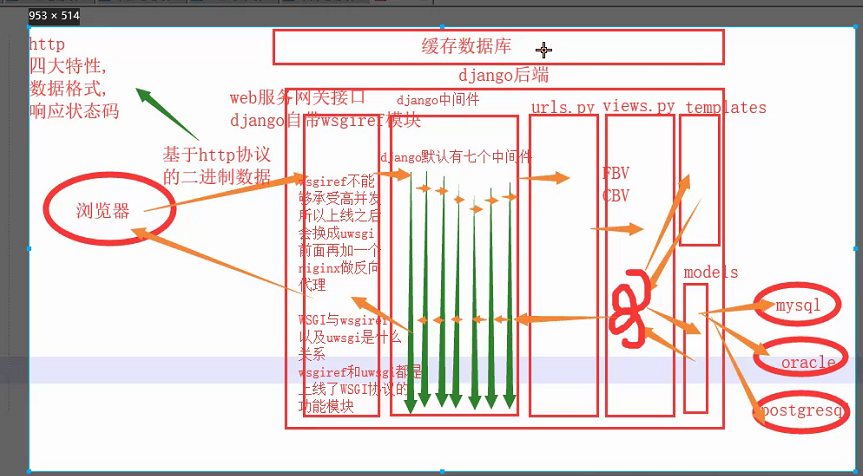
中间件:(默认有七个)
    通俗讲:django中间件类似于django的保安,来去都经过他;
    大致流程:请求来时先经过中件才能到达django后端(urls,views,templates,models),
            响应走时也要经过中间件才能到达web网关接口
    作用:
        1.网站全局的身份校验,访问频率限制,权限校验.....涉及全局,都可用到
        2. django的中间件是所有web框架中做的最好的
 django中间件中的五个自定义方法
    *****
    1.process_request()
        规律:
            1.请求来时,自上而下依次执行每个中间件里的process_request的方法;
            2.如果这个方法里直接返回了HttpResponse对象,不会再往下执行;而是跳到同级别的 process_response
       方法,直接往回走;
        应用场景:访问频率限制,身份校验

    2.prosess_response()
        规律:
            1.必须将形参response返回, 该形参是返回前端的数据
            2.响应走时会自下而上的执行每一个中间件中的process_response方法

    **
    3.process_view(): 在url匹配成功之后,视图函数之前 触发
    4.process_exception(): 视图函授出错之后触发,自行执行
    5.process_template_response():
        规律:
            1.返回的HttpResponse对象中必须包含render属性才会触发,如下例:
        def login(request):
            print('我是谁?我从哪里来?')
            def render():
                return HttpResponse('6666')
            OBJ= HttpResponse('我要到那里去?')
            OBJ.render = render
            return OBJ
    注:1.写中间件中时,只要有response这个形参,那就返回response(给前端的信息)
自定义我们自己的中间键
    1.要想自己写的中间件生效,必须先继承MiddlewareMiXin
      2.注册中间件时,路径不要写错
2.csrf跨站请求伪造
csrf跨站请求伪造:
    钓鱼网站: 制造一个更正常网站一模一样的网站,骗取用户输入信息,eg转账交易..
    钓鱼原理: 在用户输入对方账户的input框中做些改动;比如这个input框 不设置name属性,
             然后在内部隐藏那个一个已经写好有 name,value属性的input框
    预防思路:给用户的form表单 中 放一个每次永远不会重复的随机字符串作为唯一标识,
        验证通过再进行其他操作,未通过,返回一个403

    随机字符串特点:
        1.同一个浏览器每一次访问都不一样
        2.不同浏览器 绝对不会重复

    1. form表单发送 post请求时, 需要
        {% csrf_token %}
    2. ajax 发送post请求,避免csrf校验的方法
        首先:{% csrf_token %}
        其次:
            1.利用标签查找获取该input框的键值信息
                {'username':'xxx','csrfmiddlewaretoken':$('[name=csrfmiddlewaretoken]').val()}
            2.直接写
                {'username':'xxx','csrfmiddlewaretoken':'{{csrf_token}}'}
            3.将获取随机键值对的方法弄到js文件中,用时导进去
                相关代码:
                function getCookie(name) {
                    var cookieValue = null;
                    if (document.cookie && document.cookie !== '') {
                        var cookies = document.cookie.split(';');
                        for (var i = 0; i < cookies.length; i++) {
                            var cookie = jQuery.trim(cookies[i]);
                            // Does this cookie string begin with the name we want?
                            if (cookie.substring(0, name.length + 1) === (name + '=')) {
                                cookieValue = decodeURIComponent(cookie.substring(name.length + 1));
                                break;
                            }
                        }
                    }
                    return cookieValue;
                }
                var csrftoken = getCookie('csrftoken');


                function csrfSafeMethod(method) {
                  // these HTTP methods do not require CSRF protection
                  return (/^(GET|HEAD|OPTIONS|TRACE)$/.test(method));
                }

                $.ajaxSetup({
                  beforeSend: function (xhr, settings) {
                    if (!csrfSafeMethod(settings.type) && !this.crossDomain) {
                      xhr.setRequestHeader("X-CSRFToken", csrftoken);
                    }
                  }
                });
3.装饰器相关
 1 装饰器相关:
 2     1.全局不校验csrf,有几个让校验   csrf_frotect
 3     2.全局校验csrf,有几个不让校验   csrf_exempt
 4     form django.utils.decorators import method_decorator
 5     form django.views.decorators.csrf import csrf_exempt(不校验),csrf_frotect(校验)
 6     给fbv装饰时正常,给cbv装饰时有以下两种情况发生
 7     1.csrf_frotect 的 三种装饰方式
 8         # 第一种方式
 9         # @method_decorator(csrf_protect,name='post')  # 有效的
10         class MyView(View):
11             # 第三种方式
12             # @method_decorator(csrf_protect)
13             def dispatch(self, request, *args, **kwargs):
14                 res = super().dispatch(request, *args, **kwargs)
15                 return res
16
17             def get(self,request):
18                 return HttpResponse('get')
19             # 第二种方式
20             # @method_decorator(csrf_protect)  # 有效的
21             def post(self,request):
22                 return HttpResponse('post')
23
24         注: 三种方法可随意用其中的一种
25     2.csrf_exempt的两种装饰方式(只能给dispatch装)   特例
26         @method_decorator(csrf_exempt,name='dispatch')  # 第二种可以不校验的方式
27         class MyView(View):
28             # @method_decorator(csrf_exempt)  # 第一种可以不校验的方式
29             def dispatch(self, request, *args, **kwargs):
30                 res = super().dispatch(request, *args, **kwargs)
31                 return res
32
33             def get(self,request):
34                 return HttpResponse('get')
35
36             def post(self,request):
37                 return HttpResponse('post')
38     小结:装饰器中只要csrf_exemp是特例,其他给cbv装饰时都有三种方式
4.auth模块
auth模块:要用就用全套
    相关简介:
        1.是一个跟用户相关的功能模块,用于 用户的注册,登录,改密码;
        2.执行数据库迁移命令后,会生成很多表, auth_user是跟用户相关的表;
        3.用 createsuperuser 创建超级用户后,该用户可登录django admin后台管理权限
    功能功能:
        1.查询用户
            from django.contrib import auth
            user_obj = auth.authenticate(username=username,password=password)
            注:必须要用该方法,因为数据库中的密码是密文的,而你获取的输入却是明文的,
               不用该方法的话,永远也匹配不上
        2.记录用户状态到session中
            auth.login(request,user_obj)
        3.判断用户是否登录
            request.user.is_authenticated   返回T/F
        4.获取用户对象
            request.user
            注:登录了获取到用户对象,没登录可以拿到匿名对象
        5.校验用户是否登录
            form django.contrib.auth.decorators import login_required
            1.局部配置:
                @login_required(login_url='/xxx/')
            2.全局配置  在setting送文件中
                LOGIN_URL = '/xxx/'
        6.验证密码是否正确
            request.user.check_password(old_opassword)
        7.修改密码
            request.user.set_password(new_password)
            request.user.save()
            注: 修改密码,一定要save保存,否则无法生效
        8.退出登录
            auth.logout(request) 效果相当于 request.session.flush()
        9.注册用户
       from django.contrip.auth.models import User
            超级用户的创建:
                User.objects.create_superuser(username=username,password=password,email='123@qq.com')
            普通用户的创建:
                User.objects.create_user(username=username,password=password)

    自定义auth_user表:使用类继承
        from django.contrib.auth.models import AbstractUser
        class Userinfo(AbstractUser):
            phon = models.BigIntegerField()
            avatar = models.CharField(max_length=32)

        注:
            1.自定义表只能添加新的字段,但是不要与原表中的字段重复(*****)
            2.要在 配置文件中 设置 orm将要使用的表,而不是原来的默认表
                AUTH_USER_MODEL = 'app01.Userinfo'  # '应用名.类名'
            3.执行数据库迁移命令后,auth提供的功能还可以照样去用
5.settings 插拔式源码 拓展
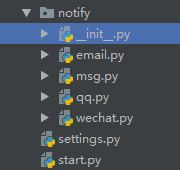
__init__.py文件中

import settings
import importlib

def send_all(content):
    for path_str in settings.NOTIFY_LIST:  # 1.拿出一个个的字符串   'notify.email.Email'
        module_path,class_name = path_str.rsplit('.',maxsplit=1)  # 2.从右边开始 按照点切一个 ['notify.email','Email']
        module = importlib.import_module(module_path)  # from notity import msg,email,wechat
        cls = getattr(module,class_name)  # 利用反射 一切皆对象的思想 从文件中获取属性或者方法 cls = 一个个的类名
        obj = cls()  # 类实例化生成对象
        obj.send(content)  # 对象调方法
settings.py文件

NOTIFY_LIST = [
    'notify.email.Email',
    'notify.msg.Msg',
    'notify.wechat.WeChat',
    'notify.qq.QQ',
]


功能相关

class Email(object):
    def __init__(self):
        pass  # 发送邮件需要的代码配置

    def send(self,content):
        print('邮件通知:%s'%content)

class  Msg(object):
    def __init__(self):
        pass  # 发送短信需要的代码配置

    def send(self,content):
        print('短信通知:%s' % content)

class QQ(object):
    def __init__(self):
        pass  # 发送qq需要的代码准备

    def send(self,content):
        print('qq通知:%s'%content)

class WeChat(object):
    def __init__(self):
        pass  # 发送微信需要的代码配置

    def send(self,content):
        print('微信通知:%s'%content)
...
View Code
start.py 文件

import notify
notify.send_all('国庆放假了 记住放八天哦')