python 3.x 爬虫基础
python 3.x 爬虫基础---http headers详解
python 3.x 爬虫基础---Requersts,BeautifulSoup4(bs4)
前言
爬虫也了解了一段时间了希望在半个月的时间内结束它的学习,开启python的新大陆,今天大致总结一下爬虫基础相关的类库---Urllib。
Urllib
官方文档地址:https://docs.python.org/3/library/urllib.html
urllib提供了一系列用于操作URL的功能。
Python3中将python2.7的urllib和urllib2两个包合并成了一个urllib库,其主要包括一下模块:
urllib.request 请求模块
urllib.error 异常处理模块
urllib.parse url解析模块
urllib.robotparser robots.txt解析模块
urllib.request
urllib.request.urlopen
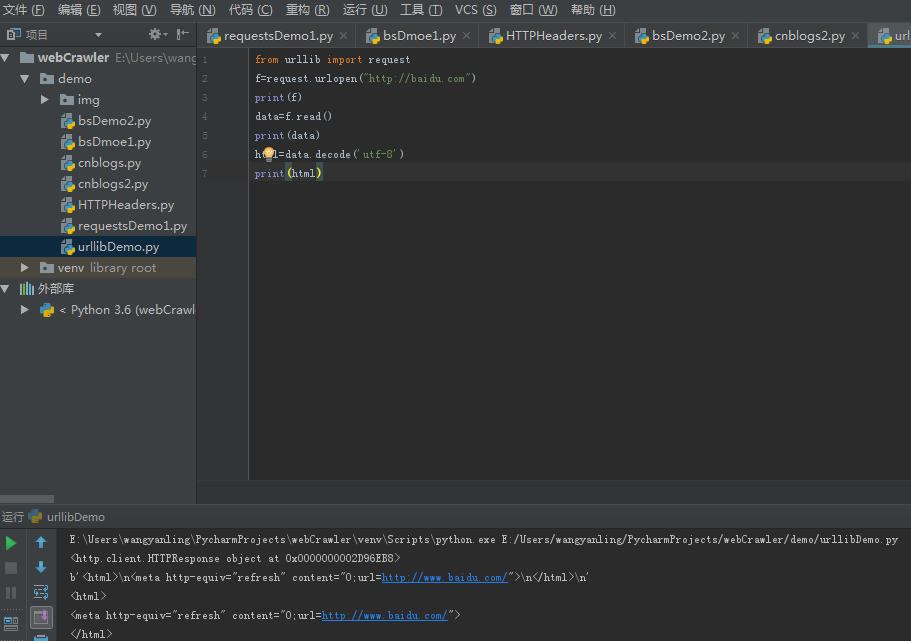
通过案例可以看出urlopen,会返回一个二进制的对象,对这个对象进行read()操作可以得到一个包含网页的二进制字符串,然后用decode()解码成一段html代码。
urlopen参数如下:
urllib.request.urlopen(url, data=None, [timeout, ]*, cafile=None, capath=None, cadefault=False, context=None)
常用参数:
url:访问的地址,一般不只是地址。
data:此参数为可选字段,特别要注意的是,如果选择,请求变为post传递方式,其中传递的参数需要转为bytes,如果是我们只需要通过 urllib.parse.urlencode 转换即可:
import urllib.parse
import urllib.request
data = bytes(urllib.parse.urlencode({'word': 'hello'}), encoding=  'utf8')
response = urllib.request.urlopen('http://xxxxx', data=data)
print(response.read().decode('utf-8'))
timeout:设置网站的访问超时时间
其他参数:
context 参数:它必须是 ssl.SSLContext 类型,用来指定 SSL 设置。
cafile 和 capath 两个参数:是指定CA证书和它的路径,这个在请求 HTTPS 链接时会有用。
cadefault 参数:现在已经弃用了,默认为 False
urlopen返回对象提供方法:
read() , readline() ,readlines() , fileno() , close() :对HTTPResponse类型数据进行操作。
info():返回HTTPMessage对象,表示远程服务器返回的头信息。
getcode():返回Http状态码。
geturl():返回请求的url。


import urllib.request
response = urllib.request.urlopen('http://python.org/')
print("查看 response 的返回类型:",type(response))
print("查看反应地址信息: ",response)
print("查看头部信息1(http header):
",response.info())
print("查看头部信息2(http header):
",response.getheaders())
print("输出头部属性信息:",response.getheader("Server"))
print("查看响应状态信息1(http status):
",response.status)
print("查看响应状态信息2(http status):
",response.getcode())
print("查看响应 url 地址:
",response.geturl())
page = response.read()
print("输出网页源码:",page.decode('utf-8'))
urllib.request.Request
import urllib.request
headers = {'Host': 'www.xicidaili.com',
           'User-Agent': 'Mozilla/4.0 (compatible; MSIE 7.0; Windows NT 6.0)',
           'Accept': r'application/json, text/javascript, */*; q=0.01',
           'Referer': r'http://www.xicidaili.com/', }
req = urllib.request.Request(r'http://www.xicidaili.com/nn/', headers=headers)
response = urllib.request.urlopen(req)
html = response.read().decode('utf-8')
print(html)
通过代码我们可以看出urlopen不再是传递url了,而是一个 request。这样一来我们不带把请求独立成一个对象,而且能更加灵活方便的配置访问参数,这是爬虫http必不可少的一步。
Request参数如下:
urllib.request.Request(url, data=None, headers={}, origin_req_host=None, unverifiable=False, method=None)
常用参数:
url:访问的地址。
data:此参数为可选字段,其中传递的参数需要转为bytes,如果是字典我们只需要通过 urllib.parse.urlencode 转换即可:
headers:http相应headers传递的信息,构造方法:headers 参数传递,通过调用 Request 对象的 add_header() 方法来添加请求头。python 3.x 爬虫基础---http headers详解,可参考此文章。
其他参数:
origin_req_host :指的是请求方的 host 名称或者 IP 地址。
unverifiable :用来表明这个请求是否是无法验证的,默认是 False 。意思就是说用户没有足够权限来选择接收这个请求的结果。如果没有权限,这时 unverifiable 的值就是 True 。
method :用来指示请求使用的方法,比如 GET , POST , PUT 等
urllib.request.ProxyHandler(ip代理)
以上做些简单的demo是没有问题的,但是如果想让你的爬虫更加强大,那么 rulllib.request.ProxyHandler 设置代理你一定要知道,网站它会检测某一段时间某个IP 的访问次数,如果访问次数过多,它会禁止你的访问,所以这个时候需要通过设置代理来爬取数据
ef Proxy_read(proxy_list, user_agent_list, i):
    proxy_ip = proxy_list[i]
    print('当前代理ip:%s'%proxy_ip)
    user_agent = random.choice(user_agent_list)
    print('当前代理user_agent:%s'%user_agent)
    sleep_time = random.randint(1,3)
    print('等待时间:%s s' %sleep_time)
    time.sleep(sleep_time)
    print('开始获取')
    headers = {'User-Agent': user_agent,'Accept': r'application/json, text/javascript, */*; q=0.01',
                'Referer': r'https://www.cnblogs.com'
                }
    proxy_support = request.ProxyHandler({'http':proxy_ip})
    opener = request.build_opener(proxy_support)
    request.install_opener(opener)
    req = request.Request(r'https://www.cnblogs.com/kmonkeywyl/p/8409715.html',headers=headers)
    try:
        html = request.urlopen(req).read().decode('utf-8')
    except Exception as e:
        print('******打开失败!******')
    else:
        global count
    count +=1
    print('OK!总计成功%s次!'%count)
以上代码是前段时间写的刷新页面的但是没有达到想要的效果,不过里面有用到 request.ProxyHandler({'http':proxy_ip}) 。其中 urllib.request.build_opener() 方法来利用这个处理器构建一个 Opener ,那么这个 Opener 在发送请求的时候就具备了认证功能了。 request.install_opener(opener) 方法打开链接,就可以完成认证了。
urllib.request.HTTPCookieProcessor(cookie操作)
网站中通过cookie进行判断权限是很常见的。那么我们可以通过 urllib.request.HTTPCookieProcessor(cookie) 来操作cookie。使用Cookie和使用代理IP一样,也需要创建一个自己的opener。在HTTP包中,提供了cookiejar模块,用于提供对Cookie的支持。 http.cookiejar功能强大,我们可以利用本模块的CookieJar类的对象来捕获cookie并在后续连接请求时重新发送,比如可以实现模拟登录功能。该模块主要的对象有CookieJar、FileCookieJar、MozillaCookieJar、LWPCookieJar。
获取cookie( CookieJar)
import http.cookiejar, urllib.request
cookie = http.cookiejar.CookieJar()
handler = urllib.request.HTTPCookieProcessor(cookie)
opener = urllib.request.build_opener(handler)
response = opener.open('http://www.baidu.com')
for item in cookie:
   print(item.name+"="+item.value)

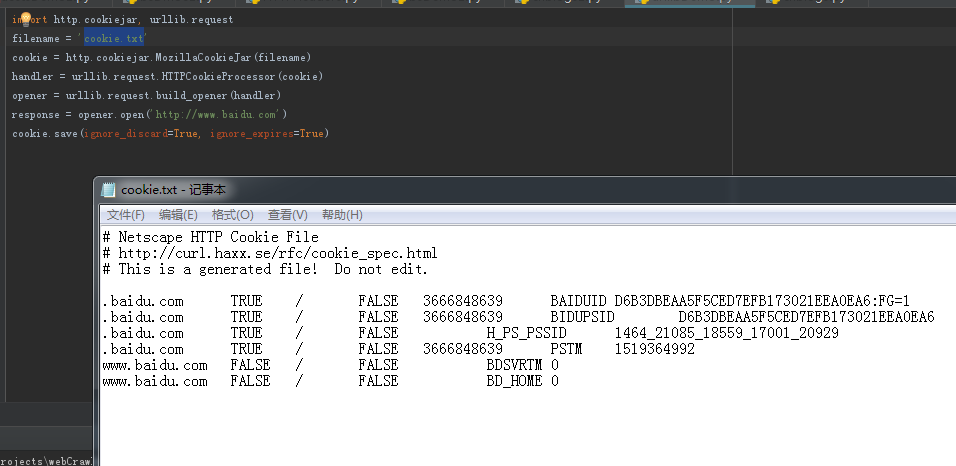
保存cookie(MozillaCookieJar)
filename = 'cookie.txt'
cookie = http.cookiejar.MozillaCookieJar(filename)
handler = urllib.request.HTTPCookieProcessor(cookie)
opener = urllib.request.build_opener(handler)
response = opener.open('http://www.baidu.com')
cookie.save(ignore_discard=True, ignore_expires=True)
使用cookie
import http.cookiejar, urllib.request
cookie = http.cookiejar.MozillaCookieJar()
cookie.load('cookie.txt', ignore_discard=True, ignore_expires=True)
handler = urllib.request.HTTPCookieProcessor(cookie)
opener = urllib.request.build_opener(handler)
response = opener.open('http://www.baidu.com')
print(response.read().decode('utf-8'))

其中FileCookieJar、MozillaCookieJar、LWPCookieJar约为保存cookie信息,只是保存格式不同。我们在进行操作cookie时使用对应的格式即可。
urllib.error
用 try-except来捕捉异常,主要的错误方式就两种 URLError(错误信息)和HTTPError(错误编码).
try:
    data=urllib.request.urlopen(url)
    print(data.read().decode('utf-8'))
except urllib.error.HTTPError as e:
    print(e.code)
except urllib.error.URLError as e:
    print(e.reason)
urllib.parse
urllib.parse.urlparse
将对应的URL解析成六部分,并以元组的数据格式返回来。
import urllib.parse
o = urllib.parse.urlparse('http://www.cnblogs.com/kmonkeywyl/')
print(o)

参数
result = urlparse('url',scheme='https')解析协议 可以去掉http://
result = urlparse('url',scheme='http')
result = urlparse('url',allow_fragments=False) url带有查询参数
result = urlparse('url',allow_fragments=False) url不带有查询参数
urllib.parse.urlunparse
拼接url
from urllib.parse
data = ['http','www.baidu.com','index.html','user','a=1','comment']
print(urllib.parse.urlunparse(data))

urllib.parse.urljoin
用来拼接url的方法 或者叫组合方法,url必须为一致站点,否则后面参数会覆盖前面的host
from urllib.parse import urljoin
print(urljoin('http://www.baidu.com','FAQ.html'))
print(urljoin('http://www.badiu.com','https://www.baidu.com/FAQ.html'))
print(urljoin('http://www.baidu.com/about.html','http://www.baidu.com/FAQ.html'))
print(urljoin('www.baidu.com#comment','?category=2'))
这个在这个就不过多的介绍了,有兴趣的可以去看资料。